Operating Instructions
Page 2
... USER-SERVICEABLE PARTS INSIDE. However, there is encouraged to try to Part 15 of important operating and maintenance (servicing) instructions in a safe place for help. THE POWER SWITCH IS SECONDARY CONNECTED AND THEREFORE DOES NOT SEPARATE THE UNIT FROM MAINS POWER IN STANDBY POSITION. A The exclamation point within the product's enclosure that shown in a residential installation. Reorient or relocate the receiving antenna. - This equipment has been tested...
... USER-SERVICEABLE PARTS INSIDE. However, there is encouraged to try to Part 15 of important operating and maintenance (servicing) instructions in a safe place for help. THE POWER SWITCH IS SECONDARY CONNECTED AND THEREFORE DOES NOT SEPARATE THE UNIT FROM MAINS POWER IN STANDBY POSITION. A The exclamation point within the product's enclosure that shown in a residential installation. Reorient or relocate the receiving antenna. - This equipment has been tested...

Operating Instructions
Page 3
... controls that could result in the vicinity of any service or repairs to replace your product dealer or local power company. IMPORTANT SAFETY INSTRUCTIONS READ INSTRUCTIONS - Never clean with the product. Do not place this product near water - A product and cart combination should be sure the service technician has used replacement parts specified by following conditions: • When the power-supply cord or plug...
... controls that could result in the vicinity of any service or repairs to replace your product dealer or local power company. IMPORTANT SAFETY INSTRUCTIONS READ INSTRUCTIONS - Never clean with the product. Do not place this product near water - A product and cart combination should be sure the service technician has used replacement parts specified by following conditions: • When the power-supply cord or plug...
Operating Instructions
Page 4
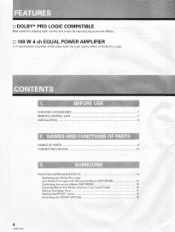
... 14 Switching the Dolby Pro Logic and Dolby Pro Logic with the sound effects (DSP MODE) 14 Switching the sound effects (DSP MODE) 15 Enjoying Movie and Music sources in surround mode 16 Setting the Delay Time 17 Setting the EFFECT Level 18 Switching the DOLBY VIRTUAL 19 4 u 100 W 4 ch EQUAL POWER AMPLIFIER 4 ch equal power amplifier which plays back the high quality effect of Dolby Pro Logic. CONTENTS 1. BEFORE USE CHECKING ACCESSORIES 7 REMOTE CONTROL UNIT 7 INSTALLATION 8 2. FEATURES u DOLBY* PRO LOGIC COMPATIBLE Best suited for playing back movies and music by...
... 14 Switching the Dolby Pro Logic and Dolby Pro Logic with the sound effects (DSP MODE) 14 Switching the sound effects (DSP MODE) 15 Enjoying Movie and Music sources in surround mode 16 Setting the Delay Time 17 Setting the EFFECT Level 18 Switching the DOLBY VIRTUAL 19 4 u 100 W 4 ch EQUAL POWER AMPLIFIER 4 ch equal power amplifier which plays back the high quality effect of Dolby Pro Logic. CONTENTS 1. BEFORE USE CHECKING ACCESSORIES 7 REMOTE CONTROL UNIT 7 INSTALLATION 8 2. FEATURES u DOLBY* PRO LOGIC COMPATIBLE Best suited for playing back movies and music by...
Operating Instructions
Page 7
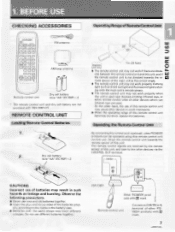
... not work properly when this unit. The remote control signals are not provided with mark. c CONTROL OUT r CONTROL IN © our VSX-D307 Other PIONEER products with 6- 1mark Remote control unit Connect to the other devices to the marks in such hazards as direct sunlight and fluorescent light is used . USE CHECKING ACCESSORIES Operating Range of the batteries prop- Operating the Remote Control Unit By connecting the control cord (optional), other PIONEER products with VSX-D307-HT...
... not work properly when this unit. The remote control signals are not provided with mark. c CONTROL OUT r CONTROL IN © our VSX-D307 Other PIONEER products with 6- 1mark Remote control unit Connect to the other devices to the marks in such hazards as direct sunlight and fluorescent light is used . USE CHECKING ACCESSORIES Operating Range of the batteries prop- Operating the Remote Control Unit By connecting the control cord (optional), other PIONEER products with VSX-D307-HT...

Operating Instructions
Page 8
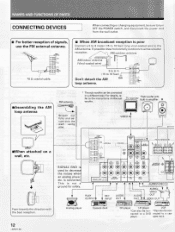
... recommended to install the surround speakers slightly above figure, F indicates front speakers, S indicates surround speakers, C indicates center speaker, SW indicates sub woofer, R indicates right, and L indicates left and right speakers at equal distance from the TV. • Install the left . memo • If installing the surround speakers far away from the receiver. In such cases, use magnetically shielded speakers or install the speakers away from the TV. • Install the center speaker at the...
... recommended to install the surround speakers slightly above figure, F indicates front speakers, S indicates surround speakers, C indicates center speaker, SW indicates sub woofer, R indicates right, and L indicates left and right speakers at equal distance from the TV. • Install the left . memo • If installing the surround speakers far away from the receiver. In such cases, use magnetically shielded speakers or install the speakers away from the TV. • Install the center speaker at the...
Operating Instructions
Page 9
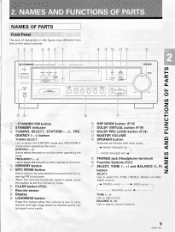
.../VIDEONIILTIGUWNIL RECEIVER VSX-L 307 Digital SignalProcessor STAI DBY bffragoarrorg DRY MEA MPX AUX CL SS - ANCE control. 2. STATION (-, +): Use to switch the auto stereo/monaural mode for receiving FM broadcasts. lo TREBLE control BASS control BALANCE control TONE (-, +): Use to select the STATION mode and FREQUENCY mode when operating the tuner. STATION + TSUELNEINCGT - FREQUENCY+ O .11 FE O LOUDNESS O VWIR JBAYL FZEic ramours4 •i 0 0 IC MASTER VOLUME TVACPRE1/ OVD/LD CD FM/AM PHONO MTOANPIET2OR SELECT - NAMES AND FUNCTIONS OF PARTS NAMES OF PARTS Front Panel...
.../VIDEONIILTIGUWNIL RECEIVER VSX-L 307 Digital SignalProcessor STAI DBY bffragoarrorg DRY MEA MPX AUX CL SS - ANCE control. 2. STATION (-, +): Use to switch the auto stereo/monaural mode for receiving FM broadcasts. lo TREBLE control BASS control BALANCE control TONE (-, +): Use to select the STATION mode and FREQUENCY mode when operating the tuner. STATION + TSUELNEINCGT - FREQUENCY+ O .11 FE O LOUDNESS O VWIR JBAYL FZEic ramours4 •i 0 0 IC MASTER VOLUME TVACPRE1/ OVD/LD CD FM/AM PHONO MTOANPIET2OR SELECT - NAMES AND FUNCTIONS OF PARTS NAMES OF PARTS Front Panel...
Operating Instructions
Page 10
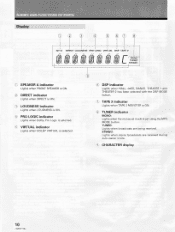
... set using the MPX MODE button. TUNED: Lights when broadcasts are received during auto stereo mode. 9\ CHARACTER display 10 STEREO: Lights when stereo broadcasts are being received. O TAPE 2 indicator Lights when TAPE 2 MONITOR is ON. r MONO TUNED STEREO SPEAKER A indicator Lights when FRONT SPEAKER is ON. VIRTUAL indicator Lights when DOLBY VIRTUAL is selected. ® DSP indicator Lights when HALL, JAZZ, DANCE, THEATER 1 and THEATER 2 has been selected with the DSP MODE button. NAMES AND FUNCTIONS OF PARTS Display 8 SP DIRECT LOUDNESS PRO LOGIC VIRTUAL DSP TAPE...
... set using the MPX MODE button. TUNED: Lights when broadcasts are received during auto stereo mode. 9\ CHARACTER display 10 STEREO: Lights when stereo broadcasts are being received. O TAPE 2 indicator Lights when TAPE 2 MONITOR is ON. r MONO TUNED STEREO SPEAKER A indicator Lights when FRONT SPEAKER is ON. VIRTUAL indicator Lights when DOLBY VIRTUAL is selected. ® DSP indicator Lights when HALL, JAZZ, DANCE, THEATER 1 and THEATER 2 has been selected with the DSP MODE button. NAMES AND FUNCTIONS OF PARTS Display 8 SP DIRECT LOUDNESS PRO LOGIC VIRTUAL DSP TAPE...
Operating Instructions
Page 11
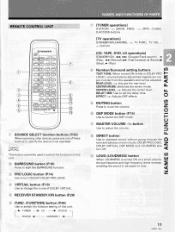
...) Use to switch the DSP mode. 11 MASTER VOLUME -/+ button Use to adjust the volume. 52 DIRECT button Use to set the delay time. REMOTE CONTROL UNIT sucTO PIONEER t s-a--ute - DVD/LD PHONO VCR/TAPE 1 411 NAMES AND FUNCTIONS OF PARTS 7 [TUNER operations] STATION -,+, BAND, FREQ. -,+, MPX, CLASS, D.ACCESS buttons [TV operations] STANDBY/ON,CHANNEL -,+, TV FUNC., TV VOL. ,+, buttons [CD, TAPE, DVD, LD operations] STANDBY/ON, I-4-1, 10.-*1 (Chapter/Track search), (Play), * (Rewind), 0-0. (Fast Forward), II (Pause). (Stop), IP- (Play) 8 Number/Surround setting buttons TEST TONE: When turned ON...
...) Use to switch the DSP mode. 11 MASTER VOLUME -/+ button Use to adjust the volume. 52 DIRECT button Use to set the delay time. REMOTE CONTROL UNIT sucTO PIONEER t s-a--ute - DVD/LD PHONO VCR/TAPE 1 411 NAMES AND FUNCTIONS OF PARTS 7 [TUNER operations] STATION -,+, BAND, FREQ. -,+, MPX, CLASS, D.ACCESS buttons [TV operations] STANDBY/ON,CHANNEL -,+, TV FUNC., TV VOL. ,+, buttons [CD, TAPE, DVD, LD operations] STANDBY/ON, I-4-1, 10.-*1 (Chapter/Track search), (Play), * (Rewind), 0-0. (Fast Forward), II (Pause). (Stop), IP- (Play) 8 Number/Surround setting buttons TEST TONE: When turned ON...
Operating Instructions
Page 12
... 75u VIDEO VIDEO IN IN PRE OUT R IN IN OUT (PLAY) 4,EC) IN LC) ** IN OUT IN (PLAY) (PM O @ CENTER SPEAKER RCD CI SIGNAL GND rh-0 TAPE2 MONITOR I CD --"-DVD/"'" -LD VCR/ TAPE1 PLAY OUTPUTS REC AUDIO INPUT OUT AUDI OUT AUDIO/VIDEO IN AUDI t VIDEO OUT VIDEO OUT Analog player CLO I I I I [ I 1 Cassete deck CD player LD player *Can also be connected in amplifier R .0 A VIDEO IN •When attached on the sub woofer. LOOP ANTENNA AM UNBAL 7 5i1 75 Q coaxial cable...
... 75u VIDEO VIDEO IN IN PRE OUT R IN IN OUT (PLAY) 4,EC) IN LC) ** IN OUT IN (PLAY) (PM O @ CENTER SPEAKER RCD CI SIGNAL GND rh-0 TAPE2 MONITOR I CD --"-DVD/"'" -LD VCR/ TAPE1 PLAY OUTPUTS REC AUDIO INPUT OUT AUDI OUT AUDIO/VIDEO IN AUDI t VIDEO OUT VIDEO OUT Analog player CLO I I I I [ I 1 Cassete deck CD player LD player *Can also be connected in amplifier R .0 A VIDEO IN •When attached on the sub woofer. LOOP ANTENNA AM UNBAL 7 5i1 75 Q coaxial cable...
Operating Instructions
Page 16
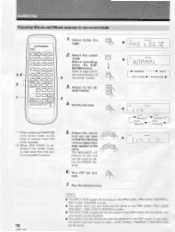
... adjusted. • The center and rear levels can be used to the de- SURRCUND CENTER MCMJE (( 3. Set the test tone. 5. Adjust the center level and rear level so that the test tone volume output from each speaker is the - just the FRONT bal- Play the desired source. SP.A I CI RE :FIVRR LOUD 1+) cigtc MARTER -T )( ) AV MULTI -CHANNEL RECEIVER REMOTE CONTROL UNIT MI *1 When selecting PHANTOM in the center mode, no test tone is output from the center speaker. *2 When 3CH LOGIC is selected in surround mode 4,6 2 1 OD PIONEER...
... adjusted. • The center and rear levels can be used to the de- SURRCUND CENTER MCMJE (( 3. Set the test tone. 5. Adjust the center level and rear level so that the test tone volume output from each speaker is the - just the FRONT bal- Play the desired source. SP.A I CI RE :FIVRR LOUD 1+) cigtc MARTER -T )( ) AV MULTI -CHANNEL RECEIVER REMOTE CONTROL UNIT MI *1 When selecting PHANTOM in the center mode, no test tone is output from the center speaker. *2 When 3CH LOGIC is selected in surround mode 4,6 2 1 OD PIONEER...
Operating Instructions
Page 19
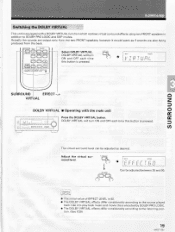
... back. DOLBY VIRTUAL will turn ON and OFF each time this button is pressed. Actually the sounds are output only from the two FRONT speakers, however it to play back music and movie discs encoded by DOLBY PRO LOGIC. • The DOLBY VIRTUAL effects differ considerably according to the source played back. A j t:.,L• L CC, • th D -C) DE, ) VCCT N., )7 tiNC, ) , 0 CC r ( +, MASTER C1,FILI C. Adjust the virtual surround level. - Use it...
... back. DOLBY VIRTUAL will turn ON and OFF each time this button is pressed. Actually the sounds are output only from the two FRONT speakers, however it to play back music and movie discs encoded by DOLBY PRO LOGIC. • The DOLBY VIRTUAL effects differ considerably according to the source played back. A j t:.,L• L CC, • th D -C) DE, ) VCCT N., )7 tiNC, ) , 0 CC r ( +, MASTER C1,FILI C. Adjust the virtual surround level. - Use it...
Operating Instructions
Page 21
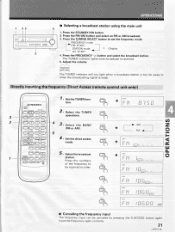
... signal is received. 5. Directly inputting the frequency [Direct Access (remote control unit only)] OPERATIONS (1,1) PIONECR fn, JNEL 3 EjnNo re.-) 1:- 1 I I 1 Display 4. tion. 2. Press the numbers of the frequency to set the frequency mode. 0- Press the T.UNING SELECT button to DELAY TIME be canceled by pressing the D.ACCESS button again. The TUNED indicator lights when broadcast is weak. Set the TUNER func- Set the direct access mode. I - I LI LCI LI I Ln I LCi. 11 LI 11 LI TUNED STEREO • Canceling the frequency input...
... signal is received. 5. Directly inputting the frequency [Direct Access (remote control unit only)] OPERATIONS (1,1) PIONECR fn, JNEL 3 EjnNo re.-) 1:- 1 I I 1 Display 4. tion. 2. Press the numbers of the frequency to set the frequency mode. 0- Press the T.UNING SELECT button to DELAY TIME be canceled by pressing the D.ACCESS button again. The TUNED indicator lights when broadcast is weak. Set the TUNER func- Set the direct access mode. I - I LI LCI LI I Ln I LCi. 11 LI 11 LI TUNED STEREO • Canceling the frequency input...
Operating Instructions
Page 23
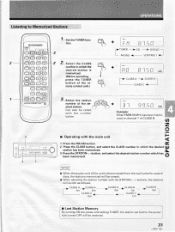
... CLASS button, and select the CLASS number in which has been memorized. ONE LEVEL SW VD number in channel 7 of the unit is memorized. memo • When the power cord of CLASS B. 2 0 0 CO o oO O CO 0 C ) oo on oo 3 0 • Operating with the number button. Set the TUNER function. Select the station number of the re- 000 LODE DD "(5 mote control unit.) VWITIJAL LOUD CD CD MASTER 'IRECT VOLUME 1 AV MULTICHANNEL RECEIVER REMOTE CONTROL...
... CLASS button, and select the CLASS number in which has been memorized. ONE LEVEL SW VD number in channel 7 of the unit is memorized. memo • When the power cord of CLASS B. 2 0 0 CO o oO O CO 0 C ) oo on oo 3 0 • Operating with the number button. Set the TUNER function. Select the station number of the re- 000 LODE DD "(5 mote control unit.) VWITIJAL LOUD CD CD MASTER 'IRECT VOLUME 1 AV MULTICHANNEL RECEIVER REMOTE CONTROL...
Operating Instructions
Page 24
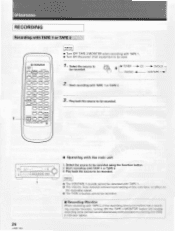
... • Operating with playback monitoring (the TAPE 2 indicator lights). STATION + (D) CD, ID TARE BAND N VOL ( ) CD) Int 1• Select the source to be recorded using the Function button. 2. memo • The VCR/TAPE 1 sounds cannot be recorded with TAPE 1. • The volume, tone, balance and surround setting of all equipment to be used. a PIONEER SOURCE SELECT CHANNEL CO S, VOIP.C6. Play back the source to be recorded. RECORDING Recording with TAPE 1 or TAPE 2 memo • Turn OFF TAPE 2 MONITOR when...
... • Operating with playback monitoring (the TAPE 2 indicator lights). STATION + (D) CD, ID TARE BAND N VOL ( ) CD) Int 1• Select the source to be recorded using the Function button. 2. memo • The VCR/TAPE 1 sounds cannot be recorded with TAPE 1. • The volume, tone, balance and surround setting of all equipment to be used. a PIONEER SOURCE SELECT CHANNEL CO S, VOIP.C6. Play back the source to be recorded. RECORDING Recording with TAPE 1 or TAPE 2 memo • Turn OFF TAPE 2 MONITOR when...

Operating Instructions
Page 25
... ( ) OVO C • ) ( , TEST Li) TONE ) ,1%! ) o co) CENTER MODE - "Ne CE_Jo } min SURROUND TIME - 7)42- (=, =) L, . ( ) NI ) VIRTUAL LOGO FII • • LINE, DI.EC T 1 j) tL.-_1-=. *a ) AV MULTI•CHANNEL RECEIVER REMOTE CONTROL UNIT OPERATIONS 1. G. Select the source to be recorded using the Function button. Select the source to be recorded. O memo • The signal from VCR/TAPE 1 cannot be recorded. Recording with VCR. 3. r or.-TUNER PHONO CD ► DVD/LD VCR/TAPE 1 -4- 2 Start recording with...
... ( ) OVO C • ) ( , TEST Li) TONE ) ,1%! ) o co) CENTER MODE - "Ne CE_Jo } min SURROUND TIME - 7)42- (=, =) L, . ( ) NI ) VIRTUAL LOGO FII • • LINE, DI.EC T 1 j) tL.-_1-=. *a ) AV MULTI•CHANNEL RECEIVER REMOTE CONTROL UNIT OPERATIONS 1. G. Select the source to be recorded using the Function button. Select the source to be recorded. O memo • The signal from VCR/TAPE 1 cannot be recorded. Recording with VCR. 3. r or.-TUNER PHONO CD ► DVD/LD VCR/TAPE 1 -4- 2 Start recording with...
Operating Instructions
Page 27
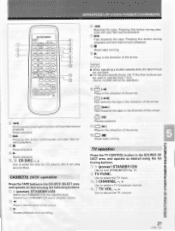
... PIONEER EQUIPMENTS CD i roum(1,0 PIONEErt II I I (3) (3) LC; - I I - ,F4N E1, C. C, O (power) STANDBY/ON Use to turn STANDBY/ON the cassette deck. (Cannot turn STANDBY/ON the TV. memo • When operating a double cassette deck, the deck II must g be operated. • For double cassette decks, the Number buttons can play several discs. M Pauses playback. ( , Plays in the direction of the arrow. © II Pauses playback and recording. TV operation Press the TV CONTROL button...
... PIONEER EQUIPMENTS CD i roum(1,0 PIONEErt II I I (3) (3) LC; - I I - ,F4N E1, C. C, O (power) STANDBY/ON Use to turn STANDBY/ON the cassette deck. (Cannot turn STANDBY/ON the TV. memo • When operating a double cassette deck, the deck II must g be operated. • For double cassette decks, the Number buttons can play several discs. M Pauses playback. ( , Plays in the direction of the arrow. © II Pauses playback and recording. TV operation Press the TV CONTROL button...
Operating Instructions
Page 28
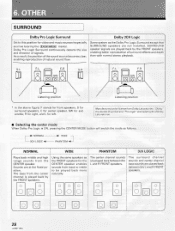
...; Selecting the center mode When Dolby Pro Logic is played back by the FRONT speakers, enabling better reproduction of surround effects and depth than with normal stereo playback. The bass from the center channel is ON, pressing the CENTER MODE button will switch the mode as the FRONT speakers for left. F-L / \ 0 F -R / \ SW 0 o O _ Listening position Listening position * In the above figure, F stands for front speakers, S for surround speakers, C for center speaker, SW for sub woofer, R for...
...; Selecting the center mode When Dolby Pro Logic is played back by the FRONT speakers, enabling better reproduction of surround effects and depth than with normal stereo playback. The bass from the center channel is ON, pressing the CENTER MODE button will switch the mode as the FRONT speakers for left. F-L / \ 0 F -R / \ SW 0 o O _ Listening position Listening position * In the above figure, F stands for front speakers, S for surround speakers, C for center speaker, SW for sub woofer, R for...
Operating Instructions
Page 30
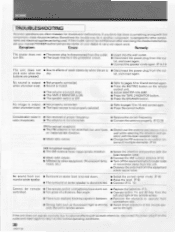
... the TAPE 2 MONITOR button. • Press the SPEAKER button. Sometimes the trouble may lie in • Not received at proper frequency. No sound is output • Not properly connected. when a function is set . • Sound is muted. • The volume is turned down . • Select the correct center mode. (P.16) round or center speaker. • Raise the level. (P.16) • The surround or center speaker is OFF. • Refer to pages 12 to the light. radio broadcasts...
... the TAPE 2 MONITOR button. • Press the SPEAKER button. Sometimes the trouble may lie in • Not received at proper frequency. No sound is output • Not properly connected. when a function is set . • Sound is muted. • The volume is turned down . • Select the correct center mode. (P.16) round or center speaker. • Raise the level. (P.16) • The surround or center speaker is OFF. • Refer to pages 12 to the light. radio broadcasts...
Operating Instructions
Page 31
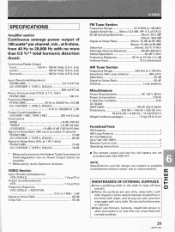
...;1) dB Antenna Input 75 S2. SPECIFICATIONS Amplifier section Continuous average power output of 100 watts* per channel, min., at 1 W (1 kHz)] PHONO MM 75 dB CD, VCR/TAPE 1, TAPE 2, DVD/LD 79 dB * Measured pursuant to the Federal Trade Commission's Trade Regulation rule on or near this unit, since these will corrode surfaces. 31 VIDEO Section Input (Sensitivity/Impedance) VCR, DVD/LD Output (Level/Impedance) VCR Frequency Response VCR, DVD/LD -) MONITOR Signal-to...
...;1) dB Antenna Input 75 S2. SPECIFICATIONS Amplifier section Continuous average power output of 100 watts* per channel, min., at 1 W (1 kHz)] PHONO MM 75 dB CD, VCR/TAPE 1, TAPE 2, DVD/LD 79 dB * Measured pursuant to the Federal Trade Commission's Trade Regulation rule on or near this unit, since these will corrode surfaces. 31 VIDEO Section Input (Sensitivity/Impedance) VCR, DVD/LD Output (Level/Impedance) VCR Frequency Response VCR, DVD/LD -) MONITOR Signal-to...
Operating Instructions
Page 32
... Information courtesy of your volume control at a low setting. • Slowly increase the sound until it 's time to consider how you to purchase replacement parts, operating instructions, service manuals, or accessories, please call the number shown below. 1- 800- 421- 1 404 Please do this product require service in Indonesia E We Want You Listening For A Lifetime Used wisely, your equipment offers. Copyright © 1997 Pioneer Electronic Corporation. P.O. LTD...
... Information courtesy of your volume control at a low setting. • Slowly increase the sound until it 's time to consider how you to purchase replacement parts, operating instructions, service manuals, or accessories, please call the number shown below. 1- 800- 421- 1 404 Please do this product require service in Indonesia E We Want You Listening For A Lifetime Used wisely, your equipment offers. Copyright © 1997 Pioneer Electronic Corporation. P.O. LTD...


