
Instruction Manual English
Page 5
Full Auto MCACC 115 119 121 123 127 Pioneer Remote App Main features Initial Setup Troubleshooting 128 Before starting the procedure 130 When the unit is operating erratically 130 Troubleshooting 131 132 133 134 134 135 138 141 141 142 ... 4. Playing Back Play Queue Adding Play Queue Information Sort and Delete Playing Back Connecting a transmitter for playback Connections Setting Up Playing Back Setup System Setup Menu list Input/Output Assign Speaker Audio Adjust Source Hardware Multi Zone Miscellaneous MCACC Menu operations Full Auto MCACC 101 Manual MCACC 103 MCACC Data ...
Full Auto MCACC 115 119 121 123 127 Pioneer Remote App Main features Initial Setup Troubleshooting 128 Before starting the procedure 130 When the unit is operating erratically 130 Troubleshooting 131 132 133 134 134 135 138 141 141 142 ... 4. Playing Back Play Queue Adding Play Queue Information Sort and Delete Playing Back Connecting a transmitter for playback Connections Setting Up Playing Back Setup System Setup Menu list Input/Output Assign Speaker Audio Adjust Source Hardware Multi Zone Miscellaneous MCACC Menu operations Full Auto MCACC 101 Manual MCACC 103 MCACC Data ...
Instruction Manual English
Page 7
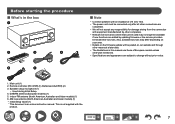
...(North American,Australian and Asian models) (1) 6. AM loop antenna (North American,Australian and Asian models) (1) • Initial Setup Guide (1) * This document is not supplied with an impedance of European models unless otherwise mentioned. • Specifications and appearance ... available if new functions are subject to change without prior notice. 1. DAB/FM antenna (European models) (1) 5. Speaker setup microphone (1) • Used during Initial Setup. 4. Remote controller (RC-974R) (1), Batteries (AAA/R03) (2) 3. This is an online instruction manual. Main unit (1) 2.
...(North American,Australian and Asian models) (1) 6. AM loop antenna (North American,Australian and Asian models) (1) • Initial Setup Guide (1) * This document is not supplied with an impedance of European models unless otherwise mentioned. • Specifications and appearance ... available if new functions are subject to change without prior notice. 1. DAB/FM antenna (European models) (1) 5. Speaker setup microphone (1) • Used during Initial Setup. 4. Remote controller (RC-974R) (1), Batteries (AAA/R03) (2) 3. This is an online instruction manual. Main unit (1) 2.
Instruction Manual English
Page 8
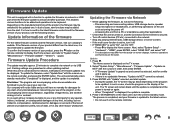
...third party for any special, indirect, incidental, or consequential damages of firmware updates may be displayed. Press to "Off". - Update 1. Select "System Setup" - "Firmware Update" - In such a case, new functions may be added from the start update. • During the update, the TV ...• If the multi-zone function is active, turn the unit into standby mode. Disconnecting and reconnecting cables, USB storage device, speaker setup microphone or headphones, or performing operations on the unit such as turning the power off control devices (PC etc.) connected to the network...
...third party for any special, indirect, incidental, or consequential damages of firmware updates may be displayed. Press to "Off". - Update 1. Select "System Setup" - "Firmware Update" - In such a case, new functions may be added from the start update. • During the update, the TV ...• If the multi-zone function is active, turn the unit into standby mode. Disconnecting and reconnecting cables, USB storage device, speaker setup microphone or headphones, or performing operations on the unit such as turning the power off control devices (PC etc.) connected to the network...
Instruction Manual English
Page 9
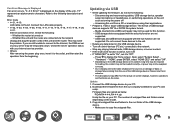
...files and folders varies depending on the model. 3. USB hubs and USB devices equipped with the security function are not supported. Next, select "System Setup" "Hardware" - PIOAVR R.zip Unzip the file on your PC and unzip. is displayed on the display of the unit. ..., or power may differ from the our company's website to display the Home screen. Disconnecting and reconnecting cables, USB storage device, speaker setup microphone or headphones, or performing operations on the unit such as below. Do not connect these devices to the unit. • Delete ...
...files and folders varies depending on the model. 3. USB hubs and USB devices equipped with the security function are not supported. Next, select "System Setup" "Hardware" - PIOAVR R.zip Unzip the file on your PC and unzip. is displayed on the display of the unit. ..., or power may differ from the our company's website to display the Home screen. Disconnecting and reconnecting cables, USB storage device, speaker setup microphone or headphones, or performing operations on the unit such as below. Do not connect these devices to the unit. • Delete ...
Instruction Manual English
Page 10
... Update" is grayed out and cannot be selected, wait for a while until the update is completed and the power is for another model. Select "System Setup" - is displayed, the update is Displayed If an error occurs Error!" "Miscellaneous" - Press . If an Error Message is complete. 8. "Update via USB" cannot be treated...
... Update" is grayed out and cannot be selected, wait for a while until the update is completed and the power is for another model. Select "System Setup" - is displayed, the update is Displayed If an error occurs Error!" "Miscellaneous" - Press . If an Error Message is complete. 8. "Update via USB" cannot be treated...

Instruction Manual English
Page 12
.... PERSONAL PRESET 1/2/3 buttons: Registers the current setting conditions such as input selector, listening mode, etc. AUX INPUT jack: Connect a mobile music 12 SETUP MIC jack: Connect the supplied speaker setup microphone. ( →p131, p144) 17. using a stereo mini plug cable (ø1/8″/3.5 mm). 14. Also, pressing this button repeatedly switches the input...
.... PERSONAL PRESET 1/2/3 buttons: Registers the current setting conditions such as input selector, listening mode, etc. AUX INPUT jack: Connect a mobile music 12 SETUP MIC jack: Connect the supplied speaker setup microphone. ( →p131, p144) 17. using a stereo mini plug cable (ø1/8″/3.5 mm). 14. Also, pressing this button repeatedly switches the input...

Instruction Manual English
Page 18
HDMI MAIN/SUB button: Select the HDMI OUT jack to display the Home screen and selecting "System Setup" "Hardware" - or call the registered settings. ( →p95) 3. Cursor buttons and ENTER button: Select the item with "21. Select the time from "MAIN", "SUB", and "...
HDMI MAIN/SUB button: Select the HDMI OUT jack to display the Home screen and selecting "System Setup" "Hardware" - or call the registered settings. ( →p95) 3. Cursor buttons and ENTER button: Select the item with "21. Select the time from "MAIN", "SUB", and "...

Instruction Manual English
Page 20
... switch between upper and lower cases. (Can also be switched with the cursors / / / on the TV screen such as when inputting a password for Wi-Fi Setup ( →p135) or naming a preset radio station ( →p121). 1. Inputting Characters You can input characters or symbols on the keyboard displayed on the remote controller...
... switch between upper and lower cases. (Can also be switched with the cursors / / / on the TV screen such as when inputting a password for Wi-Fi Setup ( →p135) or naming a preset radio station ( →p121). 1. Inputting Characters You can input characters or symbols on the keyboard displayed on the remote controller...
Instruction Manual English
Page 34
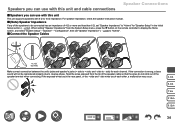
...the wires do not stick out of the speakers to be reproduced properly due to 16 Ω impedance. Twist the wires exposed from the System Setup menu, press the button on the remote controller to - "Configuration", then set "Speaker Impedance" to + side, and - If the exposed ...wires touch the rear panel, or the + side and - side to display the Home screen, and select "System Setup" - For speaker impedance, check the speaker instruction manual. „ (Note) Speaker Impedance If any of the speaker terminal when connecting. side wires touch each...
...the wires do not stick out of the speakers to be reproduced properly due to 16 Ω impedance. Twist the wires exposed from the System Setup menu, press the button on the remote controller to - "Configuration", then set "Speaker Impedance" to + side, and - If the exposed ...wires touch the rear panel, or the + side and - side to display the Home screen, and select "System Setup" - For speaker impedance, check the speaker instruction manual. „ (Note) Speaker Impedance If any of the speaker terminal when connecting. side wires touch each...

Instruction Manual English
Page 54
a HDMI cable, b Digital optical cable Setup • When not using a TV's built-in tuner), connection with a digital optical cable is connected, use an HDMI cable that supports 4K or 8K video. ... the ARC-compatible HDMI IN jack of the TV, etc. Connections Connecting the TV By connecting a TV to this unit, you use a cable set "System Setup" - IN(ARC) To ARC/eARC TV ARC TV a SUB Monitor ( →p55) ZONE 2 ( →p58) If the TV supports the ARC (Audio Return Channel) function...
a HDMI cable, b Digital optical cable Setup • When not using a TV's built-in tuner), connection with a digital optical cable is connected, use an HDMI cable that supports 4K or 8K video. ... the ARC-compatible HDMI IN jack of the TV, etc. Connections Connecting the TV By connecting a TV to this unit, you use a cable set "System Setup" - IN(ARC) To ARC/eARC TV ARC TV a SUB Monitor ( →p55) ZONE 2 ( →p58) If the TV supports the ARC (Audio Return Channel) function...
Instruction Manual English
Page 58
... component to PCM output. It may also be output only when the signal is set "Input/ Output Assign" - "TV Out / OSD" - TV a HDMI cable 58 Setup • When video and audio via HDMI input are output to ZONE 2, set to convert the audio output of the same Blu-ray Disc player... SUB/ZONE 2 a jack will be played on Be sure to "4K Standard" ( →p111). Note that can be limited to insert the HDMI the System Setup menu.
... component to PCM output. It may also be output only when the signal is set "Input/ Output Assign" - "TV Out / OSD" - TV a HDMI cable 58 Setup • When video and audio via HDMI input are output to ZONE 2, set to convert the audio output of the same Blu-ray Disc player... SUB/ZONE 2 a jack will be played on Be sure to "4K Standard" ( →p111). Note that can be limited to insert the HDMI the System Setup menu.

Instruction Manual English
Page 59
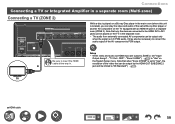
a Setup • Settings are required to output audio to "Zone 2". "Zone 2 Lineout" ( →p115) to ZONE 2. Press on this unit with an HDMI jack, use a digital ... not equipped with a digital coaxial cable or digital optical cable, change the audio output of HDMI IN1 to display the Home screen, then set "System Setup" - Use an analog audio cable to connect the ZONE 2 LINE OUT terminal on the remote controller to IN3 jacks. "Configuration" - Input Terminal Integrated amplifier a Analog...
a Setup • Settings are required to output audio to "Zone 2". "Zone 2 Lineout" ( →p115) to ZONE 2. Press on this unit with an HDMI jack, use a digital ... not equipped with a digital coaxial cable or digital optical cable, change the audio output of HDMI IN1 to display the Home screen, then set "System Setup" - Use an analog audio cable to connect the ZONE 2 LINE OUT terminal on the remote controller to IN3 jacks. "Configuration" - Input Terminal Integrated amplifier a Analog...
Instruction Manual English
Page 61
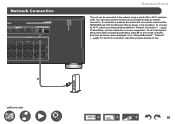
... LAN). a a Ethernet cable 61 To connect by network connection. For the Wi-Fi connection, stand the wireless antenna for use. To set in the System Setup menu after completing Initial Setup, press on the remote controller, then from the Home screen displayed, set in "Network Connection" ( →p143) of Initial...
... LAN). a a Ethernet cable 61 To connect by network connection. For the Wi-Fi connection, stand the wireless antenna for use. To set in the System Setup menu after completing Initial Setup, press on the remote controller, then from the Home screen displayed, set in "Network Connection" ( →p143) of Initial...

Instruction Manual English
Page 70
... Step", and then select the frequency step for Stations by 1 step. Press the cursor buttons / on the remote controller, and from Home displayed select "System Setup" -
... Step", and then select the frequency step for Stations by 1 step. Press the cursor buttons / on the remote controller, and from Home displayed select "System Setup" -

Instruction Manual English
Page 80
...- "Power Management" - Confirm that this unit from the list of AirPlay wireless technology, the sound produced on the remote controller. iPhone Pioneer VSX-935 XXXXXX e.g., iOS 10 80 Playback AirPlay® By connecting this unit to the same network as iOS devices, such as that of iPhone...connected via network. 2. For details, refer to the characteristics of devices displayed. 3. Then, press NET on the iOS device. • If "System Setup" - Tap the AirPlay icon in the play the music files on the AirPlay-enabled device. Next, click the AirPlay icon in the Home, manually ...
...- "Power Management" - Confirm that this unit from the list of AirPlay wireless technology, the sound produced on the remote controller. iPhone Pioneer VSX-935 XXXXXX e.g., iOS 10 80 Playback AirPlay® By connecting this unit to the same network as iOS devices, such as that of iPhone...connected via network. 2. For details, refer to the characteristics of devices displayed. 3. Then, press NET on the iOS device. • If "System Setup" - Tap the AirPlay icon in the play the music files on the AirPlay-enabled device. Next, click the AirPlay icon in the Home, manually ...
Instruction Manual English
Page 81
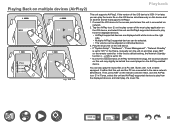
.... 1. Play the music file on the remote controller. "Network Standby" is connected via network. 2. Then, press NET on the iOS device. • If "System Setup" - Next, click the AirPlay icon in the Home, manually turn the unit on and then press NET on the AirPlay-enabled device. You can be...of the music play application on the iOS device, and select this unit may slightly be adjusted on multiple devices (AirPlay2) Playback Wi-Fi iPhone Pioneer VSX-935 XXXXXX Pioneer XXXXXXXX Pioneer XXXXXXXX e.g., iOS 11.4 This unit supports AirPlay2. Playing Back on individual devices. 3.
.... 1. Play the music file on the remote controller. "Network Standby" is connected via network. 2. Then, press NET on the iOS device. • If "System Setup" - Next, click the AirPlay icon in the Home, manually turn the unit on and then press NET on the AirPlay-enabled device. You can be...of the music play application on the iOS device, and select this unit may slightly be adjusted on multiple devices (AirPlay2) Playback Wi-Fi iPhone Pioneer VSX-935 XXXXXX Pioneer XXXXXXXX Pioneer XXXXXXXX e.g., iOS 11.4 This unit supports AirPlay2. Playing Back on individual devices. 3.

Instruction Manual English
Page 82
... be required. • This unit does not support the following URL. Music from a streaming distribution service or music in the "Setup menu" cannot be played. Connect the mobile device to the network where this unit is displayed. Internet Radio • Some of ...compatible devices. Also, connecting multiple speakers supporting DTS Play-Fi on the same network will automatically display compatible devices. 4. https://intl.pioneer-audiovisual.com/playfi/info_p.html • To use a music streaming distribution service, user registration may be selected during playback. 82 Line...
... be required. • This unit does not support the following URL. Music from a streaming distribution service or music in the "Setup menu" cannot be played. Connect the mobile device to the network where this unit is displayed. Internet Radio • Some of ...compatible devices. Also, connecting multiple speakers supporting DTS Play-Fi on the same network will automatically display compatible devices. 4. https://intl.pioneer-audiovisual.com/playfi/info_p.html • To use a music streaming distribution service, user registration may be selected during playback. 82 Line...

Instruction Manual English
Page 83
...this unit is registered with an Amazon account, you have selected for information about the app. 2. Available services may differ depending on Pioneer Remote App. Register with the Amazon account on your other terminals with Amazon Alexa. 83 Tap "Next" to perform operations such ... the Amazon account information, such as your email address and password, to "Pioneer Remote App" ( →p145) for your area. 4. After logging in the Setup screen, select the language and register the device name. Start Pioneer Remote App and tap the unit when displayed. 3. When this unit.
...this unit is registered with an Amazon account, you have selected for information about the app. 2. Available services may differ depending on Pioneer Remote App. Register with the Amazon account on your other terminals with Amazon Alexa. 83 Tap "Next" to perform operations such ... the Amazon account information, such as your email address and password, to "Pioneer Remote App" ( →p145) for your area. 4. After logging in the Setup screen, select the language and register the device name. Start Pioneer Remote App and tap the unit when displayed. 3. When this unit.
Instruction Manual English
Page 88
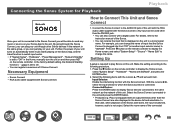
...is displayed on the unit to a more logical name. Press the button on the remote controller to display the Home screen, and select "System Setup" - "Hardware" - Input Selector: Enable the interlocking function with SONOS", and press the ENTER button. 2. With the cursors / , select the... through the Sonos Connect, you can play Sonos on the Sonos App, and the linked function to switch input works. • If "System Setup" - Necessary Equipment • Sonos Connect • RCA audio cable (supplied with the Sonos Connect. Select the following procedure. 1. Playback Connecting ...
...is displayed on the unit to a more logical name. Press the button on the remote controller to display the Home screen, and select "System Setup" - "Hardware" - Input Selector: Enable the interlocking function with SONOS", and press the ENTER button. 2. With the cursors / , select the... through the Sonos Connect, you can play Sonos on the Sonos App, and the linked function to switch input works. • If "System Setup" - Necessary Equipment • Sonos Connect • RCA audio cable (supplied with the Sonos Connect. Select the following procedure. 1. Playback Connecting ...
Instruction Manual English
Page 93
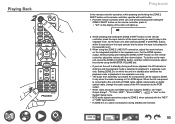
... switches the playback mode to ZONE 2 only when the audio is analog or 2 ch PCM signal. "Zone 2 HDMI" ( →p111) to "Use" on the System Setup menu. • DSD audio signals cannot be output to playback in the separate room. 3. Playing Back 2 1 Playback In the remote controller operation, while pressing and...
... switches the playback mode to ZONE 2 only when the audio is analog or 2 ch PCM signal. "Zone 2 HDMI" ( →p111) to "Use" on the System Setup menu. • DSD audio signals cannot be output to playback in the separate room. 3. Playing Back 2 1 Playback In the remote controller operation, while pressing and...