
Owner's Manual
Page 1
...RECEIVER VSX-1019AH-K VSX-919AH-K Register your product at http://www.pioneerelectronics.com (US) http://www.pioneerelectronics.ca (Canada) · Protect your new investment The details of your purchase will be on file for reference in the event of an insurance claim such as loss or theft. · Receive... free tips, updates and service bulletins on your new product · Improve product development Your input helps us continue to design products that meet your needs. · Receive a free Pioneer newsletter Registered customers can opt in to...
...RECEIVER VSX-1019AH-K VSX-919AH-K Register your product at http://www.pioneerelectronics.com (US) http://www.pioneerelectronics.ca (Canada) · Protect your new investment The details of your purchase will be on file for reference in the event of an insurance claim such as loss or theft. · Receive... free tips, updates and service bulletins on your new product · Improve product development Your input helps us continue to design products that meet your needs. · Receive a free Pioneer newsletter Registered customers can opt in to...
Owner's Manual
Page 2
...PLEASE WRITE THIS SERIAL NUMBER ON YOUR ENCLOSED WARRANTY CARD AND KEEP IN A SECURE AREA. Reorient or relocate the receiving antenna. - Connect the equipment into an outlet on proposition 65 known to the State of California and other governmental ...interference to provide reasonable protection against harmful interference in for connections. Product Name: AUDIO/VIDEO MULTI-CHANNEL RECEIVER Model Number: VSX-1019AH-K, VSX-919AH-K Responsible Party Name: PIONEER ELECTRONICS SERVICE INC. The voltage of this material may invalidate the user's right to dripping, splashing...
...PLEASE WRITE THIS SERIAL NUMBER ON YOUR ENCLOSED WARRANTY CARD AND KEEP IN A SECURE AREA. Reorient or relocate the receiving antenna. - Connect the equipment into an outlet on proposition 65 known to the State of California and other governmental ...interference to provide reasonable protection against harmful interference in for connections. Product Name: AUDIO/VIDEO MULTI-CHANNEL RECEIVER Model Number: VSX-1019AH-K, VSX-919AH-K Responsible Party Name: PIONEER ELECTRONICS SERVICE INC. The voltage of this material may invalidate the user's right to dripping, splashing...
Owner's Manual
Page 4
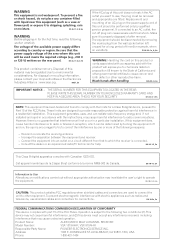
...30 MULTI-ZONE setup 31 Making MULTI-ZONE connections 31 Connecting an IR receiver 32 Operating other Pioneer components with this Pioneer product. Contents 01 Before you start Checking what's in the box 7 Installing the receiver 7 Loading the batteries 7 02 Controls and displays Front panel 8 Display... . . 33 Connecting a component to the front panel inputs 34 Connecting an iPod 34 Connecting a USB device 35 Plugging in the receiver 35 04 Basic Setup Switching the speaker impedance 36 Changing the OSD display language (OSD Language 36 Automatically setting up for surround sound (...
...30 MULTI-ZONE setup 31 Making MULTI-ZONE connections 31 Connecting an IR receiver 32 Operating other Pioneer components with this Pioneer product. Contents 01 Before you start Checking what's in the box 7 Installing the receiver 7 Loading the batteries 7 02 Controls and displays Front panel 8 Display... . . 33 Connecting a component to the front panel inputs 34 Connecting an iPod 34 Connecting a USB device 35 Plugging in the receiver 35 04 Basic Setup Switching the speaker impedance 36 Changing the OSD display language (OSD Language 36 Automatically setting up for surround sound (...

Owner's Manual
Page 5
...71 Checking your system settings 71 Resetting the system 72 Default system settings 72 09 Controlling the rest of your system Operating multiple receivers 73 Setting the remote to control other components 73 Selecting preset codes directly 73 Resetting the remote control presets 74 Default preset ...codes 74 Controls the components 74 10 The Advanced MCACC menu Making receiver settings from the Advanced MCACC menu 77 Automatic MCACC (Expert 78 Manual MCACC setup 82 Fine Channel Level 83 Fine Speaker Distance ...
...71 Checking your system settings 71 Resetting the system 72 Default system settings 72 09 Controlling the rest of your system Operating multiple receivers 73 Setting the remote to control other components 73 Selecting preset codes directly 73 Resetting the remote control presets 74 Default preset ...codes 74 Controls the components 74 10 The Advanced MCACC menu Making receiver settings from the Advanced MCACC menu 77 Automatic MCACC (Expert 78 Manual MCACC setup 82 Fine Channel Level 83 Fine Speaker Distance ...
Owner's Manual
Page 6
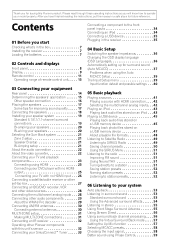
... converter (page 22) • Connecting your TV and playback components (page 23) • Connecting AM/FM antennas (page 30) • Plugging in the receiver (page 35) 5 Switching the speaker impedance (page 36) (Only if the impedance of the connected speakers is 6 Ω to 8 Ω)...Dialog Enhancement (page 64) • Change the channel level while listening (Tip on the receiver The unit is a full-fledged AV receiver equipped with an abundance of the remote control • Operating multiple receivers (page 73) • Setting the remote to control other components (page 73) The...
... converter (page 22) • Connecting your TV and playback components (page 23) • Connecting AM/FM antennas (page 30) • Plugging in the receiver (page 35) 5 Switching the speaker impedance (page 36) (Only if the impedance of the connected speakers is 6 Ω to 8 Ω)...Dialog Enhancement (page 64) • Change the channel level while listening (Tip on the receiver The unit is a full-fledged AV receiver equipped with an abundance of the remote control • Operating multiple receivers (page 73) • Setting the remote to control other components (page 73) The...

Owner's Manual
Page 7
in places that you start 01 Chapter 1: Before you 've received the following supplied accessories: • Setup microphone (cable: 5 m (16.4 ft.)) • Remote control unit • AA size IEC R6 dry cell batteries (to confirm system ...operation) x2 • AM loop antenna • FM wire antenna • iPod cable • These operating instructions Installing the receiver • When installing this receiver's bottom panel while the power is on the following precautions: • Never use new and old batteries together. • Insert the plus and...
in places that you start 01 Chapter 1: Before you 've received the following supplied accessories: • Setup microphone (cable: 5 m (16.4 ft.)) • Remote control unit • AA size IEC R6 dry cell batteries (to confirm system ...operation) x2 • AM loop antenna • FM wire antenna • iPod cable • These operating instructions Installing the receiver • When installing this receiver's bottom panel while the power is on the following precautions: • Never use new and old batteries together. • Insert the plus and...
Owner's Manual
Page 8
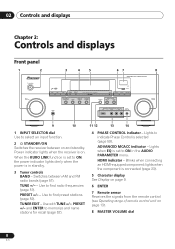
...Controls and displays Chapter 2: Controls and displays Front panel 1 2 STANDBY/ON INPUT SELECTOR 3 4 5 67 8 AUDIO/VIDEO MULTI-CHANNEL RECEIVER BAND TUNE TUNE PHASE CONTROL ADVANCED MCACC AUTO SURR/ALC/ STREAM DIRECT STEREO ADVANCED SURROUND STANDARD SURROUND PHONES HDMI ENTER PRESET PRESET TUNER EDIT... between on and standby. Use with TUNE +/-, PRESET +/- Lights to select an input function. 2 STANDBY/ON Switches the receiver between AM and FM radio bands (page 51). and ENTER to find radio frequencies (page 51). lights when the component is set...
...Controls and displays Chapter 2: Controls and displays Front panel 1 2 STANDBY/ON INPUT SELECTOR 3 4 5 67 8 AUDIO/VIDEO MULTI-CHANNEL RECEIVER BAND TUNE TUNE PHASE CONTROL ADVANCED MCACC AUTO SURR/ALC/ STREAM DIRECT STEREO ADVANCED SURROUND STANDARD SURROUND PHONES HDMI ENTER PRESET PRESET TUNER EDIT... between on and standby. Use with TUNE +/-, PRESET +/- Lights to select an input function. 2 STANDBY/ON Switches the receiver between AM and FM radio bands (page 51). and ENTER to find radio frequencies (page 51). lights when the component is set...

Owner's Manual
Page 9
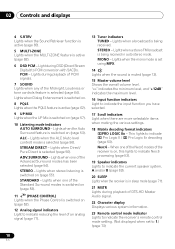
... displays 02 9 PHONES jack Use to indicate the channels being input when PCM signals are connected, there is no sound output from the receiver. AUTO lights when the receiver is set to select the input signal automatically (page 58). 2 Program format indicators Light to connect headphones. Either one channel other than the...
... displays 02 9 PHONES jack Use to indicate the channels being input when PCM signals are connected, there is no sound output from the receiver. AUTO lights when the receiver is set to select the input signal automatically (page 58). 2 Program format indicators Light to connect headphones. Either one channel other than the...
Owner's Manual
Page 10
... Matrix decoding format indicators 2PRO LOGIC IIx - STEREO - MONO - Lights during playback of PCM signals. 7 SOUND Lights when any of the receiver is on (page 53). Lights when Dialog Enhancement is switched on. 8 PQLS Lights when the PQLS feature is active (page 62). 9 UP...DIRECT - Lights when one of the Advanced Surround modes has been selected (page 54). STANDARD - ALC - Lights when a stereo FM broadcast is being received. "---" indicates the minimum level, and "+12dB" indicates the maximum level. 16 Input function indicators Light to indicate 2 Pro Logic II / 2 Pro Logic...
... Matrix decoding format indicators 2PRO LOGIC IIx - STEREO - MONO - Lights during playback of PCM signals. 7 SOUND Lights when any of the receiver is on (page 53). Lights when Dialog Enhancement is switched on. 8 PQLS Lights when the PQLS feature is active (page 62). 9 UP...DIRECT - Lights when one of the Advanced Surround modes has been selected (page 54). STANDARD - ALC - Lights when a stereo FM broadcast is being received. "---" indicates the minimum level, and "+12dB" indicates the maximum level. 16 Input function indicators Light to indicate 2 Pro Logic II / 2 Pro Logic...
Owner's Manual
Page 11
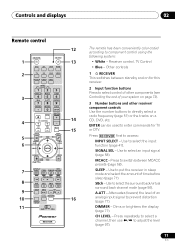
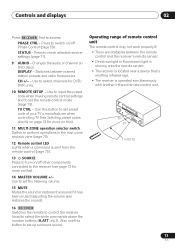
... surround back/virtual surround back channel mode (page 56). SIGNAL SEL - Use to select an input signal (page 58). A.ATT - DIMMER - Press RECEIVER first to select the input function (page 41). Use to access: INPUT SELECT - Press to adjust the level (page 97). 11 En Press repeatedly... the tracks on a CD, DVD, etc. Dims or brightens the display (page 71). SBch - Controls and displays 02 Remote control 1 2 3 4 5 6 7 8 9 10 11 RECEIVER SOURCE DVD BD DVR HDMI TV CD CD-R VIDEO iPod USB TUNER SIRIUS INPUT SELECT 12 SIGNAL SEL MCACC 45 SBch A.ATT 78 D.ACCESS CH...
... surround back/virtual surround back channel mode (page 56). SIGNAL SEL - Use to select an input signal (page 58). A.ATT - DIMMER - Press RECEIVER first to select the input function (page 41). Use to access: INPUT SELECT - Press to adjust the level (page 97). 11 En Press repeatedly... the tracks on a CD, DVD, etc. Dims or brightens the display (page 71). SBch - Controls and displays 02 Remote control 1 2 3 4 5 6 7 8 9 10 11 RECEIVER SOURCE DVD BD DVR HDMI TV CD CD-R VIDEO iPod USB TUNER SIRIUS INPUT SELECT 12 SIGNAL SEL MCACC 45 SBch A.ATT 78 D.ACCESS CH...
Owner's Manual
Page 12
CH +/- - The BAND and T.EDIT tuner controls are used to select channels. Press RECEIVER first to access the Home Menu (pages 36, 39, 62, 77, 93 and 98). HOME MENU - Use to access: AUDIO PARAMETER - Press for example DVD, ... to this ). - VOL +/- - Press to confirm and exit the current menu screen (also use PRESET / to find preset stations (page 52). 7 Receiver controls Press RECEIVER first to access: D.ACCESS - STEREO - Use to adjust the volume on /off the power of radio station presets (page 52). 4 TV CONTROL buttons These...
CH +/- - The BAND and T.EDIT tuner controls are used to select channels. Press RECEIVER first to access the Home Menu (pages 36, 39, 62, 77, 93 and 98). HOME MENU - Use to access: AUDIO PARAMETER - Press for example DVD, ... to this ). - VOL +/- - Press to confirm and exit the current menu screen (also use PRESET / to find preset stations (page 52). 7 Receiver controls Press RECEIVER first to access: D.ACCESS - STEREO - Use to adjust the volume on /off the power of radio station presets (page 52). 4 TV CONTROL buttons These...
Owner's Manual
Page 13
...page 73). CH +/- - STATUS - Use to select channels for more on /off Phase Control (page 59). Controls and displays 02 Press RECEIVER first to check selected receiver settings (page 71). 9 AUDIO - Press to access: PHASE CTRL - Also use this ). 14 MASTER VOLUME +/- Switches between the remote ...has been muted (adjusting the volume also restores the sound). 16 RECEIVER Switches the remote to control the receiver (used to set up surround sound. Press to switch on/off other components connected to the receiver (see page 73 for more on this). 11 MULTI-ZONE operation...
...page 73). CH +/- - STATUS - Use to select channels for more on /off Phase Control (page 59). Controls and displays 02 Press RECEIVER first to check selected receiver settings (page 71). 9 AUDIO - Press to access: PHASE CTRL - Also use this ). 14 MASTER VOLUME +/- Switches between the remote ...has been muted (adjusting the volume also restores the sound). 16 RECEIVER Switches the remote to control the receiver (used to set up surround sound. Press to switch on/off other components connected to the receiver (see page 73 for more on this). 11 MULTI-ZONE operation...
Owner's Manual
Page 14
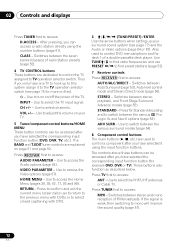
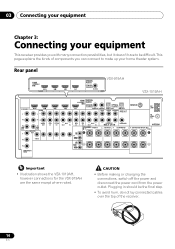
..., but it doesn't have to be the final step. • To avoid hum, do not lay connected cables over the top of the receiver. 14 En Plugging in should be difficult. CAUTION • Before making or changing the connections, switch off the power and disconnect the power cord.... 03 Connecting your equipment Chapter 3: Connecting your home theater system. Rear panel HDMI ASSIGNABLE 12 BD IN IN 1 IN 2 OUT AUDIO DIGITAL AUDIO VSX-919AH COAXIAL ASSIGNABLE IN (DVD) FRONT VSX-1019AH YL ASSIGNABLE Y BD IN IN 1 AUDIO YL PB PR IN 1 (DVD) Y PB PB R PR IN 2 (DVR) MONITOR OUT ...
..., but it doesn't have to be the final step. • To avoid hum, do not lay connected cables over the top of the receiver. 14 En Plugging in should be difficult. CAUTION • Before making or changing the connections, switch off the power and disconnect the power cord.... 03 Connecting your equipment Chapter 3: Connecting your home theater system. Rear panel HDMI ASSIGNABLE 12 BD IN IN 1 IN 2 OUT AUDIO DIGITAL AUDIO VSX-919AH COAXIAL ASSIGNABLE IN (DVD) FRONT VSX-1019AH YL ASSIGNABLE Y BD IN IN 1 AUDIO YL PB PR IN 1 (DVD) Y PB PB R PR IN 2 (DVR) MONITOR OUT ...
Owner's Manual
Page 18
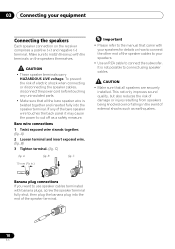
... that all the bare speaker wire is not possible to use speaker cables terminated with your equipment Connecting the speakers Each speaker connection on the receiver comprises a positive (+) and negative (-) terminal.
... that all the bare speaker wire is not possible to use speaker cables terminated with your equipment Connecting the speakers Each speaker connection on the receiver comprises a positive (+) and negative (-) terminal.
Owner's Manual
Page 20
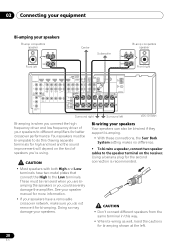
... connect the High to the speaker terminal on the kind of your speakers to do not remove it for bi-amping shown at the left VSX-1019AH Bi-amping is recommended. See your speaker manual for better crossover performance. Using a banana plug for the second connection is when you do this...; Don't connect different speakers from the same terminal in this (having separate terminals for high and low) and the sound improvement will depend on the receiver.
... connect the High to the speaker terminal on the kind of your speakers to do not remove it for bi-amping shown at the left VSX-1019AH Bi-amping is recommended. See your speaker manual for better crossover performance. Using a banana plug for the second connection is when you do this...; Don't connect different speakers from the same terminal in this (having separate terminals for high and low) and the sound improvement will depend on the receiver.

Owner's Manual
Page 22
... HD audio Digital (Coaxial) Conventional digital audio Digital (Optical) About the video converter The video converter ensures that order). The receiver selects the first available signal in that all of the MONITOR VIDEO OUT jacks. Use of this copyright protection technology must connect ...your monitor/TV to the receiver's HDMI video outputs when connecting this receiver. 03 Connecting your equipment Sound signal priority High picture quality About the audio connection There are ...
... HD audio Digital (Coaxial) Conventional digital audio Digital (Optical) About the video converter The video converter ensures that order). The receiver selects the first available signal in that all of the MONITOR VIDEO OUT jacks. Use of this copyright protection technology must connect ...your monitor/TV to the receiver's HDMI video outputs when connecting this receiver. 03 Connecting your equipment Sound signal priority High picture quality About the audio connection There are ...
Owner's Manual
Page 23
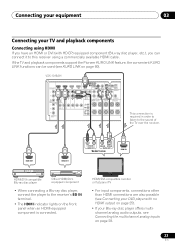
...no HDMI output on page 25). • If your TV and playback components Connecting using a commercially available HDMI cable. VSX-1019AH ASSIGNABLE BD IN IN 1 IN 2 AUDIO Y YL HDMI ASSIGNABLE DIGITAL AUDIO 1 3 COAXIAL ASSIGNABLE OPTICAL ASSIGNABLE IN...DVIequipped component • When connecting a Blu-ray disc player, connect the player to the receiver's BD IN terminal. • The HDMI indicator lights on the front panel when an HDMI...En If the TV and playback components support the Pioneer KURO LINK feature, the convenient KURO LINK functions can connect it to the sound of ...
...no HDMI output on page 25). • If your TV and playback components Connecting using a commercially available HDMI cable. VSX-1019AH ASSIGNABLE BD IN IN 1 IN 2 AUDIO Y YL HDMI ASSIGNABLE DIGITAL AUDIO 1 3 COAXIAL ASSIGNABLE OPTICAL ASSIGNABLE IN...DVIequipped component • When connecting a Blu-ray disc player, connect the player to the receiver's BD IN terminal. • The HDMI indicator lights on the front panel when an HDMI...En If the TV and playback components support the Pioneer KURO LINK feature, the convenient KURO LINK functions can connect it to the sound of ...

Owner's Manual
Page 24
...problem with HDCP, an HDCP ERROR message is only possible when connected to this is connected using an HDMI cable. This receiver incorporates High-Definition Multimedia Interface (HDMI™) technology. A DVI connection, however, does not support audio signals. Some ...components that is not compatible with displaying video this receiver also supports the corresponding format. 2 Signal transfer is displayed on the front panel display. 03 Connecting your local audio dealer ...
...problem with HDCP, an HDCP ERROR message is only possible when connected to this is connected using an HDMI cable. This receiver incorporates High-Definition Multimedia Interface (HDMI™) technology. A DVI connection, however, does not support audio signals. Some ...components that is not compatible with displaying video this receiver also supports the corresponding format. 2 Signal transfer is displayed on the front panel display. 03 Connecting your local audio dealer ...

Owner's Manual
Page 25
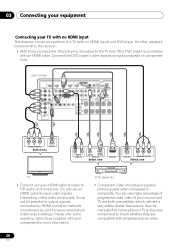
HDMI/DVI-compatible monitor or flat panel TV 25 En VSX-1019AH HDMI ASSIGNABLE DIGITAL AUDIO 1 3 COAXIAL OPTICAL ASSIGNABLE ASSIGNABLE ASSIGNABLE BD IN IN 1 IN 2 IN 3 OUT AUDIO IN 1 (DVD) IN 2 (CD) IN 1 (TV/SAT) IN 2 (.... • Component video should give superior picture quality when compared to composite. See the manuals that came with your TV and source component to the receiver. Connecting your equipment 03 Connecting your source and TV are compatible with progressive-scan video. You can also take advantage of progressive scan video (if...
HDMI/DVI-compatible monitor or flat panel TV 25 En VSX-1019AH HDMI ASSIGNABLE DIGITAL AUDIO 1 3 COAXIAL OPTICAL ASSIGNABLE ASSIGNABLE ASSIGNABLE BD IN IN 1 IN 2 IN 3 OUT AUDIO IN 1 (DVD) IN 2 (CD) IN 1 (TV/SAT) IN 2 (.... • Component video should give superior picture quality when compared to composite. See the manuals that came with your TV and source component to the receiver. Connecting your equipment 03 Connecting your source and TV are compatible with progressive-scan video. You can also take advantage of progressive scan video (if...
Owner's Manual
Page 26
...TV and source component to check whether they are both compatible), which delivers a very stable, flicker-free picture. Depending on the receiver. See the manuals that came with your TV with no HDMI input This diagram shows connections of progressive scan video (if your ...component for more information. VSX-1019AH HDMI ASSIGNABLE DIGITAL AUDIO 1 3 COAXIAL OPTICAL ASSIGNABLE BD IN IN 1 IN 2 IN 3 OUT AUDIO ASSIGNABLE ASSIGNABLE IN 1 (DVD) IN 2 (...
...TV and source component to check whether they are both compatible), which delivers a very stable, flicker-free picture. Depending on the receiver. See the manuals that came with your TV with no HDMI input This diagram shows connections of progressive scan video (if your ...component for more information. VSX-1019AH HDMI ASSIGNABLE DIGITAL AUDIO 1 3 COAXIAL OPTICAL ASSIGNABLE BD IN IN 1 IN 2 IN 3 OUT AUDIO ASSIGNABLE ASSIGNABLE IN 1 (DVD) IN 2 (...


