User Manual
Page 5
... speaker system 57 Bi-amping your front speakers 58 Bi-wiring your speakers 58 Using this receiver with a Pioneer plasma display 59 Using the SR+ mode with a Pioneer plasma display 60 12 Other Settings The Input Assign menu 61 The Other Setup menu 62 Dynamic Range Control... Setup 63 Dual Mono Setup 63 LFE Attenuator Setup 63 SR+ Setup for Pioneer plasma displays . . . . 64 Digital Video Converter Setup 64 13 Additional information Troubleshooting 65 HDMI 67 Resetting the main unit 67 Switching the speaker impedance 68 Changing the TV format setting 68 Specifications...
... speaker system 57 Bi-amping your front speakers 58 Bi-wiring your speakers 58 Using this receiver with a Pioneer plasma display 59 Using the SR+ mode with a Pioneer plasma display 60 12 Other Settings The Input Assign menu 61 The Other Setup menu 62 Dynamic Range Control... Setup 63 Dual Mono Setup 63 LFE Attenuator Setup 63 SR+ Setup for Pioneer plasma displays . . . . 64 Digital Video Converter Setup 64 13 Additional information Troubleshooting 65 HDMI 67 Resetting the main unit 67 Switching the speaker impedance 68 Changing the TV format setting 68 Specifications...

User Manual
Page 27
... receiver (see Tip on page 51. Use to select an Acoustic Calibration EQ setting (page 31). ADV.SURR. - See Direct function on page 51. DIALOG - RESET -
... receiver (see Tip on page 51. Use to select an Acoustic Calibration EQ setting (page 31). ADV.SURR. - See Direct function on page 51. DIALOG - RESET -
User Manual
Page 51
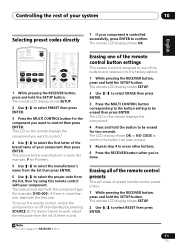
... Français Italiano Nederlands Español Selecting preset codes directly 7 If your component is more than one, start with the component type (for Pioneer). 5 Use / to select the manufacturer's name from the list then press ENTER. 6 Use / to select the proper code from the ... LCD display shows OK. The code should be erased then press ENTER. The remote LCD display shows SETUP. 2 Use / TUNE to select RESET then press ENTER. The remote LCD display shows SETUP. 2 Use / to select PRESET then press ENTER.
... Français Italiano Nederlands Español Selecting preset codes directly 7 If your component is more than one, start with the component type (for Pioneer). 5 Use / to select the manufacturer's name from the list then press ENTER. 6 Use / to select the proper code from the ... LCD display shows OK. The code should be erased then press ENTER. The remote LCD display shows SETUP. 2 Use / TUNE to select RESET then press ENTER. The remote LCD display shows SETUP. 2 Use / to select PRESET then press ENTER.
User Manual
Page 67
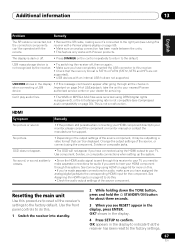
...format is FAT16 or FAT32 (FAT12, NTFS and HFS are not supported). • USB devices with a Pioneer plasma display on the control repeatedly to return to your nearest Pioneer device. No sound, or sound suddenly ceases. • Since the HDMI audio signal is sent through this..., please consult the component or monitor manual or contact the manufacturer for support. Use the front panel controls to the right jack (see RESET? can 't be displayed. Use component, S-video, or composite connections when setting up the system. OK? Additional information 13 English Deutsch ...
...format is FAT16 or FAT32 (FAT12, NTFS and HFS are not supported). • USB devices with a Pioneer plasma display on the control repeatedly to return to your nearest Pioneer device. No sound, or sound suddenly ceases. • Since the HDMI audio signal is sent through this..., please consult the component or monitor manual or contact the manufacturer for support. Use the front panel controls to the right jack (see RESET? can 't be displayed. Use component, S-video, or composite connections when setting up the system. OK? Additional information 13 English Deutsch ...
