User Manual
Page 4
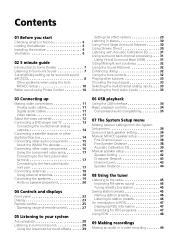
... 18 Using external antennas 18 Connecting the speakers 19 Hints on speaker placement 20 04 Controls and displays Front panel 22 Display 23 Remote control 25 Operating range of remote control 27 05 Listening to your system Auto playback 28 Listening in surround sound 28 Using the Advanced surround effects . . . . . 29 06...
... 18 Using external antennas 18 Connecting the speakers 19 Hints on speaker placement 20 04 Controls and displays Front panel 22 Display 23 Remote control 25 Operating range of remote control 27 05 Listening to your system Auto playback 28 Listening in surround sound 28 Using the Advanced surround effects . . . . . 29 06...
User Manual
Page 5
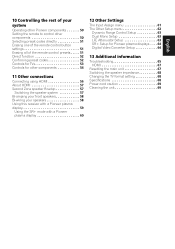
10 Controlling the rest of your system Operating other Pioneer components 50 Setting the remote to control other components 50 Selecting preset codes directly 51 Erasing one of the remote control button settings 51 Erasing all of the remote control presets . . . . . 51 Direct function 52 Confirming preset codes ... menu 61 The Other Setup menu 62 Dynamic Range Control Setup 63 Dual Mono Setup 63 LFE Attenuator Setup 63 SR+ Setup for Pioneer plasma displays . . . . 64 Digital Video Converter Setup 64 13 Additional information Troubleshooting 65 HDMI 67 Resetting the main unit 67...
10 Controlling the rest of your system Operating other Pioneer components 50 Setting the remote to control other components 50 Selecting preset codes directly 51 Erasing one of the remote control button settings 51 Erasing all of the remote control presets . . . . . 51 Direct function 52 Confirming preset codes ... menu 61 The Other Setup menu 62 Dynamic Range Control Setup 63 Dual Mono Setup 63 LFE Attenuator Setup 63 SR+ Setup for Pioneer plasma displays . . . . 64 Digital Video Converter Setup 64 13 Additional information Troubleshooting 65 HDMI 67 Resetting the main unit 67...

User Manual
Page 6
... you start Chapter 1: Before you start Checking what's in the box Please check that you've received the following supplied accessories: • Setup microphone • Remote control unit • Dry cell batteries (AA size IEC R6) x2 • AM loop antenna • FM wire antenna • These operating instructions • Warranty...
... you start Chapter 1: Before you start Checking what's in the box Please check that you've received the following supplied accessories: • Setup microphone • Remote control unit • Dry cell batteries (AA size IEC R6) x2 • AM loop antenna • FM wire antenna • These operating instructions • Warranty...

User Manual
Page 7
... surround sound, you may need to a CD with the TV if you can select. Place your speaker setup. If it isn't, press DVD on the remote to set to STANDARD (see your DVD player's manual for optimal surround sound. This receiver will have a big effect on -screen automatic MCACC setup to...
... surround sound, you may need to a CD with the TV if you can select. Place your speaker setup. If it isn't, press DVD on the remote to set to STANDARD (see your DVD player's manual for optimal surround sound. This receiver will have a big effect on -screen automatic MCACC setup to...
User Manual
Page 8
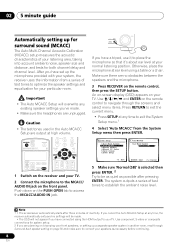
...TV. 2 Connect the microphone to the MCACC/ AUDIO IN jack on the front panel. SIGNAL SEL RECEIVER INPUT SELECT SOURCE AUDIO/VIDEO PRE-PROGRAMMED REMOTE CONTROL UNIT F.AUDIO DVD TV CD-R/TAPE USB CD FM DVR TVCTRL AM RECEIVER D.ACCESS +10 CLASS DISC ENTER TOP MENU TUNE ST ST ... automatically starts after pressing ENTER. An on-screen display (OSD) appears on your TV. Use and ENTER on the remote control to navigate through Surround back speaker setting on the remote control, then press the SETUP button. USB MCACC/ AUDIO IN DOWN MASTER VOLUME UP If you have a tripod, ...
...TV. 2 Connect the microphone to the MCACC/ AUDIO IN jack on the front panel. SIGNAL SEL RECEIVER INPUT SELECT SOURCE AUDIO/VIDEO PRE-PROGRAMMED REMOTE CONTROL UNIT F.AUDIO DVD TV CD-R/TAPE USB CD FM DVR TVCTRL AM RECEIVER D.ACCESS +10 CLASS DISC ENTER TOP MENU TUNE ST ST ... automatically starts after pressing ENTER. An on-screen display (OSD) appears on your TV. Use and ENTER on the remote control to navigate through Surround back speaker setting on the remote control, then press the SETUP button. USB MCACC/ AUDIO IN DOWN MASTER VOLUME UP If you have a tripod, ...

User Manual
Page 24
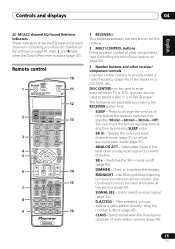
... signal. 4 2 PRO LOGIC IIx 2 PRO LOGIC II lights to indicate Pro Logic II decoding. 2 PRO LOGIC IIx lights to indicate Pro Logic IIx decoding (see Remote control below). 10 Tuner indicators - Lights when a broadcast is detected. 21 Master volume level Shows the overall volume level. 24 En RDS - Lights when a Dolby...
... signal. 4 2 PRO LOGIC IIx 2 PRO LOGIC II lights to indicate Pro Logic II decoding. 2 PRO LOGIC IIx lights to indicate Pro Logic IIx decoding (see Remote control below). 10 Tuner indicators - Lights when a broadcast is detected. 21 Master volume level Shows the overall volume level. 24 En RDS - Lights when a Dolby...
User Manual
Page 25
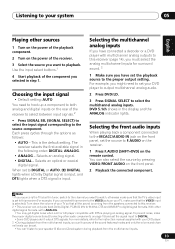
... analog input signal to movie soundtracks at low volume (page 32). MIDNIGHT - Use Midnight when listening to prevent distortion. Remote control 10 RECEIVER INPUT SELECT 1 SOURCE 11 AUDIO/VIDEO PRE-PROGRAMMED REMOTE CONTROL UNIT 12 F.AUDIO DVD TV DVR TVCTRL 2 CD-R/TAPE USB CD FM AM RECEIVER 13 SLEEP SB ch ANALOG...
... analog input signal to movie soundtracks at low volume (page 32). MIDNIGHT - Use Midnight when listening to prevent distortion. Remote control 10 RECEIVER INPUT SELECT 1 SOURCE 11 AUDIO/VIDEO PRE-PROGRAMMED REMOTE CONTROL UNIT 12 F.AUDIO DVD TV DVR TVCTRL 2 CD-R/TAPE USB CD FM AM RECEIVER 13 SLEEP SB ch ANALOG...

User Manual
Page 27
...(page 10). See Selecting preset codes directly on page 52. DIRECT F - See Direct function on page 51. See Erasing all of the remote control presets on page 51. Also use this ). 12 Character display (LCD) This display shows information when transmitting control signals. You can then ...Press to select a channel, then use +/- Press for more on page 50): SETUP - RESET - READ ID - Also adjusts the level of remote control The remote control may not work properly if: • There are shown when you choose the options below. Use to access the DVR controls (above the...
...(page 10). See Selecting preset codes directly on page 52. DIRECT F - See Direct function on page 51. See Erasing all of the remote control presets on page 51. Also use this ). 12 Character display (LCD) This display shows information when transmitting control signals. You can then ...Press to select a channel, then use +/- Press for more on page 50): SETUP - RESET - READ ID - Also adjusts the level of remote control The remote control may not work properly if: • There are shown when you choose the options below. Use to access the DVR controls (above the...
User Manual
Page 33
... component. This is selected). DVD 5.1ch shows in the following order: DIGITAL; You can also select the source by pressing VIDEO/FRONT AUDIO on the remote control. To prevent noise, make the proper digital connections (Connecting other audio components on your source is the TV's built-in step 1. Note 1 If your...
... component. This is selected). DVD 5.1ch shows in the following order: DIGITAL; You can also select the source by pressing VIDEO/FRONT AUDIO on the remote control. To prevent noise, make the proper digital connections (Connecting other audio components on your source is the TV's built-in step 1. Note 1 If your...
User Manual
Page 34
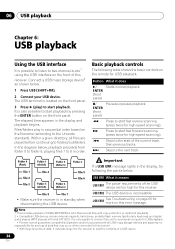
The USB terminal is located on the remote for this error message. Basic playback controls The following the points below: USB ERR What it may occur when connected to the next track. In ...; Press to start fast reverse scanning (press twice for high-speed scanning). Press to start fast forward scanning (press twice for USB playback. • Pioneer cannot guarantee compatibility (operation and/or bus power) with copy-protection or restricted playback). 2 • Compatible USB devices include external magnetic hard drives, portable flash...
The USB terminal is located on the remote for this error message. Basic playback controls The following the points below: USB ERR What it may occur when connected to the next track. In ...; Press to start fast reverse scanning (press twice for high-speed scanning). Press to start fast forward scanning (press twice for USB playback. • Pioneer cannot guarantee compatibility (operation and/or bus power) with copy-protection or restricted playback). 2 • Compatible USB devices include external magnetic hard drives, portable flash...
User Manual
Page 36
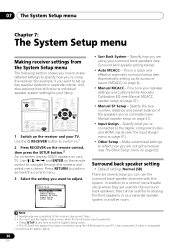
...T.EDIT RETURN TV VOL INPUT SELECT TV CH VOL 1 Switch on your TV. Use the RECEIVER button to switch on.1 2 Press RECEIVER on the remote control, then press the SETUP button.2 An on-screen display (OSD) appears on the receiver and your TV. System Setup 1.Surr Back System 2.Auto MCACC...can use the System Setup menu when the Front Audio input is a quick and effective automatic surround setup (see The Other Setup menu on the remote control to navigate through the screens and select menu items. Press RETURN to confirm and exit the current menu. 3 Select the setting you want ...
...T.EDIT RETURN TV VOL INPUT SELECT TV CH VOL 1 Switch on your TV. Use the RECEIVER button to switch on.1 2 Press RECEIVER on the remote control, then press the SETUP button.2 An on-screen display (OSD) appears on the receiver and your TV. System Setup 1.Surr Back System 2.Auto MCACC...can use the System Setup menu when the Front Audio input is a quick and effective automatic surround setup (see The Other Setup menu on the remote control to navigate through the screens and select menu items. Press RETURN to confirm and exit the current menu. 3 Select the setting you want ...
User Manual
Page 44
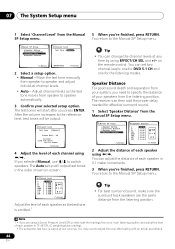
... C [ 0.0dB ] R [ 0.0dB ] RS [ 0.0dB ] SBR [ 0.0dB ] SBL [ 0.0dB ] LS [ 0.0dB ] SW [ 0.0dB ] :Finish Adjust the level of each speaker in the order shown on the remote control. The test tones will be output. 4c.Channel Level Test Tone [ Manual ] Please Wait . . .20 Caution! 07 The System Setup menu 1 Select 'Channel Level...
... C [ 0.0dB ] R [ 0.0dB ] RS [ 0.0dB ] SBR [ 0.0dB ] SBL [ 0.0dB ] LS [ 0.0dB ] SW [ 0.0dB ] :Finish Adjust the level of each speaker in the order shown on the remote control. The test tones will be output. 4c.Channel Level Test Tone [ Manual ] Please Wait . . .20 Caution! 07 The System Setup menu 1 Select 'Channel Level...
User Manual
Page 45
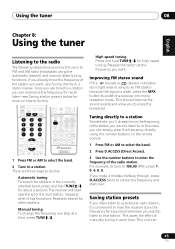
... the frequency of the radio station. Once you want to listen to. High speed tuning Press and hold TUNE/ for more on the remote control. 1 Press FM or AM to select the band. 2 Press D.ACCESS (Direct Access). 3 Use the number buttons to enter the frequency of the station you...
... the frequency of the radio station. Once you want to listen to. High speed tuning Press and hold TUNE/ for more on the remote control. 1 Press FM or AM to select the band. 2 Press D.ACCESS (Direct Access). 3 Use the number buttons to enter the frequency of the station you...

User Manual
Page 46
... En 08 Using the tuner memorize up to four characters long. • Use the MULTI JOG dial (front panel) or the ST/ buttons (remote) to select characters. • Press ENTER to confirm a character. Press repeatedly to cycle through classes A, B and C. 2 Press ST/ to... station presets For easier identification, you can name your station presets. 1 Choose the station preset you can also use the number buttons on the remote control to a station you want . Choose a name up to 30 stations, stored in which the station is also stored.1 1 Tune to recall...
... En 08 Using the tuner memorize up to four characters long. • Use the MULTI JOG dial (front panel) or the ST/ buttons (remote) to select characters. • Press ENTER to confirm a character. Press repeatedly to cycle through classes A, B and C. 2 Press ST/ to... station presets For easier identification, you can name your station presets. 1 Choose the station preset you can also use the number buttons on the remote control to a station you want . Choose a name up to 30 stations, stored in which the station is also stored.1 1 Tune to recall...
User Manual
Page 49
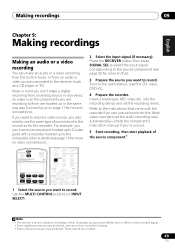
... on video connections). Insert a blank tape, MD, video etc. RECEIVER INPUT SELECT SOURCE SLEEP SR+ SB ch DIMMER ANALOG ATT MIDNIGHT AUDIO/VIDEO PRE-PROGRAMMED REMOTE CONTROL UNIT SIGNAL SEL D.ACCESS +10 CLASS DISC ENTER F.AUDIO DVD TV CD-R/TAPE USB CD FM SLEEP DVR TVCTRL AM RECEIVER h ANALOG TOP MENU...
... on video connections). Insert a blank tape, MD, video etc. RECEIVER INPUT SELECT SOURCE SLEEP SR+ SB ch DIMMER ANALOG ATT MIDNIGHT AUDIO/VIDEO PRE-PROGRAMMED REMOTE CONTROL UNIT SIGNAL SEL D.ACCESS +10 CLASS DISC ENTER F.AUDIO DVD TV CD-R/TAPE USB CD FM SLEEP DVR TVCTRL AM RECEIVER h ANALOG TOP MENU...
User Manual
Page 50
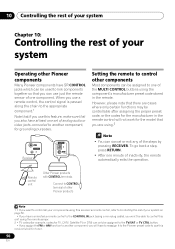
...system Operating other components Most components can be assigned to one component. OUT CONTROL IN Receiver CONTROL IN OUT Setting the remote to control other Pioneer components Many Pioneer components have SR CONTROL jacks which can be used to link components together so that you can use this unit using...only certain functions may be controllable after assigning the proper preset code, or the codes for the manufacturer in the remote control will have to reassign it to the Pioneer preset code to use this receiver's built-in tuner. 50 En 10 Controlling the rest of your system Chapter ...
...system Operating other components Most components can be assigned to one component. OUT CONTROL IN Receiver CONTROL IN OUT Setting the remote to control other Pioneer components Many Pioneer components have SR CONTROL jacks which can be used to link components together so that you can use this unit using...only certain functions may be controllable after assigning the proper preset code, or the codes for the manufacturer in the remote control will have to reassign it to the Pioneer preset code to use this receiver's built-in tuner. 50 En 10 Controlling the rest of your system Chapter ...
User Manual
Page 51
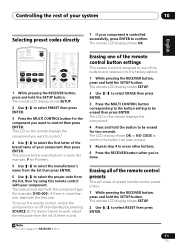
... ENTER. 3 Press the MULTI CONTROL button corresponding to the button setting to select RESET then press ENTER. The remote LCD display shows OK. TUNE 3 Press the MULTI CONTROL button for Pioneer). 5 Use / to select the manufacturer's name from the list then press ENTER. 6 Use ...;/ to select the proper code from the list (if there is one . Erasing one of the remote control button settings This erases a control ...
... ENTER. 3 Press the MULTI CONTROL button corresponding to the button setting to select RESET then press ENTER. The remote LCD display shows OK. TUNE 3 Press the MULTI CONTROL button for Pioneer). 5 Use / to select the manufacturer's name from the list then press ENTER. 6 Use ...;/ to select the proper code from the list (if there is one . Erasing one of the remote control button settings This erases a control ...

User Manual
Page 52
... 3 Press the MULTI CONTROL button of your receiver to switch direct function ON or OFF then press ENTER. Note 1 You can operate the remote control without affecting the receiver.1 1 While pressing the RECEIVER button, press and hold the SETUP button. The LCD shows OK to confirm the ... 10 Controlling the rest of the component for three seconds. When you turn direct function off, you continue to listen to a CD on the remote displays the component you select (using your system 3 Press and hold the SETUP button. When direct function is assigned to a MULTI CONTROL button....
... 3 Press the MULTI CONTROL button of your receiver to switch direct function ON or OFF then press ENTER. Note 1 You can operate the remote control without affecting the receiver.1 1 While pressing the RECEIVER button, press and hold the SETUP button. The LCD shows OK to confirm the ... 10 Controlling the rest of the component for three seconds. When you turn direct function off, you continue to listen to a CD on the remote displays the component you select (using your system 3 Press and hold the SETUP button. When direct function is assigned to a MULTI CONTROL button....

User Manual
Page 53
...). Cable TV/Satellite TV/TV SOURCE Press to switch the component assigned to the TV CTRL Cable TV/Satellite TV/TV button on the remote control are dedicated to control the TV assigned to select a specific TV channel. Selects channels. Cable TV/Satellite TV/TV Switches TEXT OFF for...the TV CTRL button. Controlling the rest of your system 10 English Deutsch Français Italiano Nederlands Español Controls for TVs This remote control can control components after entering the proper codes or teaching the receiver the commands (see Controlling the rest of your system on page ...
...). Cable TV/Satellite TV/TV SOURCE Press to switch the component assigned to the TV CTRL Cable TV/Satellite TV/TV button on the remote control are dedicated to control the TV assigned to select a specific TV channel. Selects channels. Cable TV/Satellite TV/TV Switches TEXT OFF for...the TV CTRL button. Controlling the rest of your system 10 English Deutsch Français Italiano Nederlands Español Controls for TVs This remote control can control components after entering the proper codes or teaching the receiver the commands (see Controlling the rest of your system on page ...

User Manual
Page 54
... (SHIFT+) button must be pressed twice to select or adjust and navigate items on the menu ENTER screen. TV Controls for other components This remote control can control these components after entering the proper codes or teaching the receiver the commands (see Controlling the rest of your system Button(s) Function...
... (SHIFT+) button must be pressed twice to select or adjust and navigate items on the menu ENTER screen. TV Controls for other components This remote control can control these components after entering the proper codes or teaching the receiver the commands (see Controlling the rest of your system Button(s) Function...


