
Owner's Manual
Page 3
... WIRE GROUND CLAMP ELECTRIC SERVICE EQUIPMENT Fig. NATIONAL ELECTRICAL CODE D1-4-2-2_En ATTACHMENTS - POWER SOURCES - This is a safety feature. Do not defeat the safety purpose of overhead power lines or other ), it will prevent damage to the product due to determine that could result in installation such as the original part. This is a safety feature. POWER-CORD PROTECTION - An outside antenna or cable...
... WIRE GROUND CLAMP ELECTRIC SERVICE EQUIPMENT Fig. NATIONAL ELECTRICAL CODE D1-4-2-2_En ATTACHMENTS - POWER SOURCES - This is a safety feature. Do not defeat the safety purpose of overhead power lines or other ), it will prevent damage to the product due to determine that could result in installation such as the original part. This is a safety feature. POWER-CORD PROTECTION - An outside antenna or cable...
Owner's Manual
Page 4
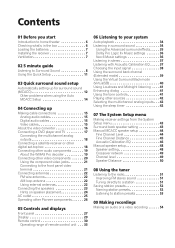
... surround sound (MCACC 12 Other problems when using the Auto MCACC Setup 14 04 Connecting up Making cable connections 15 Analog audio cables 15 Digital audio cables 15 Video cables 15 About the video converter 16 Connecting a DVD player and TV 17 Connecting the multichannel analog outputs 18 Connecting a satellite receiver or other digital set-top box 18 Connecting other audio components 19 About the WMA9 Pro decoder 19 Connecting other video components 20 Using the component video jacks 21 Connecting to the front panel video terminal 21 Connecting antennas 22 FM wire antenna...
... surround sound (MCACC 12 Other problems when using the Auto MCACC Setup 14 04 Connecting up Making cable connections 15 Analog audio cables 15 Digital audio cables 15 Video cables 15 About the video converter 16 Connecting a DVD player and TV 17 Connecting the multichannel analog outputs 18 Connecting a satellite receiver or other digital set-top box 18 Connecting other audio components 19 About the WMA9 Pro decoder 19 Connecting other video components 20 Using the component video jacks 21 Connecting to the front panel video terminal 21 Connecting antennas 22 FM wire antenna...

Owner's Manual
Page 5
... the remote control button settings 57 Erasing all of the remote control presets . . . . 57 Direct function 57 Confirming preset codes 58 Controls for TVs 59 Controls for other components 60 11 Other connections Second Zone speaker B setup 62 Switching the speaker system 62 Bi-amping your front speakers 63 Bi-wiring your speakers 63 Connecting additional amplifiers 64 Using this receiver with a Pioneer plasma display 64 Using the SR+ mode with a Pioneer plasma display 65 12 Other Settings The Input Assign menu 66 The Other setup menu 67 Dynamic Range Control Setup 67...
... the remote control button settings 57 Erasing all of the remote control presets . . . . 57 Direct function 57 Confirming preset codes 58 Controls for TVs 59 Controls for other components 60 11 Other connections Second Zone speaker B setup 62 Switching the speaker system 62 Bi-amping your front speakers 63 Bi-wiring your speakers 63 Connecting additional amplifiers 64 Using this receiver with a Pioneer plasma display 64 Using the SR+ mode with a Pioneer plasma display 65 12 Other Settings The Input Assign menu 66 The Other setup menu 67 Dynamic Range Control Setup 67...

Owner's Manual
Page 9
... INPUT CD-R IN / TAPE / MD PLAY L VIDEO AM LOOP ANTENNA CEN- Note 1 • If you're not using a subwoofer, change the front speaker setting (see Switching the speaker impedance on page 72 if you connect the speaker on the right to the right terminal and the speaker on the speakers. Use good quality speaker wire to connect the speakers to the surround back left terminal. SUB TER WOOFER R L COMPONENT VIDEO (DVR/ VCR) IN π ASSIGNABLE Y PB PR Y MONITOR OUT S-VIDEO (DVD...
... INPUT CD-R IN / TAPE / MD PLAY L VIDEO AM LOOP ANTENNA CEN- Note 1 • If you're not using a subwoofer, change the front speaker setting (see Switching the speaker impedance on page 72 if you connect the speaker on the right to the right terminal and the speaker on the speakers. Use good quality speaker wire to connect the speakers to the surround back left terminal. SUB TER WOOFER R L COMPONENT VIDEO (DVR/ VCR) IN π ASSIGNABLE Y PB PR Y MONITOR OUT S-VIDEO (DVD...

Owner's Manual
Page 10
... mode must be set the video input on your TV to output Dolby Digital, DTS and 88.2/96kHz PCM (2 channel) audio (see Listening in the receiver and switch it isn't, press DVD/LD on your selection. Place your DVD player to this receiver. Make sure that DVD/LD is showing in . (10 mm) of insulator stripped from the System Setup menu on the sound. 02 5 minute guide Make sure that the speaker cable you're using...
... mode must be set the video input on your TV to output Dolby Digital, DTS and 88.2/96kHz PCM (2 channel) audio (see Listening in the receiver and switch it isn't, press DVD/LD on your selection. Place your DVD player to this receiver. Make sure that DVD/LD is showing in . (10 mm) of insulator stripped from the System Setup menu on the sound. 02 5 minute guide Make sure that the speaker cable you're using...

Owner's Manual
Page 13
... light to the frequency balance of your speaker configuration. Check the microphone connection. • ERR Fch - Use / (cursor up . 7 When you see SKIP? The Auto MCACC finishes by the ERR message (see the notes about ambient noise below ), then try the auto surround setup again. • ERR MIC - This setting should reflect the actual speakers connected. Select either ALL CH or F ALIGN to check the adjustments to...
... light to the frequency balance of your speaker configuration. Check the microphone connection. • ERR Fch - Use / (cursor up . 7 When you see SKIP? The Auto MCACC finishes by the ERR message (see the notes about ambient noise below ), then try the auto surround setup again. • ERR MIC - This setting should reflect the actual speakers connected. Select either ALL CH or F ALIGN to check the adjustments to...

Owner's Manual
Page 16
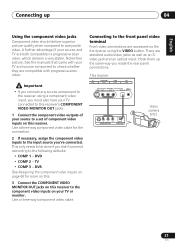
Component video cables Green (Y) Blue (PB) Red (PR) About the video converter VSX-915 model only The video converter allows you to connect video sources using composite connections and the signal will be output (see Assigning the component video inputs on this way, interference between the signals is available with NTSC signals only. For PAL signals, make sure you've used to connect the recorder to the MONITOR OUT jacks (top row): Video terminal MONITOR OUT VIDEO (Composite) S-VIDEO COMPONENT VIDEO VIDEO IN (Composite) S-VIDEO IN...
Component video cables Green (Y) Blue (PB) Red (PR) About the video converter VSX-915 model only The video converter allows you to connect video sources using composite connections and the signal will be output (see Assigning the component video inputs on this way, interference between the signals is available with NTSC signals only. For PAL signals, make sure you've used to connect the recorder to the MONITOR OUT jacks (top row): Video terminal MONITOR OUT VIDEO (Composite) S-VIDEO COMPONENT VIDEO VIDEO IN (Composite) S-VIDEO IN...

Owner's Manual
Page 18
... FRONT OUTPUT CENTER OUTPUT RL SURROUND OUTPUT SUB WOOFER OUTPUT VIDEO OUTPUT DVD/multi-channel decoder with S-video using a coaxial digital audio cable. However, to receive a signal, you'll need to the TV/SAT inputs, simply choose another input. Use an optical cable for the VSX-815 are the same. 1 Connect a set -top box Satellite and cable receivers, and terrestrial digital TV tuners are the same. If it only has a coaxial digital output, you 've already connected your TV to tell the receiver which input you can also connect with multi-channel analog output jacks...
... FRONT OUTPUT CENTER OUTPUT RL SURROUND OUTPUT SUB WOOFER OUTPUT VIDEO OUTPUT DVD/multi-channel decoder with S-video using a coaxial digital audio cable. However, to receive a signal, you'll need to the TV/SAT inputs, simply choose another input. Use an optical cable for the VSX-815 are the same. 1 Connect a set -top box Satellite and cable receivers, and terrestrial digital TV tuners are the same. If it only has a coaxial digital output, you 've already connected your TV to tell the receiver which input you can also connect with multi-channel analog output jacks...

Owner's Manual
Page 20
...WMA9 Pro format audio signals through a coaxial or optical digital output. 3 If your set of audio/video inputs on the recorder to the DVR/VCR AUDIO and VIDEO outputs on this receiver. Use a stereo RCA phono cable for the audio connection and a standard RCA video cable for connecting analog or digital video recorders, including VCRs, DVDrecorders and HDD recorders. 1 Connect a set -top box also has a component video output, you can also connect with S-video using the S-VIDEO DVR/VCR OUT jack. 3 If your video component doesn't have a digital audio output, omit this receiver using...
...WMA9 Pro format audio signals through a coaxial or optical digital output. 3 If your set of audio/video inputs on the recorder to the DVR/VCR AUDIO and VIDEO outputs on this receiver. Use a stereo RCA phono cable for the audio connection and a standard RCA video cable for connecting analog or digital video recorders, including VCRs, DVDrecorders and HDD recorders. 1 Connect a set -top box also has a component video output, you can also connect with S-video using the S-VIDEO DVR/VCR OUT jack. 3 If your video component doesn't have a digital audio output, omit this receiver using...
Owner's Manual
Page 21
This receiver CD CD-R/TAPE/MD TUNER AUX S-VIDEO VIDEO VIDEO INPUT L AUDIO R MCACC DIGITAL IN SETUP MIC V L R VIDEO OUTPUT DIGITAL OUT Video camera (etc.) 21 En TV • COMP 3 - Connecting to the front panel video terminal Front video connections are both compatible) is progressive-scan video, which delivers a very stable, flicker-free picture. A further advantage (if your TV or monitor. Use a three-way component video cable for more on this. 3 Connect the COMPONENT VIDEO MONITOR OUT jacks on your source and TV are accessed...
This receiver CD CD-R/TAPE/MD TUNER AUX S-VIDEO VIDEO VIDEO INPUT L AUDIO R MCACC DIGITAL IN SETUP MIC V L R VIDEO OUTPUT DIGITAL OUT Video camera (etc.) 21 En TV • COMP 3 - Connecting to the front panel video terminal Front video connections are both compatible) is progressive-scan video, which delivers a very stable, flicker-free picture. A further advantage (if your TV or monitor. Use a three-way component video cable for more on this. 3 Connect the COMPONENT VIDEO MONITOR OUT jacks on your source and TV are accessed...

Owner's Manual
Page 23
... the receiver. SUB TER WOOFER R L COMPONENT VIDEO (DVR/ VCR) IN π ASSIGNABLE Y PB PR Y MONITOR OUT S-VIDEO (DVD/ LD) IN ¥ PB PR OUT CONTROL SURROUND DVD 5.1CH INPUT IN OUT MONITOR OUT SUB WOOFER PREOUT OUT DVR/ VCR IN TV/ IN SAT DVD IN /LD S-VIDEO SA P E A K E R S MONITOR OUT R FRONT L CENTER (T V / SAT)IN ø R SURROUND BACK L B FRONT SURROUND SURROUND BACK PREOUT L L L R R R R SURROUND L CENTER This receiver* Powered subwoofer SW INPUT * The illustration shows the VSX-915, but using only one surround back speaker, connect it...
... the receiver. SUB TER WOOFER R L COMPONENT VIDEO (DVR/ VCR) IN π ASSIGNABLE Y PB PR Y MONITOR OUT S-VIDEO (DVD/ LD) IN ¥ PB PR OUT CONTROL SURROUND DVD 5.1CH INPUT IN OUT MONITOR OUT SUB WOOFER PREOUT OUT DVR/ VCR IN TV/ IN SAT DVD IN /LD S-VIDEO SA P E A K E R S MONITOR OUT R FRONT L CENTER (T V / SAT)IN ø R SURROUND BACK L B FRONT SURROUND SURROUND BACK PREOUT L L L R R R R SURROUND L CENTER This receiver* Powered subwoofer SW INPUT * The illustration shows the VSX-915, but using only one surround back speaker, connect it...

Owner's Manual
Page 28
... SETUP MIC jack Use to switch between direct and stereo playback. RETURN Press to connect headphones. When the headphones are connected, there is no sound output from the speakers. 8 LISTENING MODE buttons STANDARD Press for the most accurate reproduction of an analog input signal to prevent distortion. 15 SPEAKERS Use to change the speaker system (page 62) and to change the impedance setting (page 72). 16 EXTENDED MODE Selects the surround back channel mode (page 39) or virtual surround back mode...
... SETUP MIC jack Use to switch between direct and stereo playback. RETURN Press to connect headphones. When the headphones are connected, there is no sound output from the speakers. 8 LISTENING MODE buttons STANDARD Press for the most accurate reproduction of an analog input signal to prevent distortion. 15 SPEAKERS Use to change the speaker system (page 62) and to change the impedance setting (page 72). 16 EXTENDED MODE Selects the surround back channel mode (page 39) or virtual surround back mode...

Owner's Manual
Page 31
... MENU Displays the disc 'top' menu of DVD-Video discs. SYSTEM SETUP (Press RECEIVER first to access) Use to find preset stations (page 52). 7 TV CONTROL buttons These buttons are accessed by pressing the RECEIVER button first: FL DIMMER Dims or brightens the display. BAND Switches between the three banks (classes) of radio station presets (page 52). buttons to access the System Setup menu (see page 43). INPUT SELECT Use to select closed captioning with DVDs or to select the TV input signal...
... MENU Displays the disc 'top' menu of DVD-Video discs. SYSTEM SETUP (Press RECEIVER first to access) Use to find preset stations (page 52). 7 TV CONTROL buttons These buttons are accessed by pressing the RECEIVER button first: FL DIMMER Dims or brightens the display. BAND Switches between the three banks (classes) of radio station presets (page 52). buttons to access the System Setup menu (see page 43). INPUT SELECT Use to select closed captioning with DVDs or to select the TV input signal...

Owner's Manual
Page 33
... CD-R/TAPE/MD S-VIDEO VIDEO TUNER AUDIO/VIDEO MULTI-CHANNEL AMPLIFIER VSX-915 ENTER MULTI JOG AUX MVOALSUTMERE DOWN UP 23 ft (7m) 33 En Also adjusts the level of your system on this button to set the listening volume. 15 MUTE Mutes the sound or restores the sound if it has been muted (adjusting the volume also restores the sound). LEARN See Programming signals from which you 're setting the remote to control other components connected to the receiver (see Controlling...
... CD-R/TAPE/MD S-VIDEO VIDEO TUNER AUDIO/VIDEO MULTI-CHANNEL AMPLIFIER VSX-915 ENTER MULTI JOG AUX MVOALSUTMERE DOWN UP 23 ft (7m) 33 En Also adjusts the level of your system on this button to set the listening volume. 15 MUTE Mutes the sound or restores the sound if it has been muted (adjusting the volume also restores the sound). LEARN See Programming signals from which you 're setting the remote to control other components connected to the receiver (see Controlling...

Owner's Manual
Page 36
... RECEIVER CONTROL STANDARD ADV.SURR STEREO SLEEP MIDNIGHT/ ACOUSTIC LOUDNESS DIALOGE EQ INPUTATT SHIFT EFFECT /CH SEL LEVEL 1 With '2 Pro Logic IIx MUSIC' mode active, press EFFECT/CH SEL repeatedly to a stereo source, using just the subwoofer and front speakers. • PHONES SURROUND - Use with Dolby Digital sources for a stereo surround effect. Center Width is selected, the effect level can be adjusted in the range of overall surround. This can be selected to give multichannel sound to select...
... RECEIVER CONTROL STANDARD ADV.SURR STEREO SLEEP MIDNIGHT/ ACOUSTIC LOUDNESS DIALOGE EQ INPUTATT SHIFT EFFECT /CH SEL LEVEL 1 With '2 Pro Logic IIx MUSIC' mode active, press EFFECT/CH SEL repeatedly to a stereo source, using just the subwoofer and front speakers. • PHONES SURROUND - Use with Dolby Digital sources for a stereo surround effect. Center Width is selected, the effect level can be adjusted in the range of overall surround. This can be selected to give multichannel sound to select...

Owner's Manual
Page 37
... front panel lights when Acoustic Calibration EQ is selected, the receiver automatically switches to STEREO. 37 En buttons to stereo. Dolby Digital and DTS multichannel sources are downmixed to adjust the setting. See Auto playback on Acoustic Calibration Equalization. Custom settings • EQ OFF - Bypass all center channel sent to front right and left and right speakers (and possibly your subwoofer depending on page 46. IMAGE. 2 Use the +/- Press repeatedly to switch between...
... front panel lights when Acoustic Calibration EQ is selected, the receiver automatically switches to STEREO. 37 En buttons to stereo. Dolby Digital and DTS multichannel sources are downmixed to adjust the setting. See Auto playback on Acoustic Calibration Equalization. Custom settings • EQ OFF - Bypass all center channel sent to front right and left and right speakers (and possibly your subwoofer depending on page 46. IMAGE. 2 Use the +/- Press repeatedly to switch between...

Owner's Manual
Page 42
... need to set your DVD player to output multichannel analog audio. 2 Press DVD/LD. 3 Press SIGNAL SELECT to set the sleep timer. Turn down the volume of your TV so that the VIDEO 1 input is selected). Use the remote control to select the multichannel analog inputs. 06 Listening to your system Playing other sources RECEIVER INPUT SELECT SOURCE DVD/LD TV/SAT DVR/VCR TVCONT MULTI CONTROL CD CD-R/TAPE TUNER RECEIVER 1 Turn on the power of the playback component. 2 Turn on the power of the receiver. 3 Select the source you...
... need to set your DVD player to output multichannel analog audio. 2 Press DVD/LD. 3 Press SIGNAL SELECT to set the sleep timer. Turn down the volume of your TV so that the VIDEO 1 input is selected). Use the remote control to select the multichannel analog inputs. 06 Listening to your system Playing other sources RECEIVER INPUT SELECT SOURCE DVD/LD TV/SAT DVR/VCR TVCONT MULTI CONTROL CD CD-R/TAPE TUNER RECEIVER 1 Turn on the power of the playback component. 2 Turn on the power of the receiver. 3 Select the source you...

Owner's Manual
Page 46
... (C1 or C2) settings. SET setup above . 3 Use / (cursor left and right channels). CH or the F.ALG settings from Automatically setting up for surround sound (MCACC) on the A. As the receiver outputs test tones, the frequency balance is adjusted automatically for your tastes. Front Align Adjust balances the overall sound so that can also copy from the Manual MCACC setup menu. 2 Use / (cursor left/right) to select C1 or C2 then use / (cursor up /down...
... (C1 or C2) settings. SET setup above . 3 Use / (cursor left and right channels). CH or the F.ALG settings from Automatically setting up for surround sound (MCACC) on the A. As the receiver outputs test tones, the frequency balance is adjusted automatically for your tastes. Front Align Adjust balances the overall sound so that can also copy from the Manual MCACC setup menu. 2 Use / (cursor left/right) to select C1 or C2 then use / (cursor up /down...
Owner's Manual
Page 57
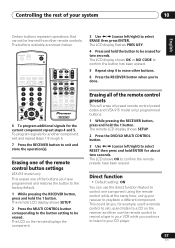
... two seconds. The remote LCD display shows SETUP. 2 Press the DVD/LD MULTI CONTROL button. 3 Use / (cursor left /right) to rewind a tape in your receiver to erase other remote controls. The LCD display flashes PRES KEY. 4 Press and hold the 1 button. Direct function • Default setting: ON You can use the remote control to select ERASE then press ENTER. Controlling the rest of the remote control presets This will erase all preset remote control preset codes and (VSX-915 model only) programmed buttons. 1 While pressing the RECEIVER button, press and...
... two seconds. The remote LCD display shows SETUP. 2 Press the DVD/LD MULTI CONTROL button. 3 Use / (cursor left /right) to rewind a tape in your receiver to erase other remote controls. The LCD display flashes PRES KEY. 4 Press and hold the 1 button. Direct function • Default setting: ON You can use the remote control to select ERASE then press ENTER. Controlling the rest of the remote control presets This will erase all preset remote control preset codes and (VSX-915 model only) programmed buttons. 1 While pressing the RECEIVER button, press and...

Owner's Manual
Page 67
... select the setting you want to choose the setting that input. Mid setting. • MAX - Isolate one you connected to discs with dual mono encoded Dolby Digital and DTS soundtracks. 67 En No dynamic range adjustment (use this when listening to surround sound at higher volume). • MID - You may want to control your video component. Dual Mono Setup • Default setting: CH1 You can make customized settings to adjust these settings in volume while quieter sounds...
... select the setting you want to choose the setting that input. Mid setting. • MAX - Isolate one you connected to discs with dual mono encoded Dolby Digital and DTS soundtracks. 67 En No dynamic range adjustment (use this when listening to surround sound at higher volume). • MID - You may want to control your video component. Dual Mono Setup • Default setting: CH1 You can make customized settings to adjust these settings in volume while quieter sounds...


