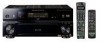
Owner's Manual
Page 3
... hazards. OVERLOADING - for long periods of time, unplug it will often require extensive work by the operating instructions as contact with a polishing cloth or a soft dry cloth. NO USER-SERVICEABLE PARTS INSIDE. POWER-CORD PROTECTION - ANTENNA LEAD IN WIRE GROUND CLAMP ELECTRIC SERVICE EQUIPMENT Fig. D1-4-2-3_En IMPORTANT SAFETY INSTRUCTIONS READ INSTRUCTIONS - The product should still fail to fit, contact your electrician to qualified...
... hazards. OVERLOADING - for long periods of time, unplug it will often require extensive work by the operating instructions as contact with a polishing cloth or a soft dry cloth. NO USER-SERVICEABLE PARTS INSIDE. POWER-CORD PROTECTION - ANTENNA LEAD IN WIRE GROUND CLAMP ELECTRIC SERVICE EQUIPMENT Fig. D1-4-2-3_En IMPORTANT SAFETY INSTRUCTIONS READ INSTRUCTIONS - The product should still fail to fit, contact your electrician to qualified...
Owner's Manual
Page 4
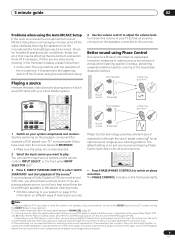
...Problems when using the Auto MCACC Setup . . . . . 9 Playing a source 9 Better sound using Phase Control 9 03 Connecting your equipment Rear panel 10 When making cable connections 11 About the video converter 11 Connecting your TV and DVD player 12 Connecting a satellite/cable receiver or other set-top box 13 Connecting a DVD/HDD recorder, VCR and other video sources 13 Using the component video jacks 14 Connecting digital audio sources 15 About the WMA9 Pro decoder 15 Connecting analog audio sources 16 Connecting a component to the front panel inputs . . 16 Installing your speaker...
...Problems when using the Auto MCACC Setup . . . . . 9 Playing a source 9 Better sound using Phase Control 9 03 Connecting your equipment Rear panel 10 When making cable connections 11 About the video converter 11 Connecting your TV and DVD player 12 Connecting a satellite/cable receiver or other set-top box 13 Connecting a DVD/HDD recorder, VCR and other video sources 13 Using the component video jacks 14 Connecting digital audio sources 15 About the WMA9 Pro decoder 15 Connecting analog audio sources 16 Connecting a component to the front panel inputs . . 16 Installing your speaker...
Owner's Manual
Page 5
... Programming signals from other remote controls . . 71 Connecting your XM Radio receiver 48 Erasing one of the remote control button settings . . 72 Listening to XM Radio 49 Resetting the remote control presets 72 Using XM HD Surround 49 Confirming preset codes 72 Saving channel presets 49 Renaming input source names 73 Using the XM Menu 50 Direct function 73 Connecting using HDMI 50 Multi Operation and System Off 73 About HDMI 51 Programming a multi-operation or a shutdown Using the i.LINK interface 51 sequence 73 Checking the i.LINK inputs 52 Using multi operations...
... Programming signals from other remote controls . . 71 Connecting your XM Radio receiver 48 Erasing one of the remote control button settings . . 72 Listening to XM Radio 49 Resetting the remote control presets 72 Using XM HD Surround 49 Confirming preset codes 72 Saving channel presets 49 Renaming input source names 73 Using the XM Menu 50 Direct function 73 Connecting using HDMI 50 Multi Operation and System Off 73 About HDMI 51 Programming a multi-operation or a shutdown Using the i.LINK interface 51 sequence 73 Checking the i.LINK inputs 52 Using multi operations...

Owner's Manual
Page 8
... the instructions on bi-amping your TV. If selecting RETRY doesn't work, turn off the power and check the speaker connections. Press RETURN to go back to the System Setup menu.7 The settings made in the OSD. Simply choose an unused preset for different listening positions. You can rename it is also possible to adjust these settings manually using the System Setup menu (starting on -screen while the receiver outputs test tones to Surround Sound...
... the instructions on bi-amping your TV. If selecting RETRY doesn't work, turn off the power and check the speaker connections. Press RETURN to go back to the System Setup menu.7 The settings made in the OSD. Simply choose an unused preset for different listening positions. You can rename it is also possible to adjust these settings manually using the System Setup menu (starting on -screen while the receiver outputs test tones to Surround Sound...
Owner's Manual
Page 9
... the digital audio output settings on the remote control, INPUT SELECT, or the front panel INPUT SELECTOR dial.2 3 Press S. It should hear surround sound. Start by switching on the playback component (for example a DVD player), your TV1 and subwoofer (if you connected this receiver. You can use of the sound signal. PHOTO STATUS SIGNAL SEL SBch STEREO MULTI OPE THX STANDARD ADV. SURR SHIFT PHASE MCACC S.DIRECT • Press PHASE (PHASE CONTROL) to switch on the front panel lights. In...
... the digital audio output settings on the remote control, INPUT SELECT, or the front panel INPUT SELECTOR dial.2 3 Press S. It should hear surround sound. Start by switching on the playback component (for example a DVD player), your TV1 and subwoofer (if you connected this receiver. You can use of the sound signal. PHOTO STATUS SIGNAL SEL SBch STEREO MULTI OPE THX STANDARD ADV. SURR SHIFT PHASE MCACC S.DIRECT • Press PHASE (PHASE CONTROL) to switch on the front panel lights. In...
Owner's Manual
Page 13
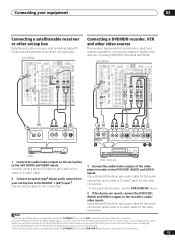
... F SUB W. Use a stereo RCA/phono jack audio cable for the audio connection and a video or S-video cable for the video connection. • For a second recorder, use the DVR/VCR2 IN inputs. 2 If the device can connect it to one of the video player/recorder to the DVR/VCR1 AUDIO and VIDEO inputs. VIDEO VIDEO COMPONENT VIDEO VIDEO R L AUDIO R SURR OUT CONTROL Connecting a DVD/HDD recorder, VCR and other set-top box Satellite and cable receivers, and terrestrial digital TV tuners are all examples of audio/video inputs and outputs suitable...
... F SUB W. Use a stereo RCA/phono jack audio cable for the audio connection and a video or S-video cable for the video connection. • For a second recorder, use the DVR/VCR2 IN inputs. 2 If the device can connect it to one of the video player/recorder to the DVR/VCR1 AUDIO and VIDEO inputs. VIDEO VIDEO COMPONENT VIDEO VIDEO R L AUDIO R SURR OUT CONTROL Connecting a DVD/HDD recorder, VCR and other set-top box Satellite and cable receivers, and terrestrial digital TV tuners are all examples of audio/video inputs and outputs suitable...
Owner's Manual
Page 21
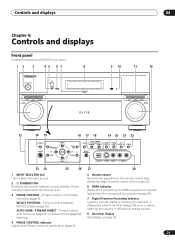
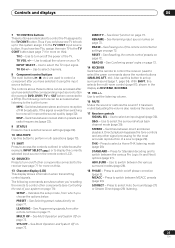
... to switch between on . 3 PHASE CONTROL - Controls and displays 04 Chapter 4: Controls and displays Front panel Illustration shows the VSX-84TXSi front panel 12 3 45 67 8 STANDBY/ON PHASE CONTROL PHASE CONTROL INPUT SELECTOR MCACC AUTO SURR/ POSITION STREAM DIRECT DIGITAL PRECISION PROCESSING 9 10 11 12 AUDIO/VIDEO MULTI-CHANNEL RECEIVER VSX-84TXSi HOME THX STANDARD SURROUND ADVANCED SURROUND MASTER VOLUME 13 14 15 16 17 18 19 20 21 22 SPEAKERS PHONES (TUNE +) AV PARAMETER (ST -) SETUP ENTER TUNER EDIT (ST +) RETURN BAND MULTI -
... to switch between on . 3 PHASE CONTROL - Controls and displays 04 Chapter 4: Controls and displays Front panel Illustration shows the VSX-84TXSi front panel 12 3 45 67 8 STANDBY/ON PHASE CONTROL PHASE CONTROL INPUT SELECTOR MCACC AUTO SURR/ POSITION STREAM DIRECT DIGITAL PRECISION PROCESSING 9 10 11 12 AUDIO/VIDEO MULTI-CHANNEL RECEIVER VSX-84TXSi HOME THX STANDARD SURROUND ADVANCED SURROUND MASTER VOLUME 13 14 15 16 17 18 19 20 21 22 SPEAKERS PHONES (TUNE +) AV PARAMETER (ST -) SETUP ENTER TUNER EDIT (ST +) RETURN BAND MULTI -
Owner's Manual
Page 24
... AUDIO SUBTITLE HDD DISP CH PHOTO STATUS SIGNAL SEL SBch DVD CH STEREO MULTI OPE THX STANDARD ADV. Press RECEIVER first to find radio frequencies and use SHIFT for INPUT SELECT ). 3 Input source buttons Press to select control of other components (see Controlling the rest of radio station presets (page 33). 5 Tuner/component control buttons/SETUP These button controls can access a radio station directly using the following controls: AV PARAMETER - Dims or brightens the display (page 68). CLASS - SETUP - RETURN - Use the TUNE / buttons to find preset stations...
... AUDIO SUBTITLE HDD DISP CH PHOTO STATUS SIGNAL SEL SBch DVD CH STEREO MULTI OPE THX STANDARD ADV. Press RECEIVER first to find radio frequencies and use SHIFT for INPUT SELECT ). 3 Input source buttons Press to select control of other components (see Controlling the rest of radio station presets (page 33). 5 Tuner/component control buttons/SETUP These button controls can access a radio station directly using the following controls: AV PARAMETER - Dims or brightens the display (page 68). CLASS - SETUP - RETURN - Use the TUNE / buttons to find preset stations...
Owner's Manual
Page 25
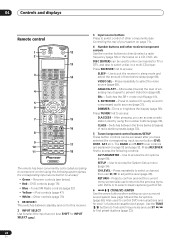
...). Switches between direct and stereo playback. Press to control other remote controls on page 71): SETUP - Use to select the surround/virtual back channel mode (page 30). LEARNING - MCACC - DISP - See Renaming input source names on page 73. Use to switch between named station presets and radio frequencies (page 33). 9 STATUS Press to check selected receiver settings (page 69). 10 MULTIOPE Use this selects the multi-room control (page 57), shown in tuner: MPX - Press to the receiver (see Controlling...
...). Switches between direct and stereo playback. Press to control other remote controls on page 71): SETUP - Use to select the surround/virtual back channel mode (page 30). LEARNING - MCACC - DISP - See Renaming input source names on page 73. Use to switch between named station presets and radio frequencies (page 33). 9 STATUS Press to check selected receiver settings (page 69). 10 MULTIOPE Use this selects the multi-room control (page 57), shown in tuner: MPX - Press to the receiver (see Controlling...
Owner's Manual
Page 30
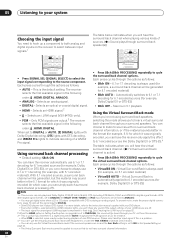
... CD player compatible with the THX, STEREO or Stream Direct modes. • You can choose to sources that do not have surround channel information. 30 En Each press cycles through the options as follows: • AUTO - Please select another input signal if this receiver. 3 • This is useful if you won't hear any sound if the output settings of sources. (ì=Sound plays through surround back speaker(s)) PHOTO STATUS SIGNAL SEL SBch STEREO MULTI OPE...
... CD player compatible with the THX, STEREO or Stream Direct modes. • You can choose to sources that do not have surround channel information. 30 En Each press cycles through the options as follows: • AUTO - Please select another input signal if this receiver. 3 • This is useful if you won't hear any sound if the output settings of sources. (ì=Sound plays through surround back speaker(s)) PHOTO STATUS SIGNAL SEL SBch STEREO MULTI OPE...
Owner's Manual
Page 35
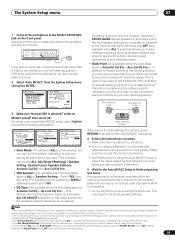
... the microphone at the reference point indicated on bi-amping your setup. ROOM & SOURCE/REC SEL CONTROL ON/OFF VIDEO SELECT SIGNAL SBch SELECT PROCESSING STEREO MCACC SETUP MIC VIDEO/GAME 2 INPUT DIGITAL IN S-VIDEO VIDEO L AUDIO R If you to save the FRONT ALIGN and/or OFF settings. 6 Switch the Multi-Point setting OFF if you switch on and the volume is turned up a separate speaker system in your front speakers, or setting up . • See Problems when using a subwoofer, it...
... the microphone at the reference point indicated on bi-amping your setup. ROOM & SOURCE/REC SEL CONTROL ON/OFF VIDEO SELECT SIGNAL SBch SELECT PROCESSING STEREO MCACC SETUP MIC VIDEO/GAME 2 INPUT DIGITAL IN S-VIDEO VIDEO L AUDIO R If you to save the FRONT ALIGN and/or OFF settings. 6 Switch the Multi-Point setting OFF if you switch on and the volume is turned up a separate speaker system in your front speakers, or setting up . • See Problems when using a subwoofer, it...

Owner's Manual
Page 58
... Input Setup menu on page 63) are available. You should have a pair of speakers attached to the sub room amplifier as shown below. CENTER OUT DVD/ LD IN TV IN SAT IN IN OUT CD-R/ TAPE IN R R L SURROUND SURROUND BACK (Single) L VIDEO / GAME1 IN FR FL iPod SUB W. Secondary multi-room setup (ROOM 3) • Connect a separate amplifier to the OUT1 ROOM3 (ZONE3) digital output on the rear of this receiver. With video sources...
... Input Setup menu on page 63) are available. You should have a pair of speakers attached to the sub room amplifier as shown below. CENTER OUT DVD/ LD IN TV IN SAT IN IN OUT CD-R/ TAPE IN R R L SURROUND SURROUND BACK (Single) L VIDEO / GAME1 IN FR FL iPod SUB W. Secondary multi-room setup (ROOM 3) • Connect a separate amplifier to the OUT1 ROOM3 (ZONE3) digital output on the rear of this receiver. With video sources...

Owner's Manual
Page 59
... & SOURCE/REC SEL CONTROL ON/OFF VIDEO SELECT SIGNAL SBch SELECT PROCESSING STEREO MCACC SETUP MIC VIDEO/GAME 2 INPUT DIGITAL IN S-VIDEO VIDEO L AUDIO R STANDBY/ON PHASE CONTROL PHASE CONTROL INPUT SELECTOR MCACC AUTO SURR/ POSITION STREAM DIRECT DIGITAL PRECISION PROCESSING AUDIO/VIDEO MULTI-CHANNEL RECEIVER VSX-84TXSi HOME THX STANDARD SURROUND ADVANCED SURROUND MASTER VOLUME • If you select TUNER, you can use the front panel TUNER controls to select a preset station (see Saving station presets on page 33 if you keep your selected sub room(s) show in the display...
... & SOURCE/REC SEL CONTROL ON/OFF VIDEO SELECT SIGNAL SBch SELECT PROCESSING STEREO MCACC SETUP MIC VIDEO/GAME 2 INPUT DIGITAL IN S-VIDEO VIDEO L AUDIO R STANDBY/ON PHASE CONTROL PHASE CONTROL INPUT SELECTOR MCACC AUTO SURR/ POSITION STREAM DIRECT DIGITAL PRECISION PROCESSING AUDIO/VIDEO MULTI-CHANNEL RECEIVER VSX-84TXSi HOME THX STANDARD SURROUND ADVANCED SURROUND MASTER VOLUME • If you select TUNER, you can use the front panel TUNER controls to select a preset station (see Saving station presets on page 33 if you keep your selected sub room(s) show in the display...

Owner's Manual
Page 61
... display input to which you should connect your source components (DVD player, etc.) in The Input Setup menu on page 63. 2 To switch SR+ mode on/off . • Before you can use the extra SR+ features, you will need to make using this receiver. VIDEO INPUT 1 Pioneer plasma display VIDEO INPUT 2 Important • The additional SR+ features do not work when the iPod or XM Radio functions are connected with the CONTROL OUT jack of this chapter. For each component, connect the video output directly...
... display input to which you should connect your source components (DVD player, etc.) in The Input Setup menu on page 63. 2 To switch SR+ mode on/off . • Before you can use the extra SR+ features, you will need to make using this receiver. VIDEO INPUT 1 Pioneer plasma display VIDEO INPUT 2 Important • The additional SR+ features do not work when the iPod or XM Radio functions are connected with the CONTROL OUT jack of this chapter. For each component, connect the video output directly...

Owner's Manual
Page 75
.../DTV RETURN Use to display the DTV menu. DTV Number buttons Use to add a decimal point when DTV selecting a specific TV channel. Cable TV/Satellite TV/TV/DTV +10 button Use to select a specific TV channel. ENTER/ DISC Use to select the component. Select the menu screen. Cable TV/Satellite TV/TV // / & ENTER Press to switch the component between Cable TV/Satellite standby and on a program source. Use the input source buttons to enter a channel. Button (s) Function Components SOURCE Press to select or adjust and navigate...
.../DTV RETURN Use to display the DTV menu. DTV Number buttons Use to add a decimal point when DTV selecting a specific TV channel. Cable TV/Satellite TV/TV/DTV +10 button Use to select a specific TV channel. ENTER/ DISC Use to select the component. Select the menu screen. Cable TV/Satellite TV/TV // / & ENTER Press to switch the component between Cable TV/Satellite standby and on a program source. Use the input source buttons to enter a channel. Button (s) Function Components SOURCE Press to select or adjust and navigate...

Owner's Manual
Page 76
...using this receiver's remote control, refer to Setting the remote to control other Pioneer components with this unit's sensor Many Pioneer components have connected a remote control to the CONTROL IN jack (using a mini-plug cable), you also have at least one set of one component. Selects channels. ANTENNA AUDIO PHONO P IN & SOURCE 2(ZONE2) L CD IN PRE OUT R L SUB W. Use a cable with a Pioneer plasma display on DVD/DVR player multilingual DVDs. CENTER SURROUND R L L UDIO R SURROUND L BACK RS-232C MULTI CH IN OUT IN CONTROL CONTROL IN OUT CONTROL IN OUT RECEIVER...
...using this receiver's remote control, refer to Setting the remote to control other Pioneer components with this unit's sensor Many Pioneer components have connected a remote control to the CONTROL IN jack (using a mini-plug cable), you also have at least one set of one component. Selects channels. ANTENNA AUDIO PHONO P IN & SOURCE 2(ZONE2) L CD IN PRE OUT R L SUB W. Use a cable with a Pioneer plasma display on DVD/DVR player multilingual DVDs. CENTER SURROUND R L L UDIO R SURROUND L BACK RS-232C MULTI CH IN OUT IN CONTROL CONTROL IN OUT CONTROL IN OUT RECEIVER...

Owner's Manual
Page 77
... No sound is output when an input source is something wrong with SAFETY 2 switched on, turn down the SETUP button on improving heat dispersal. The MCACC blinks and the power does not turn on then the power automatically page 6 for help. Sometimes the trouble may have a serious problem. The receiver suddenly switches • Check that the MCACC setup microphone is disconnected. • Make sure the correct input signal is plugged in the Manual MCACC setup...
... No sound is output when an input source is something wrong with SAFETY 2 switched on, turn down the SETUP button on improving heat dispersal. The MCACC blinks and the power does not turn on then the power automatically page 6 for help. Sometimes the trouble may have a serious problem. The receiver suddenly switches • Check that the MCACC setup microphone is disconnected. • Make sure the correct input signal is plugged in the Manual MCACC setup...
Owner's Manual
Page 78
... your DVD player. software is played back. • If the source component has a digital volume control, make sure that the input signal type is set to DIGITAL (see Selecting the multichannel analog inputs on page 54). Other audio problems Symptom Remedy Broadcast stations cannot be no flag to indicate 6.1 compatibility, then with Dolby Digital/DTS discs. The scan function of your DVD player is very little low frequency information in surround sound on page 27). • Check that the LFE channel...
... your DVD player. software is played back. • If the source component has a digital volume control, make sure that the input signal type is set to DIGITAL (see Selecting the multichannel analog inputs on page 54). Other audio problems Symptom Remedy Broadcast stations cannot be no flag to indicate 6.1 compatibility, then with Dolby Digital/DTS discs. The scan function of your DVD player is very little low frequency information in surround sound on page 27). • Check that the LFE channel...

Owner's Manual
Page 80
... playing Dolby/DTS • Check the playback (especially the digital output) settings of factors (room size, speaker placement, etc.) this setting. Most recent settings have disappeared. 12 Additional information Settings Symptom Remedy The Auto MCACC Setup continually shows an error. • The ambient noise level may be kept low enough, you try to make settings. • With the receiver in standby, press STANDBY/ON while holding down the MULTI-ROOM&SOURCE CONTROL button...
... playing Dolby/DTS • Check the playback (especially the digital output) settings of factors (room size, speaker placement, etc.) this setting. Most recent settings have disappeared. 12 Additional information Settings Symptom Remedy The Auto MCACC Setup continually shows an error. • The ambient noise level may be kept low enough, you try to make settings. • With the receiver in standby, press STANDBY/ON while holding down the MULTI-ROOM&SOURCE CONTROL button...
Owner's Manual
Page 83
... HDMI component directly to . You have selected a channel that does not exist, The receiver will automatically switch to channel 001 (or the or that you have not subscribed to your iPod. There is attached securely. The picture quality may be outputting a video format that the XM antenna cable is no HDMI audio output. iPod to HDMI converted video will be updated. In this case, connect using the component, S-video or composite jacks. • Try changing the Resolution setting (in Input...
... HDMI component directly to . You have selected a channel that does not exist, The receiver will automatically switch to channel 001 (or the or that you have not subscribed to your iPod. There is attached securely. The picture quality may be outputting a video format that the XM antenna cable is no HDMI audio output. iPod to HDMI converted video will be updated. In this case, connect using the component, S-video or composite jacks. • Try changing the Resolution setting (in Input...


