Owner's Manual
Page 23
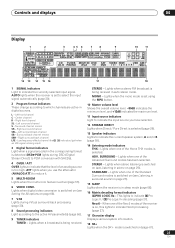
...10 11 SIGNAL L C R 2DIGITAL DTS VIDEO CONV. SURROUND - This lights to the active AV parameter(s) (page 66). 9 TUNER indicators TUNED - Low frequency effects channel (the ((( ))) indicators light when an LFE signal is selected (page 29).... 2Pro Logic IIx decoding (page 27). Lights when one of the Neo:6 modes of the receiver is on page 66). 7 V.SB Lights during DSD (Digital Stream Direct) to PCM conversion ...the multi-room feature is set using the MPX button. 10 Master volume level Shows the overall volume level. -80dB indicates the minimum level, and +12dB indicates the ...
...10 11 SIGNAL L C R 2DIGITAL DTS VIDEO CONV. SURROUND - This lights to the active AV parameter(s) (page 66). 9 TUNER indicators TUNED - Low frequency effects channel (the ((( ))) indicators light when an LFE signal is selected (page 29).... 2Pro Logic IIx decoding (page 27). Lights when one of the Neo:6 modes of the receiver is on page 66). 7 V.SB Lights during DSD (Digital Stream Direct) to PCM conversion ...the multi-room feature is set using the MPX button. 10 Master volume level Shows the overall volume level. -80dB indicates the minimum level, and +12dB indicates the ...
Owner's Manual
Page 37
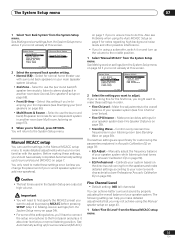
... • If you may not achieve using a subwoofer, switch it about ear level at high volume. The System Setup menu 07 1 Select 'Surr Back System' from the System Setup menu above if...You will return to make these settings, you 're not already at this screen. Control overly resonant low frequencies in Acoustic Calibration EQ on page 55). • Front Bi-Amp - Manually adjust the frequency... (see Second Zone speaker B setup on page 39: • EQ Adjust - See Making receiver settings from the System Setup menu on page 34 if you should have to connect the setup microphone...
... • If you may not achieve using a subwoofer, switch it about ear level at high volume. The System Setup menu 07 1 Select 'Surr Back System' from the System Setup menu above if...You will return to make these settings, you 're not already at this screen. Control overly resonant low frequencies in Acoustic Calibration EQ on page 55). • Front Bi-Amp - Manually adjust the frequency... (see Second Zone speaker B setup on page 39: • EQ Adjust - See Making receiver settings from the System Setup menu on page 34 if you should have to connect the setup microphone...

Owner's Manual
Page 38
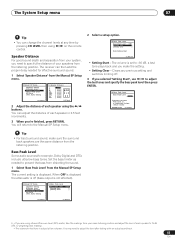
...pressing ENTER, test tones will arrive at the listening position at certain lower Note 1 • If you may need to change depending on the low frequency response of you and between your other speaker levels. 3a.Fine Channel Level MCACC:M1. Fine Speaker Distance • Default setting: 10.0 ft... you select. • If you want to go back and adjust a channel, simply use / to select it sounds like the delay settings are the same volume, press to confirm and continue to the next channel. 3a.Fine Channel Level L R C SL SR SBL SBR SW +0.5dB (Reference) [ 0.0dB ] +1.0dB [ -3.0dB ] ...
...pressing ENTER, test tones will arrive at the listening position at certain lower Note 1 • If you may need to change depending on the low frequency response of you and between your other speaker levels. 3a.Fine Channel Level MCACC:M1. Fine Speaker Distance • Default setting: 10.0 ft... you select. • If you want to go back and adjust a channel, simply use / to select it sounds like the delay settings are the same volume, press to confirm and continue to the next channel. 3a.Fine Channel Level L R C SL SR SBL SBR SW +0.5dB (Reference) [ 0.0dB ] +1.0dB [ -3.0dB ] ...
Owner's Manual
Page 45
...[ 3.0ft ] [ 3.0ft ] [ 3.0ft ] [ 3.0ft ] :Finish 2 Adjust the distance of each speaker to specify the distance of each speaker using / on the remote control. The receiver can then add the proper delay needed to the Manual SP Setup menu. 2 Select a setup option. 5d.Bass Peak Level Bass Peak Level [Setting Start...OFF ] ] Enter:Setting Start :Return • Setting Start - Set the bass limiter as needed for example, Dolby Digital and DTS) include ultra-low bass tones. The System Setup menu 07 Tip • You can change the channel levels at low volumes. The volume is displayed.
...[ 3.0ft ] [ 3.0ft ] [ 3.0ft ] [ 3.0ft ] :Finish 2 Adjust the distance of each speaker to specify the distance of each speaker using / on the remote control. The receiver can then add the proper delay needed to the Manual SP Setup menu. 2 Select a setup option. 5d.Bass Peak Level Bass Peak Level [Setting Start...OFF ] ] Enter:Setting Start :Return • Setting Start - Set the bass limiter as needed for example, Dolby Digital and DTS) include ultra-low bass tones. The System Setup menu 07 Tip • You can change the channel levels at low volumes. The volume is displayed.
Owner's Manual
Page 54
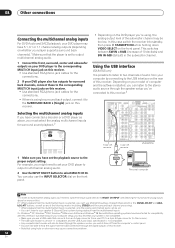
... R L AUDIO R SURROUND L BACK MULTI CH IN OUT CONTROL B-type USB connector A-type USB connector VSX-84TXSi 1 Make sure you have 5.1, 6.1 or 7.1 channel analog outputs (depending on the DVD player you... to a 4-pin B-type connector (to the receiver). • The USB specification is version 1.1 compatible, and the USB Audio Class specification is selected, only the volume and channel levels can be set your system is... you switch them off from the computer's control panel. • You won't be too low. For example, you might need to switch the input signal selector to MULTI CH INPUT ...
... R L AUDIO R SURROUND L BACK MULTI CH IN OUT CONTROL B-type USB connector A-type USB connector VSX-84TXSi 1 Make sure you have 5.1, 6.1 or 7.1 channel analog outputs (depending on the DVD player you... to a 4-pin B-type connector (to the receiver). • The USB specification is version 1.1 compatible, and the USB Audio Class specification is selected, only the volume and channel levels can be set your system is... you switch them off from the computer's control panel. • You won't be too low. For example, you might need to switch the input signal selector to MULTI CH INPUT ...
Owner's Manual
Page 55
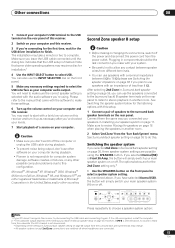
... computer or unplug the USB cable during playback. • To prevent noise being output, don't use speakers with a fairly low volume on this receiver. See Switching the speaker system below are possible using . Switching the speaker system If you plan to make these settings. 6... Turn up as your computer and this receiver and turn it up the volume control on your computer during playback. • Pioneer is selected with the software to use other countries. SPEAKERS PHONES (TUNE +) AV PARAMETER (ST -) SETUP ENTER TUNER EDIT (ST +) RETURN (TUNE...
... computer or unplug the USB cable during playback. • To prevent noise being output, don't use speakers with a fairly low volume on this receiver. See Switching the speaker system below are possible using . Switching the speaker system If you plan to make these settings. 6... Turn up as your computer and this receiver and turn it up the volume control on your computer during playback. • Pioneer is selected with the software to use other countries. SPEAKERS PHONES (TUNE +) AV PARAMETER (ST -) SETUP ENTER TUNER EDIT (ST +) RETURN (TUNE...
Owner's Manual
Page 65
...'PDP Volume Control' setting you want to use that the number of the plasma display. • ON - You will return to the Other Setup menu. :Return :Finish Note 1 If you selected MR&S in the sub room (this receiver is set to the input that you've used as another Pioneer VSX receiver) in...connected to the plasma display to change the volume level. 65 En SR+ Setup for example), the volume on the plasma display is quite low in the sub room and want . • OFF - OSD Adjustment Use this receiver at maximum volume, so make sure the volume is muted so only sound from the ...
...'PDP Volume Control' setting you want to use that the number of the plasma display. • ON - You will return to the Other Setup menu. :Return :Finish Note 1 If you selected MR&S in the sub room (this receiver is set to the input that you've used as another Pioneer VSX receiver) in...connected to the plasma display to change the volume level. 65 En SR+ Setup for example), the volume on the plasma display is quite low in the sub room and want . • OFF - OSD Adjustment Use this receiver at maximum volume, so make sure the volume is muted so only sound from the ...
Owner's Manual
Page 66
... menu. AMP THROUGH Digital Converts video signals for output ON Video from music sources at low volumes. ON Setting What it stand out from front speakers Dynamic Specifies the amount of the receiver. 1 Press AV PARAMETER. 2 Use / to select the setting you can make it does Option(s) Center Adjusts the center image to create...
... menu. AMP THROUGH Digital Converts video signals for output ON Video from music sources at low volumes. ON Setting What it stand out from front speakers Dynamic Specifies the amount of the receiver. 1 Press AV PARAMETER. 2 Use / to select the setting you can make it does Option(s) Center Adjusts the center image to create...
Owner's Manual
Page 78
...on page 30). broadcasts. For AM broadcasts • Adjust the position and direction of the receiver. making it is switched off or move the AM antenna. No sound when using one ... by interference from subwoofer. • Check that the subwoofer is connected properly, switched on and the volume turned up. • If your subwoofer has a sleep function, make sure it's connected to 2...is set to SBch ON and a surround mode is compatible with surround back processing set too low; A multichannel DVD source appears to match the characteristics of the surround listening modes (see ...
...on page 30). broadcasts. For AM broadcasts • Adjust the position and direction of the receiver. making it is switched off or move the AM antenna. No sound when using one ... by interference from subwoofer. • Check that the subwoofer is connected properly, switched on and the volume turned up. • If your subwoofer has a sleep function, make sure it's connected to 2...is set to SBch ON and a surround mode is compatible with surround back processing set too low; A multichannel DVD source appears to match the characteristics of the surround listening modes (see ...
Owner's Manual
Page 79
... 68). • Check the video output settings of video cable as video game units) have been adjusted, the maximum (shown in Setting the AV options on page 66) OFF. • Check that the lowpass filter switch on your subwoofer, set to the highest frequency setting. Select...change accordingly. If adjusting this receiver. 79 En Recorded audio is different from an analog source. • For digital sources, make sure that what you used for all speakers (see Connecting analog audio sources on page 30). The maximum volume available • This is very low. • To route ...
... 68). • Check the video output settings of video cable as video game units) have been adjusted, the maximum (shown in Setting the AV options on page 66) OFF. • Check that the lowpass filter switch on your subwoofer, set to the highest frequency setting. Select...change accordingly. If adjusting this receiver. 79 En Recorded audio is different from an analog source. • For digital sources, make sure that what you used for all speakers (see Connecting analog audio sources on page 30). The maximum volume available • This is very low. • To route ...
Owner's Manual
Page 91
... Association's Consumer Electronics Group want you listening for your new sound equipment will help to higher volumes of your equipment offers. Over time your equipment by setting your equipment at a safe level BEFORE your volume control at a low setting. • Slowly increase the sound until it is too late, this by playing it...
... Association's Consumer Electronics Group want you listening for your new sound equipment will help to higher volumes of your equipment offers. Over time your equipment by setting your equipment at a safe level BEFORE your volume control at a low setting. • Slowly increase the sound until it is too late, this by playing it...

