Owner's Manual
Page 4
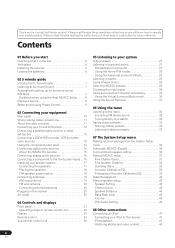
... panel 10 When making cable connections 11 About the video converter 11 Connecting your TV and DVD player 12 Connecting a satellite/cable receiver or other set-top box 13 Connecting a DVD/HDD recorder, VCR and other video sources 13 Using the component video jacks 14 Connecting digital audio...Standard surround sound 27 Using the Home THX modes 28 Using the Advanced surround effects 28 Listening in a safe place for buying this Pioneer product. Contents 01 Before you have finished reading the instructions, put them away in stereo 29 Using Stream Direct 29 Selecting MCACC presets...
... panel 10 When making cable connections 11 About the video converter 11 Connecting your TV and DVD player 12 Connecting a satellite/cable receiver or other set-top box 13 Connecting a DVD/HDD recorder, VCR and other video sources 13 Using the component video jacks 14 Connecting digital audio...Standard surround sound 27 Using the Home THX modes 28 Using the Advanced surround effects 28 Listening in a safe place for buying this Pioneer product. Contents 01 Before you have finished reading the instructions, put them away in stereo 29 Using Stream Direct 29 Selecting MCACC presets...
Owner's Manual
Page 5
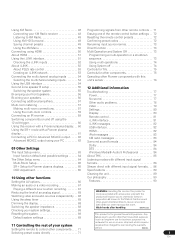
...signal Multi-Room Setup 65 formats 86 SR+ Setup for Pioneer plasma displays 65 Stream direct with different input signal formats . . . 88 OSD Adjustment 65 Specifications 89 Cleaning the unit 89 10 Using other functions Setting the AV options 66 Our philosophy 90 Features 90 Making an audio ... additional amplifiers 57 Multi-room listening 57 Making multi-room connections 57 Using the multi-room controls 59 Connecting an IR receiver 59 Switching components on this product or cords associated with accessories sold with the product will be charged for even during the ...
...signal Multi-Room Setup 65 formats 86 SR+ Setup for Pioneer plasma displays 65 Stream direct with different input signal formats . . . 88 OSD Adjustment 65 Specifications 89 Cleaning the unit 89 10 Using other functions Setting the AV options 66 Our philosophy 90 Features 90 Making an audio ... additional amplifiers 57 Multi-room listening 57 Making multi-room connections 57 Using the multi-room controls 59 Connecting an IR receiver 59 Switching components on this product or cords associated with accessories sold with the product will be charged for even during the ...

Owner's Manual
Page 7
...See Listening to your system on page 27 for more on the source and the sound settings of the receiver. See Connecting your TV and DVD player on -screen automatic MCACC setup to set the receiver to your subwoofer and the TV. For surround sound, you'll want to hook up ...the basic playback explained in Installing your speaker setup, but other sound options you can simply leave the receiver in the default settings. • Be sure to complete all . See also Making receiver settings from a home theater system depends not only on your speaker system on page 34 for surround sound ...
...See Listening to your system on page 27 for more on the source and the sound settings of the receiver. See Connecting your TV and DVD player on -screen automatic MCACC setup to set the receiver to your subwoofer and the TV. For surround sound, you'll want to hook up ...the basic playback explained in Installing your speaker setup, but other sound options you can simply leave the receiver in the default settings. • Be sure to complete all . See also Making receiver settings from a home theater system depends not only on your speaker system on page 34 for surround sound ...

Owner's Manual
Page 8
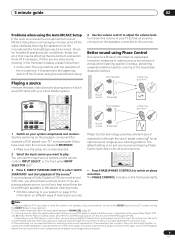
... page 34 for more test tones to be accurate (taking delay and room characteristics into account) and generally does not need to determine the optimum receiver settings for now (you can simply use the System Setup menu when the iPod or XM Radio input source is selected,3 select an MCACC preset4 then... SELECT SYSTEM OFF SOURCE CD DVD DVR2 DVR1 TV SAT CD-R i Pod VIDEO 2 VIDEO 1 TV CONT XM RADIO TUNER ROOM2/3 RECEIVER D.ACCESS +10 AV PARAMETER TOP MENU ì TUNE DTVMENU ST SETUP ENTER CLASS DISC ENTER CH LEVEL MENU ST T.EDIT ì RETURN CATEGORY TUNE GUIDE TV CONTROL BAND ...
... page 34 for more test tones to be accurate (taking delay and room characteristics into account) and generally does not need to determine the optimum receiver settings for now (you can simply use the System Setup menu when the iPod or XM Radio input source is selected,3 select an MCACC preset4 then... SELECT SYSTEM OFF SOURCE CD DVD DVR2 DVR1 TV SAT CD-R i Pod VIDEO 2 VIDEO 1 TV CONT XM RADIO TUNER ROOM2/3 RECEIVER D.ACCESS +10 AV PARAMETER TOP MENU ì TUNE DTVMENU ST SETUP ENTER CLASS DISC ENTER CH LEVEL MENU ST T.EDIT ì RETURN CATEGORY TUNE GUIDE TV CONTROL BAND ...
Owner's Manual
Page 9
... output Dolby Digital, DTS and 88.2 kHz / 96 kHz PCM (2 channel) audio, and if there is an MPEG audio option, set this receiver to adjust the volume level. If two waveforms are playing a stereo source, you may only get digital 2 channel stereo and analog sound. If a ... PHASE CONTROL indicator on phase correction. 5 minute guide 02 Problems when using Phase Control This receiver's Phase Control feature uses phase correction measures to make sure that the VIDEO 1 input is set to this receiver. (For example, if you connected this to convert the MPEG audio to PCM. • Depending...
... output Dolby Digital, DTS and 88.2 kHz / 96 kHz PCM (2 channel) audio, and if there is an MPEG audio option, set this receiver to adjust the volume level. If two waveforms are playing a stereo source, you may only get digital 2 channel stereo and analog sound. If a ... PHASE CONTROL indicator on phase correction. 5 minute guide 02 Problems when using Phase Control This receiver's Phase Control feature uses phase correction measures to make sure that the VIDEO 1 input is set to this receiver. (For example, if you connected this to convert the MPEG audio to PCM. • Depending...
Owner's Manual
Page 11
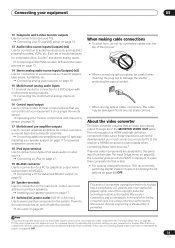
... and other video sources on page 66) OFF. 11 En The cable may not be damaged if bent around sharp corners. patents and other Pioneer components so that is prohibited. Note 1 You must assign the input source to the S-video input to which you must be downsampled, you ... to HDMI, component, S-video, then composite (in that may be converted. Use of the receiver. • When connecting optical cables, be careful when inserting the plug not to power another component in Setting the AV options on page 16. 15 Multichannel analog audio inputs 7.1 channel inputs for connection to a PC...
... and other video sources on page 66) OFF. 11 En The cable may not be damaged if bent around sharp corners. patents and other Pioneer components so that is prohibited. Note 1 You must assign the input source to the S-video input to which you must be downsampled, you ... to HDMI, component, S-video, then composite (in that may be converted. Use of the receiver. • When connecting optical cables, be careful when inserting the plug not to power another component in Setting the AV options on page 16. 15 Multichannel analog audio inputs 7.1 channel inputs for connection to a PC...
Owner's Manual
Page 12
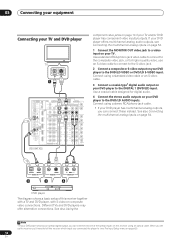
... coaxial-type1 digital audio output on this receiver together with a TV and DVD player, with S-video or composite video connections. When you set up the receiver you'll need to tell the receiver which input you can connect it to ... Connect the MONITOR OUT video jack to a video input on your DVD player to one of this receiver using an optical cable. Connect using a stereo RCA/phono jack cable. • If your TV and... PB PB (CD-R) 14 ASSIGNA- VIDEO VIDEO COMPONENT VIDEO VIDEO R L AUDIO R SURR OUT CONTROL VSX-84TXSi component video jacks on page 54.
... coaxial-type1 digital audio output on this receiver together with a TV and DVD player, with S-video or composite video connections. When you set up the receiver you'll need to tell the receiver which input you can connect it to ... Connect the MONITOR OUT video jack to a video input on your DVD player to one of this receiver using an optical cable. Connect using a stereo RCA/phono jack cable. • If your TV and... PB PB (CD-R) 14 ASSIGNA- VIDEO VIDEO COMPONENT VIDEO VIDEO R L AUDIO R SURR OUT CONTROL VSX-84TXSi component video jacks on page 54.
Owner's Manual
Page 13
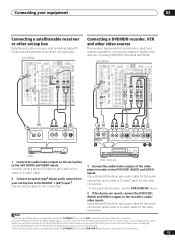
... CH IN OUT CONTROL DIGITAL OUT R AUDIO L VIDEO AV OUT S-VIDEO OPTICAL COAXIAL DIGITAL OUT 3 R AUDIO L VIDEO AV OUT S-VIDEO R AUDIO L AV IN VIDEO S-VIDEO 12 STB 1 Connect the audio/video...VIDEO / GAME1 IN OUT DVR/ VCR 1 IN OUT CD-R/ TAPE IN R FR F SUB W. VSX-84TXSi MULTI-ROOM & SOURCE / REC SEL OUT1 ROOM3 (ZONE3) OUT2 S400 (AUDIO) IR MULTI-...4 IN3 PB PB (CD-R) 14 ASSIGNA- Connecting your equipment 03 Connecting a satellite/cable receiver or other video sources This receiver has two sets of so-called 'set-top boxes'. BLE PR PR IN 1 1 2 (DVD/ LD) IN4 IN 2 ...
... CH IN OUT CONTROL DIGITAL OUT R AUDIO L VIDEO AV OUT S-VIDEO OPTICAL COAXIAL DIGITAL OUT 3 R AUDIO L VIDEO AV OUT S-VIDEO R AUDIO L AV IN VIDEO S-VIDEO 12 STB 1 Connect the audio/video...VIDEO / GAME1 IN OUT DVR/ VCR 1 IN OUT CD-R/ TAPE IN R FR F SUB W. VSX-84TXSi MULTI-ROOM & SOURCE / REC SEL OUT1 ROOM3 (ZONE3) OUT2 S400 (AUDIO) IR MULTI-...4 IN3 PB PB (CD-R) 14 ASSIGNA- Connecting your equipment 03 Connecting a satellite/cable receiver or other video sources This receiver has two sets of so-called 'set-top boxes'. BLE PR PR IN 1 1 2 (DVD/ LD) IN4 IN 2 ...

Owner's Manual
Page 14
...Connect using a coaxial digital audio cable. Use a three-way component video cable. See the manuals that came with your source to a set up the receiver you'll need to composite or S-video. VIDEO VIDEO COMPONENT VIDEO VIDEO R L AUDIO R SURROUND L BACK MULTI CH IN OUT CONTROL ...If the device can connect it to the DIGITAL 2 (DVR/VCR1) input. You can skip this receiver using a three-way component video cable. • Since they are compatible with progressive-scan video. VSX-84TXSi MULTI-ROOM & SOURCE / REC SEL OUT1 ROOM3 (ZONE3) OUT2 S400 (AUDIO) IR MULTI-ROOM...
...Connect using a coaxial digital audio cable. Use a three-way component video cable. See the manuals that came with your source to a set up the receiver you'll need to composite or S-video. VIDEO VIDEO COMPONENT VIDEO VIDEO R L AUDIO R SURROUND L BACK MULTI CH IN OUT CONTROL ...If the device can connect it to the DIGITAL 2 (DVR/VCR1) input. You can skip this receiver using a three-way component video cable. • Since they are compatible with progressive-scan video. VSX-84TXSi MULTI-ROOM & SOURCE / REC SEL OUT1 ROOM3 (ZONE3) OUT2 S400 (AUDIO) IR MULTI-ROOM...

Owner's Manual
Page 15
...that WMA9 Pro 96 kHz sources will be able to 48 kHz. 15 En Note 1 • If your digital component to a WMA9 Pro-compatible player. VSX-84TXSi MULTI-ROOM & SOURCE / REC SEL OUT1 ROOM3 (ZONE3) OUT2 S400 (AUDIO) IR MULTI-ROOM & SOURCE MAIN ROOM(ZONE1) IN1 ROOM2(ZONE2) ...14 ASSIGNA- CENT SURROUND R IN XM OUT DIGITAL PB PB PR PR OUT DVR/ VCR 2 IN ASSIGNABLE 1 3 S - However, the connected PC, DVD player, set up the receiver (see also The Input Setup menu on page 63). • The digital outputs from the DIGITAL OUT1. • In order to record some digital...
...that WMA9 Pro 96 kHz sources will be able to 48 kHz. 15 En Note 1 • If your digital component to a WMA9 Pro-compatible player. VSX-84TXSi MULTI-ROOM & SOURCE / REC SEL OUT1 ROOM3 (ZONE3) OUT2 S400 (AUDIO) IR MULTI-ROOM & SOURCE MAIN ROOM(ZONE1) IN1 ROOM2(ZONE2) ...14 ASSIGNA- CENT SURROUND R IN XM OUT DIGITAL PB PB PR PR OUT DVR/ VCR 2 IN ASSIGNABLE 1 3 S - However, the connected PC, DVD player, set up the receiver (see also The Input Setup menu on page 63). • The digital outputs from the DIGITAL OUT1. • In order to record some digital...

Owner's Manual
Page 19
...two surround back speakers THX recommends placing them together and the same distance from your listening position (see Connecting external antennas below ). L C R VSX-84TXSi MULTI-ROOM & SOURCE / REC SEL OUT1 ROOM3 (ZONE3) OUT2 S400 (AUDIO) IR MULTI-ROOM & SOURCE MAIN ROOM(ZONE1) IN1 ... ANTENNA AUDIO PHONO AM LOOP IN MULTI-ROOM & SOURCE R ROOM2(ZONE2) L CD PRE OUT R L FRONT SUB W. B fig. Avoid placing near computers, television sets or other electrical appliances and do not let it come into contact with one wire into the stand (fig. A 0~60 SR SBL SBL SBR SBR...
...two surround back speakers THX recommends placing them together and the same distance from your listening position (see Connecting external antennas below ). L C R VSX-84TXSi MULTI-ROOM & SOURCE / REC SEL OUT1 ROOM3 (ZONE3) OUT2 S400 (AUDIO) IR MULTI-ROOM & SOURCE MAIN ROOM(ZONE1) IN1 ... ANTENNA AUDIO PHONO AM LOOP IN MULTI-ROOM & SOURCE R ROOM2(ZONE2) L CD PRE OUT R L FRONT SUB W. B fig. Avoid placing near computers, television sets or other electrical appliances and do not let it come into contact with one wire into the stand (fig. A 0~60 SR SBL SBL SBR SBR...

Owner's Manual
Page 20
... external antennas To improve FM reception connect an external FM antenna to 18 ft. Plugging in the receiver Only plug in after you an electric shock. Caution • Do not connect a TV set, monitor, heater, or similar appliance to this unit's AC outlet. • Do not connect ...disconnecting the supplied AM loop antenna. Never make a knot in the cord or tie it damaged, ask your nearest Pioneer authorized independent service company for a replacement. • The receiver should be connected to the AC outlet. 20 En to a wall or door frame. This can also cause ...
... external antennas To improve FM reception connect an external FM antenna to 18 ft. Plugging in the receiver Only plug in after you an electric shock. Caution • Do not connect a TV set, monitor, heater, or similar appliance to this unit's AC outlet. • Do not connect ...disconnecting the supplied AM loop antenna. Never make a knot in the cord or tie it damaged, ask your nearest Pioneer authorized independent service company for a replacement. • The receiver should be connected to the AC outlet. 20 En to a wall or door frame. This can also cause ...
Owner's Manual
Page 22
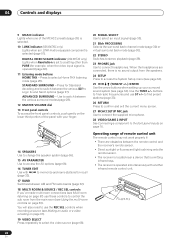
...25 (TUNE/ST +/-) /ENTER Use the arrow buttons when setting up your finger. STANDBY/ON 30 30 7m (23 ft.) AUDIO/VIDEO MULTI-CHANNEL RECEIVER 22 En ADVANCED SURROUND - DIGITAL VIDEO SCALER indicator (VSX-82TXS only) Lights when Resolution is set to connect headphones. Press to use ST +/- Press for recall...selected. 10 i.LINK indicator (VSX-84TXSi only) Lights when an i.LINK-Audio-equipped component is upscaled) (page 66). 11 Listening mode buttons HOME THX - STANDBY/ON 14 SPEAKERS Use to change the speaker system (page 55). 15 AV PARAMETER Use to access the AV options (page 66). 16 ...
...25 (TUNE/ST +/-) /ENTER Use the arrow buttons when setting up your finger. STANDBY/ON 30 30 7m (23 ft.) AUDIO/VIDEO MULTI-CHANNEL RECEIVER 22 En ADVANCED SURROUND - DIGITAL VIDEO SCALER indicator (VSX-82TXS only) Lights when Resolution is set to connect headphones. Press to use ST +/- Press for recall...selected. 10 i.LINK indicator (VSX-84TXSi only) Lights when an i.LINK-Audio-equipped component is upscaled) (page 66). 11 Listening mode buttons HOME THX - STANDBY/ON 14 SPEAKERS Use to change the speaker system (page 55). 15 AV PARAMETER Use to access the AV options (page 66). 16 ...
Owner's Manual
Page 23
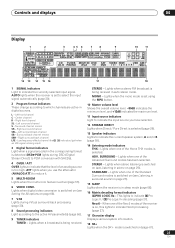
...LFE - Lights when one of the Neo:6 modes of the receiver is on, this lights to indicate Neo:6 processing (page 27). 17 Character display Displays various system information. 18 SR+ Lights when the SR+ mode is set to select the input signal automatically (page 30). 2 Program ...LOGIC IIx - STANDARD - Left front channel C - Lights when digital video conversion is being received. Low frequency effects channel (the ((( ))) indicators light when an LFE signal is switched on (see Setting the AV options on (page 61). 23 En V.SB DNR MIDNIGHT TUNED AUTO WMA9 Pro 96/24 MULTI...
...LFE - Lights when one of the Neo:6 modes of the receiver is on, this lights to indicate Neo:6 processing (page 27). 17 Character display Displays various system information. 18 SR+ Lights when the SR+ mode is set to select the input signal automatically (page 30). 2 Program ...LOGIC IIx - STANDARD - Left front channel C - Lights when digital video conversion is being received. Low frequency effects channel (the ((( ))) indicators light when an LFE signal is switched on (see Setting the AV options on (page 61). 23 En V.SB DNR MIDNIGHT TUNED AUTO WMA9 Pro 96/24 MULTI...
Owner's Manual
Page 24
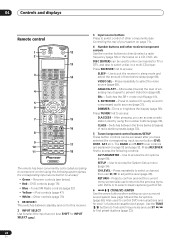
...to access): • Green - RETURN - Use the TUNE / buttons to enter commands for deck 1 of a double cassette deck player. Receiver controls (see page 34) and the AV options (page 66). ANALOG ATT - Attenuates (lowers) the level of time before sleep (page 68). After pressing, you have selected the ... (use to return to the previous menu with DVDs or to select closed captioning with DTV). 6 (TUNE/ST) /ENTER Use the arrow buttons when setting up your system on a CD, DVD, etc. Use to directly select a radio frequency (page 32) or the tracks on page 71). 4 Number...
...to access): • Green - RETURN - Use the TUNE / buttons to enter commands for deck 1 of a double cassette deck player. Receiver controls (see page 34) and the AV options (page 66). ANALOG ATT - Attenuates (lowers) the level of time before sleep (page 68). After pressing, you have selected the ... (use to return to the previous menu with DVDs or to select closed captioning with DTV). 6 (TUNE/ST) /ENTER Use the arrow buttons when setting up your system on a CD, DVD, etc. Use to directly select a radio frequency (page 32) or the tracks on page 71). 4 Number...
Owner's Manual
Page 25
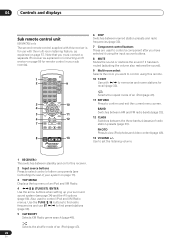
... and mono reception of FM broadcasts. Press to switch between named station presets and radio frequencies (page 33). 9 STATUS Press to check selected receiver settings (page 69). 10 MULTIOPE Use this ). Use to select a Home THX listening mode (page 28). The following controls can be accessed when... are shown when you choose the options below. With SHIFT, this system assign it has been muted (adjusting the volume also restores the sound). 17 Receiver controls SIGNAL SEL - TV VOL +/- - S.DIRECT - READ ID - See Multi Operation and System Off on page 73. 18 PHASE - Use...
... and mono reception of FM broadcasts. Press to switch between named station presets and radio frequencies (page 33). 9 STATUS Press to check selected receiver settings (page 69). 10 MULTIOPE Use this ). Use to select a Home THX listening mode (page 28). The following controls can be accessed when... are shown when you choose the options below. With SHIFT, this system assign it has been muted (adjusting the volume also restores the sound). 17 Receiver controls SIGNAL SEL - TV VOL +/- - S.DIRECT - READ ID - See Multi Operation and System Off on page 73. 18 PHASE - Use...
Owner's Manual
Page 26
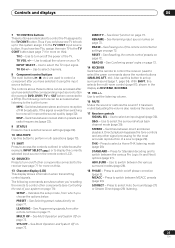
... and use with / to select control of other components (see page 34) and the AV options (page 66). BAND Switches between AM and FM radio bands (page 32). 12 ... Use the arrow buttons when setting up your surround sound system (see Controlling the rest of radio station presets (page 33). Use to set the listening volume. 1 RECEIVER This switches between the three banks...receiver as explained on page 59 for remote control in Connecting an IR receiver on page 57. 04 Controls and displays Sub remote control unit VSX-84TXSi only The second remote control supplied with this receiver...
... and use with / to select control of other components (see page 34) and the AV options (page 66). BAND Switches between AM and FM radio bands (page 32). 12 ... Use the arrow buttons when setting up your surround sound system (see Controlling the rest of radio station presets (page 33). Use to set the listening volume. 1 RECEIVER This switches between the three banks...receiver as explained on page 59 for remote control in Connecting an IR receiver on page 57. 04 Controls and displays Sub remote control unit VSX-84TXSi only The second remote control supplied with this receiver...

Owner's Manual
Page 27
..., press repeatedly to select a listening mode. • If the source is set to a source, press STANDARD (STANDARD SURROUND). See Setting the AV options on this). • While listening to NO (this receiver, you can select from both surround back speakers. 4 If surround back channel ...processing (page 30) is switched OFF, or the surround back speakers are set to anything but Normal (SB...
..., press repeatedly to select a listening mode. • If the source is set to a source, press STANDARD (STANDARD SURROUND). See Setting the AV options on this). • While listening to NO (this receiver, you can select from both surround back speakers. 4 If surround back channel ...processing (page 30) is switched OFF, or the surround back speakers are set to anything but Normal (SB...
Owner's Manual
Page 28
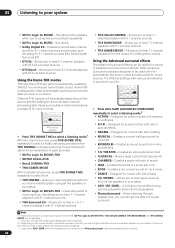
...MODE With multichannel sources, press THX (HOME THX) repeatedly to select a matrix-decoding process for 6.1 channel sources (like . Try different settings with DTS encoded sources Using the Home THX modes THX and Home THX are also suited for movies with film soundtracks, but some modes ... are designed to hear 6.1 channel playback with various soundtracks to Using surround back channel processing on this). SURR SHIFT PHASE MCACC S.DIRECT RECEIVER • Press ADV.SURR (ADVANCED SURROUND) repeatedly to make home theater audio sound more on this allows you to hear 7.1 channel ...
...MODE With multichannel sources, press THX (HOME THX) repeatedly to select a matrix-decoding process for 6.1 channel sources (like . Try different settings with DTS encoded sources Using the Home THX modes THX and Home THX are also suited for movies with film soundtracks, but some modes ... are designed to hear 6.1 channel playback with various soundtracks to Using surround back channel processing on this). SURR SHIFT PHASE MCACC S.DIRECT RECEIVER • Press ADV.SURR (ADVANCED SURROUND) repeatedly to make home theater audio sound more on this allows you to hear 7.1 channel ...
Owner's Manual
Page 29
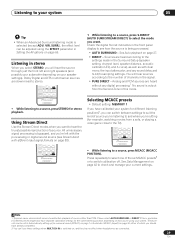
...RECEIVER • While listening to check and manage your subwoofer depending on page 66. All unnecessary signal processing is bypassed, and you're left and right speakers (and possibly your current settings. Check the digital format indicators in the front panel display to the settings made in Setting the AV...stereo. PHOTO STATUS SIGNAL SEL SBch STEREO MULTI OPE THX STANDARD ADV. SURR SHIFT PHASE MCACC S.DIRECT RECEIVER • While listening to your speaker settings). Note 1 There are downmixed to hear the truest possible reproduction of sources other than PCM. Dolby ...
...RECEIVER • While listening to check and manage your subwoofer depending on page 66. All unnecessary signal processing is bypassed, and you're left and right speakers (and possibly your current settings. Check the digital format indicators in the front panel display to the settings made in Setting the AV...stereo. PHOTO STATUS SIGNAL SEL SBch STEREO MULTI OPE THX STANDARD ADV. SURR SHIFT PHASE MCACC S.DIRECT RECEIVER • While listening to your speaker settings). Note 1 There are downmixed to hear the truest possible reproduction of sources other than PCM. Dolby ...


