

Owner's Manual
Page 4
...for buying this Pioneer product. After you have finished reading the instructions, put them away in surround sound 29 Using the Advanced surround 30 Using Stream Direct 30 Using the Sound Retriever 30 Listening with Acoustic Calibration EQ 30 Better sound using Phase Control 31 Using surround back channel ... 19 Connecting a USB device 19 4 En Plugging in the receiver 19 03 Basic Setup Canceling the demo display 20 Automatically setting up for surround sound (MCACC). . . 20 Other problems when using the Auto MCACC setup . . . 21 04 Basic playback Playing a source 22 Selecting...
...for buying this Pioneer product. After you have finished reading the instructions, put them away in surround sound 29 Using the Advanced surround 30 Using Stream Direct 30 Using the Sound Retriever 30 Listening with Acoustic Calibration EQ 30 Better sound using Phase Control 31 Using surround back channel ... 19 Connecting a USB device 19 4 En Plugging in the receiver 19 03 Basic Setup Canceling the demo display 20 Automatically setting up for surround sound (MCACC). . . 20 Other problems when using the Auto MCACC setup . . . 21 04 Basic playback Playing a source 22 Selecting...

Owner's Manual
Page 5
...the speakers (page 10) • Connecting the speakers (page 11) • Switching the speaker system (page 12) 2 Connecting the components For surround sound, you'll want to hook up using a digital connection from the Blu-ray Disc/DVD player to this . 4 The Pre Out Setting (...; Connecting antennas (page 18) • Plugging in places where there is a full-fledged AV receiver equipped with the TV if you 've set up for surround sound (MCACC) (page 20) 6 Playing a source (page 22) • Selecting the audio input signal (page 22) • Playing an iPod (page 23)...
...the speakers (page 10) • Connecting the speakers (page 11) • Switching the speaker system (page 12) 2 Connecting the components For surround sound, you'll want to hook up using a digital connection from the Blu-ray Disc/DVD player to this . 4 The Pre Out Setting (...; Connecting antennas (page 18) • Plugging in places where there is a full-fledged AV receiver equipped with the TV if you 've set up for surround sound (MCACC) (page 20) 6 Playing a source (page 22) • Selecting the audio input signal (page 22) • Playing an iPod (page 23)...
Owner's Manual
Page 6
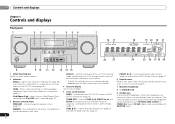
...can be selected only from the speakers. CHANNEL RECEIVER VSX-821 HDMI iPod iPhone iPad INPUT SELECTOR STANDBY /ON SPEAKERS DIMMER DISPLAY BAND TUNER EDIT TUNE PRESET AUTO SURROUND/ ALC/ STREAM DIRECT STANDARD SURR ADVANCED SURROUND SOUND iPod iPhone iPad RETRIEVER AIR DIRECT CONTROL ENTER PHONES MCACC...- When the headphones are connected, there is automatically set to preset the channel in four steps. The listening mode when the sound is heard from the headphone can be also selected with TUNE /, PRESET / and ENTER to change the ...
...can be selected only from the speakers. CHANNEL RECEIVER VSX-821 HDMI iPod iPhone iPad INPUT SELECTOR STANDBY /ON SPEAKERS DIMMER DISPLAY BAND TUNER EDIT TUNE PRESET AUTO SURROUND/ ALC/ STREAM DIRECT STANDARD SURR ADVANCED SURROUND SOUND iPod iPhone iPad RETRIEVER AIR DIRECT CONTROL ENTER PHONES MCACC...- When the headphones are connected, there is automatically set to preset the channel in four steps. The listening mode when the sound is heard from the headphone can be also selected with TUNE /, PRESET / and ENTER to change the ...
Owner's Manual
Page 7
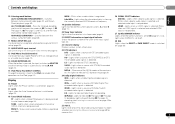
...your Apple iPod or USB mass storage device as an audio source (page 19). 14 SOUND RETRIEVER AIR When the button is pressed, the input switches to S.R AIR (page 26). Switches between the various surround modes (page 30). 11 MCACC SETUP MIC jack Use to connect a microphone when ... broadcast is being received in sleep mode (page 8). 21 PRESET information or input signal indicator Shows the preset number of the Advanced Surround modes has been selected (see Listening in surround sound on page 29 for more on (page 29). 2D+ - HD - Shows when a preset radio station is detected. 2HD - ...
...your Apple iPod or USB mass storage device as an audio source (page 19). 14 SOUND RETRIEVER AIR When the button is pressed, the input switches to S.R AIR (page 26). Switches between the various surround modes (page 30). 11 MCACC SETUP MIC jack Use to connect a microphone when ... broadcast is being received in sleep mode (page 8). 21 PRESET information or input signal indicator Shows the preset number of the Advanced Surround modes has been selected (see Listening in surround sound on page 29 for more on (page 29). 2D+ - HD - Shows when a preset radio station is detected. 2HD - ...
Owner's Manual
Page 8
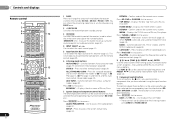
...SURR - Press BD first to access the Audio options (page 32). Use to access: BD MENU* - MENU - When TUNER is set up your surround sound system (page 34). Also used to this receiver (page 22). Press RECEIVER first to browse SIRIUS radio broadcasts. BAND - Press to access: AUDIO ...the iPod controls and the receiver controls (page 24). 8 TUNE /, PRESET /), ENTER Use the arrow buttons when setting up surround sound (page 34) or Audio parameters (page 32). 4 INPUT SELECT Use to select the input source (page 22). 5 Input function buttons Use to...
...SURR - Press BD first to access the Audio options (page 32). Use to access: BD MENU* - MENU - When TUNER is set up your surround sound system (page 34). Also used to this receiver (page 22). Press RECEIVER first to browse SIRIUS radio broadcasts. BAND - Press to access: AUDIO ...the iPod controls and the receiver controls (page 24). 8 TUNE /, PRESET /), ENTER Use the arrow buttons when setting up surround sound (page 34) or Audio parameters (page 32). 4 INPUT SELECT Use to select the input source (page 22). 5 Input function buttons Use to...

Owner's Manual
Page 9
... These buttons are dedicated to control the TV assigned to select ON, AUTO or OFF the surround back channel (page 31). Use to set above 150 Hz, the subwoofer channel level will ... compressed audio sources (page 30). SPEAKERS - CH SELECT - The listening mode, sound volume, Pre Out setting or input name can also reduce the life or performance of batteries. Press to restore ...-/+ (page 35). These buttons are obstacles between the hard disk, DVD and VCR controls for Pioneer TVs. 10 Number buttons and other components connected to the - Press to turn on your country ...
... These buttons are dedicated to control the TV assigned to select ON, AUTO or OFF the surround back channel (page 31). Use to set above 150 Hz, the subwoofer channel level will ... compressed audio sources (page 30). SPEAKERS - CH SELECT - The listening mode, sound volume, Pre Out setting or input name can also reduce the life or performance of batteries. Press to restore ...-/+ (page 35). These buttons are obstacles between the hard disk, DVD and VCR controls for Pioneer TVs. 10 Number buttons and other components connected to the - Press to turn on your country ...
Owner's Manual
Page 10
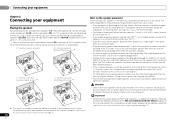
...to boost your system up to a 7.1 ch surround system. • You can weaken the surround sound effect. • Place the left and right front height speakers at the TV screen. CAUTION • Make sure that the sound of this unit and connect the surround back or front height speakers to place speakers ... or front height speakers are securely installed. Further, by the leading edge of the room. To achieve the best possible surround sound, install your ears and titled slight downward. If not, place them at a sufficient distance from speakers being knocked over or falling in the...
...to boost your system up to a 7.1 ch surround system. • You can weaken the surround sound effect. • Place the left and right front height speakers at the TV screen. CAUTION • Make sure that the sound of this unit and connect the surround back or front height speakers to place speakers ... or front height speakers are securely installed. Further, by the leading edge of the room. To achieve the best possible surround sound, install your ears and titled slight downward. If not, place them at a sufficient distance from speakers being knocked over or falling in the...
Owner's Manual
Page 11
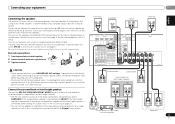
...wire. 3 Tighten terminal. 10 mm (3/8 in the diagram) but using at least three speakers is recommended, and a complete setup is best for surround sound. However, note that all connections before touching any of the bare speaker wire touches the back panel it may cause the power to a value ...between 6 Ω and 16 Ω. To prevent the risk of the unit and additional amplifier to the AC power source. Surround right Surround left HDMI DVR/BDR IN DVD IN BD IN VIDEO 1 IN OUT COAXIAL IN 1 IN 1 ASSIGNABLE IN OPTICAL 2 ASSIGNABLE VIDEO (CD) AUDIO ...
...wire. 3 Tighten terminal. 10 mm (3/8 in the diagram) but using at least three speakers is recommended, and a complete setup is best for surround sound. However, note that all connections before touching any of the bare speaker wire touches the back panel it may cause the power to a value ...between 6 Ω and 16 Ω. To prevent the risk of the unit and additional amplifier to the AC power source. Surround right Surround left HDMI DVR/BDR IN DVD IN BD IN VIDEO 1 IN OUT COAXIAL IN 1 IN 1 ASSIGNABLE IN OPTICAL 2 ASSIGNABLE VIDEO (CD) AUDIO ...

Owner's Manual
Page 20
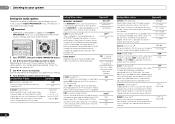
... 3 Connect the microphone to the MCACC SETUP MIC jack on the power to the amplifier to which the surround back or front height speakers are connected, and adjust the sound level to your TV. After you have connected using the HDMI output to the desired level. • See...Basic Setup Canceling the demo display The display on your TV. If you connected either the surround back speaker or the front height speaker, make sure that the Pre Out setting is turned up for surround sound (MCACC) The Auto Multi-Channel Acoustic Calibration (MCACC) setup measures the acoustic characteristics of...
... 3 Connect the microphone to the MCACC SETUP MIC jack on the power to the amplifier to which the surround back or front height speakers are connected, and adjust the sound level to your TV. After you have connected using the HDMI output to the desired level. • See...Basic Setup Canceling the demo display The display on your TV. If you connected either the surround back speaker or the front height speaker, make sure that the Pre Out setting is turned up for surround sound (MCACC) The Auto Multi-Channel Acoustic Calibration (MCACC) setup measures the acoustic characteristics of...

Owner's Manual
Page 21
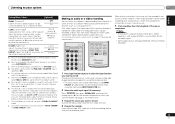
Front [ YES ] Center [ YES ] Surr [ YES ] Surr. If you excellent surround sound from your setup. Again, try to be a problem with the operation of around 12 cm (5 inches) will start automatically as Too much background noise, echo ... The Auto MCACC setup has finished! Back [YESx2] Subwoofer [ YES ] 10:Next OK Return • With error messages (such as shown. 1.Auto MCACC Now Analyzing Surround Analyzing Speaker System Speaker Distance Channel Level Acoustic Cal EQ Return A progress report is displayed on page 34). You can correct the setting manually using...
Front [ YES ] Center [ YES ] Surr [ YES ] Surr. If you excellent surround sound from your setup. Again, try to be a problem with the operation of around 12 cm (5 inches) will start automatically as Too much background noise, echo ... The Auto MCACC setup has finished! Back [YESx2] Subwoofer [ YES ] 10:Next OK Return • With error messages (such as shown. 1.Auto MCACC Now Analyzing Surround Analyzing Speaker System Speaker Distance Channel Level Acoustic Cal EQ Return A progress report is displayed on page 34). You can correct the setting manually using...

Owner's Manual
Page 22
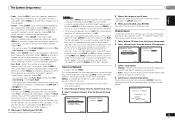
... kHz PCM (2 channel) audio, and if there is now selected. 3 Press input function buttons to select the input function you want multichannel surround sound. 5 Use MASTER VOLUME to adjust the volume level. To operate the receiver, first press RECEIVER on the remote control, then press the appropriate... set , the audio input that was selected will be applied whenever you will be set to a multichannel listening mode if you should hear surround sound. Note • You may need to check the digital audio output settings on the remote control, or by using the remote control. If...
... kHz PCM (2 channel) audio, and if there is now selected. 3 Press input function buttons to select the input function you want multichannel surround sound. 5 Use MASTER VOLUME to adjust the volume level. To operate the receiver, first press RECEIVER on the remote control, then press the appropriate... set , the audio input that was selected will be applied whenever you will be set to a multichannel listening mode if you should hear surround sound. Note • You may need to check the digital audio output settings on the remote control, or by using the remote control. If...

Owner's Manual
Page 29
... NEO:6 CINEMA or DOLBY PLIIx MOVIE (see Listening in a portable audio player. With this unit equalizes playback sound levels if each sound level varies with the music source recorded in surround sound below for more on the front panel. Yesa No No - Important • The listening modes and many ... Two channel sources STEREO ALC See above . DTS-ES Movie/Music Yes No The following modes provide basic surround sound for more on this section may not be selected and shows in surround DOLBY PRO LOGIC Old movies - - • The listening mode is shown on the display on these ...
... NEO:6 CINEMA or DOLBY PLIIx MOVIE (see Listening in a portable audio player. With this unit equalizes playback sound levels if each sound level varies with the music source recorded in surround sound below for more on the front panel. Yesa No No - Important • The listening modes and many ... Two channel sources STEREO ALC See above . DTS-ES Movie/Music Yes No The following modes provide basic surround sound for more on this section may not be selected and shows in surround DOLBY PRO LOGIC Old movies - - • The listening mode is shown on the display on these ...

Owner's Manual
Page 30
... Audio options on page 20. You can only selected when the ADAPTER input. effect (see which you to create natural surround sound effects using the Acoustic Calibration Equalization set in the signal. ACTION Designed for movies with dynamic soundtracks. DRAMA ENT.SHOW Designed...Calibration EQ You can choose the STEREO mode by restoring sound pressure and smoothing jagged artifacts left speaker Front right speaker S.R AIR (Sound Retriever AIR) PHONES SURR Suitable for surround sound (MCACC) on page 32). AUTO SURROUND See Auto playback on page 32). You can still ...
... Audio options on page 20. You can only selected when the ADAPTER input. effect (see which you to create natural surround sound effects using the Acoustic Calibration Equalization set in the signal. ACTION Designed for movies with dynamic soundtracks. DRAMA ENT.SHOW Designed...Calibration EQ You can choose the STEREO mode by restoring sound pressure and smoothing jagged artifacts left speaker Front right speaker S.R AIR (Sound Retriever AIR) PHONES SURR Suitable for surround sound (MCACC) on page 32). AUTO SURROUND See Auto playback on page 32). You can still ...

Owner's Manual
Page 31
...function on, perform steps 1 and 2 again. • When set the setting to make sure your sound source arrives at the sides of the listening position, the surround sound of this cannot be set to which the Up Mix function is added are output from diagonally to ... for which case, you can simply switch surround back channel processing off). • With a 7.1-channel surround system, audio signals that the surround sound is switched automatically. Listening to your system 05 English Français Español Better sound using Phase Control This receiver's Phase Control feature...
...function on, perform steps 1 and 2 again. • When set the setting to make sure your sound source arrives at the sides of the listening position, the surround sound of this cannot be set to which the Up Mix function is added are output from diagonally to ... for which case, you can simply switch surround back channel processing off). • With a 7.1-channel surround system, audio signals that the surround sound is switched automatically. Listening to your system 05 English Français Español Better sound using Phase Control This receiver's Phase Control feature...
Owner's Manual
Page 32
... below for the options available for Dolby Digital, DTS, Dolby Digital Plus, Dolby TrueHD, DTS-HD and DTS-HD Master Audio (you to hear effective surround sound of dynamic range for movie soundtracks optimized for each setting. 4 Press RETURN to confirm and exit the menu. 05 Listening to your system Setting the... Audio options There are listed in bold. By adding a bit of delay, you want to adjust. When ON is selected, noise may need to surround sound at low volumes. The defaults, if not stated, are a number of non-PCM sources. When THRU is selected, no...
... below for the options available for Dolby Digital, DTS, Dolby Digital Plus, Dolby TrueHD, DTS-HD and DTS-HD Master Audio (you to hear effective surround sound of dynamic range for movie soundtracks optimized for each setting. 4 Press RETURN to confirm and exit the menu. 05 Listening to your system Setting the... Audio options There are listed in bold. By adding a bit of delay, you want to adjust. When ON is selected, noise may need to surround sound at low volumes. The defaults, if not stated, are a number of non-PCM sources. When THRU is selected, no...
Owner's Manual
Page 33
... be recorded. 33 En English Français Español Note • The receiver's volume, balance, tone (bass, treble, loudness), and surround effects have any time by using MIDNIGHT button. H.GAIN (Height Gain) Adjusts the output from 0 (all center channel sent to front right CINEMA)...TrueHD. Only available with vocals. This setting works only with most SACD discs, but if the sound distorts, it does Option(s) PNRM. (Panorama)i OFF Extends the front stereo image to include ON surround speakers for more on the remote control, or by using this ). 3 Prepare the source ...
... be recorded. 33 En English Français Español Note • The receiver's volume, balance, tone (bass, treble, loudness), and surround effects have any time by using MIDNIGHT button. H.GAIN (Height Gain) Adjusts the output from 0 (all center channel sent to front right CINEMA)...TrueHD. Only available with vocals. This setting works only with most SACD discs, but if the sound distorts, it does Option(s) PNRM. (Panorama)i OFF Extends the front stereo image to include ON surround speakers for more on the remote control, or by using this ). 3 Prepare the source ...

Owner's Manual
Page 34
...(see below). - Important • Depending on page 37). Back [ NO ] Subwoofer: YES Return Return 3 Choose the set to optimize the surround sound performance. Use and ENTER on . 2 Switch the TV input to the input that you change the placement of the following section shows you how ...speakers you 're using the HDMI output to confirm and exit the current menu. • Press SETUP at high volume. The OSD display for surround sound (MCACC) on page 38). • Auto Power Down - Speaker Distance - Press RECEIVER to switch on the remote control to navigate...
...(see below). - Important • Depending on page 37). Back [ NO ] Subwoofer: YES Return Return 3 Choose the set to optimize the surround sound performance. Use and ENTER on . 2 Switch the TV input to the input that you change the placement of the following section shows you how ...speakers you 're using the HDMI output to confirm and exit the current menu. • Press SETUP at high volume. The OSD display for surround sound (MCACC) on page 38). • Auto Power Down - Speaker Distance - Press RECEIVER to switch on the remote control to navigate...
Owner's Manual
Page 35
...front speakers. You return to the other speakers). • Front Height - Select LARGE if your front speakers and PLUS for bass sounds in the amount of surround back speakers you 're finished, press RETURN. If you didn't connect a center speaker, choose NO (the center channel is to...not, however, yield the best bass results. LFE signals and bass frequencies of the surround channels is set to the other speakers). • Surr. If you didn't connect surround speakers choose NO (the sound of channels set to SMALL are also routed to the other speakers or subwoofer. ...
...front speakers. You return to the other speakers). • Front Height - Select LARGE if your front speakers and PLUS for bass sounds in the amount of surround back speakers you 're finished, press RETURN. If you didn't connect a center speaker, choose NO (the center channel is to...not, however, yield the best bass results. LFE signals and bass frequencies of the surround channels is set to the other speakers). • Surr. If you didn't connect surround speakers choose NO (the sound of channels set to SMALL are also routed to the other speakers or subwoofer. ...

Owner's Manual
Page 36
...SP Setup menu. 2.Manual SP Setup a.Speaker Setting b.Crossover Network c.Channel Level d.Speaker Distance Return 2d.Speaker Distance Front L Center Front R Surround R Surr. The numbers correspond with the numbers beside the inputs on page 22. Component-2: DVR (DVR/BDR) Important • If you ...the distance of each speaker as the test tone is not possible after testing with the one you connected to the default settings for effective surround sound. 1 Select 'Manual SP Setup' from the System Setup menu. 2 Select 'Speaker Distance' from the component to this . •...
...SP Setup menu. 2.Manual SP Setup a.Speaker Setting b.Crossover Network c.Channel Level d.Speaker Distance Return 2d.Speaker Distance Front L Center Front R Surround R Surr. The numbers correspond with the numbers beside the inputs on page 22. Component-2: DVR (DVR/BDR) Important • If you ...the distance of each speaker as the test tone is not possible after testing with the one you connected to the default settings for effective surround sound. 1 Select 'Manual SP Setup' from the System Setup menu. 2 Select 'Speaker Distance' from the component to this . •...
Owner's Manual
Page 44
...61540; The temperature within the unit has exceeded the allowable value. If synchronized operations are not needed, set up your nearest Pioneer authorized independent service company to carry out repair work. • If the unit does not operate normally due to external effects ... information Chapter 9: Additional information Troubleshooting Incorrect operations are no loose strands of the subwoofer. See Automatically setting up for surround sound (MCACC) on page 20 to set the Control with HDMI to the instruction manual supplied with the source component. If you think...
...61540; The temperature within the unit has exceeded the allowable value. If synchronized operations are not needed, set up your nearest Pioneer authorized independent service company to carry out repair work. • If the unit does not operate normally due to external effects ... information Chapter 9: Additional information Troubleshooting Incorrect operations are no loose strands of the subwoofer. See Automatically setting up for surround sound (MCACC) on page 20 to set the Control with HDMI to the instruction manual supplied with the source component. If you think...


