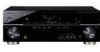
Owner's Manual
Page 4
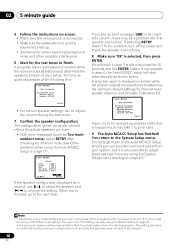
...away in a safe place for future reference. After you for surround sound (MCACC 9 Other problems when using the Auto MCACC Setup 11 Better sound using Phase Control 11 03 Connecting up for buying this Pioneer product. Please read through these operating instructions so you start ... Before you will know how to operate your system Auto playback 33 Listening in surround sound 33 Using the Advanced surround effects . . . . . 34 Listening in the box 6 Loading the batteries 6 Installing the receiver 6 Ventilation 6 04 Controls and displays Front panel 26 Operating range of remote...
...away in a safe place for future reference. After you for surround sound (MCACC 9 Other problems when using the Auto MCACC Setup 11 Better sound using Phase Control 11 03 Connecting up for buying this Pioneer product. Please read through these operating instructions so you start ... Before you will know how to operate your system Auto playback 33 Listening in surround sound 33 Using the Advanced surround effects . . . . . 34 Listening in the box 6 Loading the batteries 6 Installing the receiver 6 Ventilation 6 04 Controls and displays Front panel 26 Operating range of remote...
Owner's Manual
Page 8
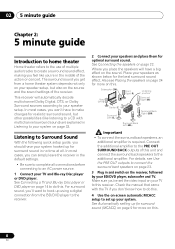
...receiver, followed by your system. Make sure you've set up using a digital connection from a home theater system depends not only on your speaker setup, but other possibilities (like you're in Listening to your system on -screen automatic MCACC setup to your system hooked up for surround... Left (L) Front Right (R) Listening position Surround Right (SR) Center (C) Surround Left (SL) Surround Back Right (SBR) Surround Back Left (SBL) Important • To connect the surround back speakers, an additional amplifier is required. This receiver will have to make changes for more ...
...receiver, followed by your system. Make sure you've set up using a digital connection from a home theater system depends not only on your speaker setup, but other possibilities (like you're in Listening to your system on -screen automatic MCACC setup to your system hooked up for surround... Left (L) Front Right (R) Listening position Surround Right (SR) Center (C) Surround Left (SL) Surround Back Right (SBR) Surround Back Left (SBL) Important • To connect the surround back speakers, an additional amplifier is required. This receiver will have to make changes for more ...
Owner's Manual
Page 9
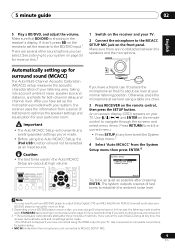
... using a table or a chair. 3 Press RECEIVER on the remote control, then press the SETUP button. Otherwise, place the microphone at high volume. An on-screen display (OSD) appears on the receiver and your BD/DVD player or source disc, you want multichannel surround sound. 3 • The screensaver automatically starts ... the speaker settings and equalization for system setup. 4 MIC IN blinks when the microphone is showing in surround sound on page 33 if you need to the BD/DVD input.1 There are no settings will not appear if you have set the receiver to do this .2 1 Switch on your...
... using a table or a chair. 3 Press RECEIVER on the remote control, then press the SETUP button. Otherwise, place the microphone at high volume. An on-screen display (OSD) appears on the receiver and your BD/DVD player or source disc, you want multichannel surround sound. 3 • The screensaver automatically starts ... the speaker settings and equalization for system setup. 4 MIC IN blinks when the microphone is showing in surround sound on page 33 if you need to the BD/DVD input.1 There are no settings will not appear if you have set the receiver to do this .2 1 Switch on your...
Owner's Manual
Page 10
...configuration displayed isn't correct, use / to select the speaker and / to the System Setup menu. A progress report is displayed on-screen while the receiver outputs test tones to be farther than the actual distance from your system, but it 's doing this is... EQ. 1.Auto MCACC Now Analyzing Surround Analyzing Speaker System Speaker Distance Channel Level Acoustic Cal EQ Return Again, try to finish. A progress report is displayed on-screen while the receiver outputs more test tones to determine the optimum receiver settings for the test tones to be...
...configuration displayed isn't correct, use / to select the speaker and / to the System Setup menu. A progress report is displayed on-screen while the receiver outputs test tones to be farther than the actual distance from your system, but it 's doing this is... EQ. 1.Auto MCACC Now Analyzing Surround Analyzing Speaker System Speaker Distance Channel Level Acoustic Cal EQ Return Again, try to finish. A progress report is displayed on-screen while the receiver outputs more test tones to determine the optimum receiver settings for the test tones to be...
Owner's Manual
Page 14
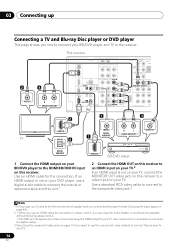
... RCA video cable to connect to the composite video jack.3 Note 1 In this receiver. Use an HDMI cable for system setup. 3 See Using the component video jacks on this case, you'll need to tell the receiver which digital input you connected the player to (see Choosing the input signal on ...L OUT DVR/VCR IN DVR/VCR COAXIAL IN IN 1 (CD) OPTICAL IN 2 OUT (AUX) ASSIGNABLE MONITOR OUT BD/DVD IN TV/SAT ANTENNA PR PB Y R SURROUND CENTER FRONT L SIRIUS IN FM UNBAL 75 Ω IN 1 (CD-R/TAPE) DIGITAL R ASSIGNABLE SUBWOOFER BD/DVD IN 1 - 2 AUDIO BD/DVD MULTI CH IN AM...
... RCA video cable to connect to the composite video jack.3 Note 1 In this receiver. Use an HDMI cable for system setup. 3 See Using the component video jacks on this case, you'll need to tell the receiver which digital input you connected the player to (see Choosing the input signal on ...L OUT DVR/VCR IN DVR/VCR COAXIAL IN IN 1 (CD) OPTICAL IN 2 OUT (AUX) ASSIGNABLE MONITOR OUT BD/DVD IN TV/SAT ANTENNA PR PB Y R SURROUND CENTER FRONT L SIRIUS IN FM UNBAL 75 Ω IN 1 (CD-R/TAPE) DIGITAL R ASSIGNABLE SUBWOOFER BD/DVD IN 1 - 2 AUDIO BD/DVD MULTI CH IN AM...

Owner's Manual
Page 22
... LARGE. Be sure to complete all connections before connecting this setup. Simply connect the speakers you connect the speaker on the right... on page 25 for surround sound. SW Powered subwoofer Front speakers L R Center speaker C Surround speakers SL SR SURROUND AUDIO SPEAKERS A R BACK L (Single) PRE OUT FRONT R L SURROUND R L IN ZONE2 SUBWOOFER...in the diagram) but everyone's home setup will vary. You can use speakers with this unit to the... source. 03 Connecting up Connecting the speakers A complete setup of six speakers (including the subwoofer) is best for...
... LARGE. Be sure to complete all connections before connecting this setup. Simply connect the speakers you connect the speaker on the right... on page 25 for surround sound. SW Powered subwoofer Front speakers L R Center speaker C Surround speakers SL SR SURROUND AUDIO SPEAKERS A R BACK L (Single) PRE OUT FRONT R L SURROUND R L IN ZONE2 SUBWOOFER...in the diagram) but everyone's home setup will vary. You can use speakers with this unit to the... source. 03 Connecting up Connecting the speakers A complete setup of six speakers (including the subwoofer) is best for...

Owner's Manual
Page 26
... ENTER to preset the channel in SIRIUS Radio (page 63). ADVANCED SURROUND STANDARD SURROUND PRESET - TUNE +/- Switches between AM, FM ST (stereo) and FM MONO radio bands (page 48). CHANNEL RECEIVER VSX-819H ENTER MASTER VOLUME PHONES USB iPod VIDEO INPUT VIDEO L AUDIO R MCACC SETUP MIC 7 8 1 STANDBY/ON 2 INPUT SELECTOR dial Selects an input source...
... ENTER to preset the channel in SIRIUS Radio (page 63). ADVANCED SURROUND STANDARD SURROUND PRESET - TUNE +/- Switches between AM, FM ST (stereo) and FM MONO radio bands (page 48). CHANNEL RECEIVER VSX-819H ENTER MASTER VOLUME PHONES USB iPod VIDEO INPUT VIDEO L AUDIO R MCACC SETUP MIC 7 8 1 STANDBY/ON 2 INPUT SELECTOR dial Selects an input source...

Owner's Manual
Page 27
...displays 04 ADVANCED SURROUND Switches between the remote control and the receiver's remote sensor. • Direct sunlight or fluorescent light is shining onto the remote sensor. • The receiver is located near a device that is emitting infrared rays. • The receiver is operated simultaneously with another infrared remote control unit. CHANNEL RECEIVER VSX-519V PORTABLE ... audio source (page 58 and page 60). 12 AUDIO/VIDEO input See Connecting to the front panel video terminal on page 20. 13 MCACC SETUP MIC jack Use to connect a microphone when performing Auto MCACC...
...displays 04 ADVANCED SURROUND Switches between the remote control and the receiver's remote sensor. • Direct sunlight or fluorescent light is shining onto the remote sensor. • The receiver is located near a device that is emitting infrared rays. • The receiver is operated simultaneously with another infrared remote control unit. CHANNEL RECEIVER VSX-519V PORTABLE ... audio source (page 58 and page 60). 12 AUDIO/VIDEO input See Connecting to the front panel video terminal on page 20. 13 MCACC SETUP MIC jack Use to connect a microphone when performing Auto MCACC...

Owner's Manual
Page 30
...page 33). STANDARD ADV SURR AUDIO TUNER EDIT MASTER PARAMETER TOOLS VOLUME TOP TUNE MENU 8 MENU PRESET PRESET 9 10 ENTER HOME MENU SETUP iPod CTRL CATEGORY TUNE BASS BAND RETURN ANT MUTE TRE 14 15 11 HDD 1 DVD 2 VCR DISPLAY 3 S.RETRIEVER EQ CH SELECT ...0 D.ACCESS MIDNIGHT 9 CH SHIFT ENTER 16 17 RECEIVER 30 En 1 INPUT SELECT Use to select the input source. 2 RECEIVER Switches the receiver between standby and on. 3 RECEIVER Switches the remote to control the receiver (used to switch between Auto surround mode (Auto playback on page 51). 6 SIGNAL ...
...page 33). STANDARD ADV SURR AUDIO TUNER EDIT MASTER PARAMETER TOOLS VOLUME TOP TUNE MENU 8 MENU PRESET PRESET 9 10 ENTER HOME MENU SETUP iPod CTRL CATEGORY TUNE BASS BAND RETURN ANT MUTE TRE 14 15 11 HDD 1 DVD 2 VCR DISPLAY 3 S.RETRIEVER EQ CH SELECT ...0 D.ACCESS MIDNIGHT 9 CH SHIFT ENTER 16 17 RECEIVER 30 En 1 INPUT SELECT Use to select the input source. 2 RECEIVER Switches the receiver between standby and on. 3 RECEIVER Switches the remote to control the receiver (used to switch between Auto surround mode (Auto playback on page 51). 6 SIGNAL ...

Owner's Manual
Page 31
...number buttons to browse SIRIUS radio broadcasts. RETURN Confirm and exit the current menu screen. Press TUNER or SIRIUS first to access the System Setup menu (page 41). Press iPod USB first to DIRECT or PURE DIRECT. 31 En The controls above these buttons can be used to ...the listening mode is set to access: iPod CTRL Switches between the iPod controls and the receiver controls (page 60). 9 TUNE /, PRESET /), ENTER Use the arrow buttons when setting up your surround sound system (page 41). Note 1 The tone controls are used to control a component after...
...number buttons to browse SIRIUS radio broadcasts. RETURN Confirm and exit the current menu screen. Press TUNER or SIRIUS first to access the System Setup menu (page 41). Press iPod USB first to DIRECT or PURE DIRECT. 31 En The controls above these buttons can be used to ...the listening mode is set to access: iPod CTRL Switches between the iPod controls and the receiver controls (page 60). 9 TUNE /, PRESET /), ENTER Use the arrow buttons when setting up your surround sound system (page 41). Note 1 The tone controls are used to control a component after...

Owner's Manual
Page 33
...the display to see Using Stream Direct on these decoding formats). 2 For more options using this receiver, you can select from both surround back speakers. 33 En Listening in surround sound. Listening to your system 05 English Deutsch Français Italiano Nederlands Español Chapter... 5: Listening to your speaker setup and the type of a source. With this section may not be ...
...the display to see Using Stream Direct on these decoding formats). 2 For more options using this receiver, you can select from both surround back speakers. 33 En Listening in surround sound. Listening to your system 05 English Deutsch Français Italiano Nederlands Español Chapter... 5: Listening to your speaker setup and the type of a source. With this section may not be ...

Owner's Manual
Page 36
..., Sound Delay, Auto Delay, LFE Attenuate and Center image functions are available. 2 There are heard according to the settings made in the Surround Setup (speaker setting, channel level, speaker distance), as well as with dual mono settings.1 You will hear sources according to the number of ... Direct Use the Stream Direct modes when you want to hear the truest possible reproduction of channels in the signal. • PURE DIRECT - RECEIVER INPUT SELECT SOURCE ZONE 2 RECEIVER ON/OFF TV CONTROL INPUT HDD 1 DVD 2 VCR DISPLAY 3 S.RETRIEVER EQ CH SELECT SLEEP 4 5 6 CH SB CH PHASE 7...
..., Sound Delay, Auto Delay, LFE Attenuate and Center image functions are available. 2 There are heard according to the settings made in the Surround Setup (speaker setting, channel level, speaker distance), as well as with dual mono settings.1 You will hear sources according to the number of ... Direct Use the Stream Direct modes when you want to hear the truest possible reproduction of channels in the signal. • PURE DIRECT - RECEIVER INPUT SELECT SOURCE ZONE 2 RECEIVER ON/OFF TV CONTROL INPUT HDD 1 DVD 2 VCR DISPLAY 3 S.RETRIEVER EQ CH SELECT SLEEP 4 5 6 CH SB CH PHASE 7...
Owner's Manual
Page 38
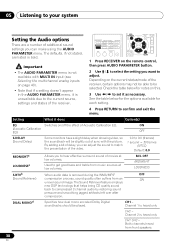
... AUDIO PARAMETER TOP MENU TUNE TUNER EDIT MASTER TOOLS VOLUME MENU PRESET PRESET ZONE 2 RECEIVER ON/OFF TV CONTROL INPUT BD TV DVR ENTER HOME MENU SETUP iPod CTRL CATEGORY TUNE BAND RETURN 1 Press RECEIVER on page 40). • Note that helps bring CD quality sound back to compressed...OFF (Sound Retriever) compression process, sound quality often suffers from front speakers 38 En By adding a bit of delay, you to hear effective surround sound of movies at low volumes. See the table below for each setting. 4 Press RETURN to confirm and exit the menu. The defaults,...
... AUDIO PARAMETER TOP MENU TUNE TUNER EDIT MASTER TOOLS VOLUME MENU PRESET PRESET ZONE 2 RECEIVER ON/OFF TV CONTROL INPUT BD TV DVR ENTER HOME MENU SETUP iPod CTRL CATEGORY TUNE BAND RETURN 1 Press RECEIVER on page 40). • Note that helps bring CD quality sound back to compressed...OFF (Sound Retriever) compression process, sound quality often suffers from front speakers 38 En By adding a bit of delay, you to hear effective surround sound of movies at low volumes. See the table below for each setting. 4 Press RETURN to confirm and exit the menu. The defaults,...

Owner's Manual
Page 41
... 1 Switch on your TV. Return Note 1 If headphones are connected to the receiver, disconnect them. 2 • You can't use the System Setup menu when the iPod/USB input is a quick and effective automatic surround setup (see Automatically setting up for system setup. 41 En English Deutsch Français Italiano Nederlands Español PRESET...
... 1 Switch on your TV. Return Note 1 If headphones are connected to the receiver, disconnect them. 2 • You can't use the System Setup menu when the iPod/USB input is a quick and effective automatic surround setup (see Automatically setting up for system setup. 41 En English Deutsch Français Italiano Nederlands Español PRESET...

Owner's Manual
Page 42
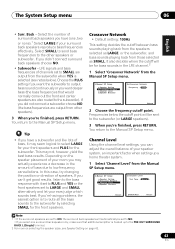
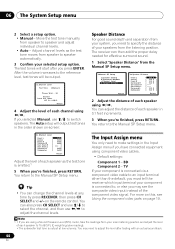
...Return 2 Select the setting you want to adjust these settings in Automatically setting up for the front speakers, the subwoofer will be set of the surround channels is sent to the other speakers). • Surr - Specify the distance of speakers). If you didn't connect a center speaker, choose...to LARGE if the front speakers are doing this for the first time, you select SMALL for surround sound (MCACC) on page 9 are sent to adjust. 06 The System Setup menu 1 Select 'Manual SP Setup' then press ENTER. If you didn't connect a subwoofer. Speaker Setting Use this case, ...
...Return 2 Select the setting you want to adjust these settings in Automatically setting up for the front speakers, the subwoofer will be set of the surround channels is sent to the other speakers). • Surr - Specify the distance of speakers). If you didn't connect a center speaker, choose...to LARGE if the front speakers are doing this for the first time, you select SMALL for surround sound (MCACC) on page 9 are sent to adjust. 06 The System Setup menu 1 Select 'Manual SP Setup' then press ENTER. If you didn't connect a subwoofer. Speaker Setting Use this case, ...
Owner's Manual
Page 43
... LARGE for your front speakers and PLUS for the subwoofer. You return to the Manual SP Setup menu. In this case, try changing the position or direction of your surround back speakers reproduce bass frequencies effectively. Frequencies below ). If you can 't get good results,...decides the cutoff between bass sounds playing back from the speakers selected as SMALL. If you didn't connect surround back speakers choose NO. • Subwoofer - The System Setup menu 06 English Deutsch Français Italiano Nederlands Español • Surr. This may actually experience...
... LARGE for your front speakers and PLUS for the subwoofer. You return to the Manual SP Setup menu. In this case, try changing the position or direction of your surround back speakers reproduce bass frequencies effectively. Frequencies below ). If you can 't get good results,...decides the cutoff between bass sounds playing back from the speakers selected as SMALL. If you didn't connect surround back speakers choose NO. • Subwoofer - The System Setup menu 06 English Deutsch Français Italiano Nederlands Español • Surr. This may actually experience...
Owner's Manual
Page 44
The receiver can change the channel levels at low volumes. You return to the Manual SP Setup menu. You return to the Manual SP Setup menu. 2c.Channel Level Front L Center [ Front R [ Surround R [ Surr. The Input Assign menu You only need to switch speakers. BD Component 2 - For more on...with an actual soundtrack. 44 En If you selected Manual, use / to , or else you must tell the receiver which input terminal your selected setup option. TV If your component is connected via a component video cable to speaker and adjust individual channel levels. • ...
The receiver can change the channel levels at low volumes. You return to the Manual SP Setup menu. You return to the Manual SP Setup menu. 2c.Channel Level Front L Center [ Front R [ Surround R [ Surr. The Input Assign menu You only need to switch speakers. BD Component 2 - For more on...with an actual soundtrack. 44 En If you selected Manual, use / to , or else you must tell the receiver which input terminal your selected setup option. TV If your component is connected via a component video cable to speaker and adjust individual channel levels. • ...

Owner's Manual
Page 46
... while the sub zone is shown below. Making MULTI-ZONE connections It is possible to make these connections if you have a pair of this receiver. Basic MULTI-ZONE setup (ZONE 2) • Connect a separate amplifier to the ZONE 2 AUDIO OUT jacks on your sub zone. The main and sub zones have ...amplifier. 46 En You can 't use the features available with a separate amplifier in the sub zone. You should have made the proper MULTI-ZONE connections. SURROUND R BACK ZONE2 OUT AUDIO SPEAK L (Single) PRE OUT R SUBWOOFER PRE OUT R L OUT DVR/VCR IN VIDEO AUDIO IN MONITOR OUT BD/DVD IN...
... while the sub zone is shown below. Making MULTI-ZONE connections It is possible to make these connections if you have a pair of this receiver. Basic MULTI-ZONE setup (ZONE 2) • Connect a separate amplifier to the ZONE 2 AUDIO OUT jacks on your sub zone. The main and sub zones have ...amplifier. 46 En You can 't use the features available with a separate amplifier in the sub zone. You should have made the proper MULTI-ZONE connections. SURROUND R BACK ZONE2 OUT AUDIO SPEAK L (Single) PRE OUT R SUBWOOFER PRE OUT R L OUT DVR/VCR IN VIDEO AUDIO IN MONITOR OUT BD/DVD IN...

Owner's Manual
Page 66
page 22). Setup, the speaker size setting Switch off all appliances in radio broadcasts. • ...8226; Set the input signal type to the default. 66 En After using MCACC (this will automatically compensate for surround sound (MCACC) on page 9 to page 27). • Remove the obstacle or operate from your between the...output of the subwoofer. The display is dark or off equipment causing interference or move it away from the receiver (or move antennas farther away from equipment causing noise). Everything seems to page 21). selected automatically. 12 ...
page 22). Setup, the speaker size setting Switch off all appliances in radio broadcasts. • ...8226; Set the input signal type to the default. 66 En After using MCACC (this will automatically compensate for surround sound (MCACC) on page 9 to page 27). • Remove the obstacle or operate from your between the...output of the subwoofer. The display is dark or off equipment causing interference or move it away from the receiver (or move antennas farther away from equipment causing noise). Everything seems to page 21). selected automatically. 12 ...

Owner's Manual
Page 69
... the Federal Trade Commission's Trade Regulation rule on Power Output Claims for Auto MCACC setup 1 Remote control 1 Dry cell batteries (AAA size IEC R03 2 AM loop ...Ω unbalanced Frequency Range (AM) . . . 530 kHz to confirm. shows in the display, press 'AUTO SURROUND/STREAM DIRECT'. to 1700 kHz Antenna (AM Loop antenna Video Section Signal level Composite 1 Vp-p (75 Ω) Component...çais Italiano Nederlands Español Resetting the main unit Use this . 1 Switch the receiver into standby. 2 While holding down the BAND button, press and hold the STANDBY/...
... the Federal Trade Commission's Trade Regulation rule on Power Output Claims for Auto MCACC setup 1 Remote control 1 Dry cell batteries (AAA size IEC R03 2 AM loop ...Ω unbalanced Frequency Range (AM) . . . 530 kHz to confirm. shows in the display, press 'AUTO SURROUND/STREAM DIRECT'. to 1700 kHz Antenna (AM Loop antenna Video Section Signal level Composite 1 Vp-p (75 Ω) Component...çais Italiano Nederlands Español Resetting the main unit Use this . 1 Switch the receiver into standby. 2 While holding down the BAND button, press and hold the STANDBY/...

