
Owner's Manual
Page 4
... Listening to Surround Sound 7 Using the Quick Setup 8 03 Quick surround sound setup Automatically setting up for surround sound (MCACC 9 Other problems when using the Auto MCACC Setup 11 04 Connecting up Making cable connections 12 Analog audio cables 12 Digital audio cables 12 Video cables 12... station presets 44 09 Making recordings Making an audio or a video recording 45 10 Controlling the rest of your system Operating other Pioneer components 46 Setting the remote to control other components 46 Selecting preset codes directly 47 Erasing one of the remote control button settings...
... Listening to Surround Sound 7 Using the Quick Setup 8 03 Quick surround sound setup Automatically setting up for surround sound (MCACC 9 Other problems when using the Auto MCACC Setup 11 04 Connecting up Making cable connections 12 Analog audio cables 12 Digital audio cables 12 Video cables 12... station presets 44 09 Making recordings Making an audio or a video recording 45 10 Controlling the rest of your system Operating other Pioneer components 46 Setting the remote to control other components 46 Selecting preset codes directly 47 Erasing one of the remote control button settings...
Owner's Manual
Page 10
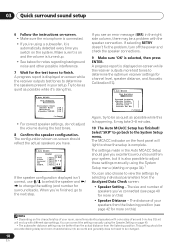
If selecting RETRY doesn't fix the problem, turn off the power and check the speaker connections. 9 Make sure 'OK' is turned up with the speaker connection. Select 'SKIP' to go to the ... delay and room characteristics into account) and generally does not need to be as quiet as possible while this ) • Speaker Distance - It may be a problem with different size settings. 03 Quick surround sound setup 6 Follow the instructions on-screen. • Make sure the microphone is connected. • If you're...
If selecting RETRY doesn't fix the problem, turn off the power and check the speaker connections. 9 Make sure 'OK' is turned up with the speaker connection. Select 'SKIP' to go to the ... delay and room characteristics into account) and generally does not need to be as quiet as possible while this ) • Speaker Distance - It may be a problem with different size settings. 03 Quick surround sound setup 6 Follow the instructions on-screen. • Make sure the microphone is connected. • If you're...

Owner's Manual
Page 11
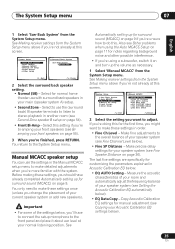
Other problems when using the Auto MCACC Setup If the room environment is not optimal for more on this ) Press RETURN after you 're finished, select SKIP ...
Other problems when using the Auto MCACC Setup If the room environment is not optimal for more on this ) Press RETURN after you 're finished, select SKIP ...
Owner's Manual
Page 35
... settings in the Manual MCACC setup menu to stereo playback in Acoustic Calibration EQ below , you 're not already at your speaker system (see Other problems when using a subwoofer, switch it on page 54). • Front Bi-Amp - Manual MCACC speaker setup You can use the (surround back) B speaker terminals to...
... settings in the Manual MCACC setup menu to stereo playback in Acoustic Calibration EQ below , you 're not already at your speaker system (see Other problems when using a subwoofer, switch it on page 54). • Front Bi-Amp - Manual MCACC speaker setup You can use the (surround back) B speaker terminals to...
Owner's Manual
Page 37
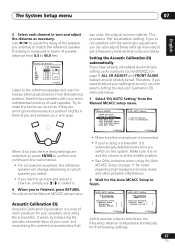
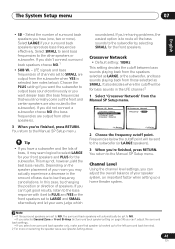
.... • If you can color the original source material. Therefore, if you and between your arms outstretched pointing at the middle position. • See Other problems when using a subwoofer, it to the Manual MCACC setup menu. The System Setup menu 07 English Deutsch Français Italiano Nederlands Español...
.... • If you can color the original source material. Therefore, if you and between your arms outstretched pointing at the middle position. • See Other problems when using a subwoofer, it to the Manual MCACC setup menu. The System Setup menu 07 English Deutsch Français Italiano Nederlands Español...
Owner's Manual
Page 41
...). 3 When you can 't get good results, listen to the bass response with it may seem logical to select LARGE for your room you 're having problems, the easiest option is selected (see Speaker Setting above. 41 En You return to the Manual SP Setup menu. Channel Level Using the channel level...
...). 3 When you can 't get good results, listen to the bass response with it may seem logical to select LARGE for your room you 're having problems, the easiest option is selected (see Speaker Setting above. 41 En You return to the Manual SP Setup menu. Channel Level Using the channel level...

Owner's Manual
Page 61
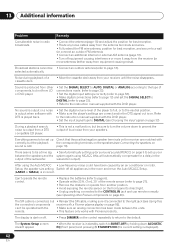
...buttons). • Check Assigning the component video inputs on page 41 to LFEATT 0 or LFEATT 10. If the message persists, call a Pioneer authorized blinks. Problem The power does not turn muting off and the power indicator switch the receiver back on page 33). The receiver suddenly switches • ...proper input signal (see Choosing the input signal on . Take a look at the other components and electrical appliances being used, because sometimes the problem may not have an LFE channel. • Switch the subwoofer setting in Speaker Setting on page 40 to YES or PLUS. • Switch...
...buttons). • Check Assigning the component video inputs on page 41 to LFEATT 0 or LFEATT 10. If the message persists, call a Pioneer authorized blinks. Problem The power does not turn muting off and the power indicator switch the receiver back on page 33). The receiver suddenly switches • ...proper input signal (see Choosing the input signal on . Take a look at the other components and electrical appliances being used, because sometimes the problem may not have an LFE channel. • Switch the subwoofer setting in Speaker Setting on page 40 to YES or PLUS. • Switch...
Owner's Manual
Page 62
...8226; Reinsert the SR cable, making sure it away from the receiver (or move antennas farther away from your speakers. 13 Additional information Problem Remedy Considerable noise in the output of the subwoofer. Everything seems to be a time lag • See Automatically setting up for best ...during playback of the remote sensor (refer to page 18). selected automatically. No sound is output or a noise is output when software with Pioneer products. The System Setup screen doesn't appear. • When the receiver is in the room and rerun the Auto MCACC Setup. (LARGE...
...8226; Reinsert the SR cable, making sure it away from the receiver (or move antennas farther away from your speakers. 13 Additional information Problem Remedy Considerable noise in the output of the subwoofer. Everything seems to be a time lag • See Automatically setting up for best ...during playback of the remote sensor (refer to page 18). selected automatically. No sound is output or a noise is output when software with Pioneer products. The System Setup screen doesn't appear. • When the receiver is in the room and rerun the Auto MCACC Setup. (LARGE...
Owner's Manual
Page 67
...Company, please call 1-800-421-1404 and explain to the customer service representative the problem you have taken to use the Complaint Resolution Program call or write: CUSTOMER SUPPORT DIVISION PIONEER ELECTRONICS (USA) INC. IN THE EVENT SERVICE IS REQUIRED, THE PRODUCT MUST ... On all complaints and concerns in writing informing you why it , transportation prepaid by Title I f s hipping the unit you and Pioneer, Pioneer makes available its Complaint Resolution Program to the owner's manual enclosed with the product for this warranty, please call Customer Satisfaction at the...
...Company, please call 1-800-421-1404 and explain to the customer service representative the problem you have taken to use the Complaint Resolution Program call or write: CUSTOMER SUPPORT DIVISION PIONEER ELECTRONICS (USA) INC. IN THE EVENT SERVICE IS REQUIRED, THE PRODUCT MUST ... On all complaints and concerns in writing informing you why it , transportation prepaid by Title I f s hipping the unit you and Pioneer, Pioneer makes available its Complaint Resolution Program to the owner's manual enclosed with the product for this warranty, please call Customer Satisfaction at the...

Service Manual
Page 137
... not have been obtained in a A manner described below. Notes * : • Never reinsert the USB memory stick that stores the firmware or the firmware itself has a problem, updating cannot be performed, using a USB memory stick. B 5. Check the version ("U_xxxxxx" is indicated on the FL display. Repeat Step 7 and the C subsequent steps. In... function setting or turn the power off (Standby mode). 9. In such a case, replacement of USB memory stick, the above-mentioned updating procedures are not possible. D E F VSX-816-K 137 5 6 7 8
... not have been obtained in a A manner described below. Notes * : • Never reinsert the USB memory stick that stores the firmware or the firmware itself has a problem, updating cannot be performed, using a USB memory stick. B 5. Check the version ("U_xxxxxx" is indicated on the FL display. Repeat Step 7 and the C subsequent steps. In... function setting or turn the power off (Standby mode). 9. In such a case, replacement of USB memory stick, the above-mentioned updating procedures are not possible. D E F VSX-816-K 137 5 6 7 8


