Owner's Manual
Page 1
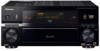
AUDIO/VIDEO MULTI-CHANNEL RECEIVER VSX-74TXVi VSX-74TXVi-S VSX-72TXV VSX-72TXV-S Register your product at www.pioneerelectronics.com (US) www.pioneerelectronics.ca (Canada) Operating Instructions
AUDIO/VIDEO MULTI-CHANNEL RECEIVER VSX-74TXVi VSX-74TXVi-S VSX-72TXV VSX-72TXV-S Register your product at www.pioneerelectronics.com (US) www.pioneerelectronics.ca (Canada) Operating Instructions

Owner's Manual
Page 2
... installation. and Australia Model C67-7-3_En Product Name: AUDIO/VIDEO MULTI-CHANNEL RECEIVER Model Number: VSX-74TXVi, VSX-74TXVi-S, VSX-72TXV, VSX-72TXV-S Responsible Party Name: PIONEER ELECTRONICS SERVICE INC. Reorient or relocate the receiving antenna. - D8-10-1-2_En This Class B digital apparatus complies with the... SANS EN LAISSER AUCUNE PARTIE A DECOUVERT. Operation is connected. - If this device must accept any interference received, including interference that the power cord can radiate radio frequency energy and, if not installed and used to connect...
... installation. and Australia Model C67-7-3_En Product Name: AUDIO/VIDEO MULTI-CHANNEL RECEIVER Model Number: VSX-74TXVi, VSX-74TXVi-S, VSX-72TXV, VSX-72TXV-S Responsible Party Name: PIONEER ELECTRONICS SERVICE INC. Reorient or relocate the receiving antenna. - D8-10-1-2_En This Class B digital apparatus complies with the... SANS EN LAISSER AUCUNE PARTIE A DECOUVERT. Operation is connected. - If this device must accept any interference received, including interference that the power cord can radiate radio frequency energy and, if not installed and used to connect...
Owner's Manual
Page 4
...Checking what's in the box 6 Ventilation 6 Installing the receiver 6 Loading the batteries 6 02 5 minute guide Introduction...Connecting your TV and DVD player 12 Connecting a satellite/cable receiver or other set-top box 13 Connecting a DVD/HDD recorder,...wire antenna 20 Connecting external antennas 20 Plugging in the receiver 20 AC outlet 20 05 Listening to your system Auto...Listening to station presets 31 07 The System Setup menu Making receiver settings from the System Setup menu 32 Automatic MCACC (Expert...iPod to the receiver 45 Remote control 24 Playing music from your iPod 45...
...Checking what's in the box 6 Ventilation 6 Installing the receiver 6 Loading the batteries 6 02 5 minute guide Introduction...Connecting your TV and DVD player 12 Connecting a satellite/cable receiver or other set-top box 13 Connecting a DVD/HDD recorder,...wire antenna 20 Connecting external antennas 20 Plugging in the receiver 20 AC outlet 20 05 Listening to your system Auto...Listening to station presets 31 07 The System Setup menu Making receiver settings from the System Setup menu 32 Automatic MCACC (Expert...iPod to the receiver 45 Remote control 24 Playing music from your iPod 45...
Owner's Manual
Page 5
...50 Using multi operations 71 Creating an i.LINK network 50 Using System off using the 12 volt trigger 58 Using this receiver with a Pioneer plasma display 58 Using the SR+ mode with a Pioneer plasma display 59 Connecting a PC for Advanced MCACC output . . . . . 60 Advanced MCACC output using your... Media® Audio 9 Professional 81 The Other Setup menu 62 About THX 82 Multi-Room and IR receiver setup 63 Listening modes with the product will be charged for Pioneer plasma displays 63 formats 83 OSD Adjustment 63 Stream direct with different input signal formats . . . 85...
...50 Using multi operations 71 Creating an i.LINK network 50 Using System off using the 12 volt trigger 58 Using this receiver with a Pioneer plasma display 58 Using the SR+ mode with a Pioneer plasma display 59 Connecting a PC for Advanced MCACC output . . . . . 60 Advanced MCACC output using your... Media® Audio 9 Professional 81 The Other Setup menu 62 About THX 82 Multi-Room and IR receiver setup 63 Listening modes with the product will be charged for Pioneer plasma displays 63 formats 83 OSD Adjustment 63 Stream direct with different input signal formats . . . 85...

Owner's Manual
Page 6
...installing this unit, make sure to leave space around the unit for iPod • Warranty card • These operating instructions Installing the receiver • When installing this unit, make sure the openings are never blocked or covered with governmental regulations or environmental public instruction's rules ...(such as leakage and bursting. 01 Before you start Chapter 1: Before you start Checking what's in the box Please check that you've received the following supplied accessories: • Setup microphone (cable: 20 ft.) • Remote control unit • AA/IEC R6P dry cell ...
...installing this unit, make sure to leave space around the unit for iPod • Warranty card • These operating instructions Installing the receiver • When installing this unit, make sure the openings are never blocked or covered with governmental regulations or environmental public instruction's rules ...(such as leakage and bursting. 01 Before you start Chapter 1: Before you start Checking what's in the box Please check that you've received the following supplied accessories: • Setup microphone (cable: 20 ft.) • Remote control unit • AA/IEC R6P dry cell ...

Owner's Manual
Page 7
... and the TV. Automatically setting up for more on this unit to an AC power source. 1 Connect your TV and DVD player. This receiver will automatically decode multichannel Dolby Digital, DTS, or Dolby Surround sources according to your speaker system on page 17. In most cases, you select... Front Left (L) Subwoofer (SW) Surround Right (SR) Listening position Surround Left (SL) Surround Back Right (SBR) Surround Back Left (SBL) 3 Plug in the receiver and switch it isn't, press DVD/LD on the remote control to set up using the Auto MCACC Setup the headphones should have set the...
... and the TV. Automatically setting up for more on this unit to an AC power source. 1 Connect your TV and DVD player. This receiver will automatically decode multichannel Dolby Digital, DTS, or Dolby Surround sources according to your speaker system on page 17. In most cases, you select... Front Left (L) Subwoofer (SW) Surround Right (SR) Listening position Surround Left (SL) Surround Back Right (SBR) Surround Back Left (SBL) 3 Plug in the receiver and switch it isn't, press DVD/LD on the remote control to set up using the Auto MCACC Setup the headphones should have set the...

Owner's Manual
Page 8
.... This setting should be accurate (taking delay and room characteristics into account) and generally does not need to determine the optimum receiver settings for the test tones to be as quiet as Ambient Noise or Microphone Check) select RETRY after checking for ambient noise ...SEL CONTROL ON/OFF VIDEO SELECT SIGNAL SBch SELECT PROCESSING STEREO MCACC SETUP MIC VIDEO/GAME 2 INPUT DIGITAL IN S-VIDEO VIDEO L AUDIO R 3 Press RECEIVER on the remote, then press SETUP.1 An on-screen display (OSD) appears on page 41. • The subwoofer distance setting may take 2-6 minutes....
.... This setting should be accurate (taking delay and room characteristics into account) and generally does not need to determine the optimum receiver settings for the test tones to be as quiet as Ambient Noise or Microphone Check) select RETRY after checking for ambient noise ...SEL CONTROL ON/OFF VIDEO SELECT SIGNAL SBch SELECT PROCESSING STEREO MCACC SETUP MIC VIDEO/GAME 2 INPUT DIGITAL IN S-VIDEO VIDEO L AUDIO R 3 Press RECEIVER on the remote, then press SETUP.1 An on-screen display (OSD) appears on page 41. • The subwoofer distance setting may take 2-6 minutes....

Owner's Manual
Page 9
... phase, preventing unwanted distortion and/or coloring of the source.3 If you're playing a Dolby Digital or DTS surround sound DVD disc, you connected this receiver. SURR SHIFT PHASE MCACC S.DIRECT 4 Use the volume control to switch on your listening position. Front speaker P H A S E C O N T O Sound N ... correction. You can use of phase matching4 for example a DVD player), your TV1 and subwoofer (if you have one), then the receiver (press RECEIVER). • Make sure the setup mic is disconnected. 2 Select the input source you may interfere with your DVD player or source discs...
... phase, preventing unwanted distortion and/or coloring of the source.3 If you're playing a Dolby Digital or DTS surround sound DVD disc, you connected this receiver. SURR SHIFT PHASE MCACC S.DIRECT 4 Use the volume control to switch on your listening position. Front speaker P H A S E C O N T O Sound N ... correction. You can use of phase matching4 for example a DVD player), your TV1 and subwoofer (if you have one), then the receiver (press RECEIVER). • Make sure the setup mic is disconnected. 2 Select the input source you may interfere with your DVD player or source discs...
Owner's Manual
Page 10
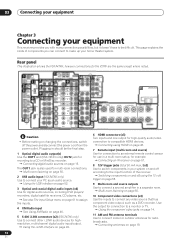
... connect other i.LINK audio devices for multi-room connections. Connecting using the 12 volt trigger on page 46. 5 S-400 i.LINK connectors (x2) (VSX-74TXVi only) Use to connect a second amplifier in a multi-room setup, for use in a separate room. Using the i.LINK interface on page 14...; Before making or changing the connections, switch off according to compatible HDMI devices. Connecting an IR receiver on page 52. 3 Optical and coaxial digital audio inputs (x6) Use for the 72TXV are the same except where noted. Plugging in your PC as a DVD recorder. Connecting digital audio...
... connect other i.LINK audio devices for multi-room connections. Connecting using the 12 volt trigger on page 46. 5 S-400 i.LINK connectors (x2) (VSX-74TXVi only) Use to connect a second amplifier in a multi-room setup, for use in a separate room. Using the i.LINK interface on page 14...; Before making or changing the connections, switch off according to compatible HDMI devices. Connecting an IR receiver on page 52. 3 Optical and coaxial digital audio inputs (x6) Use for the 72TXV are the same except where noted. Plugging in your PC as a DVD recorder. Connecting digital audio...
Owner's Manual
Page 11
Each set of the receiver. • When connecting optical cables, be careful when inserting the plug not to damage the shutter protecting the optical socket. • When storing optical cable, coil loosely. Operating other Pioneer components with this case, use an (analog) S-video or composite ...connect your equipment 03 12 Composite and S-video monitor outputs Use to connect monitors and TVs. Connecting your monitor/TV to the receiver's HDMI/component video outputs when connecting these resolutions cannot be downsampled, you must assign the input source to the S-video input to...
Each set of the receiver. • When connecting optical cables, be careful when inserting the plug not to damage the shutter protecting the optical socket. • When storing optical cable, coil loosely. Operating other Pioneer components with this case, use an (analog) S-video or composite ...connect your equipment 03 12 Composite and S-video monitor outputs Use to connect monitors and TVs. Connecting your monitor/TV to the receiver's HDMI/component video outputs when connecting these resolutions cannot be downsampled, you must assign the input source to the S-video input to...

Owner's Manual
Page 12
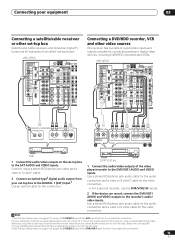
... DIGITAL PB PB PR PR OUT DVR/ VCR 2 IN ASSIGNABLE 1-3 S -VIDEO VIDEO COMPONENT VIDEO VIDEO R L AUDIO R SURROU B M OUT IN CONTROL VSX-74TXVi component video jacks on page 51. See also Connecting the multichannel analog inputs on page 14 if your DVD player to one of this...OPTICAL COAXIAL DIGITAL OUT S-VIDEO VIDEO OUT R AUDIO L ANALOG OUT 3 2 4 DVD player The diagram shows a basic setup of the optical inputs on this receiver together with a TV and DVD player, with S-video or composite video connections. BLE PR PR IN1 1-2 (DVD/ LD) IN2 IN3 Y Y IN2 OUT ...
... DIGITAL PB PB PR PR OUT DVR/ VCR 2 IN ASSIGNABLE 1-3 S -VIDEO VIDEO COMPONENT VIDEO VIDEO R L AUDIO R SURROU B M OUT IN CONTROL VSX-74TXVi component video jacks on page 51. See also Connecting the multichannel analog inputs on page 14 if your DVD player to one of this...OPTICAL COAXIAL DIGITAL OUT S-VIDEO VIDEO OUT R AUDIO L ANALOG OUT 3 2 4 DVD player The diagram shows a basic setup of the optical inputs on this receiver together with a TV and DVD player, with S-video or composite video connections. BLE PR PR IN1 1-2 (DVD/ LD) IN2 IN3 Y Y IN2 OUT ...
Owner's Manual
Page 13
... VIDEO VIDEO R L AUDIO R SURROUND BACK MULT OUT IN CONTROL Connecting a DVD/HDD recorder, VCR and other set-top box Satellite and cable receivers, and terrestrial digital TV tuners are all examples of so-called 'set -top box to (see The Input Setup menu on page 61). 3 If...video4 cable for the video connection. Connecting your equipment 03 Connecting a satellite/cable receiver or other video sources This receiver has two sets of the video player/recorder to the DVR/VCR1 AUDIO and VIDEO inputs. VSX-74TXVi MULTI-ROOM &SOURCE /REC SEL OUT1 ROOM3(ZONE3) OUT2 MULTI-ROOM &...
... VIDEO VIDEO R L AUDIO R SURROUND BACK MULT OUT IN CONTROL Connecting a DVD/HDD recorder, VCR and other set-top box Satellite and cable receivers, and terrestrial digital TV tuners are all examples of so-called 'set -top box to (see The Input Setup menu on page 61). 3 If...video4 cable for the video connection. Connecting your equipment 03 Connecting a satellite/cable receiver or other video sources This receiver has two sets of the video player/recorder to the DVR/VCR1 AUDIO and VIDEO inputs. VSX-74TXVi MULTI-ROOM &SOURCE /REC SEL OUT1 ROOM3(ZONE3) OUT2 MULTI-ROOM &...
Owner's Manual
Page 14
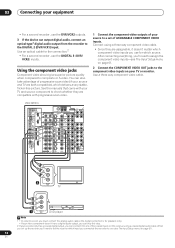
... with your video component doesn't have a digital audio output, you set of your recorder only has a coaxial digital output, you can skip this receiver using a three-way component video cable. • Since they are both compatible), which source. CENTER SURROUND R L IN XM DIGITAL PB PB...composite or S-video. See the manuals that came with progressive-scan video. 1 Connect the component video outputs of ASSIGNABLE COMPONENT VIDEO inputs. VSX-74TXVi MULTI-ROOM &SOURCE /REC SEL OUT1 ROOM3(ZONE3) OUT2 MULTI-ROOM & SOURCE IN ROOM2(ZONE2) OUT FM UNBAL 75Ω MONITOR...
... with your video component doesn't have a digital audio output, you set of your recorder only has a coaxial digital output, you can skip this receiver using a three-way component video cable. • Since they are both compatible), which source. CENTER SURROUND R L IN XM DIGITAL PB PB...composite or S-video. See the manuals that came with progressive-scan video. 1 Connect the component video outputs of ASSIGNABLE COMPONENT VIDEO inputs. VSX-74TXVi MULTI-ROOM &SOURCE /REC SEL OUT1 ROOM3(ZONE3) OUT2 MULTI-ROOM & SOURCE IN ROOM2(ZONE2) OUT FM UNBAL 75Ω MONITOR...

Owner's Manual
Page 15
... PB (CD-R) 1-4 IN2 ASSIGNA- Use an optical cable for making digital recordings. Use an optical cable to connect to the DIGITAL OUT1 or (VSX-74TXVi only) OUT2 (OUT1 is shown in Connecting analog audio sources below. 3 • Microsoft, Windows Media®, and the Windows logo are trademarks..., or registered trademarks of the coaxial inputs on this receiver. must be downsampled to 48kHz. 15 En Note that WMA9 Pro 96kHz sources will be able to output WMA9 Pro format audio signals through a...
... PB (CD-R) 1-4 IN2 ASSIGNA- Use an optical cable for making digital recordings. Use an optical cable to connect to the DIGITAL OUT1 or (VSX-74TXVi only) OUT2 (OUT1 is shown in Connecting analog audio sources below. 3 • Microsoft, Windows Media®, and the Windows logo are trademarks..., or registered trademarks of the coaxial inputs on this receiver. must be downsampled to 48kHz. 15 En Note that WMA9 Pro 96kHz sources will be able to output WMA9 Pro format audio signals through a...

Owner's Manual
Page 16
...deck, MD recorder, etc., connect the analog audio outputs (OUT) to the analog audio inputs on this receiver. • If your equipment Connecting analog audio sources This receiver features three stereo audio-only inputs. SPEAKERS PHONES (TUNE +) AV PARAMETER (ST -) SETUP ENTER TUNER ...EDIT (ST +) RETURN (TUNE -) BAND MULTI - This input also has a grounding terminal that most turntables require. 2 Turntable VSX-74TXVi M & SOURCE ONE2...
...deck, MD recorder, etc., connect the analog audio outputs (OUT) to the analog audio inputs on this receiver. • If your equipment Connecting analog audio sources This receiver features three stereo audio-only inputs. SPEAKERS PHONES (TUNE +) AV PARAMETER (ST -) SETUP ENTER TUNER ...EDIT (ST +) RETURN (TUNE -) BAND MULTI - This input also has a grounding terminal that most turntables require. 2 Turntable VSX-74TXVi M & SOURCE ONE2...

Owner's Manual
Page 17
... VCR 2 IN ASSIGNABLE 1-3 S -VIDEO VIDEO COMPONENT VIDEO VIDEO R L AUDIO R SURROUND L BACK RS-232C MULTI CH OUT IN IN CONTROL VSX-74TXVi CENTER R SURROUND L AC OUTLET SWITCHED 100W(0.8A)MAX SURROUND R BACK / L(Single) B SELECTABLE Surround left Surround right Surround back left and... right speakers only are necessary. If any of the receiver's surround sound capabilities connect front, center, surround and surround back speakers, as well as a pair, but you can use speakers with...
... VCR 2 IN ASSIGNABLE 1-3 S -VIDEO VIDEO COMPONENT VIDEO VIDEO R L AUDIO R SURROUND L BACK RS-232C MULTI CH OUT IN IN CONTROL VSX-74TXVi CENTER R SURROUND L AC OUTLET SWITCHED 100W(0.8A)MAX SURROUND R BACK / L(Single) B SELECTABLE Surround left Surround right Surround back left and... right speakers only are necessary. If any of the receiver's surround sound capabilities connect front, center, surround and surround back speakers, as well as a pair, but you can use speakers with...
Owner's Manual
Page 20
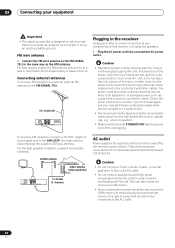
... the supplied AM loop antenna. Caution • Do not connect a TV set, monitor, heater, or similar appliance to be disconnected by the receiver's power switch. Do not place the unit, a piece of connected equipment should be stepped on and off by removing the mains plug from the...reception, connect a 15-18 ft. Check the power cord once in the cord or tie it damaged, ask your nearest Pioneer authorized independent service company for a replacement. • The receiver should not exceed 100 W (0.8 A). If you find it with high power consumption to the AC outlet in after you...
... the supplied AM loop antenna. Caution • Do not connect a TV set, monitor, heater, or similar appliance to be disconnected by the receiver's power switch. Do not place the unit, a piece of connected equipment should be stepped on and off by removing the mains plug from the...reception, connect a 15-18 ft. Check the power cord once in the cord or tie it damaged, ask your nearest Pioneer authorized independent service company for a replacement. • The receiver should not exceed 100 W (0.8 A). If you find it with high power consumption to the AC outlet in after you...

Owner's Manual
Page 21
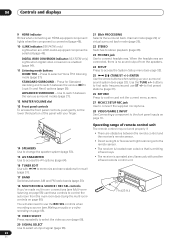
...MCACC POSITION - Press to select an input source. 2 STANDBY/ON Switches the receiver between MCACC presets (page 28). Controls and displays 04 Chapter 4: Controls and displays Front panel Illustration shows the VSX-74TXVi front panel 12 3 45 67 8 STANDBY/ON PHASE CONTROL PHASE CONTROL... INPUT SELECTOR MCACC AUTO SURR/ POSITION STREAM DIRECT DIGITAL PRECISION PROCESSING 9 10 11 12 AUDIO/VIDEO MULTI-CHANNEL RECEIVER VSX-74TXVi HOME THX STANDARD SURROUND ADVANCED SURROUND MASTER VOLUME 13 14 15 16 17 18 19 20 21 22 SPEAKERS PHONES (TUNE ...
...MCACC POSITION - Press to select an input source. 2 STANDBY/ON Switches the receiver between MCACC presets (page 28). Controls and displays 04 Chapter 4: Controls and displays Front panel Illustration shows the VSX-74TXVi front panel 12 3 45 67 8 STANDBY/ON PHASE CONTROL PHASE CONTROL... INPUT SELECTOR MCACC AUTO SURR/ POSITION STREAM DIRECT DIGITAL PRECISION PROCESSING 9 10 11 12 AUDIO/VIDEO MULTI-CHANNEL RECEIVER VSX-74TXVi HOME THX STANDARD SURROUND ADVANCED SURROUND MASTER VOLUME 13 14 15 16 17 18 19 20 21 22 SPEAKERS PHONES (TUNE ...
Owner's Manual
Page 22
... only) Lights when an i.LINK-Audio-equipped component is enabled (page 64). 11 Listening mode buttons HOME THX - DIGITAL VIDEO CONVERSION indicator (VSX-72TXV only) Lights when digital video conversion is selected (page 49). When the headphones are obstacles between AM and FM radio bands (page 30). 18 MULTI... the main room (see Making an audio or a video recording on page 56). STANDBY/ON 30 30 7m (23 ft.) AUDIO/VIDEO MULTI-CHANNEL RECEIVER 19 VIDEO SELECT Press repeatedly to select the video source (page 66). 20 SIGNAL SELECT Use to access the AV options (page 64). Press to...
... only) Lights when an i.LINK-Audio-equipped component is enabled (page 64). 11 Listening mode buttons HOME THX - DIGITAL VIDEO CONVERSION indicator (VSX-72TXV only) Lights when digital video conversion is selected (page 49). When the headphones are obstacles between AM and FM radio bands (page 30). 18 MULTI... the main room (see Making an audio or a video recording on page 56). STANDBY/ON 30 30 7m (23 ft.) AUDIO/VIDEO MULTI-CHANNEL RECEIVER 19 VIDEO SELECT Press repeatedly to select the video source (page 66). 20 SIGNAL SELECT Use to access the AV options (page 64). Press to...

Owner's Manual
Page 23
... is switched on (see Listening in sleep mode (page 66). 16 Matrix decoding format indicators 2PRO LOGIC IIx - AUTO lights when the receiver is set using the MPX button. 10 Master volume level Shows the overall volume level. -80dB indicates the minimum level, and +12dB ... to indicate the current speaker system, A and/or B (page 53). 14 Listening mode indicators THX - Neo:6 - Lights when digital video conversion is being received in digital sources. ADV. Low frequency effects channel (the ((( ))) indicators light when an LFE signal is active (page 55). 6 VIDEO CONV. STANDARD -...
... is switched on (see Listening in sleep mode (page 66). 16 Matrix decoding format indicators 2PRO LOGIC IIx - AUTO lights when the receiver is set using the MPX button. 10 Master volume level Shows the overall volume level. -80dB indicates the minimum level, and +12dB ... to indicate the current speaker system, A and/or B (page 53). 14 Listening mode indicators THX - Neo:6 - Lights when digital video conversion is being received in digital sources. ADV. Low frequency effects channel (the ((( ))) indicators light when an LFE signal is active (page 55). 6 VIDEO CONV. STANDARD -...


