Owner's Manual
Page 3
... time, unplug it can result in a risk of fire or electric shock. POWER-CORD PROTECTION - Article 810 of the National Electrical Code, ANSI/NFPA 70, provides information with regard to proper grounding of the mast and supporting structure, grounding of the lead-in wire to an antenna discharge unit, size of grounding conductors, location of important operating and maintenance (servicing) instructions...
... time, unplug it can result in a risk of fire or electric shock. POWER-CORD PROTECTION - Article 810 of the National Electrical Code, ANSI/NFPA 70, provides information with regard to proper grounding of the mast and supporting structure, grounding of the lead-in wire to an antenna discharge unit, size of grounding conductors, location of important operating and maintenance (servicing) instructions...
Owner's Manual
Page 4
... component video jacks 14 Connecting digital audio sources 15 About the WMA9 Pro decoder 15 Connecting analog audio sources 16 Connecting a component to the front panel inputs . . 16 Installing your speaker system 17 Connecting the speakers 17 Placing the speakers 18 THX speaker system setup 19 Connecting antennas 19 AM loop antenna 19 FM wire antenna 20 Connecting external antennas 20 Plugging in the receiver 20 AC outlet 20 05 Listening to your system Auto playback 26 Listening in surround sound 26 Standard surround sound 26 Using the Home...
... component video jacks 14 Connecting digital audio sources 15 About the WMA9 Pro decoder 15 Connecting analog audio sources 16 Connecting a component to the front panel inputs . . 16 Installing your speaker system 17 Connecting the speakers 17 Placing the speakers 18 THX speaker system setup 19 Connecting antennas 19 AM loop antenna 19 FM wire antenna 20 Connecting external antennas 20 Plugging in the receiver 20 AC outlet 20 05 Listening to your system Auto playback 26 Listening in surround sound 26 Standard surround sound 26 Using the Home...
Owner's Manual
Page 5
...+ mode with a Pioneer plasma display 59 Connecting a PC for Advanced MCACC output . . . . . 60 Advanced MCACC output using your PC 60 12 Additional information Troubleshooting 74 Power 74 No sound 74 Other audio problems 75 Video 76 Settings 76 Display 77 Remote control 78 i.LINK interface 78 i.LINK messages 79 USB interface 79 HDMI 79 iPod messages 80 XM radio messages 80 Surround sound formats 81 09 Other Settings Dolby 81 The Input Setup menu 61 DTS 81 Input function default and...
...+ mode with a Pioneer plasma display 59 Connecting a PC for Advanced MCACC output . . . . . 60 Advanced MCACC output using your PC 60 12 Additional information Troubleshooting 74 Power 74 No sound 74 Other audio problems 75 Video 76 Settings 76 Display 77 Remote control 78 i.LINK interface 78 i.LINK messages 79 USB interface 79 HDMI 79 iPod messages 80 XM radio messages 80 Surround sound formats 81 09 Other Settings Dolby 81 The Input Setup menu 61 DTS 81 Input function default and...

Owner's Manual
Page 8
... incorrect speaker settings. 6 If you excellent surround sound from the MCACC Data Check screen. Place the microphone so that it is selected,3 select an MCACC preset4 then select OK. 6 Follow the instructions on-screen. ROOM & SOURCE/REC SEL CONTROL ON/OFF VIDEO SELECT SIGNAL SBch SELECT PROCESSING STEREO MCACC SETUP MIC VIDEO/GAME 2 INPUT DIGITAL IN S-VIDEO VIDEO L AUDIO R 3 Press RECEIVER on the remote, then press SETUP.1 An on-screen display (OSD) appears on your TV. 2 Connect the microphone to a comfortable volume level. 7 Wait for channel level, speaker...
... incorrect speaker settings. 6 If you excellent surround sound from the MCACC Data Check screen. Place the microphone so that it is selected,3 select an MCACC preset4 then select OK. 6 Follow the instructions on-screen. ROOM & SOURCE/REC SEL CONTROL ON/OFF VIDEO SELECT SIGNAL SBch SELECT PROCESSING STEREO MCACC SETUP MIC VIDEO/GAME 2 INPUT DIGITAL IN S-VIDEO VIDEO L AUDIO R 3 Press RECEIVER on the remote, then press SETUP.1 An on-screen display (OSD) appears on your TV. 2 Connect the microphone to a comfortable volume level. 7 Wait for channel level, speaker...

Owner's Manual
Page 9
... volume level. P Front speaker H A S E C O N T O F Sound F source Subwoofer Listening position ? RECEIVER INPUT SELECT SYSTEM OFF SOURCE GUIDE TV CONTROL TV VOL INPUT SELECT TV CH VOL REC DTV INFO MUTE MPX REC STOP MEMORY CD DVD DVR2 DVR1 TV SAT CD-R i Pod VIDEO 2 VIDEO 1 TV CONT XM RADIO TUNER ROOM2/3 RECEIVER AUDIO SUBTITLE HDD DISP CH STATUS SIGNAL SEL SBch DVD CH STEREO MULTI OPE THX STANDARD ADV. Front speaker P H A S E C O N T O Sound N source Subwoofer Listening position 1 Switch on the playback component (for example a DVD player...
... volume level. P Front speaker H A S E C O N T O F Sound F source Subwoofer Listening position ? RECEIVER INPUT SELECT SYSTEM OFF SOURCE GUIDE TV CONTROL TV VOL INPUT SELECT TV CH VOL REC DTV INFO MUTE MPX REC STOP MEMORY CD DVD DVR2 DVR1 TV SAT CD-R i Pod VIDEO 2 VIDEO 1 TV CONT XM RADIO TUNER ROOM2/3 RECEIVER AUDIO SUBTITLE HDD DISP CH STATUS SIGNAL SEL SBch DVD CH STEREO MULTI OPE THX STANDARD ADV. Front speaker P H A S E C O N T O Sound N source Subwoofer Listening position 1 Switch on the playback component (for example a DVD player...
Owner's Manual
Page 11
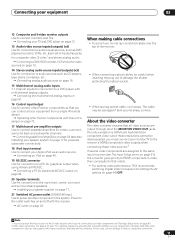
... switches on and off with the receiver. Power to audio/visual sources, such as CD players, tape decks, turntables, etc. The only exception is HDMI and high-definition component video: since these video sources.2 If several video components are output through all of the MONITOR VIDEO OUT jacks. Connecting a DVD/HDD recorder, VCR and other video sources on page 13. 14 Stereo analog audio source inputs/(outputs) (x3) Use for connection to which you've connected your video component (see The Input Setup menu on your component or display. Connecting...
... switches on and off with the receiver. Power to audio/visual sources, such as CD players, tape decks, turntables, etc. The only exception is HDMI and high-definition component video: since these video sources.2 If several video components are output through all of the MONITOR VIDEO OUT jacks. Connecting a DVD/HDD recorder, VCR and other video sources on page 13. 14 Stereo analog audio source inputs/(outputs) (x3) Use for connection to which you've connected your video component (see The Input Setup menu on your component or display. Connecting...
Owner's Manual
Page 22
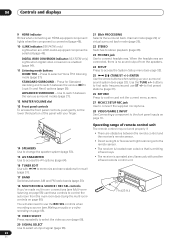
... menu screen. 27 MCACC SETUP MIC jack Use to connect the supplied microphone. 28 VIDEO/GAME 2 INPUT See Connecting a component to access the AV options (page 64). STANDBY/ON 30 30 7m (23 ft.) AUDIO/VIDEO MULTI-CHANNEL RECEIVER 19 VIDEO SELECT Press repeatedly to select the video source (page 66). 20 SIGNAL SELECT Use to select a Home THX listening mode (page 27). 04 Controls and displays 9 HDMI indicator Blinks when connecting an HDMI-equipped component; STANDARD SURROUND - Use the TUNE +/- Press to select an input signal (page 28). 22 En buttons to switch...
... menu screen. 27 MCACC SETUP MIC jack Use to connect the supplied microphone. 28 VIDEO/GAME 2 INPUT See Connecting a component to access the AV options (page 64). STANDBY/ON 30 30 7m (23 ft.) AUDIO/VIDEO MULTI-CHANNEL RECEIVER 19 VIDEO SELECT Press repeatedly to select the video source (page 66). 20 SIGNAL SELECT Use to select a Home THX listening mode (page 27). 04 Controls and displays 9 HDMI indicator Blinks when connecting an HDMI-equipped component; STANDARD SURROUND - Use the TUNE +/- Press to select an input signal (page 28). 22 En buttons to switch...
Owner's Manual
Page 24
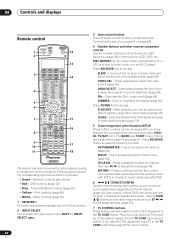
...) 1 RECEIVER This switches between the three banks (classes) of radio station presets (page 31). 5 Tuner/component control buttons/SETUP These button controls can be used to control DVD menus/options and for INPUT SELECT ). 3 Input source buttons Press to select control of a double cassette deck player. Use to access the AV options (page 64). Press TUNER first to select the video source (page 66). Press to select a disc in sleep mode and select the amount of time before sleep (page 66). ANALOG ATT - DIMMER - CH LEVEL...
...) 1 RECEIVER This switches between the three banks (classes) of radio station presets (page 31). 5 Tuner/component control buttons/SETUP These button controls can be used to control DVD menus/options and for INPUT SELECT ). 3 Input source buttons Press to select control of a double cassette deck player. Use to access the AV options (page 64). Press TUNER first to select the video source (page 66). Press to select a disc in sleep mode and select the amount of time before sleep (page 66). ANALOG ATT - DIMMER - CH LEVEL...

Owner's Manual
Page 25
... turn on page 69. LEARNING - See Direct function on page 70. Use to set the listening volume. 16 MUTE Mutes the sound or restores the sound if it using the input source buttons. See Multi Operation and System Off on page 70. Switches between the various surround modes (page 27). 18 PHASE - Press to switch between named station presets and radio frequencies (page 31). 9 STATUS Press to check selected receiver settings (page 66). 10 MULTIOPE Use...
... turn on page 69. LEARNING - See Direct function on page 70. Use to set the listening volume. 16 MUTE Mutes the sound or restores the sound if it using the input source buttons. See Multi Operation and System Off on page 70. Switches between the various surround modes (page 27). 18 PHASE - Press to switch between named station presets and radio frequencies (page 31). 9 STATUS Press to check selected receiver settings (page 66). 10 MULTIOPE Use...
Owner's Manual
Page 33
... VIDEO SELECT SIGNAL SBch SELECT PROCESSING STEREO MCACC SETUP MIC VIDEO/GAME 2 INPUT DIGITAL IN S-VIDEO VIDEO L AUDIO R If you have a tripod, use two more on this . • Do not adjust the volume during the test tones. Optionally,5 FRONT ALIGN sets all speakers to SMALL), otherwise leave it is on bi-amping your front speakers, or setting up . • See Problems when using THX speakers (set the following parameters: 1.Auto MCACC Option Auto Mode [ ALL ] Speaker settings will be at your current speaker setting...
... VIDEO SELECT SIGNAL SBch SELECT PROCESSING STEREO MCACC SETUP MIC VIDEO/GAME 2 INPUT DIGITAL IN S-VIDEO VIDEO L AUDIO R If you have a tripod, use two more on this . • Do not adjust the volume during the test tones. Optionally,5 FRONT ALIGN sets all speakers to SMALL), otherwise leave it is on bi-amping your front speakers, or setting up . • See Problems when using THX speakers (set the following parameters: 1.Auto MCACC Option Auto Mode [ ALL ] Speaker settings will be at your current speaker setting...

Owner's Manual
Page 34
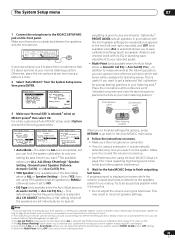
... adjust these settings manually using the Manual speaker setup on this system. In addition to view the settings by selecting individual parameters from the listening position. Press RETURN to go back to determine the optimum receiver settings for more test tones to the System Setup menu. The overall balance of your main listening position. 8 The Auto MCACC Setup has finished! Note 1 This screen is displayed on -screen should give you excellent surround sound...
... adjust these settings manually using the Manual speaker setup on this system. In addition to view the settings by selecting individual parameters from the listening position. Press RETURN to go back to determine the optimum receiver settings for more test tones to the System Setup menu. The overall balance of your main listening position. 8 The Auto MCACC Setup has finished! Note 1 This screen is displayed on -screen should give you excellent surround sound...
Owner's Manual
Page 35
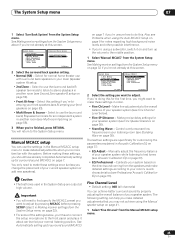
... achieve using a subwoofer, switch it about ear level at high volume. Caution • The test tones used in the System Setup are specifically for the first time, you might want to the middle position. 1 Select 'Manual MCACC' from the speakers and make detailed adjustments that you 're biamping your front speakers (see Fine Channel Level below , you 're not already at this screen. See Making receiver settings from the System Setup menu above...
... achieve using a subwoofer, switch it about ear level at high volume. Caution • The test tones used in the System Setup are specifically for the first time, you might want to the middle position. 1 Select 'Manual MCACC' from the speakers and make detailed adjustments that you 're biamping your front speakers (see Fine Channel Level below , you 're not already at this screen. See Making receiver settings from the System Setup menu above...

Owner's Manual
Page 37
... the channel level for more on the direct sound coming from the Manual MCACC setup menu. 3.Manual MCACC a.Fine Ch Level b.Fine SP Distance c.Standing Wave d.EQ Adjust e.EQ Professional 3d.EQ Adjust MCACC:M1. Use the / buttons to select the frequency and / to the Manual MCACC setup menu. The Standing Wave Control uses filters to another MCACC preset. • Standing Wave control filter settings cannot be displayed on-screen, or using a computer (with the Auto MCACC Setup...
... the channel level for more on the direct sound coming from the Manual MCACC setup menu. 3.Manual MCACC a.Fine Ch Level b.Fine SP Distance c.Standing Wave d.EQ Adjust e.EQ Professional 3d.EQ Adjust MCACC:M1. Use the / buttons to select the frequency and / to the Manual MCACC setup menu. The Standing Wave Control uses filters to another MCACC preset. • Standing Wave control filter settings cannot be displayed on-screen, or using a computer (with the Auto MCACC Setup...
Owner's Manual
Page 51
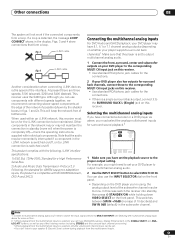
If a loop is selected, you can be set to output multichannel analog audio. 1 Connect the front, surround, center and subwoofer outputs on your DVD player to the corresponding MULTI CH input jack on this receiver. • Use standard RCA/phono jack cables for the connections. 2 If your DVD player also has outputs for surround back channels, connect these to the corresponding MULTI CH input jacks on /off )-check the operating instructions supplied with different speeds together, we recommend connecting slower-speed components at the edge...
If a loop is selected, you can be set to output multichannel analog audio. 1 Connect the front, surround, center and subwoofer outputs on your DVD player to the corresponding MULTI CH input jack on this receiver. • Use standard RCA/phono jack cables for the connections. 2 If your DVD player also has outputs for surround back channels, connect these to the corresponding MULTI CH input jacks on /off )-check the operating instructions supplied with different speeds together, we recommend connecting slower-speed components at the edge...
Owner's Manual
Page 52
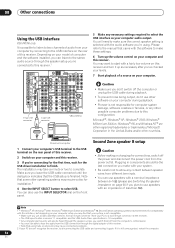
... SUB W. Please refer to the manual that using . If it up the volume control on your PC doesn't recognize the receiver, try disconnecting the USB cable and connecting it again. CENTER SURROUND R L IN XM DIGITAL PB PB PR PR OUT DVR/ VCR 2 IN ASSIGNABLE 1-3 S -VIDEO VIDEO COMPONENT VIDEO VIDEO R L AUDIO R SURROUND L BACK RS-232C MULTI CH OUT IN IN CONTROL B-type USB connector A-type USB connector VSX-74TXVi 5 Make any contact between speaker wires...
... SUB W. Please refer to the manual that using . If it up the volume control on your PC doesn't recognize the receiver, try disconnecting the USB cable and connecting it again. CENTER SURROUND R L IN XM DIGITAL PB PB PR PR OUT DVR/ VCR 2 IN ASSIGNABLE 1-3 S -VIDEO VIDEO COMPONENT VIDEO VIDEO R L AUDIO R SURROUND L BACK RS-232C MULTI CH OUT IN IN CONTROL B-type USB connector A-type USB connector VSX-74TXVi 5 Make any contact between speaker wires...

Owner's Manual
Page 56
.... ROOM & SOURCE/REC SEL CONTROL ON/OFF VIDEO SELECT SIGNAL SBch SELECT PROCESSING STEREO MCACC SETUP MIC VIDEO/GAME 2 INPUT DIGITAL IN S-VIDEO VIDEO L AUDIO R STANDBY/ON PHASE CONTROL PHASE CONTROL INPUT SELECTOR MCACC AUTO SURR/ POSITION STREAM DIRECT DIGITAL PRECISION PROCESSING AUDIO/VIDEO MULTI-CHANNEL RECEIVER VSX-74TXVi HOME THX STANDARD SURROUND ADVANCED SURROUND MASTER VOLUME 1 Press the MULTI ROOM & SOURCE ON/OFF button on the rear of speakers attached to hear the digital output of this also selects the RECOUT input source. Selects your selected sub room...
.... ROOM & SOURCE/REC SEL CONTROL ON/OFF VIDEO SELECT SIGNAL SBch SELECT PROCESSING STEREO MCACC SETUP MIC VIDEO/GAME 2 INPUT DIGITAL IN S-VIDEO VIDEO L AUDIO R STANDBY/ON PHASE CONTROL PHASE CONTROL INPUT SELECTOR MCACC AUTO SURR/ POSITION STREAM DIRECT DIGITAL PRECISION PROCESSING AUDIO/VIDEO MULTI-CHANNEL RECEIVER VSX-74TXVi HOME THX STANDARD SURROUND ADVANCED SURROUND MASTER VOLUME 1 Press the MULTI ROOM & SOURCE ON/OFF button on the rear of speakers attached to hear the digital output of this also selects the RECOUT input source. Selects your selected sub room...

Owner's Manual
Page 57
... FL R L iPod SUB W. CENTER SURROUND R L IN XM DIGITAL PB PB PR PR OUT DVR/ VCR 2 IN ASSIGNABLE 1-3 S -VIDEO VIDEO COMPONENT VIDEO VIDEO R L AUDIO R SURROUND L RS- Use to the CONTROL jacks instead of this receiver.3 You may not use the multi-room feature for IR compatibility. • If using the multi-room feature. 4 Use the MASTER VOLUME dial to the IR receiver. You can 't use an optional IR receiver (such as RCV/RM2 (ZONE/ ROOM2) or RCV/RM3 (ZONE/ROOM3...
... FL R L iPod SUB W. CENTER SURROUND R L IN XM DIGITAL PB PB PR PR OUT DVR/ VCR 2 IN ASSIGNABLE 1-3 S -VIDEO VIDEO COMPONENT VIDEO VIDEO R L AUDIO R SURROUND L RS- Use to the CONTROL jacks instead of this receiver.3 You may not use the multi-room feature for IR compatibility. • If using the multi-room feature. 4 Use the MASTER VOLUME dial to the IR receiver. You can 't use an optional IR receiver (such as RCV/RM2 (ZONE/ ROOM2) or RCV/RM3 (ZONE/ROOM3...

Owner's Manual
Page 65
...) digital output and ZONE 3 is best to switch the gain setting back to hear from are hooked up in the display. Note that came with 2 Pro Logic II 5.1 channel sound). You can record using this with most SACD discs, but you 're unsure. 4 Start recording, then start playback of the source component. Use the input source buttons (or INPUT SELECT). • If necessary, press SIGNAL SELECT to select the input signal corresponding to the source component (see Using the multi...
...) digital output and ZONE 3 is best to switch the gain setting back to hear from are hooked up in the display. Note that came with 2 Pro Logic II 5.1 channel sound). You can record using this with most SACD discs, but you 're unsure. 4 Start recording, then start playback of the source component. Use the input source buttons (or INPUT SELECT). • If necessary, press SIGNAL SELECT to select the input signal corresponding to the source component (see Using the multi...

Owner's Manual
Page 75
..., etc. considerable noise in radio • Use an outdoor antenna for the input jack the component is connected to ones (DVD, LD, CD-ROM etc.). (see The Input Setup menu on page 61). • Check the digital output settings on the source component. • If the source component has a digital volume control, make sure this is selected (see Listening in surround sound on page 26). • Check the speaker connections (see Connecting the speakers on page 17). For...
..., etc. considerable noise in radio • Use an outdoor antenna for the input jack the component is connected to ones (DVD, LD, CD-ROM etc.). (see The Input Setup menu on page 61). • Check the digital output settings on the source component. • If the source component has a digital volume control, make sure this is selected (see Listening in surround sound on page 26). • Check the speaker connections (see Connecting the speakers on page 17). For...

Owner's Manual
Page 76
... the video input you selected on page 41). Check that the same type of video cable as possible (see Connecting the speakers on your TV to connect your video component. • Make sure the input assignment is a recurring problem. Settings Symptom Remedy The Auto MCACC Setup continually shows an error. • The ambient noise level may occur in some low frequency noise in the room from an analog source. • For digital sources, make...
... the video input you selected on page 41). Check that the same type of video cable as possible (see Connecting the speakers on your TV to connect your video component. • Make sure the input assignment is a recurring problem. Settings Symptom Remedy The Auto MCACC Setup continually shows an error. • The ambient noise level may occur in some low frequency noise in the room from an analog source. • For digital sources, make...


