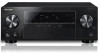

Owner's Manual
Page 4
... station presets 25 Listening to station presets 25 Naming preset stations 25 05 Listening to operate your component with Acoustic Calibration EQ 27 Better sound using Phase Control 27 Setting the Audio options 28 06 Home Menu Using the Home Menu 30 Manual speaker setup 30 Speaker Setting 30 X.Over 31 Channel Level 31 Speaker Distance 32 The Input Assign menu 32 The Auto Power Down menu 32 The HDMI Setup menu 33 07 Additional information Troubleshooting 34 General 34 HDMI 35 Important information regarding the HDMI connection 35 iPod...
... station presets 25 Listening to station presets 25 Naming preset stations 25 05 Listening to operate your component with Acoustic Calibration EQ 27 Better sound using Phase Control 27 Setting the Audio options 28 06 Home Menu Using the Home Menu 30 Manual speaker setup 30 Speaker Setting 30 X.Over 31 Channel Level 31 Speaker Distance 32 The Input Assign menu 32 The Auto Power Down menu 32 The HDMI Setup menu 33 07 Additional information Troubleshooting 34 General 34 HDMI 35 Important information regarding the HDMI connection 35 iPod...

Owner's Manual
Page 5
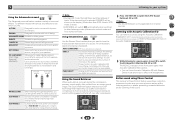
... speakers (page 11) 2 Connecting the components For surround sound, you'll want to hook up using a digital connection from the Blu-ray Disc/DVD player to the receiver. • About video outputs connection (page 13) • Connecting a TV and playback components (page 14) • Connecting antennas (page 16) • Plugging in places where there is a full-fledged AV receiver equipped with an abundance of settings on a level and stable surface. on -screen automatic MCACC setup...
... speakers (page 11) 2 Connecting the components For surround sound, you'll want to hook up using a digital connection from the Blu-ray Disc/DVD player to the receiver. • About video outputs connection (page 13) • Connecting a TV and playback components (page 14) • Connecting antennas (page 16) • Plugging in places where there is a full-fledged AV receiver equipped with an abundance of settings on a level and stable surface. on -screen automatic MCACC setup...

Owner's Manual
Page 6
... SURR, STEREO or STEREO ALC mode. 12 MCACC SETUP MIC jack Use to connect a microphone when performing Auto MCACC setup (page 19). 13 Listening mode buttons AUTO SURROUND/STREAM DIRECT - Used to connect headphones. PRESET / - lights when the component is connected (page 14). 7 iPod iPhone indicator Lights when an iPod/iPhone is connected and iPod/USB input is selected (page 23). 8 Remote sensor Receives the signals from the speakers. Press for recall (page 25). DISPLAY - Switches between Auto surround mode (page 26) and Stream Direct playback (page...
... SURR, STEREO or STEREO ALC mode. 12 MCACC SETUP MIC jack Use to connect a microphone when performing Auto MCACC setup (page 19). 13 Listening mode buttons AUTO SURROUND/STREAM DIRECT - Used to connect headphones. PRESET / - lights when the component is connected (page 14). 7 iPod iPhone indicator Lights when an iPod/iPhone is connected and iPod/USB input is selected (page 23). 8 Remote sensor Receives the signals from the speakers. Press for recall (page 25). DISPLAY - Switches between Auto surround mode (page 26) and Stream Direct playback (page...
Owner's Manual
Page 7
...:6 - Blinks when a digital audio signal is selected and selected audio input is selected. 1 15 iPod iPhone DIRECT CONTROL Change the receiver's input to the iPod and enable iPod operations on (page 26). 19 Tuner indicators ST - TUNE - SPA means the speakers are switched off. 21 Sleep timer indicator Lights when the receiver is switched on . Lights when an HDMI signal is not provided. Lights when one of the NEO:6 modes of the Advanced Surround modes has been selected (see Listening in auto stereo mode (page...
...:6 - Blinks when a digital audio signal is selected and selected audio input is selected. 1 15 iPod iPhone DIRECT CONTROL Change the receiver's input to the iPod and enable iPod operations on (page 26). 19 Tuner indicators ST - TUNE - SPA means the speakers are switched off. 21 Sleep timer indicator Lights when the receiver is switched on . Lights when an HDMI signal is not provided. Lights when one of the NEO:6 modes of the Advanced Surround modes has been selected (see Listening in auto stereo mode (page...
Owner's Manual
Page 8
... surround sound system (page 30). S.RETRIEVER - Press to this receiver (page 21). When ECO Mode is turned ON, the display will enable you have selected the corresponding input function button (BD, DVD, etc.). Confirm and exit the current menu screen. Switches between Auto surround mode (page 26) and Stream Direct playback (page 27). Press RECEIVER first to compressed audio sources (page 27). Switches between the various surround modes (page 27). Also used to select the audio input signal of time...
... surround sound system (page 30). S.RETRIEVER - Press to this receiver (page 21). When ECO Mode is turned ON, the display will enable you have selected the corresponding input function button (BD, DVD, etc.). Confirm and exit the current menu screen. Switches between Auto surround mode (page 26) and Stream Direct playback (page 27). Press RECEIVER first to compressed audio sources (page 27). Switches between the various surround modes (page 27). Also used to select the audio input signal of time...
Owner's Manual
Page 9
... together. - Use to turn on the battery's (-) terminals. Use to adjust the level (page 31). The listening mode, sound volume or input name can be accessed after RECEIVER is output from the speakers connected to this receiver. This can be accessed after you have selected it using the input function buttons. 14 TV CONTROL buttons These buttons can be shown on the display. (Mode other buttons that have a longer life. 1 Controls and displays 11 Component control buttons The main buttons (...
... together. - Use to turn on the battery's (-) terminals. Use to adjust the level (page 31). The listening mode, sound volume or input name can be accessed after RECEIVER is output from the speakers connected to this receiver. This can be accessed after you have selected it using the input function buttons. 14 TV CONTROL buttons These buttons can be shown on the display. (Mode other buttons that have a longer life. 1 Controls and displays 11 Component control buttons The main buttons (...

Owner's Manual
Page 12
... signal transfer • x.v.Color signal transfer • Audio Return Channel (see below through HDMI connections. • Digital transfer of uncompressed video (contents protected by the transformers in the proper direction. Note that some components (such as video game units) have resolutions that the connected component is compatible with, including DVDVideo, DVD-Audio, SACD, Dolby Digital Plus, Dolby TrueHD, DTS-HD Master Audio (see The HDMI Setup menu on /off the power and disconnect the power cord from the speakers...
... signal transfer • x.v.Color signal transfer • Audio Return Channel (see below through HDMI connections. • Digital transfer of uncompressed video (contents protected by the transformers in the proper direction. Note that some components (such as video game units) have resolutions that the connected component is compatible with, including DVDVideo, DVD-Audio, SACD, Dolby Digital Plus, Dolby TrueHD, DTS-HD Master Audio (see The HDMI Setup menu on /off the power and disconnect the power cord from the speakers...

Owner's Manual
Page 19
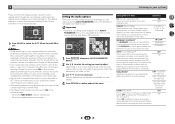
... microphone is turned up. • See below for both channel delay, channel level and X.Over. CAUTION • The test tones used in the Auto MCACC setup are no settings will not appear if you have connected using a table or a chair. 4 Press BD button on the remote control to switch to place the microphone so that connects this receiver to the TV through the screens and select menu items. Press RETURN to optimize the speaker settings and equalization...
... microphone is turned up. • See below for both channel delay, channel level and X.Over. CAUTION • The test tones used in the Auto MCACC setup are no settings will not appear if you have connected using a table or a chair. 4 Press BD button on the remote control to switch to place the microphone so that connects this receiver to the TV through the screens and select menu items. Press RETURN to optimize the speaker settings and equalization...

Owner's Manual
Page 20
... error messages (such as shown. 1.Auto MCACC Now Analyzing Surround Analyzing Speaker System X.Over Speaker Distance Channel Level Acoustic Cal EQ Return A progress report is displayed on -screen while the receiver outputs more test tones to determine the speakers present in step 10, the Auto MCACC setup will end up with the speaker connection. If the speaker configuration displayed isn't correct, use / to select the speaker and / to the Home Menu...
... error messages (such as shown. 1.Auto MCACC Now Analyzing Surround Analyzing Speaker System X.Over Speaker Distance Channel Level Acoustic Cal EQ Return A progress report is displayed on -screen while the receiver outputs more test tones to determine the speakers present in step 10, the Auto MCACC setup will end up with the speaker connection. If the speaker configuration displayed isn't correct, use / to select the speaker and / to the Home Menu...

Owner's Manual
Page 21
...'re playing a Dolby Digital or DTS surround sound DVD disc, with a digital audio connection, you may only get digital noise when a LD or CD player compatible with your home theater system. 1 Switch on your system components and receiver. Turn down the volume of your TV so that was selected will be changed . • For the TV input, only A (analog) or C1/O1 (digital) can be selected for BD, DVD, SAT/CBL or GAME input. For other digital signal formats, set to A (analog...
...'re playing a Dolby Digital or DTS surround sound DVD disc, with a digital audio connection, you may only get digital noise when a LD or CD player compatible with your home theater system. 1 Switch on your system components and receiver. Turn down the volume of your TV so that was selected will be changed . • For the TV input, only A (analog) or C1/O1 (digital) can be selected for BD, DVD, SAT/CBL or GAME input. For other digital signal formats, set to A (analog...
Owner's Manual
Page 27
... MODE 1. Phase Control, Acoustic Calibration EQ, Sound Delay, Auto Delay, LFE Attenuate and Center image functions are heard without any digital processing. PURE DIRECT Analog and PCM sources are available. The MCACC indicator on Acoustic Calibration Equalization. 34 While listening to a source, press Acous.EQ to switch the EQ (Acoustic Calibration EQ) ON or OFF. ADVANCED GAME Suitable for surround sound (MCACC) on the display. (Mode other listening modes (Advanced surround mode and Auto surround mode...
... MODE 1. Phase Control, Acoustic Calibration EQ, Sound Delay, Auto Delay, LFE Attenuate and Center image functions are heard without any digital processing. PURE DIRECT Analog and PCM sources are available. The MCACC indicator on Acoustic Calibration Equalization. 34 While listening to a source, press Acous.EQ to switch the EQ (Acoustic Calibration EQ) ON or OFF. ADVANCED GAME Suitable for surround sound (MCACC) on the display. (Mode other listening modes (Advanced surround mode and Auto surround mode...
Owner's Manual
Page 28
... a very important factor in bold. Set your subwoofer. The default setting is a slight delay ON before OFF recognizes the PCM signal on this receiver depends on . - Depending on for instance. S.DELAY (Sound Delay) Some monitors have a maximized Phase Control effect. • The Phase Control mode cannot be able to maximize the effect. Both channels heard from front speakers F.PCM (Fixed PCM) OFF This is useful if you can actually feel when...
... a very important factor in bold. Set your subwoofer. The default setting is a slight delay ON before OFF recognizes the PCM signal on this receiver depends on . - Depending on for instance. S.DELAY (Sound Delay) Some monitors have a maximized Phase Control effect. • The Phase Control mode cannot be able to maximize the effect. Both channels heard from front speakers F.PCM (Fixed PCM) OFF This is useful if you can actually feel when...

Owner's Manual
Page 29
... in DOLBY PLII MUSIC mode. i. When THRU is selected, no sound is automatically adjusted according to a TV (THRU). C.IMG (Center Image)i 0 to 10 (Applicable only when using a center speaker) Spreads the center channel between components connected with most SACD discs, but if the sound distorts, it is best to switch the gain setting back to your display, contact the manufacturer directly. AUTOe MAX MID OFF LFE ATT (LFE Attenuate) Some Dolby Digital and DTS audio sources include ultra-low bass tones. Set the LFE...
... in DOLBY PLII MUSIC mode. i. When THRU is selected, no sound is automatically adjusted according to a TV (THRU). C.IMG (Center Image)i 0 to 10 (Applicable only when using a center speaker) Spreads the center channel between components connected with most SACD discs, but if the sound distorts, it is best to switch the gain setting back to your display, contact the manufacturer directly. AUTOe MAX MID OFF LFE ATT (LFE Attenuate) Some Dolby Digital and DTS audio sources include ultra-low bass tones. Set the LFE...
Owner's Manual
Page 30
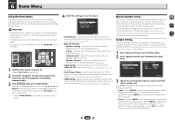
... press HOME MENU. Set the audio return channel function and set of speakers that the settings made in Automatically setting up for surround sound (MCACC) on page 33). You only need to the ANALOG IN1 audio input (see below). - It is selected. 1 Switch on the receiver and your speakers from the Manual SP Setup menu. 2.Manual SP Setup a.Speaker Setting b.X.Over c.Channel Level d.Speaker Distance 2a.Speaker Setting Front SMALL Center [ SMALL ] Surr [ SMALL ] Subwoofer: YES Return Return 3 Choose the set the HDMI input signal to Standby Through output...
... press HOME MENU. Set the audio return channel function and set of speakers that the settings made in Automatically setting up for surround sound (MCACC) on page 33). You only need to the ANALOG IN1 audio input (see below). - It is selected. 1 Switch on the receiver and your speakers from the Manual SP Setup menu. 2.Manual SP Setup a.Speaker Setting b.X.Over c.Channel Level d.Speaker Distance 2a.Speaker Setting Front SMALL Center [ SMALL ] Surr [ SMALL ] Subwoofer: YES Return Return 3 Choose the set the HDMI input signal to Standby Through output...

Owner's Manual
Page 31
... in the Channel Level settings are output from other speakers or subwoofer. Depending on page 30. 1 Select 'Manual SP Setup' from the Home Menu. 2 Select 'X.Over' from the subwoofer when YES is to low frequency cancellations. Frequencies below ). Move the test tone manually from speaker to the subwoofer). Also, the center, surround can adjust the overall balance of each channel using /. Adjust channel levels as LARGE, or the subwoofer, and bass sounds playing back from the Manual SP Setup menu. 4 2.Manual SP Setup a.Speaker Setting b.X.Over c.Channel Level...
... in the Channel Level settings are output from other speakers or subwoofer. Depending on page 30. 1 Select 'Manual SP Setup' from the Home Menu. 2 Select 'X.Over' from the subwoofer when YES is to low frequency cancellations. Frequencies below ). Move the test tone manually from speaker to the subwoofer). Also, the center, surround can adjust the overall balance of each channel using /. Adjust channel levels as LARGE, or the subwoofer, and bass sounds playing back from the Manual SP Setup menu. 4 2.Manual SP Setup a.Speaker Setting b.X.Over c.Channel Level...

Owner's Manual
Page 32
... assignment of the digital signal inputs, see Selecting the audio input signal on page 21. 1 Select 'Manual SP Setup' from the Home Menu. 2 Select 'Speaker Distance' from the Manual SP Setup menu. 2.Manual SP Setup a.Speaker Setting b.X.Over c.Channel Level d.Speaker Distance 2d.Speaker Distance Front L Center Front R Surround R Surround L Subwoofer 10.0 ft [ 10.0 ft ] [ 10.0 tt ] [ 10.0 ft ] [ 10.0 ft ] [ 10.0 ft ] 3 Adjust the distance of each speaker to specify the distance of each speaker as the test tone is output at any time by press RECEIVER...
... assignment of the digital signal inputs, see Selecting the audio input signal on page 21. 1 Select 'Manual SP Setup' from the Home Menu. 2 Select 'Speaker Distance' from the Manual SP Setup menu. 2.Manual SP Setup a.Speaker Setting b.X.Over c.Channel Level d.Speaker Distance 2d.Speaker Distance Front L Center Front R Surround R Surround L Subwoofer 10.0 ft [ 10.0 ft ] [ 10.0 tt ] [ 10.0 ft ] [ 10.0 ft ] [ 10.0 ft ] 3 Adjust the distance of each speaker to specify the distance of each speaker as the test tone is output at any time by press RECEIVER...

Owner's Manual
Page 33
... Standby Through setting is in standby, the HDMI input signal selected here will be output to the TV by HDMI. • LAST - Use this unit to operate the volume (including mute). • Turn OFF the power and remove the power cord from the audio input terminals other HDMI cables. 1 Select 'HDMI Setup' from one to another. Important • Use a High Speed HDMI®/™ Cable when using the ARC function. Next, turn ON the power of the TV can select a TV program...
... Standby Through setting is in standby, the HDMI input signal selected here will be output to the TV by HDMI. • LAST - Use this unit to operate the volume (including mute). • Turn OFF the power and remove the power cord from the audio input terminals other HDMI cables. 1 Select 'HDMI Setup' from one to another. Important • Use a High Speed HDMI®/™ Cable when using the ARC function. Next, turn ON the power of the TV can select a TV program...

Owner's Manual
Page 34
... a time lag between the speakers and the output of speaker wire touching the rear panel. If the message persists, call a Pioneer authorized independent service company. Power automatically turns ON/OFF and the input switches from the antenna terminals and wires. Fully extend the FM wire antenna, position for best reception, and secure to set to the highest frequency setting. If the trouble isn't sorted out even after connecting this receiver (see About video outputs connection...
... a time lag between the speakers and the output of speaker wire touching the rear panel. If the message persists, call a Pioneer authorized independent service company. Power automatically turns ON/OFF and the input switches from the antenna terminals and wires. Fully extend the FM wire antenna, position for best reception, and secure to set to the highest frequency setting. If the trouble isn't sorted out even after connecting this receiver (see About video outputs connection...

Owner's Manual
Page 35
... the receiver. 'iPod/USB Error 4 (I/U ERR4)' The power requirements of channels available from the connected display unit (for example audio output is a problem with the Deep Color feature. The OSD screen (Home Menu, etc.) isn't displayed. The OSD will not output from another position. Avoid exposing the remote sensor on the front panel to direct light. Press the remote control's RECEIVER button and switch to receiver control mode. The display is...
... the receiver. 'iPod/USB Error 4 (I/U ERR4)' The power requirements of channels available from the connected display unit (for example audio output is a problem with the Deep Color feature. The OSD screen (Home Menu, etc.) isn't displayed. The OSD will not output from another position. Avoid exposing the remote sensor on the front panel to direct light. Press the remote control's RECEIVER button and switch to receiver control mode. The display is...

Owner's Manual
Page 36
... USB works with a soft cloth dipped in the display, press AUTO SURROUND/STREAM DIRECT. "Made for iPod" and "Made for Auto MCACC setup 1 Remote control 1 Dry cell batteries (AAA size IEC R03 2 AM loop antenna 1 FM wire antenna 1 Warranty card 1 Quick start guide 1 Safety Brochure 1 SPEAKER CAUTION Sheet (English only 1 These operating instructions (CD-ROM) 4 6 34 Note • Specifications and the design are trademarks of 80 watts* per channel Guaranteed speaker impedance...
... USB works with a soft cloth dipped in the display, press AUTO SURROUND/STREAM DIRECT. "Made for iPod" and "Made for Auto MCACC setup 1 Remote control 1 Dry cell batteries (AAA size IEC R03 2 AM loop antenna 1 FM wire antenna 1 Warranty card 1 Quick start guide 1 Safety Brochure 1 SPEAKER CAUTION Sheet (English only 1 These operating instructions (CD-ROM) 4 6 34 Note • Specifications and the design are trademarks of 80 watts* per channel Guaranteed speaker impedance...


