
Owner's Manual
Page 1
AUDIO/VIDEO MULTI-CHANNEL RECEIVER RECEPTEUR AUDIOVISUEL A VOIES MULTIPLES RECEPTOR MULTICANAL DE AUDIO/VÍDEO VSX-520 Register your product on http://www.pioneerelectronics.com (US) http://www.pioneerelectronics.ca (Canada) • Protect your new investment The... new product • Improve product development Your input helps us continue to design products that meet your needs. • Receive a free Pioneer newsletter Registered customers can opt in to receive a monthly newsletter. http://www.pioneerelectronics.com (US) http://www.pioneerelectronics.ca (Canada) Operating Instructions ...
AUDIO/VIDEO MULTI-CHANNEL RECEIVER RECEPTEUR AUDIOVISUEL A VOIES MULTIPLES RECEPTOR MULTICANAL DE AUDIO/VÍDEO VSX-520 Register your product on http://www.pioneerelectronics.com (US) http://www.pioneerelectronics.ca (Canada) • Protect your new investment The... new product • Improve product development Your input helps us continue to design products that meet your needs. • Receive a free Pioneer newsletter Registered customers can opt in to receive a monthly newsletter. http://www.pioneerelectronics.com (US) http://www.pioneerelectronics.ca (Canada) Operating Instructions ...
Owner's Manual
Page 4
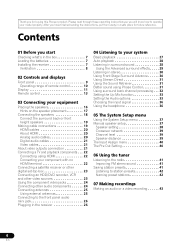
... 27 Auto playback 28 Listening in surround sound 28 Using the Advanced surround effects . . . . . 29 Listening in a safe place for buying this Pioneer product. After you for future reference. Thank you have finished reading the instructions, put them away in stereo 30 Using Front Stage Surround Advance 30...the Audio options 33 Choosing the input signal 36 Using the headphone 36 05 The System Setup menu Using the System Setup menu 37 Manual speaker setup 37 Speaker setting 38 Crossover network 39 Channel level 39 Speaker distance 39 The Input Assign menu 40 The Pre Out ...
... 27 Auto playback 28 Listening in surround sound 28 Using the Advanced surround effects . . . . . 29 Listening in a safe place for buying this Pioneer product. After you for future reference. Thank you have finished reading the instructions, put them away in stereo 30 Using Front Stage Surround Advance 30...the Audio options 33 Choosing the input signal 36 Using the headphone 36 05 The System Setup menu Using the System Setup menu 37 Manual speaker setup 37 Speaker setting 38 Crossover network 39 Channel level 39 Speaker distance 39 The Input Assign menu 40 The Pre Out ...
Owner's Manual
Page 6
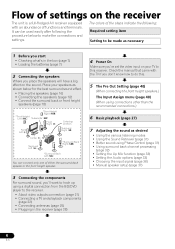
...; Plugging in the box (page 7) • Loading the batteries (page 7) 2 Connecting the speakers Where you don't know how to do this receiver. Check the manual that came with an abundance of the steps indicate the following: Required setting item Setting to be used easily after following the procedure below for... (page 32) • Setting the Up Mix function (page 33) • Setting the Audio options (page 33) • Choosing the input signal (page 36) • Manual speaker setup (page 37) 6 En The colors of functions and terminals.
...; Plugging in the box (page 7) • Loading the batteries (page 7) 2 Connecting the speakers Where you don't know how to do this receiver. Check the manual that came with an abundance of the steps indicate the following: Required setting item Setting to be used easily after following the procedure below for... (page 32) • Setting the Up Mix function (page 33) • Setting the Audio options (page 33) • Choosing the input signal (page 36) • Manual speaker setup (page 37) 6 En The colors of functions and terminals.
Owner's Manual
Page 24
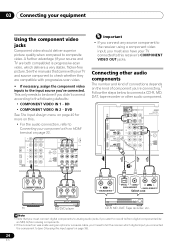
... your equipment Using the component video jacks Component video should deliver superior picture quality when compared to the input source you've connected. See the manuals that you must also have your component with progressive-scan video. • If necessary, assign the component video inputs to composite video. BD • COMPONENT...
... your equipment Using the component video jacks Component video should deliver superior picture quality when compared to the input source you've connected. See the manuals that you must also have your component with progressive-scan video. • If necessary, assign the component video inputs to composite video. BD • COMPONENT...

Owner's Manual
Page 27
... on the current source, settings and status of the source.3 If you're playing a Dolby Digital or DTS surround sound DVD disc, you need to manually switch the input signal type press SIGNAL SEL (page 36). 3 • You may need to check the digital audio output settings on your DVD player...
... on the current source, settings and status of the source.3 If you're playing a Dolby Digital or DTS surround sound DVD disc, you need to manually switch the input signal type press SIGNAL SEL (page 36). 3 • You may need to check the digital audio output settings on your DVD player...

Owner's Manual
Page 35
... sound more distant (minus settings), or more forward (positive settings). -3 to +3 Default: 0 PNRM.g Extends the front stereo image to OFF and adjust the delay time manually. This setting works only with (Center image) vocals.
... sound more distant (minus settings), or more forward (positive settings). -3 to +3 Default: 0 PNRM.g Extends the front stereo image to OFF and adjust the delay time manually. This setting works only with (Center image) vocals.
Owner's Manual
Page 36
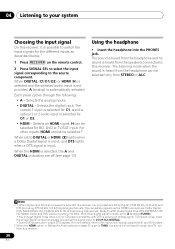
....2 When set the signal input to C1/O1/O2 (DIGITAL). • Some DVD players don't output DTS signals. For more details, refer to the instruction manual supplied with DTS is selected, the A and DIGITAL indicators are : Dolby Digital, DTS, SACD (DSD 2 ch), PCM (32 kHz to 192 kHz sampling frequencies), Dolby...
....2 When set the signal input to C1/O1/O2 (DIGITAL). • Some DVD players don't output DTS signals. For more details, refer to the instruction manual supplied with DTS is selected, the A and DIGITAL indicators are : Dolby Digital, DTS, SACD (DSD 2 ch), PCM (32 kHz to 192 kHz sampling frequencies), Dolby...
Owner's Manual
Page 37
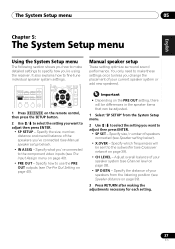
... select the setting you want to the component video inputs (see The Input Assign menu on page 39). • CH LEVEL - Manual speaker setup These setting optimize surround sound performance. Specify the size, number, distance and overall balance of the speakers you've connected (see... Manual speaker setup below ). • X.OVER - Important • Depending on page 40). You only need to adjust then press ENTER. • SP...
... select the setting you want to the component video inputs (see The Input Assign menu on page 39). • CH LEVEL - Manual speaker setup These setting optimize surround sound performance. Specify the size, number, distance and overall balance of the speakers you've connected (see... Manual speaker setup below ). • X.OVER - Important • Depending on page 40). You only need to adjust then press ENTER. • SP...
Owner's Manual
Page 39
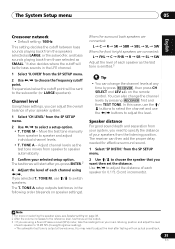
... / to choose the frequency cutoff point. Frequencies below the cutoff point will be sent to select a setup option. • T. Move the test tone manually from speaker to speaker automatically. 3 Confirm your speakers from the SP SETUP menu. 2 Use / to adjust the distance of each speaker as the...
... / to choose the frequency cutoff point. Frequencies below the cutoff point will be sent to select a setup option. • T. Move the test tone manually from speaker to speaker automatically. 3 Confirm your speakers from the SP SETUP menu. 2 Use / to adjust the distance of each speaker as the...
Owner's Manual
Page 41
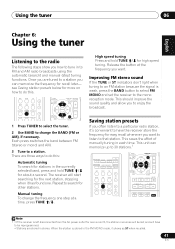
Each press switches the band between FM (stereo or mono) and AM. 3 Tune to the mono reception mode. Manual tuning To change the BAND (FM or AM), if necessary. BD DVD TV DVR CD CD-R CH ADAPTER TUNER PORTABLE PHASE S.RETRIEVER SIGNAL SEL VOL .... 41 En Repeat to search for easy recall whenever you to FM and AM radio broadcasts using the automatic (search) and manual (step) tuning functions. This saves the effort of manually tuning in to enjoy the broadcast. When the station is weak, press the BAND button to select FM MONO and set...
Each press switches the band between FM (stereo or mono) and AM. 3 Tune to the mono reception mode. Manual tuning To change the BAND (FM or AM), if necessary. BD DVD TV DVR CD CD-R CH ADAPTER TUNER PORTABLE PHASE S.RETRIEVER SIGNAL SEL VOL .... 41 En Repeat to search for easy recall whenever you to FM and AM radio broadcasts using the automatic (search) and manual (step) tuning functions. This saves the effort of manually tuning in to enjoy the broadcast. When the station is weak, press the BAND button to select FM MONO and set...

Owner's Manual
Page 43
... buttons (or INPUT SELECTOR). 2 Select the input signal (if necessary). into the recording device and set the audio recording level automatically-check the component's instruction manual if you can 't record a component hooked up to the source component (see Connecting an HDD/DVD recorder, VCR and other video sources on page 23...
... buttons (or INPUT SELECTOR). 2 Select the input signal (if necessary). into the recording device and set the audio recording level automatically-check the component's instruction manual if you can 't record a component hooked up to the source component (see Connecting an HDD/DVD recorder, VCR and other video sources on page 23...
Owner's Manual
Page 47
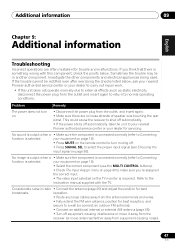
...connected correctly (refer to Connecting function is selected. Considerable noise in another component. Refer to the instruction manual supplied with this component, check the points below , ask your nearest Pioneer authorized service center or your dealer to carry out repair work. • If the unit does ... normally due to normal operating conditions. Problem Remedy The power does not turn muting off automatically, take the unit to your nearest Pioneer authorized service center or your equipment on page 16). • Press MUTE on the remote control to turn on the TV monitor...
...connected correctly (refer to Connecting function is selected. Considerable noise in another component. Refer to the instruction manual supplied with this component, check the points below , ask your nearest Pioneer authorized service center or your dealer to carry out repair work. • If the unit does ... normally due to normal operating conditions. Problem Remedy The power does not turn muting off automatically, take the unit to your nearest Pioneer authorized service center or your equipment on page 16). • Press MUTE on the remote control to turn on the TV monitor...
Owner's Manual
Page 48
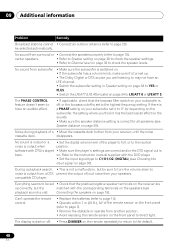
... is output or a • Set the digital volume level of the remote sensor on the front panel (refer to page 18). Refer to the instruction manual supplied with the DVD player. • Set the input signal type to C1/O1/O2 (DIGITAL) (see Speaker distance on the front panel to the...
... is output or a • Set the digital volume level of the remote sensor on the front panel (refer to page 18). Refer to the instruction manual supplied with the DVD player. • Set the input signal type to C1/O1/O2 (DIGITAL) (see Speaker distance on the front panel to the...
Owner's Manual
Page 50
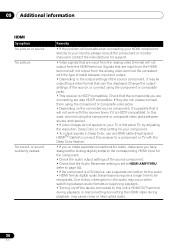
... on your TV or flat panel TV, try adjusting the resolution, Deep Color or other setting for your monitor, please consult the component or monitor manual or contact the manufacturer for the audio. • HDMI format digital audio transmissions require a longer time to this , interruption in Deep Color, use a separate connection...
... on your TV or flat panel TV, try adjusting the resolution, Deep Color or other setting for your monitor, please consult the component or monitor manual or contact the manufacturer for the audio. • HDMI format digital audio transmissions require a longer time to this , interruption in Deep Color, use a separate connection...

Owner's Manual
Page 158
...SUBSEQUENT DAMAGE FROM LEAKING, DAMAGE FROM INOPERATIVE BATTERIES, OR THE USE OF BATTERIES NOT CONFORMING TO THOSE SPECIFIED IN THE OWNER'S MANUAL. PIONEER LIMITS ITS OBLIGATIONS UNDER ANY IMPLIED WARRANTIES INCLUDING, BUT NOT LIMITED TO, THE IMPLIED WARRANTIES OF MERCHANTABILITY AND FITNESS FOR A PARTICULAR...-421-1404 http://www.pioneerelectronics.com IN CANADA For additional information on this purpose. You are experiencing, steps you and Pioneer, Pioneer makes available its Complaint Resolution Program to present your sales receipt or, if rented, your rental contract showing place and ...
...SUBSEQUENT DAMAGE FROM LEAKING, DAMAGE FROM INOPERATIVE BATTERIES, OR THE USE OF BATTERIES NOT CONFORMING TO THOSE SPECIFIED IN THE OWNER'S MANUAL. PIONEER LIMITS ITS OBLIGATIONS UNDER ANY IMPLIED WARRANTIES INCLUDING, BUT NOT LIMITED TO, THE IMPLIED WARRANTIES OF MERCHANTABILITY AND FITNESS FOR A PARTICULAR...-421-1404 http://www.pioneerelectronics.com IN CANADA For additional information on this purpose. You are experiencing, steps you and Pioneer, Pioneer makes available its Complaint Resolution Program to present your sales receipt or, if rented, your rental contract showing place and ...


