Owner's Manual
Page 4
...Sound Retriever 27 Manufactured under license from Dolby Laboratories. Wash hands after handling D36-P4_A_En WARNING: Handling the cord on this Pioneer product. "DTS" is a trademark of California and other governmental entities to cause cancer and birth defect or other sources 27... audio cables 8 Video cables 8 Connecting a TV and DVD player 9 Connecting the multichannel analog outputs 10 Connecting a satellite receiver or other digital set-top box 10 Connecting other audio components 11 About the WMA9 Pro decoder 11 Connecting other video components 12 Using the component ...
...Sound Retriever 27 Manufactured under license from Dolby Laboratories. Wash hands after handling D36-P4_A_En WARNING: Handling the cord on this Pioneer product. "DTS" is a trademark of California and other governmental entities to cause cancer and birth defect or other sources 27... audio cables 8 Video cables 8 Connecting a TV and DVD player 9 Connecting the multichannel analog outputs 10 Connecting a satellite receiver or other digital set-top box 10 Connecting other audio components 11 About the WMA9 Pro decoder 11 Connecting other video components 12 Using the component ...
Owner's Manual
Page 6
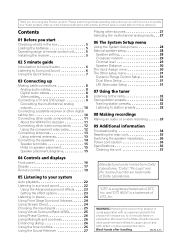
... designed with the easiest possible setup in mind, so with the following quick setup guide, you should already be set the receiver to this . For surround sound, you'll want multichannel surround sound. 6 En There are explained in surround sound on page 22 if you need... your speaker setup, but other sound options you won't have a big effect on the source and the sound settings of the receiver. In most cases, you can simply leave the receiver in the default settings. • Be sure to make changes for more on your speaker setup. Place your speaker setup, room size...
... designed with the easiest possible setup in mind, so with the following quick setup guide, you should already be set the receiver to this . For surround sound, you'll want multichannel surround sound. 6 En There are explained in surround sound on page 22 if you need... your speaker setup, but other sound options you won't have a big effect on the source and the sound settings of the receiver. In most cases, you can simply leave the receiver in the default settings. • Be sure to make changes for more on your speaker setup. Place your speaker setup, room size...
Owner's Manual
Page 7
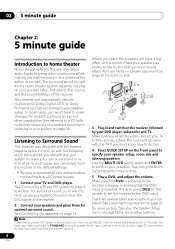
... speakers • BACK - Use the front panel controls for the steps below to find the speaker setup that you want to make more specific settings, refer to The System Setup menu on . 2 Press QUICK SETUP. 3 Use the MULTI JOG dial to choose your speaker setup, room size...RETRIEVER LOUDNESS MODE TONE SIGNAL SELECT DIMMER TUNER EDIT QUICK SETUP SETUP RETURN MULTI JOG ENTER VSX-517 MULTI JOG TUNING STATION STEREO/ ADVANCED F.S.SURR STANDARD SURROUND LISTENING MODE MASTER VOLUME DOWN UP 1 If the receiver is off, press STANDBY/ON to turn the power on page 28. The ...
... speakers • BACK - Use the front panel controls for the steps below to find the speaker setup that you want to make more specific settings, refer to The System Setup menu on . 2 Press QUICK SETUP. 3 Use the MULTI JOG dial to choose your speaker setup, room size...RETRIEVER LOUDNESS MODE TONE SIGNAL SELECT DIMMER TUNER EDIT QUICK SETUP SETUP RETURN MULTI JOG ENTER VSX-517 MULTI JOG TUNING STATION STEREO/ ADVANCED F.S.SURR STANDARD SURROUND LISTENING MODE MASTER VOLUME DOWN UP 1 If the receiver is off, press STANDBY/ON to turn the power on page 28. The ...
Owner's Manual
Page 9
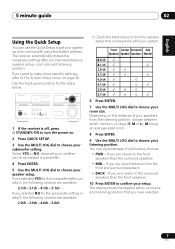
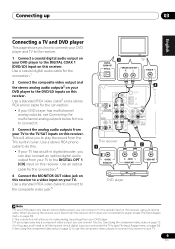
...the connection.1 2 Connect the composite video output and the stereo analog audio outputs2 on your DVD player to the DVD/LD inputs on this receiver. When you set up 03 English Deutsch Français Italiano Nederlands Español Connecting a TV and DVD player This page shows you how to connect... your DVD player and TV to the receiver. 1 Connect a coaxial digital audio output on your DVD player to the DIGITAL COAX 1 (DVD/LD) input on this receiver...
...the connection.1 2 Connect the composite video output and the stereo analog audio outputs2 on your DVD player to the DVD/LD inputs on this receiver. When you set up 03 English Deutsch Français Italiano Nederlands Español Connecting a TV and DVD player This page shows you how to connect... your DVD player and TV to the receiver. 1 Connect a coaxial digital audio output on your DVD player to the DIGITAL COAX 1 (DVD/LD) input on this receiver...
Owner's Manual
Page 10
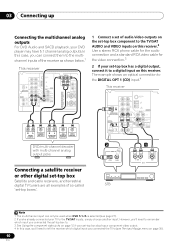
... DVD/multi-channel decoder with multi-channel analog output jacks Connecting a satellite receiver or other digital set-top box Satellite and cable receivers, and terrestrial digital TV tuners are all examples of so-called 'set-top boxes'. 2 DIGITAL OUT OPTICAL COAXIAL 1 R AUDIO L AV OUT VIDEO STB Note 1 The multichannel input can connect them to the...
... DVD/multi-channel decoder with multi-channel analog output jacks Connecting a satellite receiver or other digital set-top box Satellite and cable receivers, and terrestrial digital TV tuners are all examples of so-called 'set-top boxes'. 2 DIGITAL OUT OPTICAL COAXIAL 1 R AUDIO L AV OUT VIDEO STB Note 1 The multichannel input can connect them to the...
Owner's Manual
Page 11
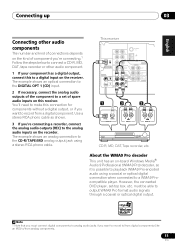
...connection to the DIGITAL OPT 1 (CD) input. 2 If necessary, connect the analog audio outputs of the component to a set -top box, etc. You'll need to make this receiver. The example shows an analog connection to the CD-R/TAPE/MD analog output jack using a coaxial or optical digital connection when... a CD-R, MD, DAT, tape recorder or other audio component. 1 If your component has a digital output, connect this to a digital input on the receiver. However, the connected DVD player, set of component you want to record to/from digital components (like an MD) to/from a digital component.
...connection to the DIGITAL OPT 1 (CD) input. 2 If necessary, connect the analog audio outputs of the component to a set -top box, etc. You'll need to make this receiver. The example shows an analog connection to the CD-R/TAPE/MD analog output jack using a coaxial or optical digital connection when... a CD-R, MD, DAT, tape recorder or other audio component. 1 If your component has a digital output, connect this to a digital input on the receiver. However, the connected DVD player, set of component you want to record to/from digital components (like an MD) to/from a digital component.
Owner's Manual
Page 12
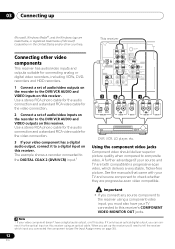
... Microsoft Corporation in the United States and/or other video components This receiver has audio/video inputs and outputs suitable for connecting analog or digital video recorders, including VCRs, DVDrecorders and HDD recorders. 1 Connect a set of audio/video inputs on the recorder to the DIGITAL COAX 2... (DVR/VCR) input.1 This receiver FM UNBAL 75 Ω IN CD IN OPT 1 (CD) OUT ASSIGNABLE DIGITAL IN IN ...
... Microsoft Corporation in the United States and/or other video components This receiver has audio/video inputs and outputs suitable for connecting analog or digital video recorders, including VCRs, DVDrecorders and HDD recorders. 1 Connect a set of audio/video inputs on the recorder to the DIGITAL COAX 2... (DVR/VCR) input.1 This receiver FM UNBAL 75 Ω IN CD IN OPT 1 (CD) OUT ASSIGNABLE DIGITAL IN IN ...

Owner's Manual
Page 13
... mount the AM antenna to a wall or other surface, secure the stand with screws (fig. DVD • COMP 2 - b). • If you didn't connect according to a set of both AM antenna wires. 2 Push open the tabs, then insert one wire fully into each terminal, then release the tabs to the attached stand... vinyl-coated wire to 6 m (15 ft. DVR See Assigning the component video inputs on page 30. 3 Connect the COMPONENT VIDEO MONITOR OUT jacks on this receiver. For best results, extend the FM antenna fully and fix to 18 ft.) Indoor antenna FM UNBAL 75 (vinyl-coated wire) AM LOOP For the...
... mount the AM antenna to a wall or other surface, secure the stand with screws (fig. DVD • COMP 2 - b). • If you didn't connect according to a set of both AM antenna wires. 2 Push open the tabs, then insert one wire fully into each terminal, then release the tabs to the attached stand... vinyl-coated wire to 6 m (15 ft. DVR See Assigning the component video inputs on page 30. 3 Connect the COMPONENT VIDEO MONITOR OUT jacks on this receiver. For best results, extend the FM antenna fully and fix to 18 ft.) Indoor antenna FM UNBAL 75 (vinyl-coated wire) AM LOOP For the...
Owner's Manual
Page 14
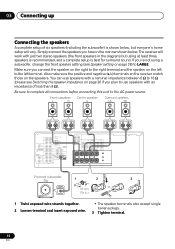
...A complete setup of less than 8 Ω). Also make sure the positive and negative (+/-) terminals on the receiver match those on page 28) to 16 Ω (please see Speaker setting on the speakers. Simply connect the speakers you 're not using at least three speakers is recommended, and ...setup will work with just two stereo speakers (the front speakers in the manner shown below , but using a subwoofer, change the front speaker setting (see Switching the speaker impedance on the left to the AC power source. 1 Twist exposed wire strands together. 2 Loosen terminal and insert exposed...
...A complete setup of less than 8 Ω). Also make sure the positive and negative (+/-) terminals on the receiver match those on page 28) to 16 Ω (please see Speaker setting on the speakers. Simply connect the speakers you 're not using at least three speakers is recommended, and ...setup will work with just two stereo speakers (the front speakers in the manner shown below , but using a subwoofer, change the front speaker setting (see Switching the speaker impedance on the left to the AC power source. 1 Twist exposed wire strands together. 2 Loosen terminal and insert exposed...
Owner's Manual
Page 18
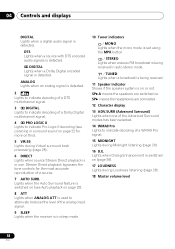
...to indicate decoding of the analog input signal. 9 SLEEP Lights when the receiver is in sleep mode. 10 Tuner indicators / MONO Lights when the mono mode is set using the MPX button. / STEREO Lights when a stereo FM broadcast is being received in auto stereo mode. / TUNED Lights when a broadcast is being... received. 11 Speaker indicator Shows if the speaker system is on (page 26)....
...to indicate decoding of the analog input signal. 9 SLEEP Lights when the receiver is in sleep mode. 10 Tuner indicators / MONO Lights when the mono mode is set using the MPX button. / STEREO Lights when a stereo FM broadcast is being received in auto stereo mode. / TUNED Lights when a broadcast is being... received. 11 Speaker indicator Shows if the speaker system is on (page 26)....
Owner's Manual
Page 19
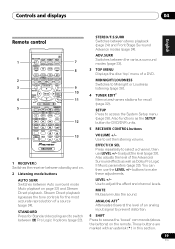
...to adjust the effect and channel levels. Use to access the System Setup menu (page 28). EFFECT/CH SEL Press repeatedly to set the listening volume. LEVEL +/- Stream Direct playback bypasses the tone controls for the most accurate reproduction of the Advanced Surround effects as... SUBTITLE CH GUIDE REC AUDIO TIMERREC INFO RECSTOP JUKEBOX DISPLAY CLASS DVD/DVR SHIFT MPX TUNING STATION 6 TUNER RECEIVER 7 8 9 10 11 12 13 1 RECEIVER Switches the receiver between standby and on. 2 Listening mode buttons AUTO SURR Switches between Auto surround mode (Auto playback on the...
...to adjust the effect and channel levels. Use to access the System Setup menu (page 28). EFFECT/CH SEL Press repeatedly to set the listening volume. LEVEL +/- Stream Direct playback bypasses the tone controls for the most accurate reproduction of the Advanced Surround effects as... SUBTITLE CH GUIDE REC AUDIO TIMERREC INFO RECSTOP JUKEBOX DISPLAY CLASS DVD/DVR SHIFT MPX TUNING STATION 6 TUNER RECEIVER 7 8 9 10 11 12 13 1 RECEIVER Switches the receiver between standby and on. 2 Listening mode buttons AUTO SURR Switches between Auto surround mode (Auto playback on the...

Owner's Manual
Page 20
...track or chapter, then previous tracks/chapters. Skips to change the amount of time before the receiver switches into standby (30 min - 60 min - 90 min - Off). TIMER REC* Accesses the timerrecording...stand out when watching TV or a movie (page 26). 10 ENTER Use the arrow buttons when setting up surround sound for DVD menus. (S.RETRIEVER)* Press to restore CD quality sound to ...to HDD or vice-versa. 12 DVD/DVR control buttons Use these buttons to control a Pioneer DVD player or recorder connected to access the commands bordered by pressing SLEEP once. HDD/ Switch...
...track or chapter, then previous tracks/chapters. Skips to change the amount of time before the receiver switches into standby (30 min - 60 min - 90 min - Off). TIMER REC* Accesses the timerrecording...stand out when watching TV or a movie (page 26). 10 ENTER Use the arrow buttons when setting up surround sound for DVD menus. (S.RETRIEVER)* Press to restore CD quality sound to ...to HDD or vice-versa. 12 DVD/DVR control buttons Use these buttons to control a Pioneer DVD player or recorder connected to access the commands bordered by pressing SLEEP once. HDD/ Switch...
Owner's Manual
Page 22
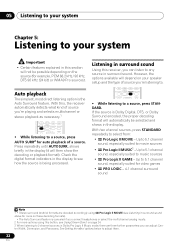
...; 2 Pro Logic II MOVIE - With two channel sources, press STANDARD repeatedly to movie sources • 2 Pro Logic II MUSIC3 - See Setting the effect options below to a source, press AUTO SURR2 for more on your system Important • Certain features explained in surround sound Using this...section will then show the decoding or playback format). Auto playback The simplest, most direct listening option is being processed. Listening in this receiver, you 're playing and selects multichannel or stereo playback as necessary.1 CD CD-R FM AM STEREO/ AUTOSURR F.S.SURR STANDARD ADV.SURR ...
...; 2 Pro Logic II MOVIE - With two channel sources, press STANDARD repeatedly to movie sources • 2 Pro Logic II MUSIC3 - See Setting the effect options below to a source, press AUTO SURR2 for more on your system Important • Certain features explained in surround sound Using this...section will then show the decoding or playback format). Auto playback The simplest, most direct listening option is being processed. Listening in this receiver, you 're playing and selects multichannel or stereo playback as necessary.1 CD CD-R FM AM STEREO/ AUTOSURR F.S.SURR STANDARD ADV.SURR ...
Owner's Manual
Page 23
... listening mode. • ACTION - Creates surround sound from front to back, -3 to +3 Default: 0 making it sound wider (higher settings) or narrower (lower settings). 0 to 7 Default: 3 Dimension* Adjusts the surround sound balance from mono soundtracks. • ENT. Provides surround sound for notes on... the current status / mode of the receiver, certain options may not appear. Creates the effect of settings you press ADV.SURR with the headphones connected, PHONES SURROUND will automatically be set it does Options Center Width* (Applicable only when using ...
... listening mode. • ACTION - Creates surround sound from front to back, -3 to +3 Default: 0 making it sound wider (higher settings) or narrower (lower settings). 0 to 7 Default: 3 Dimension* Adjusts the surround sound balance from mono soundtracks. • ENT. Provides surround sound for notes on... the current status / mode of the receiver, certain options may not appear. Creates the effect of settings you press ADV.SURR with the headphones connected, PHONES SURROUND will automatically be set it does Options Center Width* (Applicable only when using ...

Owner's Manual
Page 24
...When using just the front speakers and the subwoofer. WIDE - All unnecessary signal processing is heard with dual mono, Center Width, Dimension and Panorama settings. CD CD R FM AM STEREO/ AUTOSURR F.S.SURR STANDARD ADV.SURR • While listening to a source, press AUTO SURR to the number of... sound effect directed to switch between: • STEREO - Press repeatedly to the center of a source. For analog sources, only Channel Level can be set . CD CD R FM AM STEREO/ AUTOSURR F.S.SURR STANDARD ADV.SURR • While listening to a source, press STEREO/ F.S.SURR to hear the ...
...When using just the front speakers and the subwoofer. WIDE - All unnecessary signal processing is heard with dual mono, Center Width, Dimension and Panorama settings. CD CD R FM AM STEREO/ AUTOSURR F.S.SURR STANDARD ADV.SURR • While listening to a source, press AUTO SURR to the number of... sound effect directed to switch between: • STEREO - Press repeatedly to the center of a source. For analog sources, only Channel Level can be set . CD CD R FM AM STEREO/ AUTOSURR F.S.SURR STANDARD ADV.SURR • While listening to a source, press STEREO/ F.S.SURR to hear the ...
Owner's Manual
Page 25
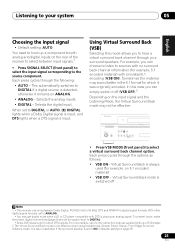
...Depending on the rear of the receiver to select between input signals.1 • Press SIGNAL SELECT (front panel) to select the input signal corresponding to the source component. Selects the analog inputs. • DIGITAL - Sometimes the material may sound better in Speaker setting on page 28. 25 En...cycles through the following: • AUTO - To prevent noise, make the proper digital connections (page 9) and set to NO in the 5.1 format for which it off Note 1 • This receiver can only playback Dolby Digital, PCM (32 kHz to 96 kHz), DTS and WMA9 Pro digital signal formats....
...Depending on the rear of the receiver to select between input signals.1 • Press SIGNAL SELECT (front panel) to select the input signal corresponding to the source component. Selects the analog inputs. • DIGITAL - Sometimes the material may sound better in Speaker setting on page 28. 25 En...cycles through the following: • AUTO - To prevent noise, make the proper digital connections (page 9) and set to NO in the 5.1 format for which it off Note 1 • This receiver can only playback Dolby Digital, PCM (32 kHz to 96 kHz), DTS and WMA9 Pro digital signal formats....
Owner's Manual
Page 26
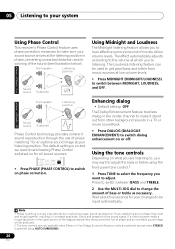
...switch dialog enhancement on or off. Using Midnight and Loudness The Midnight listening feature allows you 're listening. Enhancing dialog • Default setting: OFF The Dialog Enhancement feature localizes dialog in the center channel to make sure your sound source arrives at low volume levels. 05 ...Listening to your system Using Phase Control This receiver's Phase Control feature uses phase correction measures to make it stand out from music sources at which you to hear effective surround sound...
...switch dialog enhancement on or off. Using Midnight and Loudness The Midnight listening feature allows you 're listening. Enhancing dialog • Default setting: OFF The Dialog Enhancement feature localizes dialog in the center channel to make sure your sound source arrives at low volume levels. 05 ...Listening to your system Using Phase Control This receiver's Phase Control feature uses phase correction measures to make it stand out from music sources at which you to hear effective surround sound...

Owner's Manual
Page 27
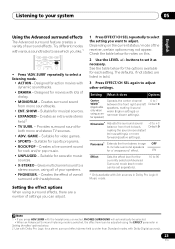
...To cancel playback from the multichannel inputs, use any of the sound features/modes and only the volume and channel levels can be set. 27 En The Sound Retriever feature employs new DSP technology that helps bring CD quality sound back to compressed 2-channel audio by ...after compression.1 • Press S.RETRIEVER (SHIFT+) (SOUND RETRIEVER) to playback. Use the input select buttons (INPUT SELECTOR). 4 Start playback of the receiver. 3 Select the source you must select the analog multichannel inputs for surround sound.2 • Press DVD 5.1 (SHIFT+DVD) on the remote control or DVD...
...To cancel playback from the multichannel inputs, use any of the sound features/modes and only the volume and channel levels can be set. 27 En The Sound Retriever feature employs new DSP technology that helps bring CD quality sound back to compressed 2-channel audio by ...after compression.1 • Press S.RETRIEVER (SHIFT+) (SOUND RETRIEVER) to playback. Use the input select buttons (INPUT SELECTOR). 4 Start playback of the receiver. 3 Select the source you must select the analog multichannel inputs for surround sound.2 • Press DVD 5.1 (SHIFT+DVD) on the remote control or DVD...
Owner's Manual
Page 28
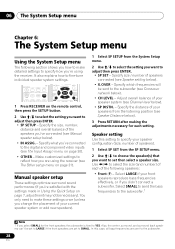
...see Channel level below). • SP DISTN. - Specify what you 're using the receiver (see Manual speaker setup below ). • X.OVER - Make customized settings to LARGE if the front speakers are set then select a speaker size. Adjust overall balance of the speakers you've connected (see ... AM SETUP VOLUME RETURN 1 Press RECEIVER on the remote control, then press the SETUP button. 2 Use / to adjust then press ENTER. • SP SETUP - Manual speaker setup These settings optimize surround sound performance (if you want to set to the digital and component video...
...see Channel level below). • SP DISTN. - Specify what you 're using the receiver (see Manual speaker setup below ). • X.OVER - Make customized settings to LARGE if the front speakers are set then select a speaker size. Adjust overall balance of the speakers you've connected (see ... AM SETUP VOLUME RETURN 1 Press RECEIVER on the remote control, then press the SETUP button. 2 Use / to adjust then press ENTER. • SP SETUP - Manual speaker setup These settings optimize surround sound performance (if you want to set to the digital and component video...
Owner's Manual
Page 29
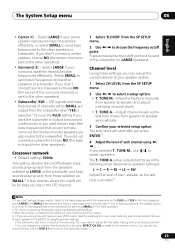
... frequencies effectively. Select SMALL to send bass frequencies to the other speakers). • Surround (S) - Crossover network • Default setting: 100Hz This setting decides the cutoff between bass sounds playing back from the speakers selected as LARGE, or the subwoofer, and bass sounds playing back... to speaker automatically. 3 Confirm your speaker system. 1 Select CH LEVEL from your ears judge which sounds best. Channel level Using these settings, you did not connect a subwoofer choose NO (the bass is output at any time by selecting SMALL for the listening modes. 29 ...
... frequencies effectively. Select SMALL to send bass frequencies to the other speakers). • Surround (S) - Crossover network • Default setting: 100Hz This setting decides the cutoff between bass sounds playing back from the speakers selected as LARGE, or the subwoofer, and bass sounds playing back... to speaker automatically. 3 Confirm your speaker system. 1 Select CH LEVEL from your ears judge which sounds best. Channel level Using these settings, you did not connect a subwoofer choose NO (the bass is output at any time by selecting SMALL for the listening modes. 29 ...


