Owner's Manual
Page 4
... Hints on speaker placement 21 Speaker placement diagrams 21 AC outlet 22 04 Controls and displays Front panel 23 Display 25 VSX-515 model 25 VSX-415 model 25 Remote control 27 05 Listening to your system Auto playback 29 Listening in surround sound 29 Using the ...Using the sleep timer 36 06 Setting up the receiver Choosing your receiver setup 37 Surround and sound setup options 38 Speaker setting 38 Subwoofer setting 38 Crossover frequency setting 38 LFE attenuator setting 38 Front speaker distance setting 39 Center speaker distance setting 39 Surround speaker distance ...
... Hints on speaker placement 21 Speaker placement diagrams 21 AC outlet 22 04 Controls and displays Front panel 23 Display 25 VSX-515 model 25 VSX-415 model 25 Remote control 27 05 Listening to your system Auto playback 29 Listening in surround sound 29 Using the ...Using the sleep timer 36 06 Setting up the receiver Choosing your receiver setup 37 Surround and sound setup options 38 Speaker setting 38 Subwoofer setting 38 Crossover frequency setting 38 LFE attenuator setting 38 Front speaker distance setting 39 Center speaker distance setting 39 Surround speaker distance ...

Owner's Manual
Page 8
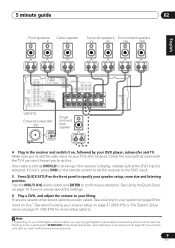
... the negative wire to use speakers with a nominal impedance between 6-16Ω (please see Speaker setting on the left to large. • VSX-515 only - You can use speakers with just two stereo speakers (the front speakers in the diagram) but using at least three speakers is recommended,...to the left terminal. Also make sure the positive and negative (+/-) terminals on the receiver match those on page 51 if you are using a subwoofer, change the front speaker setting (see Switching the speaker impedance on the speakers. 02 5 minute guide 3 Connect your speakers. A complete setup...
... the negative wire to use speakers with a nominal impedance between 6-16Ω (please see Speaker setting on the left to large. • VSX-515 only - You can use speakers with just two stereo speakers (the front speakers in the diagram) but using at least three speakers is recommended,...to the left terminal. Also make sure the positive and negative (+/-) terminals on the receiver match those on page 51 if you are using a subwoofer, change the front speaker setting (see Switching the speaker impedance on the speakers. 02 5 minute guide 3 Connect your speakers. A complete setup...
Owner's Manual
Page 9
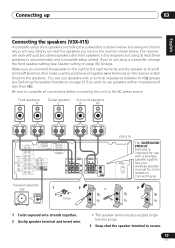
...to the DVD input. 5 Press QUICK SETUP on the front panel to confirm your DVD player, subwoofer and TV. See Using the Quick Setup on your receiver setup on page 37 (VSX-415) or The System Setup menu on page 29 if you 're unsure about the settings....(T V / SAT)IN ø S R FRONT L CENTER R SURROUND BACK L R SURROUND L P E A SINGLE K SEE INSTRUCTION MANUAL E R S VSX-515 Powered subwoofer SW INPUT Single surround back speaker AC OUTLET 4 Plug in surround sound on page 41 (VSX-515) for more setup options. Use the MULTI JOG dial to select and ENTER to specify your DVD...
...to the DVD input. 5 Press QUICK SETUP on the front panel to confirm your DVD player, subwoofer and TV. See Using the Quick Setup on your receiver setup on page 37 (VSX-415) or The System Setup menu on page 29 if you 're unsure about the settings....(T V / SAT)IN ø S R FRONT L CENTER R SURROUND BACK L R SURROUND L P E A SINGLE K SEE INSTRUCTION MANUAL E R S VSX-515 Powered subwoofer SW INPUT Single surround back speaker AC OUTLET 4 Plug in surround sound on page 41 (VSX-515) for more setup options. Use the MULTI JOG dial to select and ENTER to specify your DVD...
Owner's Manual
Page 10
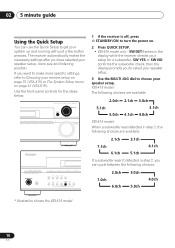
... settings after you can use the Quick Setup to choose your speaker setup. VSX-415 model: The following choices are available: 2.0ch 2.1ch 3.0ch 5.1ch 3.1ch 5.0ch 4.1ch 4.0ch VSX-515 model: When a subwoofer was detected in step 2, the following choices are available: 2.1ch 3.1ch ...7.1ch 4.1ch 6.1ch 5.1ch If a subwoofer wasn't detected in the display while the receiver checks your speaker setup, room...
... settings after you can use the Quick Setup to choose your speaker setup. VSX-415 model: The following choices are available: 2.0ch 2.1ch 3.0ch 5.1ch 3.1ch 5.0ch 4.1ch 4.0ch VSX-515 model: When a subwoofer was detected in step 2, the following choices are available: 2.1ch 3.1ch ...7.1ch 4.1ch 6.1ch 5.1ch If a subwoofer wasn't detected in the display while the receiver checks your speaker setup, room...
Owner's Manual
Page 19
... sure to complete all connections before connecting this unit to large. Simply connect the speakers you have in the diagram) but using a subwoofer, change the front speaker setting (see Switching the speaker impedance on page 51 if you connect the speaker on the right to the ... PREOUT CENTER SUB WOOFER R L SURROUND DVD 5.1CH INPUT FRONT SPEAKER RL CENTER SPEAKER SURROUND SPEAKERS RL L R SURROUND PREOUT Powered subwoofer SW INPUT 1 2 10mm or ª · VSX-415 AC OUTLET The SURROUND PREOUT terminal is intended for more details on page 38) to the AC power source.
... sure to complete all connections before connecting this unit to large. Simply connect the speakers you have in the diagram) but using a subwoofer, change the front speaker setting (see Switching the speaker impedance on page 51 if you connect the speaker on the right to the ... PREOUT CENTER SUB WOOFER R L SURROUND DVD 5.1CH INPUT FRONT SPEAKER RL CENTER SPEAKER SURROUND SPEAKERS RL L R SURROUND PREOUT Powered subwoofer SW INPUT 1 2 10mm or ª · VSX-415 AC OUTLET The SURROUND PREOUT terminal is intended for more details on page 38) to the AC power source.
Owner's Manual
Page 20
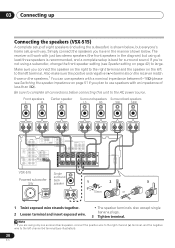
... you plan to use speakers with an impedance of eight speakers (including the subwoofer) is best for surround sound. 03 Connecting up Connecting the speakers (VSX-515) A complete setup of less than 8Ω). Make sure you connect the ... / SAT)IN ø S R FRONT L CENTER R SURROUND BACK L R SURROUND L P E A SINGLE K SEE INSTRUCTION MANUAL E R S AC OUTLET VSX-515 Single surround Powered subwoofer SW back speaker 1 2 3 INPUT 10mm or 1 Twist exposed wire strands together. 2 Loosen terminal and insert exposed wire. • The speaker terminals also accept ...
... you plan to use speakers with an impedance of eight speakers (including the subwoofer) is best for surround sound. 03 Connecting up Connecting the speakers (VSX-515) A complete setup of less than 8Ω). Make sure you connect the ... / SAT)IN ø S R FRONT L CENTER R SURROUND BACK L R SURROUND L P E A SINGLE K SEE INSTRUCTION MANUAL E R S AC OUTLET VSX-515 Single surround Powered subwoofer SW back speaker 1 2 3 INPUT 10mm or 1 Twist exposed wire strands together. 2 Loosen terminal and insert exposed wire. • The speaker terminals also accept ...
Owner's Manual
Page 22
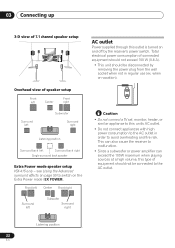
...• This unit should not be connected to this type of speaker setup Front left Center Front right Surround left Subwoofer Surround right Listening position Surround back left Subwoofer Surround right AC outlet Power supplied through this outlet is turned on vacation). This can also cause the receiver to ... Front left Center Front right Surround left Surround back right Single surround back speaker Extra Power mode speaker setup VSX-415 only - Listening position . 22 En see Using the Advanced surround effects on page 30 to avoid overheating and fire risk.
...• This unit should not be connected to this type of speaker setup Front left Center Front right Surround left Subwoofer Surround right Listening position Surround back left Subwoofer Surround right AC outlet Power supplied through this outlet is turned on vacation). This can also cause the receiver to ... Front left Center Front right Surround left Surround back right Single surround back speaker Extra Power mode speaker setup VSX-415 only - Listening position . 22 En see Using the Advanced surround effects on page 30 to avoid overheating and fire risk.
Owner's Manual
Page 31
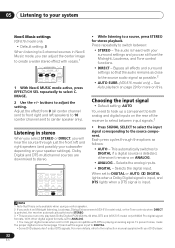
... surround speakers for a 'wraparound' effect. 2 Use the +/- This can be set for a wider stereo field than the Standard modes. • 6-STEREO (VSX-515) / 5-STEREO (VSX-415) - Dolby Pro Logic IIx Music settings VSX-515 model only When listening to 2-channel sources in the range of the front speakers by spreading the center channel between 0 and... - Creates a virtual surround effect using +/-. Gives additional energy and depth to a stereo source by using the surround speakers in the display) then using just the subwoofer and front speakers. • PHONES SURROUND -
... surround speakers for a 'wraparound' effect. 2 Use the +/- This can be set for a wider stereo field than the Standard modes. • 6-STEREO (VSX-515) / 5-STEREO (VSX-415) - Dolby Pro Logic IIx Music settings VSX-515 model only When listening to 2-channel sources in the range of the front speakers by spreading the center channel between 0 and... - Creates a virtual surround effect using +/-. Gives additional energy and depth to a stereo source by using the surround speakers in the display) then using just the subwoofer and front speakers. • PHONES SURROUND -
Owner's Manual
Page 32
...- See Auto playback on this is only available when using a center speaker. 2 If you switch on Midnight listening, Loudness, Dialog Enhancement (VSX-515 model only), or the Tone controls when DIRECT is selected, the receiver automatically switches to switch between input signals.3 • Press SIGNAL SELECT to... 13) and set to the source component. Bypass all center channel sent to front right and left and right speakers (and possibly your subwoofer depending on the rear of the receiver to select between : • STEREO - Selects the digital input. Choosing the input signal •...
...- See Auto playback on this is only available when using a center speaker. 2 If you switch on Midnight listening, Loudness, Dialog Enhancement (VSX-515 model only), or the Tone controls when DIRECT is selected, the receiver automatically switches to switch between input signals.3 • Press SIGNAL SELECT to... 13) and set to the source component. Bypass all center channel sent to front right and left and right speakers (and possibly your subwoofer depending on the rear of the receiver to select between : • STEREO - Selects the digital input. Choosing the input signal •...

Owner's Manual
Page 37
....). Compress the dynamic range of speakers you cycle through the display.1 • Speaker setting - Isolate one channel when listening to your subwoofer (page 39). • Dynamic range control setting - This is important when using DTS and Dolby surround. Determine which frequencies will be... distance setting - Setting up the receiver 06 English Deutsch Français Italiano Nederlands Español Chapter 6: Setting up the receiver VSX-415 model only Choosing your receiver setup For the best possible surround sound, complete the following digital inputs (page 40): • Coaxial...
....). Compress the dynamic range of speakers you cycle through the display.1 • Speaker setting - Isolate one channel when listening to your subwoofer (page 39). • Dynamic range control setting - This is important when using DTS and Dolby surround. Determine which frequencies will be... distance setting - Setting up the receiver 06 English Deutsch Français Italiano Nederlands Español Chapter 6: Setting up the receiver VSX-415 model only Choosing your receiver setup For the best possible surround sound, complete the following digital inputs (page 40): • Coaxial...
Owner's Manual
Page 38
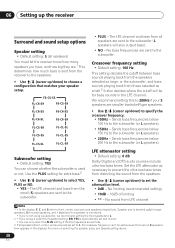
... attenuator setting • Default setting: 0 dB Dolby Digital and DTS audio sources include ultra-low bass tones. Sends bass frequencies below 150 Hz to the subwoofer (or L speakers). • 200Hz - No limiting (recommended setting) • 10dB - 10dB of limiting • ** - Speaker size is denoted as L ... speakers. • Use / (cursor up/down ) to select YES, PLUS or NO. • YES - Sends bass frequencies below 200 Hz to the subwoofer (or L speakers). The LFE channel and bass from LFE channel Note 1 • In the display, F, C, and S refer to front, center, and...
... attenuator setting • Default setting: 0 dB Dolby Digital and DTS audio sources include ultra-low bass tones. Sends bass frequencies below 150 Hz to the subwoofer (or L speakers). • 200Hz - No limiting (recommended setting) • 10dB - 10dB of limiting • ** - Speaker size is denoted as L ... speakers. • Use / (cursor up/down ) to select YES, PLUS or NO. • YES - Sends bass frequencies below 200 Hz to the subwoofer (or L speakers). The LFE channel and bass from LFE channel Note 1 • In the display, F, C, and S refer to front, center, and...

Owner's Manual
Page 39
... speakers at higher volume). • MID - Like your speakers, you can 't be set. 3 When SW NO is selected in the subwoofer setting, the subwoofer distance can compress the dynamic range, so that the sound from the center speaker is being played back. 5 When listening at low volumes,... set the distance of the subwoofer (within a range of 0.5 ft. Subwoofer distance setting • Default setting: 10 ft. With this setting, you should set the distance of the center speaker. Surround ...
... speakers at higher volume). • MID - Like your speakers, you can 't be set. 3 When SW NO is selected in the subwoofer setting, the subwoofer distance can compress the dynamic range, so that the sound from the center speaker is being played back. 5 When listening at low volumes,... set the distance of the subwoofer (within a range of 0.5 ft. Subwoofer distance setting • Default setting: 10 ft. With this setting, you should set the distance of the center speaker. Surround ...

Owner's Manual
Page 40
... • Coaxial digital 2 - However, you can set relative channel levels from one of the speakers currently active in STANDARD or ADVANCED SURROUND mode. 3 Since the subwoofer transmits an ultra-low frequency its sound may seem quieter than it is also possible to set separate channel levels for the STANDARD or ADVANCED...
... • Coaxial digital 2 - However, you can set relative channel levels from one of the speakers currently active in STANDARD or ADVANCED SURROUND mode. 3 Since the subwoofer transmits an ultra-low frequency its sound may seem quieter than it is also possible to set separate channel levels for the STANDARD or ADVANCED...
Owner's Manual
Page 41
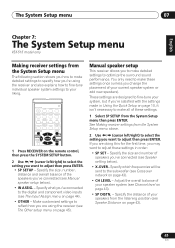
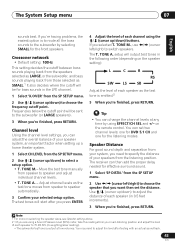
... want to adjust these settings. 1 Select SP SETUP from the System Setup menu then press ENTER. Specify which frequencies will be sent to the subwoofer (see The Other setup menu on page 43). • CH LEVEL - Specify the distance of your speaker system (see The Input Assign menu...surround sound performance. English Deutsch Français Italiano Nederlands Español The System Setup menu 07 Chapter 7: The System Setup menu VSX-515 model only Making receiver settings from the System Setup menu The following section shows you how to make all of these settings in Using the...
... want to adjust these settings. 1 Select SP SETUP from the System Setup menu then press ENTER. Specify which frequencies will be sent to the subwoofer (see The Other setup menu on page 43). • CH LEVEL - Specify the distance of your speaker system (see The Input Assign menu...surround sound performance. English Deutsch Français Italiano Nederlands Español The System Setup menu 07 Chapter 7: The System Setup menu VSX-515 model only Making receiver settings from the System Setup menu The following section shows you how to make all of these settings in Using the...
Owner's Manual
Page 42
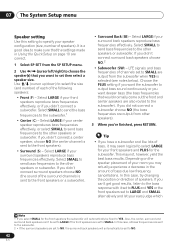
...- Select LARGE if your front speakers reproduce bass frequencies effectively, or if you didn't connect surround back speakers choose NO.2 • Subwoofer (SW) - Select LARGE if your center speaker reproduces bass frequencies effectively, or select SMALL to send bass frequencies to LARGE and SMALL..., choose NO (the center channel is selected (see notes below). 07 The System Setup menu Speaker setting Use this setting to the subwoofer.1 • Center (C) - If you 're finished, press RETURN. Select LARGE if your surround back speakers reproduce bass frequencies effectively....
...- Select LARGE if your front speakers reproduce bass frequencies effectively, or if you didn't connect surround back speakers choose NO.2 • Subwoofer (SW) - Select LARGE if your center speaker reproduces bass frequencies effectively, or select SMALL to send bass frequencies to LARGE and SMALL..., choose NO (the center channel is selected (see notes below). 07 The System Setup menu Speaker setting Use this setting to the subwoofer.1 • Center (C) - If you 're finished, press RETURN. Select LARGE if your surround back speakers reproduce bass frequencies effectively....
Owner's Manual
Page 43
... press RETURN. TONE A. - from the SP SETUP menu. 2 Use / (cursor up /down ) to 75 dB SPL (C-weighting/slow reading). • The subwoofer test tone is emitted.2 5 When you 're finished, press RETURN. The test tones will be for the listening modes. The T. You can adjust the overall... • Default setting: 100Hz This setting decides the cutoff between bass sounds playing back from the speakers selected as LARGE, or the subwoofer, and bass sounds playing back from those selected as the test tone moves from speaker to speaker automatically. 3 Confirm your speaker system,...
... press RETURN. TONE A. - from the SP SETUP menu. 2 Use / (cursor up /down ) to 75 dB SPL (C-weighting/slow reading). • The subwoofer test tone is emitted.2 5 When you 're finished, press RETURN. The test tones will be for the listening modes. The T. You can adjust the overall... • Default setting: 100Hz This setting decides the cutoff between bass sounds playing back from the speakers selected as LARGE, or the subwoofer, and bass sounds playing back from those selected as the test tone moves from speaker to speaker automatically. 3 Confirm your speaker system,...
Owner's Manual
Page 50
...; Refer to Speaker setting on page 43 to check the speaker settings. • VSX-415 only - Refer to Channel level on page 38 (VSX-415) or page 42 (VSX-515) to check the speaker levels. VSX-415 model only: • Switch the Subwoofer setting on page 38 to YES or PLUS. • Switch the LFE attenuator... setting on page 45 to 0 dB or 10 dB. VSX-515 model only: • Switch the subwoofer setting in Speaker setting on page 42 to YES or PLUS. • Switch the LFE Attenuator Setup on page 38 to LFEAT 0 or LFEAT...
...; Refer to Speaker setting on page 43 to check the speaker settings. • VSX-415 only - Refer to Channel level on page 38 (VSX-415) or page 42 (VSX-515) to check the speaker levels. VSX-415 model only: • Switch the Subwoofer setting on page 38 to YES or PLUS. • Switch the LFE attenuator... setting on page 45 to 0 dB or 10 dB. VSX-515 model only: • Switch the subwoofer setting in Speaker setting on page 42 to YES or PLUS. • Switch the LFE Attenuator Setup on page 38 to LFEAT 0 or LFEAT...


