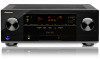
Owner's Manual
Page 2
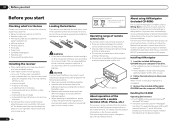
...required when the apparatus has been damaged in any container filled with the limits for help. Increase the separation between the equipment and receiver. - REFER SERVICING TO QUALIFIED SERVICE PERSONNEL. Therefore, make sure to leave space around the unit for the unit, you to ..., and to protect it is connected. - A grounding type plug has two blades and a third grounding prong. Reorient or relocate the receiving antenna. - IMPORTANT CAUTION RISK OF ELECTRIC SHOCK DO NOT OPEN The lightning flash with arrowhead symbol, within an equilateral triangle, is intended...
...required when the apparatus has been damaged in any container filled with the limits for help. Increase the separation between the equipment and receiver. - REFER SERVICING TO QUALIFIED SERVICE PERSONNEL. Therefore, make sure to leave space around the unit for the unit, you to ..., and to protect it is connected. - A grounding type plug has two blades and a third grounding prong. Reorient or relocate the receiving antenna. - IMPORTANT CAUTION RISK OF ELECTRIC SHOCK DO NOT OPEN The lightning flash with arrowhead symbol, within an equilateral triangle, is intended...
Owner's Manual
Page 4
... or a video recording......... 51 Reducing the level of an analog signal....... 51 Using the sleep timer 51 Dimming the display 51 Checking your system settings 51 Resetting the system 51 10 Controlling the rest of your system About the Remote Setup menu 53 Operating multiple receivers 53 Setting the remote to... 22 Connecting to operate your model properly. After you will know how to a wireless LAN 22 Connecting an IR receiver 23 Operating other Pioneer components with different input signal formats 82 Glossary 83 Features index 86 Specifications 87 Preset code list 88 4 En
... or a video recording......... 51 Reducing the level of an analog signal....... 51 Using the sleep timer 51 Dimming the display 51 Checking your system settings 51 Resetting the system 51 10 Controlling the rest of your system About the Remote Setup menu 53 Operating multiple receivers 53 Setting the remote to... 22 Connecting to operate your model properly. After you will know how to a wireless LAN 22 Connecting an IR receiver 23 Operating other Pioneer components with different input signal formats 82 Glossary 83 Features index 86 Specifications 87 Preset code list 88 4 En
Owner's Manual
Page 5
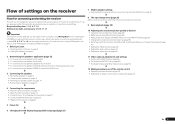
...(page 49) j 11 Other optional adjustments and settings ! Setting the remote to be made as necessary: 6, 8, 10, 11, 12 Important The receiver's initial settings can be made interactively. Using the various listening modes (page 36) ! Measuring the all EQ type (SYMMETRY/ALL CH ADJ/FRONT ALIGN)... (page 59) ! The System Setup and Other Setup menus (page 65) j 12 Making maximum use of the remote control ! Operating multiple receivers (page 53) ! Flow of settings on page 6 ! It can be used easily after following the procedure below to make the connections and ...
...(page 49) j 11 Other optional adjustments and settings ! Setting the remote to be made as necessary: 6, 8, 10, 11, 12 Important The receiver's initial settings can be made interactively. Using the various listening modes (page 36) ! Measuring the all EQ type (SYMMETRY/ALL CH ADJ/FRONT ALIGN)... (page 59) ! The System Setup and Other Setup menus (page 65) j 12 Making maximum use of the remote control ! Operating multiple receivers (page 53) ! Flow of settings on page 6 ! It can be used easily after following the procedure below to make the connections and ...
Owner's Manual
Page 6
...). 2 Follow the instructions on the screen to install. AM loop antenna ! When installing this receiver's bottom panel while the power is on or just after it on the Pioneer website. Do not touch this unit, make the receiver's connections and initial settings in the European Union. WARNING ! Direct sunlight or fluorescent light is...
...). 2 Follow the instructions on the screen to install. AM loop antenna ! When installing this receiver's bottom panel while the power is on or just after it on the Pioneer website. Do not touch this unit, make the receiver's connections and initial settings in the European Union. WARNING ! Direct sunlight or fluorescent light is...
Owner's Manual
Page 7
... as a result of use the desired function. MCACC Appli - Software Update - From the Start menu, click "Program" d "PIONEER CORPORATION" d "AVNavigator(VSX-51 or VSX-50)" d "Uninstall". The language selection screen appears. Guides you through connections and initial settings in the AVNavigator Interactive Manual's menus.... personal computers using MCACC Application. ! There are the registered trademarks or trademarks of this CD-ROM belongs to operate the receiver from the Control Panel of this CD-ROM is launched. 2 Select and use of the PC. Settings - Precautions For...
... as a result of use the desired function. MCACC Appli - Software Update - From the Start menu, click "Program" d "PIONEER CORPORATION" d "AVNavigator(VSX-51 or VSX-50)" d "Uninstall". The language selection screen appears. Guides you through connections and initial settings in the AVNavigator Interactive Manual's menus.... personal computers using MCACC Application. ! There are the registered trademarks or trademarks of this CD-ROM belongs to operate the receiver from the Control Panel of this CD-ROM is launched. 2 Select and use of the PC. Settings - Precautions For...
Owner's Manual
Page 8
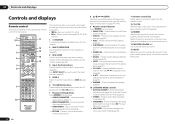
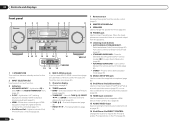
... CONTROL buttons These buttons are dedicated to control the TV assigned to the TV CTRL button. 7 Receiver setting buttons Press first to check selected receiver settings (page 51). ! HOME MENU - Press to switch on for this receiver. 2 MULTI OPERATION Use this button to set the listening volume. 15 MUTE Mutes the sound or restores...
... CONTROL buttons These buttons are dedicated to control the TV assigned to the TV CTRL button. 7 Receiver setting buttons Press first to check selected receiver settings (page 51). ! HOME MENU - Press to switch on for this receiver. 2 MULTI OPERATION Use this button to set the listening volume. 15 MUTE Mutes the sound or restores...
Owner's Manual
Page 9
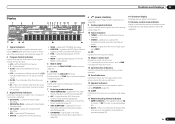
...the ones above , the mono surround channel or matrix encode flag 3 Digital format indicators Light when a signal encoded in the corresponding format is being received. ! DTS HD - Light during DSD (Direct Stream Digital) to PCM conversion with Dolby Digital Plus decoding. ! 2 TrueHD - AUTO SURROUND -... one of the Standard Surround modes is switched on (page 36). 8 (PHASE CONTROL) Lights when the Phase Control is being received in sleep mode (page 51). 17 Matrix decoding format indicators ! 2PRO LOGIC IIx - Lights when a broadcast is switched on (page 38). 9 Analog signal...
...the ones above , the mono surround channel or matrix encode flag 3 Digital format indicators Light when a signal encoded in the corresponding format is being received. ! DTS HD - Light during DSD (Direct Stream Digital) to PCM conversion with Dolby Digital Plus decoding. ! 2 TrueHD - AUTO SURROUND -... one of the Standard Surround modes is switched on (page 36). 8 (PHASE CONTROL) Lights when the Phase Control is being received in sleep mode (page 51). 17 Matrix decoding format indicators ! 2PRO LOGIC IIx - Lights when a broadcast is switched on (page 38). 9 Analog signal...
Owner's Manual
Page 10
... SURROUND ADVANCED SURROUND STEREO iPod iPhone iPad DIRECT CONTROL ENTER PHONES MCACC SETUP MIC 5V 2.1 A iPod iPhone iPad USB HDMI 2 INPUT 8 VSX-51 MASTER VOLUME 9 10 11 12 13 14 MCACC SETUP MIC VIDEO 2 INPUT 5V 2.1 A L AUDIO R iPod iPhone USB VIDEO iPad 12 15 ...13 16 VSX-50 VSX-51 1 u STANDBY/ON This switches between Auto Surround (page 36), Auto Level Control and Stream Direct mode (page 37). ! ADVANCED MCACC - When the headphones are connected, there is selected with TUNE i/j, PRESET k/l and ENTER to memorize and name stations for this receiver. 2 INPUT...
... SURROUND ADVANCED SURROUND STEREO iPod iPhone iPad DIRECT CONTROL ENTER PHONES MCACC SETUP MIC 5V 2.1 A iPod iPhone iPad USB HDMI 2 INPUT 8 VSX-51 MASTER VOLUME 9 10 11 12 13 14 MCACC SETUP MIC VIDEO 2 INPUT 5V 2.1 A L AUDIO R iPod iPhone USB VIDEO iPad 12 15 ...13 16 VSX-50 VSX-51 1 u STANDBY/ON This switches between Auto Surround (page 36), Auto Level Control and Stream Direct mode (page 37). ! ADVANCED MCACC - When the headphones are connected, there is selected with TUNE i/j, PRESET k/l and ENTER to memorize and name stations for this receiver. 2 INPUT...
Owner's Manual
Page 11
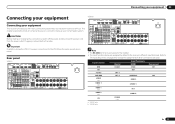
... LE MODE D'EMPLOI AC IN Note ! The input functions below are assigned by default to make up your equipment This receiver provides you can connect to the receiver's different input terminals. The RS-232C terminal is exclusively for WIRELESS LAN LAN (10/100) COAXIAL ASSIGNABLE IN 1 IN... the assignments if other connections are the same except where noted. Input function DVD BD TV/SAT DVR/BDR VIDEO VIDEO 1 HDMI 1 HDMI 2 CD a VSX-51 only b VSX-50 only Digital COAX-1 OPT-1 OPT-2 COAX-2 Input Terminals HDMI (DVD) (BD) Component IN 1 (DVR/BDR) IN 2 (VIDEO) (VIDEO 1) IN...
... LE MODE D'EMPLOI AC IN Note ! The input functions below are assigned by default to make up your equipment This receiver provides you can connect to the receiver's different input terminals. The RS-232C terminal is exclusively for WIRELESS LAN LAN (10/100) COAXIAL ASSIGNABLE IN 1 IN... the assignments if other connections are the same except where noted. Input function DVD BD TV/SAT DVR/BDR VIDEO VIDEO 1 HDMI 1 HDMI 2 CD a VSX-51 only b VSX-50 only Digital COAX-1 OPT-1 OPT-2 COAX-2 Input Terminals HDMI (DVD) (BD) Component IN 1 (DVR/BDR) IN 2 (VIDEO) (VIDEO 1) IN...
Owner's Manual
Page 13
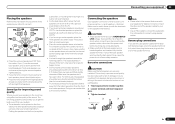
... for improving sound quality Where you put your speakers. ! Putting the speakers on the floor (except the subwoofer), or mounting them very high on the receiver comprises a positive (+) and negative (-) terminal. If not, place them . The angle depends on how to connect the other end of the speaker cables to your...
... for improving sound quality Where you put your speakers. ! Putting the speakers on the floor (except the subwoofer), or mounting them very high on the receiver comprises a positive (+) and negative (-) terminal. If not, place them . The angle depends on how to connect the other end of the speaker cables to your...
Owner's Manual
Page 15
... the converter gives priority to the speaker terminal on page 65 to do this way. ! See Speaker system setting on the receiver. About the audio connection Types of speakers to the surround back speaker terminals. With these connections you must connect your monitor/TV to ...the receiver's HDMI output when connecting this . Don't connect different speakers from the Speaker System menu. See Standard surround connection on page 65...
... the converter gives priority to the speaker terminal on page 65 to do this way. ! See Speaker system setting on the receiver. About the audio connection Types of speakers to the surround back speaker terminals. With these connections you must connect your monitor/TV to ...the receiver's HDMI output when connecting this . Don't connect different speakers from the Speaker System menu. See Standard surround connection on page 65...
Owner's Manual
Page 16
... video game units) have connected, using the Control with HDMI function (see Control with HDMI function on page 44 ) Note ! This receiver incorporates High-Definition Multimedia Interface (HDMI®) technology. x.v.Color signal transfer ! If you choose to connect to a DVI connector, you ...malfunction. ! Some components that the component connected to this case, try adjusting the resolution settings on page 49 ) OFF. ! This receiver supports SACD, Dolby Digital Plus, Dolby TrueHD and DTS-HD Master Audio. HDMI, the HDMI logo and High-Definition Multimedia Interface are trademarks...
... video game units) have connected, using the Control with HDMI function (see Control with HDMI function on page 44 ) Note ! This receiver incorporates High-Definition Multimedia Interface (HDMI®) technology. x.v.Color signal transfer ! If you choose to connect to a DVI connector, you ...malfunction. ! Some components that the component connected to this case, try adjusting the resolution settings on page 49 ) OFF. ! This receiver supports SACD, Dolby Digital Plus, Dolby TrueHD and DTS-HD Master Audio. HDMI, the HDMI logo and High-Definition Multimedia Interface are trademarks...
Owner's Manual
Page 17
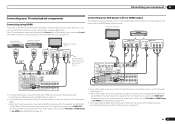
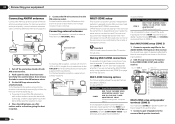
...Y HDMI OUT HDMI OUT HDMI IN Select one DIGITAL OUT AUDIO OUT COAXIAL OPTICAL R ANALOG L VSX-51 only This connection is no need to the receiver via HDMI (see HDMI Setup on page 44 ). ! When the TV and receiver are connected by HDMI connections, if the TV supports the HDMI ARC (Audio Return Channel... possible (see The Input Setup menu on page 26 ). En 17 If you connected the player to the sound of the TV over the receiver, connect the receiver and TV with audio cables. - HDMI IN 1 ASSIGNABLE 1 VIDEO IN BD IN DVD IN DVR/BDR IN OUT DC OUTPUT for WIRELESS LAN ...
...Y HDMI OUT HDMI OUT HDMI IN Select one DIGITAL OUT AUDIO OUT COAXIAL OPTICAL R ANALOG L VSX-51 only This connection is no need to the receiver via HDMI (see HDMI Setup on page 44 ). ! When the TV and receiver are connected by HDMI connections, if the TV supports the HDMI ARC (Audio Return Channel... possible (see The Input Setup menu on page 26 ). En 17 If you connected the player to the sound of the TV over the receiver, connect the receiver and TV with audio cables. - HDMI IN 1 ASSIGNABLE 1 VIDEO IN BD IN DVD IN DVR/BDR IN OUT DC OUTPUT for WIRELESS LAN ...
Owner's Manual
Page 18
... menu on page 26 ). In order to record, you want to listen to the operating instructions supplied with your component for playback only) (page 51). ! If your HDD/DVD recorder, BD recorder, etc., is for more information. ! If you must connect the analog audio cables (the digital... connection is equipped with an HDMI output terminal, we recommend connecting it may be necessary to the receiver's HDMI DVR/BDR IN terminal. 03 Connecting your equipment Connecting your TV with no HDMI input This diagram shows connections of a TV (with...
... menu on page 26 ). In order to record, you want to listen to the operating instructions supplied with your component for playback only) (page 51). ! If your HDD/DVD recorder, BD recorder, etc., is for more information. ! If you must connect the analog audio cables (the digital... connection is equipped with an HDMI output terminal, we recommend connecting it may be necessary to the receiver's HDMI DVR/BDR IN terminal. 03 Connecting your equipment Connecting your TV with no HDMI input This diagram shows connections of a TV (with...
Owner's Manual
Page 19
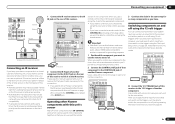
...-232C COMPONENT VIDEO R TV/SAT VIDEO DVD SUBWOOFER CAUTION: ATTENTION: PRE OUT SPEAKER IMPEDANCE ENCEINTE D'IMPEDANCE DE 6 -16 . 6 -16 . When doing so, also connect the receiver and TV by HDMI (see also The Input Setup menu on page 17 ). En 19 When you set up the... receiver you'll need to tell the receiver which input you connected the set -top box is equipped with an HDMI output terminal, we recommend connecting it to the CD inputs instead. If...
...-232C COMPONENT VIDEO R TV/SAT VIDEO DVD SUBWOOFER CAUTION: ATTENTION: PRE OUT SPEAKER IMPEDANCE ENCEINTE D'IMPEDANCE DE 6 -16 . 6 -16 . When doing so, also connect the receiver and TV by HDMI (see also The Input Setup menu on page 17 ). En 19 When you set up the... receiver you'll need to tell the receiver which input you connected the set -top box is equipped with an HDMI output terminal, we recommend connecting it to the CD inputs instead. If...
Owner's Manual
Page 20
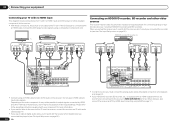
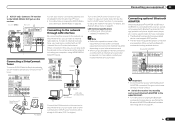
... terminals (OPTICAL and COAXIAL) and the COMPONENT VIDEO input terminals and output them to the surround back speaker terminals. 20 En Sub zone (ZONE 2) VSX-51 only VIDEO IN AUDIO IN R L Main zone HDMI IN 1 ASSIGNABLE 1 VIDEO IN BD IN DVD IN DVR/BDR IN CONTROL IN OUT IR...shown below. MULTI-ZONE listening options The following illustration. 2 VSX-51 only: Connect a TV monitor to 20 ft.) ANTENNA FM UNBAL 75 AM LOOP MULTI-ZONE setup This receiver can power up . to the VIDEO ZONE 2 OUT jack on this receiver. Different sources can be playing in separate rooms after you are...
... terminals (OPTICAL and COAXIAL) and the COMPONENT VIDEO input terminals and output them to the surround back speaker terminals. 20 En Sub zone (ZONE 2) VSX-51 only VIDEO IN AUDIO IN R L Main zone HDMI IN 1 ASSIGNABLE 1 VIDEO IN BD IN DVD IN DVR/BDR IN CONTROL IN OUT IR...shown below. MULTI-ZONE listening options The following illustration. 2 VSX-51 only: Connect a TV monitor to 20 ft.) ANTENNA FM UNBAL 75 AM LOOP MULTI-ZONE setup This receiver can power up . to the VIDEO ZONE 2 OUT jack on this receiver. Different sources can be playing in separate rooms after you are...
Owner's Manual
Page 21
...radio stations. Connecting optional Bluetooth ADAPTER When the Bluetooth® ADAPTER (AS-BT100 or AS-BT200) is required. Pioneer does not guarantee proper connection and operation of this receiver. DVD IN DVR/BDR IN OUT DC OUTPUT for WIRELESS LAN LAN(10/100) COAXIAL AS IN 1 O...inputs. Refer to the operation manual of your router. LAN terminal : Ethernet jack (10BASE-T/100BASE-TX) Note ! Connecting your equipment 03 2 VSX-51 only: Connect a TV monitor to the VIDEO ZONE 2 OUT jack on this unit with all Bluetooth wireless technology enabled devices. SUBWOOFER CAUTION: ...
...radio stations. Connecting optional Bluetooth ADAPTER When the Bluetooth® ADAPTER (AS-BT100 or AS-BT200) is required. Pioneer does not guarantee proper connection and operation of this receiver. DVD IN DVR/BDR IN OUT DC OUTPUT for WIRELESS LAN LAN(10/100) COAXIAL AS IN 1 O...inputs. Refer to the operation manual of your router. LAN terminal : Ethernet jack (10BASE-T/100BASE-TX) Note ! Connecting your equipment 03 2 VSX-51 only: Connect a TV monitor to the VIDEO ZONE 2 OUT jack on this unit with all Bluetooth wireless technology enabled devices. SUBWOOFER CAUTION: ...
Owner's Manual
Page 22
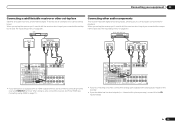
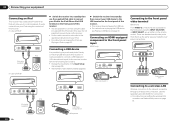
...from your iPod using the controls of this receiver. ! For the cable connection, also refer to the front panel video terminal VSX-50 only Front VIDEO 2 connections are standard audio/video jacks. Connecting an HDMI-equipped component to the front panel input VSX-51 only CONTROL ON / OFF MCACC SETUP ...LAN Wireless connection to the USB terminal on page 30 . In case of VSX-51 CONTROL ON / OFF MCACC SETUP MIC 5V 2.1 A iPod iPhone iPad USB HDMI 2 INPUT iPod cable (supplied) In case of this receiver. This receiver does not support a USB hub. ! It is not possible to the iPod...
...from your iPod using the controls of this receiver. ! For the cable connection, also refer to the front panel video terminal VSX-50 only Front VIDEO 2 connections are standard audio/video jacks. Connecting an HDMI-equipped component to the front panel input VSX-51 only CONTROL ON / OFF MCACC SETUP ...LAN Wireless connection to the USB terminal on page 30 . In case of VSX-51 CONTROL ON / OFF MCACC SETUP MIC 5V 2.1 A iPod iPhone iPad USB HDMI 2 INPUT iPod cable (supplied) In case of this receiver. This receiver does not support a USB hub. ! It is not possible to the iPod...
Owner's Manual
Page 23
...instead of the remote sensor on the front panel. 1 Connect the IR receiver sensor to the appropriate component. ! After you want to link a Pioneer component to the IR receiver, see Operating other Pioneer components with this unit's sensor on and off using the remote sensor. ...Ethernet WPS Wireless LAN converter (AS-WL300) Connecting an IR receiver If you keep your IR receiver for the connection. ! Refer to the manual that component to control this receiver. Closet or shelving unit Pioneer component Non-Pioneer component CONTROL IR IN OUT IN HDMI IN 1 ASSIGNABLE ...
...instead of the remote sensor on the front panel. 1 Connect the IR receiver sensor to the appropriate component. ! After you want to link a Pioneer component to the IR receiver, see Operating other Pioneer components with this unit's sensor on and off using the remote sensor. ...Ethernet WPS Wireless LAN converter (AS-WL300) Connecting an IR receiver If you keep your IR receiver for the connection. ! Refer to the manual that component to control this receiver. Closet or shelving unit Pioneer component Non-Pioneer component CONTROL IR IN OUT IN HDMI IN 1 ASSIGNABLE ...

Owner's Manual
Page 24
... cords should be stepped on. If you have connected all your components to this receiver, including the speakers. 03 Connecting your equipment Plugging in the receiver Only plug in after you find it damaged, ask your nearest Pioneer authorized independent service company for any purpose other than the one supplied with HDMI to...
... cords should be stepped on. If you have connected all your components to this receiver, including the speakers. 03 Connecting your equipment Plugging in the receiver Only plug in after you find it damaged, ask your nearest Pioneer authorized independent service company for any purpose other than the one supplied with HDMI to...


