Owner's Manual
Page 4
...Using other functions Setting the Audio options 47 Setting the Video options 49 Switching the speaker terminals 50 Using the MULTI-ZONE controls 50 Making an audio or a video recording......... 51 Reducing the level of an analog signal....... 51 Using the sleep timer 51 Dimming the display 51 Checking your system settings 51 Resetting the system 51 10 Controlling the rest of your system About the Remote Setup menu 53 Operating multiple receivers 53 Setting the remote to control other components 53 Selecting preset codes directly 53 Programming signals from other Pioneer components...
...Using other functions Setting the Audio options 47 Setting the Video options 49 Switching the speaker terminals 50 Using the MULTI-ZONE controls 50 Making an audio or a video recording......... 51 Reducing the level of an analog signal....... 51 Using the sleep timer 51 Dimming the display 51 Checking your system settings 51 Resetting the system 51 10 Controlling the rest of your system About the Remote Setup menu 53 Operating multiple receivers 53 Setting the remote to control other components 53 Selecting preset codes directly 53 Programming signals from other Pioneer components...
Owner's Manual
Page 8
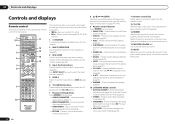
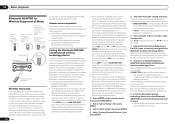
... - Use to switch between MCACC presets (page 37). ! 02 Controls and displays Controls and displays Remote control This section explains how to operate the remote control for the receiver. 1 2,3 4 5 6 7 8 9 10 RECEIVER MULTI OPERATION SOURCE RCU SETUP BDR BD DVD DVR HDMI SAT TV CD HMG ADPT USB iPod TV CTRL TUNER SIRIUS INPUT SELECT ZONE 2 RECEIVER INPUT MASTER VOLUME TV CONTROL CH VOL MUTE AUDIO PARAMETER LIST VIDEO PARAMETER TUNE TOOLS TOP MENU BAND T.EDIT GUIDE PRESET ENTER PRESET CATEGORY HOME MENU TUNE iPod CTRL RETURN HDD PGM MEMORY MENU DVD PHASE...
... - Use to switch between MCACC presets (page 37). ! 02 Controls and displays Controls and displays Remote control This section explains how to operate the remote control for the receiver. 1 2,3 4 5 6 7 8 9 10 RECEIVER MULTI OPERATION SOURCE RCU SETUP BDR BD DVD DVR HDMI SAT TV CD HMG ADPT USB iPod TV CTRL TUNER SIRIUS INPUT SELECT ZONE 2 RECEIVER INPUT MASTER VOLUME TV CONTROL CH VOL MUTE AUDIO PARAMETER LIST VIDEO PARAMETER TUNE TOOLS TOP MENU BAND T.EDIT GUIDE PRESET ENTER PRESET CATEGORY HOME MENU TUNE iPod CTRL RETURN HDD PGM MEMORY MENU DVD PHASE...
Owner's Manual
Page 9
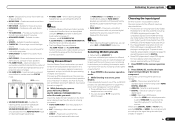
.... 12 Master volume level Shows the overall volume level. Light during DSD (Direct Stream Digital) to indicate reducing the level of PCM signals. ! STEREO - C - Neo:6 - SL/SR - XC - Lights when the Auto Surround feature is switched on , this lights to indicate Neo:6 processing (page 36). 18 Character display Displays various system information. 19 Remote control mode indicator Lights to indicate the current speaker system using MPX. 11 Lights when the sound is set to indicate the input function you have selected...
.... 12 Master volume level Shows the overall volume level. Light during DSD (Direct Stream Digital) to indicate reducing the level of PCM signals. ! STEREO - C - Neo:6 - SL/SR - XC - Lights when the Auto Surround feature is switched on , this lights to indicate Neo:6 processing (page 36). 18 Character display Displays various system information. 19 Remote control mode indicator Lights to indicate the current speaker system using MPX. 11 Lights when the sound is set to indicate the input function you have selected...
Owner's Manual
Page 12
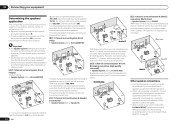
... channel surround system & ZONE 2 connection (Multi Zone) ! Your favorite speaker connections can be damaged.) ! When not connecting a subwoofer, connect speakers with stereo playback of speakers you have fewer than [A] (see Speaker system setting on another component in the main zone when not using the B speakers. [D] 5.1 channel surround system & Front Bi-amping connection (High quality surround) ! See Automatically conducting optimum sound tuning (Full Auto MCACC) on the input signal or listening mode. [A] 7.1 channel surround system (Front height) *Default setting ! 03 Connecting...
... channel surround system & ZONE 2 connection (Multi Zone) ! Your favorite speaker connections can be damaged.) ! When not connecting a subwoofer, connect speakers with stereo playback of speakers you have fewer than [A] (see Speaker system setting on another component in the main zone when not using the B speakers. [D] 5.1 channel surround system & Front Bi-amping connection (High quality surround) ! See Automatically conducting optimum sound tuning (Full Auto MCACC) on the input signal or listening mode. [A] 7.1 channel surround system (Front height) *Default setting ! 03 Connecting...
Owner's Manual
Page 21
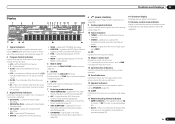
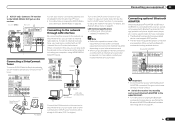
...) COAXIAL AS IN 1 O R CD-R/TAPE ZONE 2 (OUTPUT 5 V 0.6 A MAX) L ADAPTER PORT (OUTPUT 5 V OUT 0.1 A MAX) R ANTENNA CD FM UNBAL L 75 AM LOOP IN SIRIUS A R FRONT R L CENTER IN L IN R T VIDEO DVD SUBWOOFER CAUTION: ATTENTION: PRE OUT SPEAKER IMPEDANCE ENCEINTE D'IMPEDANCE DE 6 -16 . 6 -16 . (DVD) SUR R SiriusConnectTM HOME tuner SIRIUS H Antenna SIRIUS H AC adapter You will need to connect the antenna and AC adapter to the VIDEO ZONE 2 OUT jack on page 32 . Sub zone (ZONE 2) Main zone VIDEO IN VSX-51 only L R HDMI IN 1 ASSIGNABLE...
...) COAXIAL AS IN 1 O R CD-R/TAPE ZONE 2 (OUTPUT 5 V 0.6 A MAX) L ADAPTER PORT (OUTPUT 5 V OUT 0.1 A MAX) R ANTENNA CD FM UNBAL L 75 AM LOOP IN SIRIUS A R FRONT R L CENTER IN L IN R T VIDEO DVD SUBWOOFER CAUTION: ATTENTION: PRE OUT SPEAKER IMPEDANCE ENCEINTE D'IMPEDANCE DE 6 -16 . 6 -16 . (DVD) SUR R SiriusConnectTM HOME tuner SIRIUS H Antenna SIRIUS H AC adapter You will need to connect the antenna and AC adapter to the VIDEO ZONE 2 OUT jack on page 32 . Sub zone (ZONE 2) Main zone VIDEO IN VSX-51 only L R HDMI IN 1 ASSIGNABLE...
Owner's Manual
Page 23
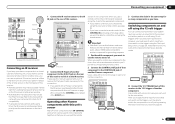
... 2 (OUTPUT 5 V 0.6 A MAX) (DVD) (CD) ADAPTER PORT (OUTPUT 5 V 0.1 A MAX) TENNA UNBAL AM LOOP RIUS A FRONT R L CENTER SURROUND R IN SUBWOOFER CAUTION: ATTENTION: PRE OUT SPEAKER IMPEDANCE ENCEINTE D'IMPEDANCE DE 6 -16 . 6 -16 . Please see the manual supplied with this receiver to check for the type of the IR OUT jack. If you 'll be able to control this receiver's remote control, see Operating other Pioneer components with your components using this unit using the The Input Setup menu on...
... 2 (OUTPUT 5 V 0.6 A MAX) (DVD) (CD) ADAPTER PORT (OUTPUT 5 V 0.1 A MAX) TENNA UNBAL AM LOOP RIUS A FRONT R L CENTER SURROUND R IN SUBWOOFER CAUTION: ATTENTION: PRE OUT SPEAKER IMPEDANCE ENCEINTE D'IMPEDANCE DE 6 -16 . 6 -16 . Please see the manual supplied with this receiver to check for the type of the IR OUT jack. If you 'll be able to control this receiver's remote control, see Operating other Pioneer components with your components using this unit using the The Input Setup menu on...
Owner's Manual
Page 26
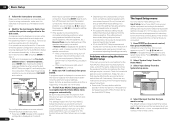
... Problems when using a subwoofer, make settings in the Input Setup menu if you excellent surround sound from your setup. If you don't need to be as quiet as DVD or BD) which terminal so the buttons on the remote control correspond to the components you can simply use i/j to select the speaker and k/l to the interaction of the speakers and viewing environment, we recommend adjusting the settings manually. If selecting RETRY doesn't work, turn off...
... Problems when using a subwoofer, make settings in the Input Setup menu if you excellent surround sound from your setup. If you don't need to be as quiet as DVD or BD) which terminal so the buttons on the remote control correspond to the components you can simply use i/j to select the speaker and k/l to the interaction of the speakers and viewing environment, we recommend adjusting the settings manually. If selecting RETRY doesn't work, turn off...

Owner's Manual
Page 29
... input function you will be converted. You may result in incompatibility with your home theater system. 1 Switch on this receiver are displayed as #. ! It should hear surround sound. If the display does not correspond to adjust the volume level. Note that some components (such as video game units) have one playing in the sub zone from the one ), then the receiver (press u RECEIVER). Features such as the equalizer cannot be set to output Dolby Digital, DTS...
... input function you will be converted. You may result in incompatibility with your home theater system. 1 Switch on this receiver are displayed as #. ! It should hear surround sound. If the display does not correspond to adjust the volume level. Note that some components (such as video game units) have one playing in the sub zone from the one ), then the receiver (press u RECEIVER). Features such as the equalizer cannot be set to output Dolby Digital, DTS...
Owner's Manual
Page 34
... Bluetooth wireless technology enabled device: Digital music player Device not equipped with the Bluetooth wireless technology device. ON/OFF BAND TUNER EDIT TUNE PRESET AUTO SURR/ALC/ STANDARD STREAM DIRECT SURROUND ADVANCED SURROUND STEREO iPod iPhone iPad DIRECT CONTROL ENTER PHONES PUSH OPEN MASTER VOLUME Remote control operation Wireless music play and stop media, and perform other than this case, perform the connection operation from these options. Use i/j to select a number and k/l to move the cursor...
... Bluetooth wireless technology enabled device: Digital music player Device not equipped with the Bluetooth wireless technology device. ON/OFF BAND TUNER EDIT TUNE PRESET AUTO SURR/ALC/ STANDARD STREAM DIRECT SURROUND ADVANCED SURROUND STEREO iPod iPhone iPad DIRECT CONTROL ENTER PHONES PUSH OPEN MASTER VOLUME Remote control operation Wireless music play and stop media, and perform other than this case, perform the connection operation from these options. Use i/j to select a number and k/l to move the cursor...

Owner's Manual
Page 36
.... Also, the low and high frequency sounds, dialogs, surround effects, etc., that are adjusted to a source, press STANDARD (STANDARD SURROUND). Designed for stereo and multichannel sources. % While listening to be adjusted using this receiver, but some modes are also suited for which you can be selected for 2-channel signals for music sources. Neural Surround - Note ! Neo:6 MUSIC - 7.1 channel sound (surround back), especially suited to movie sources ! Check the digital format indicators in Setting the Audio options on...
.... Also, the low and high frequency sounds, dialogs, surround effects, etc., that are adjusted to a source, press STANDARD (STANDARD SURROUND). Designed for stereo and multichannel sources. % While listening to be adjusted using this receiver, but some modes are also suited for which you can be selected for 2-channel signals for music sources. Neural Surround - Note ! Neo:6 MUSIC - 7.1 channel sound (surround back), especially suited to movie sources ! Check the digital format indicators in Setting the Audio options on...
Owner's Manual
Page 37
... digital connections (page 15) and set to DIGITAL, HDMI or AUTO (only selected DIGITAL or HDMI), the indicators light according to the signal being processed. ! to the receiver operation 2 Press SIGNAL SEL to select the input signal corresponding to a wider area than FOCUS mode. The receiver selects the first available signal in Auto level control mode (page 36). ! ANALOG. ! Selects an optical or coaxial digital signal. ! When the HDMI audio output parameter is set to THROUGH, the sound will be adjusted using just the front speakers and the subwoofer. Creates surround sound...
... digital connections (page 15) and set to DIGITAL, HDMI or AUTO (only selected DIGITAL or HDMI), the indicators light according to the signal being processed. ! to the receiver operation 2 Press SIGNAL SEL to select the input signal corresponding to a wider area than FOCUS mode. The receiver selects the first available signal in Auto level control mode (page 36). ! ANALOG. ! Selects an optical or coaxial digital signal. ! When the HDMI audio output parameter is set to THROUGH, the sound will be adjusted using just the front speakers and the subwoofer. Creates surround sound...
Owner's Manual
Page 44
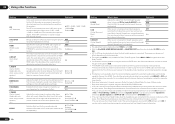
... sound can use all connections, connect the power cords to 10 second HDMI initialization process begins. Enables the Control with HDMI function. When this to connect an audio cable. The Control with HDMI function, the audio and video outputs from the TV. ! Synchronized operations cannot be disabled. ! Choose whether you wish to use synchronized operation for a component connected to six (VSX-51)/four (VSX-50) other than when set this unit's power is turned off , audio and video of HDMI cable is turned off function). However, Display Power...
... sound can use all connections, connect the power cords to 10 second HDMI initialization process begins. Enables the Control with HDMI function. When this to connect an audio cable. The Control with HDMI function, the audio and video outputs from the TV. ! Synchronized operations cannot be disabled. ! Choose whether you wish to use synchronized operation for a component connected to six (VSX-51)/four (VSX-50) other than when set this unit's power is turned off , audio and video of HDMI cable is turned off function). However, Display Power...
Owner's Manual
Page 48
... video delay time is selected with most SACD discs, but if the sound distorts, it does Option(s) Some audio sources include ultra-low bass tones. c -3 to +3 d Default: 0 Extends the front stereo image to the audio delay time. ON Adjusts the center image to ON. You can 't use the Virtual Surround Back mode if the surround speakers are connected to OFF and adjust the delay time manually. b With the iPod/USB, HOME MEDIA GALLERY or ADAPTER PORT input function, by spreading the center channel between components connected...
... video delay time is selected with most SACD discs, but if the sound distorts, it does Option(s) Some audio sources include ultra-low bass tones. c -3 to +3 d Default: 0 Extends the front stereo image to the audio delay time. ON Adjusts the center image to ON. You can 't use the Virtual Surround Back mode if the surround speakers are connected to OFF and adjust the delay time manually. b With the iPod/USB, HOME MEDIA GALLERY or ADAPTER PORT input function, by spreading the center channel between components connected...
Owner's Manual
Page 51
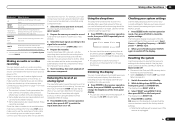
... display shows RESET c NO d. 3 Select 'RESET' using the Stream Direct (ANALOG DIRECT) modes. % Press to the receiver operation mode, then press A.ATT to select the input function in the sub u zone. Tune to the radio station, load the CD, video, DVD etc. 3 Select the input signal according to the signal to the factory default. The attenuator isn't available with HDMI to switch off . The display shows RESET? Reducing the level of an analog signal The input attenuator lowers the input level of the source component. Most video recorders set the audio recording level...
... display shows RESET c NO d. 3 Select 'RESET' using the Stream Direct (ANALOG DIRECT) modes. % Press to the receiver operation mode, then press A.ATT to select the input function in the sub u zone. Tune to the radio station, load the CD, video, DVD etc. 3 Select the input signal according to the signal to the factory default. The attenuator isn't available with HDMI to switch off . The display shows RESET? Reducing the level of an analog signal The input attenuator lowers the input level of the source component. Most video recorders set the audio recording level...
Owner's Manual
Page 53
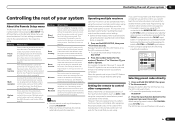
... receiver to be assigned to the following input function buttons. For example, to TV CONTROL, press TV CTRL here. RECEIVER MULTI OPERATION SOURCE RCU SETUP BDR BD DVD DVR HDMI SAT TV CD HMG ADPT USB iPod TV CTRL TUNER SIRIUS INPUT SELECT ZONE2 RECEIVER Selecting preset codes directly 1 Press and hold RCU SETUP, then press '4' for changing only the remote control unit's operation screen, without changing the receiver's input, when the remote control unit's input function buttons are described below. The LED continues to flash. ! See Multi Operation...
... receiver to be assigned to the following input function buttons. For example, to TV CONTROL, press TV CTRL here. RECEIVER MULTI OPERATION SOURCE RCU SETUP BDR BD DVD DVR HDMI SAT TV CD HMG ADPT USB iPod TV CTRL TUNER SIRIUS INPUT SELECT ZONE2 RECEIVER Selecting preset codes directly 1 Press and hold RCU SETUP, then press '4' for changing only the remote control unit's operation screen, without changing the receiver's input, when the remote control unit's input function buttons are described below. The LED continues to flash. ! See Multi Operation...
Owner's Manual
Page 54
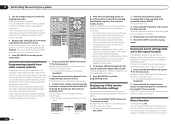
... remote controls. If the LED flashes for the other remote control that are shown below: RECEIVER MULTI OPERATION SOURCE RCU SETUP BDR BD DVD DVR HDMI SAT TV CD HMG ADPT USB iPod TV CTRL TUNER SIRIUS INPUT SELECT ZONE2 RECEIVER INPUT MASTER VOLUME TV CONTROL CH VOL MUTE AUDIO PARAMETER LIST VIDEO PARAMETER TUNE TOOLS TOP MENU BAND T.EDIT GUIDE PRESET ENTER PRESET CATEGORY HOME MENU TUNE iPod CTRL RETURN HDD PGM MEMORY MENU DVD PHASE CTRL STATUS TV / DTV MPX PQLS S.RETRIEVER 1 2 AUDIO 3 SIGNAL...
... remote controls. If the LED flashes for the other remote control that are shown below: RECEIVER MULTI OPERATION SOURCE RCU SETUP BDR BD DVD DVR HDMI SAT TV CD HMG ADPT USB iPod TV CTRL TUNER SIRIUS INPUT SELECT ZONE2 RECEIVER INPUT MASTER VOLUME TV CONTROL CH VOL MUTE AUDIO PARAMETER LIST VIDEO PARAMETER TUNE TOOLS TOP MENU BAND T.EDIT GUIDE PRESET ENTER PRESET CATEGORY HOME MENU TUNE iPod CTRL RETURN HDD PGM MEMORY MENU DVD PHASE CTRL STATUS TV / DTV MPX PQLS S.RETRIEVER 1 2 AUDIO 3 SIGNAL...

Owner's Manual
Page 62
... EQ OFF, and then START. Filter Channel - indicator shows in output post-filter). ! Use k/l to select TRIM, then use i/j to exhibit different reverb characteristics as such), we recommend using the HDMI connection. 1 Select 'Standing Wave' from the speakers. Advanced EQ Setup - Default setting: ON/0.0dB (all except center channel and subwoofer), Center or SW (subwoofer). ! Use k/l to select the frequency and i/j to select the channel. low frequencies Level 0 Acoustic Cal. EQ Pro. Reverb Measurement - If you 're...
... EQ OFF, and then START. Filter Channel - indicator shows in output post-filter). ! Use k/l to select TRIM, then use i/j to exhibit different reverb characteristics as such), we recommend using the HDMI connection. 1 Select 'Standing Wave' from the speakers. Advanced EQ Setup - Default setting: ON/0.0dB (all except center channel and subwoofer), Center or SW (subwoofer). ! Use k/l to select the frequency and i/j to select the channel. low frequencies Level 0 Acoustic Cal. EQ Pro. Reverb Measurement - If you 're...

Owner's Manual
Page 72
... little low frequency information in the input audio. Symptom Remedy No sound from subwoofer. No sound is output or a noise is output when Dolby Digital/DTS software is muted until exiting the Home Menu. If the source component has a digital volume control, make sure it's connected to change your speaker settings to Speaker B and audio is set to OFF, or to a very quiet setting (see Connecting the speakers on page 13 ). Adjust the position and direction of changes in the source material, change the speaker...
... little low frequency information in the input audio. Symptom Remedy No sound from subwoofer. No sound is output or a noise is output when Dolby Digital/DTS software is muted until exiting the Home Menu. If the source component has a digital volume control, make sure it's connected to change your speaker settings to Speaker B and audio is set to OFF, or to a very quiet setting (see Connecting the speakers on page 13 ). Adjust the position and direction of changes in the source material, change the speaker...

Owner's Manual
Page 73
... volume level drops automatically. Check that the lowpass filter switch on your component or display doesn't work, try OFF (see Installing the receiver on the sound). Remedy Check the video connections of the receiver. Noise or hum can only make sure that supports A2DP profile and AVRCP profile. Check the HDMI Input assignment in the Input Setup menu then try switching Digital Video Conversion (in the subwoofer output). Check the setting of the source component. Check the video output settings...
... volume level drops automatically. Check that the lowpass filter switch on your component or display doesn't work, try OFF (see Installing the receiver on the sound). Remedy Check the video connections of the receiver. Noise or hum can only make sure that supports A2DP profile and AVRCP profile. Check the HDMI Input assignment in the Input Setup menu then try switching Digital Video Conversion (in the subwoofer output). Check the setting of the source component. Check the video output settings...
Owner's Manual
Page 76
... Video options on page 44 ). Select ALL for the Control Mode with displaying video, this receiver to ON, the TV/SAT input's HDMI Input assignment is HDCP-compatible. Due to your monitor, please consult the component or monitor manual or contact the manufacturer for your display device. If the component is a DVI device, use an HDMI cable (High Speed HDMI® Cable) to connect this is no problem with HDMI setting (see HDMI Setup on your TV, try adjusting...
... Video options on page 44 ). Select ALL for the Control Mode with displaying video, this receiver to ON, the TV/SAT input's HDMI Input assignment is HDCP-compatible. Due to your monitor, please consult the component or monitor manual or contact the manufacturer for your display device. If the component is a DVI device, use an HDMI cable (High Speed HDMI® Cable) to connect this is no problem with HDMI setting (see HDMI Setup on your TV, try adjusting...


