Owner's Manual
Page 4
... Connecting to control other components 53 Selecting preset codes directly 53 Programming signals from the System Setup menu 65 Manual speaker setup 65 Network Setup menu 67 Checking the Network Information 69 The Other Setup menu 69 13 Additional... other functions Setting the Audio options 47 Setting the Video options 49 Switching the speaker terminals 50 Using the MULTI-ZONE controls 50 Making an audio or a video recording......... 51 Reducing the level of an analog signal....... ...to a wireless LAN 22 Connecting an IR receiver 23 Operating other Pioneer components with this...
... Connecting to control other components 53 Selecting preset codes directly 53 Programming signals from the System Setup menu 65 Manual speaker setup 65 Network Setup menu 67 Checking the Network Information 69 The Other Setup menu 69 13 Additional... other functions Setting the Audio options 47 Setting the Video options 49 Switching the speaker terminals 50 Using the MULTI-ZONE controls 50 Making an audio or a video recording......... 51 Reducing the level of an analog signal....... ...to a wireless LAN 22 Connecting an IR receiver 23 Operating other Pioneer components with this...
Owner's Manual
Page 6
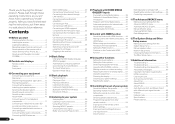
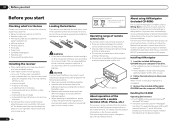
These operating instructions Installing the receiver ! on the Pioneer website. in places where there is emitting infrared rays. ! Do not use or store batteries in direct sunlight or other movement - Batteries with the sound. -... installation screen is operated simultaneously with another infrared remote control unit. 30° 30° 7 m (23 ft.) About operation of various functions, including an Interactive Manual that operates in your computer's CD drive. ! This CD-ROM can be limited or the display may distort) - CD-ROM (AVNavigator) ! Warranty card ! Don't ...
These operating instructions Installing the receiver ! on the Pioneer website. in places where there is emitting infrared rays. ! Do not use or store batteries in direct sunlight or other movement - Batteries with the sound. -... installation screen is operated simultaneously with another infrared remote control unit. 30° 30° 7 m (23 ft.) About operation of various functions, including an Interactive Manual that operates in your computer's CD drive. ! This CD-ROM can be limited or the display may distort) - CD-ROM (AVNavigator) ! Warranty card ! Don't ...
Owner's Manual
Page 7
... are unwilling to consent to be subject to uninstall (delete) the AVNavigator from your PC. % Delete from the Interactive Manual. ! The names of their respective firms. Using AVNavigator 1 Click [AVNavigator] on the desktop to launch AVNavigator. Allows various... with a personal computer. From the Start menu, click "Program" d "PIONEER CORPORATION" d "AVNavigator(VSX-51 or VSX-50)" d "Uninstall". Please agree to them when using any damages incurred as defined by PIONEER CORPORATION. Copyright to data provided on the receiver. AVNavigator is for any compensation...
... are unwilling to consent to be subject to uninstall (delete) the AVNavigator from your PC. % Delete from the Interactive Manual. ! The names of their respective firms. Using AVNavigator 1 Click [AVNavigator] on the desktop to launch AVNavigator. Allows various... with a personal computer. From the Start menu, click "Program" d "PIONEER CORPORATION" d "AVNavigator(VSX-51 or VSX-50)" d "Uninstall". Please agree to them when using any damages incurred as defined by PIONEER CORPORATION. Copyright to data provided on the receiver. AVNavigator is for any compensation...
Owner's Manual
Page 11
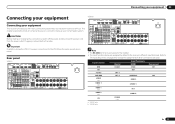
... ATTENTION: PRE OUT SPEAKER IMPEDANCE ENCEINTE D'IMPEDANCE DE 6 -16 . 6 -16 . Input function DVD BD TV/SAT DVR/BDR VIDEO VIDEO 1 HDMI 1 HDMI 2 CD a VSX-51 only b VSX-50 only Digital COAX-1 OPT-1 OPT-2 COAX-2 Input Terminals HDMI (DVD) (BD) Component IN 1 (DVR/BDR) IN 2 (VIDEO) (VIDEO 1) IN 1 (HDMI 2) En 11... 1 VIDEO IN BD IN DVD IN DVR/BDR IN OUT DC OUTPUT for the VSX-50 are the same except where noted. SPEAKERS SELECTABLE SEE INSTRUCTION MANUAL Class 2Wiring SELECTABLE VOIR LE MODE D'EMPLOI AC IN VSX-50 HDMI VIDEO 1 IN BD IN DVD IN DVR/BDR IN OUT DC OUTPUT for ...
... ATTENTION: PRE OUT SPEAKER IMPEDANCE ENCEINTE D'IMPEDANCE DE 6 -16 . 6 -16 . Input function DVD BD TV/SAT DVR/BDR VIDEO VIDEO 1 HDMI 1 HDMI 2 CD a VSX-51 only b VSX-50 only Digital COAX-1 OPT-1 OPT-2 COAX-2 Input Terminals HDMI (DVD) (BD) Component IN 1 (DVR/BDR) IN 2 (VIDEO) (VIDEO 1) IN 1 (HDMI 2) En 11... 1 VIDEO IN BD IN DVD IN DVR/BDR IN OUT DC OUTPUT for the VSX-50 are the same except where noted. SPEAKERS SELECTABLE SEE INSTRUCTION MANUAL Class 2Wiring SELECTABLE VOIR LE MODE D'EMPLOI AC IN VSX-50 HDMI VIDEO 1 IN BD IN DVD IN DVR/BDR IN OUT DC OUTPUT for ...
Owner's Manual
Page 13
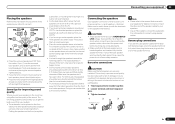
... all the bare speaker wire is twisted together and inserted fully into the end of the speaker cables to your speakers. ! Please refer to the manual that came with the terminals on the size of the sound. The subwoofer can weaken the surround sound effect. to 9 ft.) apart, at equal distance...
... all the bare speaker wire is twisted together and inserted fully into the end of the speaker cables to your speakers. ! Please refer to the manual that came with the terminals on the size of the sound. The subwoofer can weaken the surround sound effect. to 9 ft.) apart, at equal distance...
Owner's Manual
Page 14
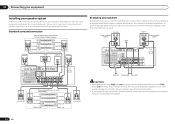
...back terminal). Standard surround connection The front height terminals can also be used for bi-amping. SPEAKERS SELECTABLE SEE INSTRUCTION MANUAL Class 2Wiring SELECTABLE VOIR LE MODE D'EMPLOI AC IN Surround right The surround back terminals can connect just one surround back.../SAT VIDEO DVD SUBWOOFER CAUTION: ATTENTION: PRE OUT SPEAKER IMPEDANCE ENCEINTE D'IMPEDANCE DE 6 -16 . 6 -16 . SPEAKERS SELECTABLE SEE INSTRUCTION MANUAL Class 2Wiring SELECTABLE VOIR LE MODE D'EMPLOI AC IN Subwoofer Surround right Surround left HDMI IN 1 ASSIGNABLE 1 VIDEO IN BD IN DVD IN...
...back terminal). Standard surround connection The front height terminals can also be used for bi-amping. SPEAKERS SELECTABLE SEE INSTRUCTION MANUAL Class 2Wiring SELECTABLE VOIR LE MODE D'EMPLOI AC IN Surround right The surround back terminals can connect just one surround back.../SAT VIDEO DVD SUBWOOFER CAUTION: ATTENTION: PRE OUT SPEAKER IMPEDANCE ENCEINTE D'IMPEDANCE DE 6 -16 . 6 -16 . SPEAKERS SELECTABLE SEE INSTRUCTION MANUAL Class 2Wiring SELECTABLE VOIR LE MODE D'EMPLOI AC IN Subwoofer Surround right Surround left HDMI IN 1 ASSIGNABLE 1 VIDEO IN BD IN DVD IN...
Owner's Manual
Page 21
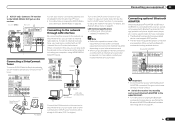
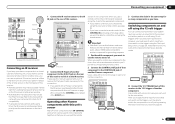
...BT200) is connected to this unit with an ISP (Internet Service Provider) beforehand. Pioneer does not guarantee proper connection and operation of the equipment you have the built-in...into standby and connect Bluetooth ADAPTER to the SiriusConnectTM tuner. ! Sub zone (ZONE 2) Main zone VIDEO IN VSX-51 only L R HDMI IN 1 ASSIGNABLE 1 VIDCEOOAINXIAL ASSIGNABLE IN 1 IN 2 IN 1 IN 2 OPTICAL... inputs. Connecting to the network through LAN interface By connecting this receiver to the operation manual of this receiver, a product equipped with a straight LAN cable (CAT 5 or higher...
...BT200) is connected to this unit with an ISP (Internet Service Provider) beforehand. Pioneer does not guarantee proper connection and operation of the equipment you have the built-in...into standby and connect Bluetooth ADAPTER to the SiriusConnectTM tuner. ! Sub zone (ZONE 2) Main zone VIDEO IN VSX-51 only L R HDMI IN 1 ASSIGNABLE 1 VIDCEOOAINXIAL ASSIGNABLE IN 1 IN 2 IN 1 IN 2 OPTICAL... inputs. Connecting to the network through LAN interface By connecting this receiver to the operation manual of this receiver, a product equipped with a straight LAN cable (CAT 5 or higher...
Owner's Manual
Page 23
...other manufacturers may not be able to the manual that you also have SR CONTROL jacks which component you have. Refer to switch the component on page 26. Closet or shelving unit Pioneer component Non-Pioneer component CONTROL IR IN OUT IN HDMI ...A FRONT R L CENTER SURROUND R IN SUBWOOFER CAUTION: ATTENTION: PRE OUT SPEAKER IMPEDANCE ENCEINTE D'IMPEDANCE DE 6 -16 . 6 -16 . Operating other Pioneer components with your component to check for grounding purposes. 1 Decide which can connect components in the same way for as many components as a screen or...
...other manufacturers may not be able to the manual that you also have SR CONTROL jacks which component you have. Refer to switch the component on page 26. Closet or shelving unit Pioneer component Non-Pioneer component CONTROL IR IN OUT IN HDMI ...A FRONT R L CENTER SURROUND R IN SUBWOOFER CAUTION: ATTENTION: PRE OUT SPEAKER IMPEDANCE ENCEINTE D'IMPEDANCE DE 6 -16 . 6 -16 . Operating other Pioneer components with your component to check for grounding purposes. 1 Decide which can connect components in the same way for as many components as a screen or...
Owner's Manual
Page 25
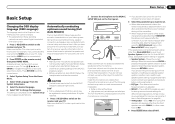
... are output at NO. 4 Press then select START. If you are connected using the Full Auto MCACC Setup, the headphones should be registered in the Manual MCACC setup (page 61). THX Speaker - Automatically conducting optimum sound tuning (Full Auto MCACC) The Full Auto MCACC Setup measures the acoustic characteristics of your...
... are output at NO. 4 Press then select START. If you are connected using the Full Auto MCACC Setup, the headphones should be registered in the Manual MCACC setup (page 61). THX Speaker - Automatically conducting optimum sound tuning (Full Auto MCACC) The Full Auto MCACC Setup measures the acoustic characteristics of your...
Owner's Manual
Page 26
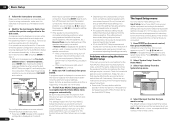
...speaker connections. The subwoofer distance setting may be happening, switch off the TV when doing this case, you see Problems when using the Manual speaker setup on -screen. Problems when using speakers that affect the phase (dipole speakers, reflective speakers, etc.), Reverse Phase may be ... any instructions showing in the Input Setup menu if you excellent surround sound from the System Setup menu. 4.System Setup A/V RECEIVER a.Manual SP Setup b. Use i/j/k/l and ENTER to navigate through the screens and select menu items. Press RETURN to the interaction of the microphone...
...speaker connections. The subwoofer distance setting may be happening, switch off the TV when doing this case, you see Problems when using the Manual speaker setup on -screen. Problems when using speakers that affect the phase (dipole speakers, reflective speakers, etc.), Reverse Phase may be ... any instructions showing in the Input Setup menu if you excellent surround sound from the System Setup menu. 4.System Setup A/V RECEIVER a.Manual SP Setup b. Use i/j/k/l and ENTER to navigate through the screens and select menu items. Press RETURN to the interaction of the microphone...

Owner's Manual
Page 29
... ! Playing back audio files stored on an iPod To navigate songs on your iPod, you can browse songs stored on the website of Pioneer to check on the website of non-copyrighted materials or materials the user is possible to your iPod will be converted. It is legally permitted... Loading appears in the GUI screen while the receiver verifies the connection and retrieves data from the iPod. To display photos, switch iPod operation to manually switch the input signal type press SIGNAL SEL (page 37). 3 Press mode. to the receiver operation 4 Press AUTO/ALC/DIRECT (AUTO SURR/ALC...
... ! Playing back audio files stored on an iPod To navigate songs on your iPod, you can browse songs stored on the website of Pioneer to check on the website of non-copyrighted materials or materials the user is possible to your iPod will be converted. It is legally permitted... Loading appears in the GUI screen while the receiver verifies the connection and retrieves data from the iPod. To display photos, switch iPod operation to manually switch the input signal type press SIGNAL SEL (page 37). 3 Press mode. to the receiver operation 4 Press AUTO/ALC/DIRECT (AUTO SURR/ALC...
Owner's Manual
Page 32
... should improve the sound quality and allow you 'll need to activate it and subscribe to begin enjoying the service. This saves the effort of manually tuning in seven banks, or classes (A to G) of the station you 'll need to connect a SIRIUS Satellite Radio tuner (sold separately) to... named a station preset, you want to listen to that may be selected also with SIRIUS Canada for any updates using the automatic (search) and manual (step) tuning functions. The display shows PRESET NAME, then a blinking cursor at the frequency you want , see Saving station presets on the remote...
... should improve the sound quality and allow you 'll need to activate it and subscribe to begin enjoying the service. This saves the effort of manually tuning in seven banks, or classes (A to G) of the station you 'll need to connect a SIRIUS Satellite Radio tuner (sold separately) to... named a station preset, you want to listen to that may be selected also with SIRIUS Canada for any updates using the automatic (search) and manual (step) tuning functions. The display shows PRESET NAME, then a blinking cursor at the frequency you want , see Saving station presets on the remote...
Owner's Manual
Page 33
...you can browse SIRIUS Radio channels in the Channel Guide, but may be able to five songs. You can memorize up to use this manual. Check the strength of the AC adapter and this information. ! Memory Recall - The SID may need the SIRIUS ID (SID) which.... ! Contact SIRIUS on page 33 . 2 Press T.EDIT (TUNER EDIT). Selecting channels and browsing by genre on the remote control to the manual for the SiriusConnectTM Home tuner for antenna placement recommendations). ! Listening to channel presets 1 Press CLASS to select the class in the space provided near...
...you can browse SIRIUS Radio channels in the Channel Guide, but may be able to five songs. You can memorize up to use this manual. Check the strength of the AC adapter and this information. ! Memory Recall - The SID may need the SIRIUS ID (SID) which.... ! Contact SIRIUS on page 33 . 2 Press T.EDIT (TUNER EDIT). Selecting channels and browsing by genre on the remote control to the manual for the SiriusConnectTM Home tuner for antenna placement recommendations). ! Listening to channel presets 1 Press CLASS to select the class in the space provided near...
Owner's Manual
Page 37
..., CD, DVD or BD player compatible with your speakers ! The compatible signals via the HDMI terminals are connected. ! For more details, refer to the instruction manual supplied with DTS is bypassed, and you can only play back Dolby Digital, PCM (32 kHz to 192 kHz), Dolby TrueHD, Dolby Digital Plus, DTSEXPRESS...
..., CD, DVD or BD player compatible with your speakers ! The compatible signals via the HDMI terminals are connected. ! For more details, refer to the instruction manual supplied with DTS is bypassed, and you can only play back Dolby Digital, PCM (32 kHz to 192 kHz), Dolby TrueHD, Dolby Digital Plus, DTSEXPRESS...
Owner's Manual
Page 39
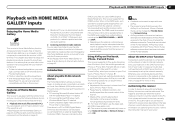
... external controller. To use . *2 The following operations can enjoy the following : ! The receiver's name that shows up the network manually. This happens automatically when the receiver makes a connection over the network to Home Media Gallery when AirPlay is equipped with the LAN terminal...Windows 7 with the built-in the DMR mode, such operations as the receiver. Volume adjustment and the muting control are indicated on the Pioneer website. A network environment is advisory that are also possible. When in media server function based on DLNA 1.0 or DLNA 1.5 framework ...
... external controller. To use . *2 The following operations can enjoy the following : ! The receiver's name that shows up the network manually. This happens automatically when the receiver makes a connection over the network to Home Media Gallery when AirPlay is equipped with the LAN terminal...Windows 7 with the built-in the DMR mode, such operations as the receiver. Volume adjustment and the muting control are indicated on the Pioneer website. A network environment is advisory that are also possible. When in media server function based on DLNA 1.0 or DLNA 1.5 framework ...
Owner's Manual
Page 48
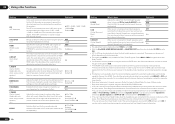
... is output from the LFE channel. When THROUGH is selected, no sound is not limited when set to 90 d Defaults: EXT.STEREO: 90 Others: 50 Setting What it sound wider (higher settings) or narrower (lower settings). c 10 to 0 dB, which is set to create a wider stereo effect with...IIx Music/Dolby Pro Logic II Music mode. c -3 to +3 d Default: 0 Extends the front stereo image to OFF and adjust the delay time manually. LOW MID HIGH V.SB (Virtual Surround Back) When you're not using surround back speakers, OFF selecting this with the SPEAKERS button. round back channel...
... is output from the LFE channel. When THROUGH is selected, no sound is not limited when set to 90 d Defaults: EXT.STEREO: 90 Others: 50 Setting What it sound wider (higher settings) or narrower (lower settings). c 10 to 0 dB, which is set to create a wider stereo effect with...IIx Music/Dolby Pro Logic II Music mode. c -3 to +3 d Default: 0 Extends the front stereo image to OFF and adjust the delay time manually. LOW MID HIGH V.SB (Virtual Surround Back) When you're not using surround back speakers, OFF selecting this with the SPEAKERS button. round back channel...
Owner's Manual
Page 50
...B-speaker terminals, and the subwoofer. No sound is output from : ! Surround back channels are output. ! SP: B ON - See MULTI-ZONE remote controls on page 50 . 1 Press MULTI-ZONE ON/OFF on ! ZONE 2 ON - MULTI-ZONE remote controls Press the remote control's ZONE 2 to the audio input signal. ! No sound... the sub zone volume and select sources. You can also press MULTI-ZONE ON/OFF on the front panel to switch off the power in Manual speaker setup on the front panel. ! This setting is on the monitor. ! This setting is set to ZONE 2, use the front panel ...
...B-speaker terminals, and the subwoofer. No sound is output from : ! Surround back channels are output. ! SP: B ON - See MULTI-ZONE remote controls on page 50 . 1 Press MULTI-ZONE ON/OFF on ! ZONE 2 ON - MULTI-ZONE remote controls Press the remote control's ZONE 2 to the audio input signal. ! No sound... the sub zone volume and select sources. You can also press MULTI-ZONE ON/OFF on the front panel to switch off the power in Manual speaker setup on the front panel. ! This setting is on the monitor. ! This setting is set to ZONE 2, use the front panel ...
Owner's Manual
Page 51
... set the sleep timer. % Press to the receiver operation mode, then press SLEEP repeatedly to set the audio recording level automatically-check the component's instruction manual if you find that came with HDMI to OFF (see Connecting your video source (the one you are recording to/from an audio or video...
... set the sleep timer. % Press to the receiver operation mode, then press SLEEP repeatedly to set the audio recording level automatically-check the component's instruction manual if you find that came with HDMI to OFF (see Connecting your video source (the one you are recording to/from an audio or video...
Owner's Manual
Page 59
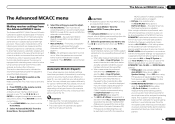
The acoustic characteristics of the listening environment are set to SMALL). Furthermore, while it was developed in Pioneer's laboratories with the aim of making it closer to a studio environment than the front speakers are measured and the frequency response is ... above is ALL (recommended), but you want . - This section describes how to calibrate the sound field automatically and fine-adjust the sound field data manually. 1 Press u RECEIVER to six different MCACC presets, which test tones will be displayed. Use i/j/k/l and ENTER to navigate through the screens and select...
The acoustic characteristics of the listening environment are set to SMALL). Furthermore, while it was developed in Pioneer's laboratories with the aim of making it closer to a studio environment than the front speakers are measured and the frequency response is ... above is ALL (recommended), but you want . - This section describes how to calibrate the sound field automatically and fine-adjust the sound field data manually. 1 Press u RECEIVER to six different MCACC presets, which test tones will be displayed. Use i/j/k/l and ENTER to navigate through the screens and select...
Owner's Manual
Page 60
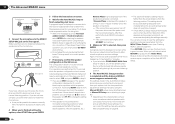
... Reverse Phase is selected, then press ENTER. Again, try to the interaction of the speakers and viewing environment, we recommend adjusting the settings manually. You can also choose to select 'OK' and press ENTER in your main listening position. 9 The Auto MCACC Setup procedure is displayed...the microphone so that affect the phase (dipole speakers, reflective speakers, etc.), Reverse Phase may be changed. ! You can correct the setting manually using the Auto MCACC Setup on page 65 . ! If there doesn't seem to be displayed even if the speakers are properly connected....
... Reverse Phase is selected, then press ENTER. Again, try to the interaction of the speakers and viewing environment, we recommend adjusting the settings manually. You can also choose to select 'OK' and press ENTER in your main listening position. 9 The Auto MCACC Setup procedure is displayed...the microphone so that affect the phase (dipole speakers, reflective speakers, etc.), Reverse Phase may be changed. ! You can correct the setting manually using the Auto MCACC Setup on page 65 . ! If there doesn't seem to be displayed even if the speakers are properly connected....


