
Owner's Manual
Page 1
... differ slightly from the original VSX-49TX manual and this manual when you have had your receiver modified with an i.LINK connection and the latest Pioneer programming. AUDIO/VIDEO MULTI-CHANNEL RECEIVER VSX-49TX This is correct and complete. Operating Instructions These new innovations are marked with an i.LINK connection and the latest Pioneer programming. Please use this...
... differ slightly from the original VSX-49TX manual and this manual when you have had your receiver modified with an i.LINK connection and the latest Pioneer programming. AUDIO/VIDEO MULTI-CHANNEL RECEIVER VSX-49TX This is correct and complete. Operating Instructions These new innovations are marked with an i.LINK connection and the latest Pioneer programming. Please use this...
Owner's Manual
Page 5
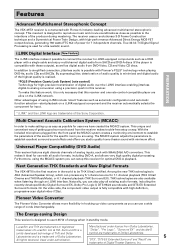
...PREPARATION Advanced Multichannel Stereophonic Concept The VSX-49TX receiver is constructed with these outputs), as well as digital audio from DVD-Video, CD and Video CD discs. i.LINK Digital Interface The i.LINK interface makes it is compatible with Pioneer's industry-leading advanced multichannel stereophonic ... Next Generation THX Standards and New Digital Formats The VSX-49TX is used for 7 independent channels. "DTS", "DTS-ES Extended Surround" and "Neo:6" are alive on a i.LINK-equipped component and the receiver automatically selects the component for optimal DVD-A playback. ...
...PREPARATION Advanced Multichannel Stereophonic Concept The VSX-49TX receiver is constructed with these outputs), as well as digital audio from DVD-Video, CD and Video CD discs. i.LINK Digital Interface The i.LINK interface makes it is compatible with Pioneer's industry-leading advanced multichannel stereophonic ... Next Generation THX Standards and New Digital Formats The VSX-49TX is used for 7 independent channels. "DTS", "DTS-ES Extended Surround" and "Neo:6" are alive on a i.LINK-equipped component and the receiver automatically selects the component for optimal DVD-A playback. ...
Owner's Manual
Page 6
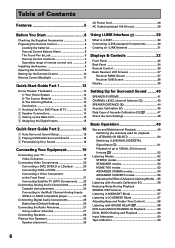
... batteries 8 Remote Control Battery Alarm 8 The Touch Pen & Lock 9 Remote Control Cushions 9 Operating range of remote control unit 9 Installing the Receiver 9 Opening the Front Panel 9 Setting Up the Remote Control 10 Remote Control Backlight 11 Quick Start Guide Part 1 12 Home Theater: The Basics...Creating an i.LINK Network 31 Displays & Controls 32 Front Panel 32 Back Panel 34 Remote Control 36 Basic Receiver LCD Screens 37 Receiver MAIN Screen 37 Receiver SUB Screen 38 Display 39 Setting Up for Surround Sound ........ 40 SPEAKER SYSTEMS 41 CHANNEL LEVEL (channel balance ...
... batteries 8 Remote Control Battery Alarm 8 The Touch Pen & Lock 9 Remote Control Cushions 9 Operating range of remote control unit 9 Installing the Receiver 9 Opening the Front Panel 9 Setting Up the Remote Control 10 Remote Control Backlight 11 Quick Start Guide Part 1 12 Home Theater: The Basics...Creating an i.LINK Network 31 Displays & Controls 32 Front Panel 32 Back Panel 34 Remote Control 36 Basic Receiver LCD Screens 37 Receiver MAIN Screen 37 Receiver SUB Screen 38 Display 39 Setting Up for Surround Sound ........ 40 SPEAKER SYSTEMS 41 CHANNEL LEVEL (channel balance ...
Owner's Manual
Page 7
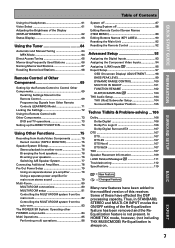
...Memorized Stations 67 Recalling Memorized Stations 68 Remote Control of Other Component 69 Setting Up the Remote Control to the modified version of this receiver. Thus, in another room 76 Bi-amping the front speakers 76 Bi-wiring your speakers 76 Switching A/B Speaker System 77 Connecting ... the MULTI-ROOM system from the main room 82 Controlling the MULTI-ROOM system from the sub room 83 The PIONEER SR System: Operating other PIONEER components 84 Multi Operations 85 Performing multi operations 86 System off 87 Using System off 88 Editing Remote Control Screen Names...
...Memorized Stations 67 Recalling Memorized Stations 68 Remote Control of Other Component 69 Setting Up the Remote Control to the modified version of this receiver. Thus, in another room 76 Bi-amping the front speakers 76 Bi-wiring your speakers 76 Switching A/B Speaker System 77 Connecting ... the MULTI-ROOM system from the main room 82 Controlling the MULTI-ROOM system from the sub room 83 The PIONEER SR System: Operating other PIONEER components 84 Multi Operations 85 Performing multi operations 86 System off 87 Using System off 88 Editing Remote Control Screen Names...

Owner's Manual
Page 8
...often but most users should be done within five minutes of battery life. Incorrect use different batteries together. • When disposing of receiver) • Operating Instructions Preparing the Remote Control Loading the batteries Load the batteries into the remote control as shown above. tion's rules... that you have received all batteries with governmental regulations or environmental public institu- This must be able to get too weak to operate the remote control...
...often but most users should be done within five minutes of battery life. Incorrect use different batteries together. • When disposing of receiver) • Operating Instructions Preparing the Remote Control Loading the batteries Load the batteries into the remote control as shown above. tion's rules... that you have received all batteries with governmental regulations or environmental public institu- This must be able to get too weak to operate the remote control...

Owner's Manual
Page 9
...sensor on the back of the remote control. For normal use the buttons on the remote control. To use the remote control to operate the VSX-49TX is set in a rack, shelf, etc., be sure to LOCK you from mistakenly pushing a button. Lock Switch Touch pen Remote Control ...or piece of cloth. PREPARATION PREPARATION Before You Start The Touch Pen & Lock The touch pen is shining onto the remote sensor. • The receiver located near a device emitting infrared rays. • Operated simultaneously with another remote control which you can 't use keep the switch set to leave ...
...sensor on the back of the remote control. For normal use the buttons on the remote control. To use the remote control to operate the VSX-49TX is set in a rack, shelf, etc., be sure to LOCK you from mistakenly pushing a button. Lock Switch Touch pen Remote Control ...or piece of cloth. PREPARATION PREPARATION Before You Start The Touch Pen & Lock The touch pen is shining onto the remote sensor. • The receiver located near a device emitting infrared rays. • Operated simultaneously with another remote control which you can 't use keep the switch set to leave ...

Owner's Manual
Page 10
...TOUCH PANEL ADJUSTMENT button. The BACK button will show the word "COMPLETE" and automatically return to the LCD COMMANDER screen. 5 Touch Panel Adjust RECEIVER BACK REMOTE SETUP CD DVD/LD VCR1 /DVR VCR2 TOUCH CROSS POINT CD-R/ TAPE1 TUNER VIDEO VCR3 TV SAT TV CONTROL « Touch Panel...in the middle to the previous screen. In the explanations below complete the TOUCH PANEL ADJUSTMENT setup to suit your personal preferences. 3 2 RECEIVER DVD/LD VCR1 /DVR Remote Setup BACK REMOTE SETUP LCD COMMANDER PRESET RECALL DIRECT FUNCTION ITEM MEMO CD CD-R/ TAPE1 TUNER VCR2 VCR3 ...
...TOUCH PANEL ADJUSTMENT button. The BACK button will show the word "COMPLETE" and automatically return to the LCD COMMANDER screen. 5 Touch Panel Adjust RECEIVER BACK REMOTE SETUP CD DVD/LD VCR1 /DVR VCR2 TOUCH CROSS POINT CD-R/ TAPE1 TUNER VIDEO VCR3 TV SAT TV CONTROL « Touch Panel...in the middle to the previous screen. In the explanations below complete the TOUCH PANEL ADJUSTMENT setup to suit your personal preferences. 3 2 RECEIVER DVD/LD VCR1 /DVR Remote Setup BACK REMOTE SETUP LCD COMMANDER PRESET RECALL DIRECT FUNCTION ITEM MEMO CD CD-R/ TAPE1 TUNER VCR2 VCR3 ...

Owner's Manual
Page 11
...CONTRAST: You can choose the sound of the beep from three different possibilities here by pushing the appropriate button (1,2,3). Remote Control Backlight 1 LIGHT RECEIVER DVD/LD VCR1 /DVR VCR2 VCR3 TV REMOTE SETUP CD CD-R/ TAPE1 TUNER VIDEO SAT TV CONTROL use the LIGHT switch to the Remote ...more energy and thus wears the batteries down quicker. 11 You can choose how long the idle remote control will beep once. PREPARATION PREPARATION 7 RECEIVER DVD/LD LCD Commander TOUCH PANEL ADJUSTMENT VCR1 /DVR LCD CONTRAST VCR2 VCR3 TV BEEP LCD TIMER : 10 SEC OFF 1 2 BACK REMOTE ...
...CONTRAST: You can choose the sound of the beep from three different possibilities here by pushing the appropriate button (1,2,3). Remote Control Backlight 1 LIGHT RECEIVER DVD/LD VCR1 /DVR VCR2 VCR3 TV REMOTE SETUP CD CD-R/ TAPE1 TUNER VIDEO SAT TV CONTROL use the LIGHT switch to the Remote ...more energy and thus wears the batteries down quicker. 11 You can choose how long the idle remote control will beep once. PREPARATION PREPARATION 7 RECEIVER DVD/LD LCD Commander TOUCH PANEL ADJUSTMENT VCR1 /DVR LCD CONTRAST VCR2 VCR3 TV BEEP LCD TIMER : 10 SEC OFF 1 2 BACK REMOTE ...
Owner's Manual
Page 12
...the subwoofer channel is outputting a surround soundtrack and all the speaker configurations and types of sources you get a more details on the VSX-49TX receiver. Quick Start Guide Part1 Home Theater: The Basics Most consumers are used to home theater systems that give you consult the manual that... center, surround left and right, and surround back left and right and a channel that powers the subwoofer) of your system is the VSX-49TX receiver and it seems so difficult is not really complicated and this multichannel setup has been named 5.1 channel sound. The easiest thing is very...
...the subwoofer channel is outputting a surround soundtrack and all the speaker configurations and types of sources you get a more details on the VSX-49TX receiver. Quick Start Guide Part1 Home Theater: The Basics Most consumers are used to home theater systems that give you consult the manual that... center, surround left and right, and surround back left and right and a channel that powers the subwoofer) of your system is the VSX-49TX receiver and it seems so difficult is not really complicated and this multichannel setup has been named 5.1 channel sound. The easiest thing is very...
Owner's Manual
Page 13
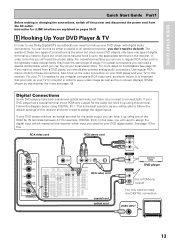
...). For optical connections you will need a special optical cable which input you will be able to see a video image as well as the on the receiver. For more see page 19). This is the best scenario, as you can do this you used for the audio output you should also connect...) in order to follow the default settings of these connections. It is no need to the appropriate terminal on screen displays (OSDs) shown by this receiver (for example, DIGITAL IN 4). If your DVD player only has an optical terminal for your TV to record from the AC outlet. If your DVD...
...). For optical connections you will need a special optical cable which input you will be able to see a video image as well as the on the receiver. For more see page 19). This is the best scenario, as you can do this you used for the audio output you should also connect...) in order to follow the default settings of these connections. It is no need to the appropriate terminal on screen displays (OSDs) shown by this receiver (for example, DIGITAL IN 4). If your DVD player only has an optical terminal for your TV to record from the AC outlet. If your DVD...

Owner's Manual
Page 14
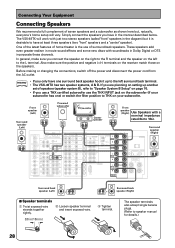
...speakers with a nominal impedance rated 6Ω-16Ω. • If you only have one surround back speaker hook it could short out the receiver. • If you have three hook up a subwoofer which provides realistic bass sounds. Follow the diagram below also explains how to the left ...to the speaker terminal make sure the positive and negative (+/-) terminals on the receiver match those on the speakers. These speakers are important to take full advantage of surround speakers connect them up to hook up the single...
...speakers with a nominal impedance rated 6Ω-16Ω. • If you only have one surround back speaker hook it could short out the receiver. • If you have three hook up a subwoofer which provides realistic bass sounds. Follow the diagram below also explains how to the left ...to the speaker terminal make sure the positive and negative (+/-) terminals on the receiver match those on the speakers. These speakers are important to take full advantage of surround speakers connect them up to hook up the single...
Owner's Manual
Page 15
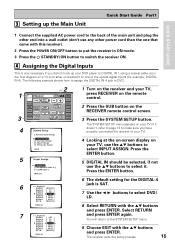
...Assign ] [2. Expert Setup] [4. You will return to the SYSTEM SETUP menu. 9 Choose EXIT with the 5∞ buttons and press ENTER. The receiver exits the setup process. 15 SIGNAL SELECT REMOTE SETUP CD CD-R/ TAPE1 TUNER VIDEO SAT TV CONTROL 4 System Setup [ Auto Surround Setup ] [1.... The following example shows how to assign the DIGITAL IN 4 jack to DVD. 1 3 2 RECEIVER DVD/LD Receiver TONE BASS/ ATREBLE VCR1 /DVR VCR2 VCR3 TV DISPLAY DIMMER STATUS SYSTEM SETUP VIDEO SELECT SPEAKER A/B MAIN SUB EFFECT/ CH SEL. THX Audio...
...Assign ] [2. Expert Setup] [4. You will return to the SYSTEM SETUP menu. 9 Choose EXIT with the 5∞ buttons and press ENTER. The receiver exits the setup process. 15 SIGNAL SELECT REMOTE SETUP CD CD-R/ TAPE1 TUNER VIDEO SAT TV CONTROL 4 System Setup [ Auto Surround Setup ] [1.... The following example shows how to assign the DIGITAL IN 4 jack to DVD. 1 3 2 RECEIVER DVD/LD Receiver TONE BASS/ ATREBLE VCR1 /DVR VCR2 VCR3 TV DISPLAY DIMMER STATUS SYSTEM SETUP VIDEO SELECT SPEAKER A/B MAIN SUB EFFECT/ CH SEL. THX Audio...
Owner's Manual
Page 16
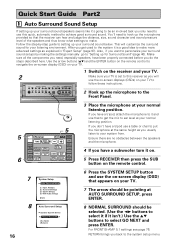
... that appears on your TV to follow these instructions. 2 Hook up the microphone provided so that to get used to the system it on. 5 Press RECEIVER then press the SUB button on the remote control. 16 7 8 System Setup [ Auto Surround Setup ] [1. THX Audio Setup] [Exit] Auto Surround Setup...SAT TV CONTROL 3 Place the microphone at the same height as you don't have a tripod, attach the microphone to it and use this receiver as you do the steps described here. Ensure there are no obstacles between the speakers and the microphone. 4 If you have been properly connected...
... that appears on your TV to follow these instructions. 2 Hook up the microphone provided so that to get used to the system it on. 5 Press RECEIVER then press the SUB button on the remote control. 16 7 8 System Setup [ Auto Surround Setup ] [1. THX Audio Setup] [Exit] Auto Surround Setup...SAT TV CONTROL 3 Place the microphone at the same height as you don't have a tripod, attach the microphone to it and use this receiver as you do the steps described here. Ensure there are no obstacles between the speakers and the microphone. 4 If you have been properly connected...

Owner's Manual
Page 18
... button on the remote control repeatedly until you don't see "7.1" in "Expert Setup" (p.97-103). 18 If you see the STANDARD button, press the RECEIVER button then press MAIN to access the main remote control screen. 5 Play a DVD then adjust the MASTER VOLUME. 3 Personalizing Your Sound 1 Use the... will also light up to that will automatically exit from the microphone, etc.) the final settings may interfere with Surround Sound 1 Make sure the receiver, your TV, and your DVD player are complete. 2 Playing a DVD with the operation of the mic. You should now have settings that ...
... button on the remote control repeatedly until you don't see "7.1" in "Expert Setup" (p.97-103). 18 If you see the STANDARD button, press the RECEIVER button then press MAIN to access the main remote control screen. 5 Play a DVD then adjust the MASTER VOLUME. 3 Personalizing Your Sound 1 Use the... will also light up to that will automatically exit from the microphone, etc.) the final settings may interfere with Surround Sound 1 Make sure the receiver, your TV, and your DVD player are complete. 2 Playing a DVD with the operation of the mic. You should now have settings that ...
Owner's Manual
Page 19
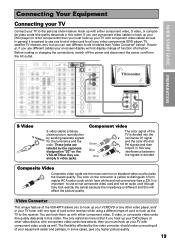
...this order). You can use one type of cord to the receiver while using a different type of cord to hook up your VCR/DVD or any other video player, and/ or your TV tuner with one kind of the VSX-49TX allows you to hook up the TV to the jacks as ...shown below ). The only restriction here is important to use different kinds of the TV is avoided. ROUND BACK R PR R SPEAKERS S Video S video cables produce clearer picture reproduction S VIDEO by the Japanese designation "S2" on the VSX-49TXbut...
...this order). You can use one type of cord to the receiver while using a different type of cord to hook up your VCR/DVD or any other video player, and/ or your TV tuner with one kind of the VSX-49TX allows you to hook up the TV to the jacks as ...shown below ). The only restriction here is important to use different kinds of the TV is avoided. ROUND BACK R PR R SPEAKERS S Video S video cables produce clearer picture reproduction S VIDEO by the Japanese designation "S2" on the VSX-49TXbut...

Owner's Manual
Page 21
... will always appear as "VIDEO." L LR MULTI CH INPUT SUB W. Front video connections are accessed via the front panel input selector as "VIDEO" in the receiver's display. See page 93 for the source players. *The arrows indicate the direction of the digital input on the front panel. PRE OUT 2 SURROUND L SURROUND...
... will always appear as "VIDEO." L LR MULTI CH INPUT SUB W. Front video connections are accessed via the front panel input selector as "VIDEO" in the receiver's display. See page 93 for the source players. *The arrows indicate the direction of the digital input on the front panel. PRE OUT 2 SURROUND L SURROUND...
Owner's Manual
Page 24
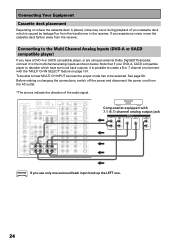
... SURROUND ANALOG CENTER SUB WOOFER SURROUND BACK L L L R R R memo If you experience noise, move the cassette deck farther away from the transformer in the receiver. PRE OUT 2 SURROUND L SURROUND BACK L (Single) CENTER SURROUND BACK L (Single) CONTROL IN MULTIROOM & SOURCE DVD /LD IN TV IN SAT IN OUT...S2 VIDEO Components equipped with the "MULTI CH IN SELECT" feature on where the cassette deck is caused by leakage flux from the receiver. Before making or changing the connections, switch off the power and disconnect the power cord from the AC outlet. *The arrows ...
... SURROUND ANALOG CENTER SUB WOOFER SURROUND BACK L L L R R R memo If you experience noise, move the cassette deck farther away from the transformer in the receiver. PRE OUT 2 SURROUND L SURROUND BACK L (Single) CENTER SURROUND BACK L (Single) CONTROL IN MULTIROOM & SOURCE DVD /LD IN TV IN SAT IN OUT...S2 VIDEO Components equipped with the "MULTI CH IN SELECT" feature on where the cassette deck is caused by leakage flux from the receiver. Before making or changing the connections, switch off the power and disconnect the power cord from the AC outlet. *The arrows ...
Owner's Manual
Page 25
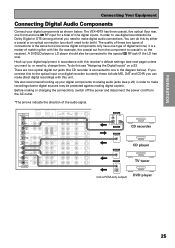
...digital soundtracks like (for example, the coaxial out from the component to make digital audio connections. You can make direct digital recordings with this receiver's default settings (see p.23) in order to coaxial in on a digital recorder (currently these two types of connections is the same but...out jacks (the CD recorder is a matter of nine digital inputs. We also recommend hooking up your digital components as shown below ). The VSX-49TX has three coaxial, five optical (four rear, one front) and one type of digital terminal, it is connected to do this to make ...
...digital soundtracks like (for example, the coaxial out from the component to make digital audio connections. You can make direct digital recordings with this receiver's default settings (see p.23) in order to coaxial in on a digital recorder (currently these two types of connections is the same but...out jacks (the CD recorder is a matter of nine digital inputs. We also recommend hooking up your digital components as shown below ). The VSX-49TX has three coaxial, five optical (four rear, one front) and one type of digital terminal, it is connected to do this to make ...

Owner's Manual
Page 26
... digital component is connected to which jack so your components will be in sync with the receiver's default settings. The default settings are used to connect digital components to assign the digital inputs you can hook up your equipment in the case ... on the remote control buttons and the like. Be sure to one type of component, they can break the shutter on the optical terminal (this receiver.
... digital component is connected to which jack so your components will be in sync with the receiver's default settings. The default settings are used to connect digital components to assign the digital inputs you can hook up your equipment in the case ... on the remote control buttons and the like. Be sure to one type of component, they can break the shutter on the optical terminal (this receiver.
Owner's Manual
Page 28
... SURROUND R AUDIO POWER AMP R L IN FRONT L R L CENTER 1 (Single) R R SUB W. In general, make sure the positive and negative (+/-) terminals on the receiver match those on the speakers. memo • If you only have one ) or switch the filter position to THX on your subwoofer has one surround... 76. • If you use a THX certified subwoofer use of home theater is desirable to have in the manner described below. The VSX-49TX will vary. The speaker terminals also accept single banana plugs. (Refer to the R terminal and the speaker on the left surround back terminal...
... SURROUND R AUDIO POWER AMP R L IN FRONT L R L CENTER 1 (Single) R R SUB W. In general, make sure the positive and negative (+/-) terminals on the receiver match those on the speakers. memo • If you only have one ) or switch the filter position to THX on your subwoofer has one surround... 76. • If you use a THX certified subwoofer use of home theater is desirable to have in the manner described below. The VSX-49TX will vary. The speaker terminals also accept single banana plugs. (Refer to the R terminal and the speaker on the left surround back terminal...


