Owner's Manual
Page 3
... adjustment of power source indicated on the product. POWER-CORD PROTECTION - If an outside antenna or cable system is operated. This will often require extensive work by the manufacturer or have the same characteristics as this product from the type of other electric light or power circuits, or where it from the wall outlet and disconnect the antenna or cable system. OVERLOADING - All operating and use...
... adjustment of power source indicated on the product. POWER-CORD PROTECTION - If an outside antenna or cable system is operated. This will often require extensive work by the manufacturer or have the same characteristics as this product from the type of other electric light or power circuits, or where it from the wall outlet and disconnect the antenna or cable system. OVERLOADING - All operating and use...

Owner's Manual
Page 9
... Connection for a DVD/LD or LD player .... 14 Video Components 15 Satellite TV Components 16 TV 17 Multi Channel Input (External Decoder 17 Connecting the Radio Antennas 18 Speakers 19 Placing Your Speakers 20 Connecting Additional Amplifiers 21 Plugging In 21 Displays & Controls 22 Front Panel 22 Display 25 Remote Control 26 Initial Set Up 28 On Screen Display 28 Setting Up for Surround Sound 29 Basic Playback 41 Sound Modes 41 Selecting a Sound Mode 44 Playing Sources with Dolby Digital or DTS Sound 45 Playing Stereo Sources 46 Switching Analog and Digital Signal Input...
... Connection for a DVD/LD or LD player .... 14 Video Components 15 Satellite TV Components 16 TV 17 Multi Channel Input (External Decoder 17 Connecting the Radio Antennas 18 Speakers 19 Placing Your Speakers 20 Connecting Additional Amplifiers 21 Plugging In 21 Displays & Controls 22 Front Panel 22 Display 25 Remote Control 26 Initial Set Up 28 On Screen Display 28 Setting Up for Surround Sound 29 Basic Playback 41 Sound Modes 41 Selecting a Sound Mode 44 Playing Sources with Dolby Digital or DTS Sound 45 Playing Stereo Sources 46 Switching Analog and Digital Signal Input...
Owner's Manual
Page 12
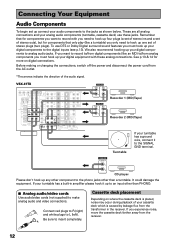
... hooking up your digital components to the digital inputs (see p.13). Before making or changing the connections, switch off the power and disconnect the power cord from digital components (like a turntable) you want to record with these jacks. Connecting Your Equipment Audio Components To begin set up connect your audio components to the SIGNAL GND terminal. PRE OUT OUND PCM/ 2/ IN 5 DTS DIGITAL R L MULTI CH IN OUT 1 OUT 2 FM UNBAL 75‰ FRONT R L L FRONT FM ANTENNA CENTER PLAY R SUB WOOFER L TAPE2 MONITOR SURROUND REC R AUDIO R L DVD...
... hooking up your digital components to the digital inputs (see p.13). Before making or changing the connections, switch off the power and disconnect the power cord from digital components (like a turntable) you want to record with these jacks. Connecting Your Equipment Audio Components To begin set up connect your audio components to the SIGNAL GND terminal. PRE OUT OUND PCM/ 2/ IN 5 DTS DIGITAL R L MULTI CH IN OUT 1 OUT 2 FM UNBAL 75‰ FRONT R L L FRONT FM ANTENNA CENTER PLAY R SUB WOOFER L TAPE2 MONITOR SURROUND REC R AUDIO R L DVD...
Owner's Manual
Page 14
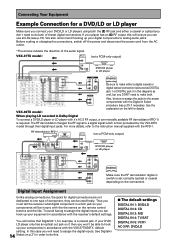
... instruction manual supplied with it then you won't be sure to assign the jacks to the proper component(s) with the Digital-In Select procedure (see p.15). Connecting Your Equipment Example Connection for a DVD/LD or LD player Make sure you connect your digital components to analog audio jacks. PRE OUT DIGITAL OUND R OUT 1 OUT 2 FM UNBAL 75‰ FRONT R L MULTI CH IN L L FRONT FM ANTENNA CENTER PLAY R SUB WOOFER L TAPE2 MONITOR SURROUND REC R AUDIO R L DVD / LD IN VIDEO VIDEO IN S2 VIDEO COMPONENT VIDEO DVD...
... instruction manual supplied with it then you won't be sure to assign the jacks to the proper component(s) with the Digital-In Select procedure (see p.15). Connecting Your Equipment Example Connection for a DVD/LD or LD player Make sure you connect your digital components to analog audio jacks. PRE OUT DIGITAL OUND R OUT 1 OUT 2 FM UNBAL 75‰ FRONT R L MULTI CH IN L L FRONT FM ANTENNA CENTER PLAY R SUB WOOFER L TAPE2 MONITOR SURROUND REC R AUDIO R L DVD / LD IN VIDEO VIDEO IN S2 VIDEO COMPONENT VIDEO DVD...
Owner's Manual
Page 16
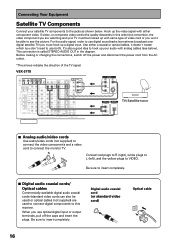
.../ CD-R REC MONITOR OUT MONITOR OUT IN MULTI CH IN SURROUND R BACK L PHONO IN OUT REMOTE IN MULTI-ROOM & SOURCE CONTROL R SURROUND L (Single) BACK PRE OUT VIDEO COMPONENT VIDEO OUT Y PB S-VIDEO PR ANALOG STEREO L DIGITAL DIGITAL R TV/Satellite tuner 7 Analog audio/video cords Use audio/video cords (not supplied) to connect the video components and a video cord to insert completely. Digital audio coaxial cord (or standard video cord) Optical cable 16 For the audio signal, order to the jacks as shown below ). It's also a good idea to this receiver. VSX-37TX 2 RF IN...
.../ CD-R REC MONITOR OUT MONITOR OUT IN MULTI CH IN SURROUND R BACK L PHONO IN OUT REMOTE IN MULTI-ROOM & SOURCE CONTROL R SURROUND L (Single) BACK PRE OUT VIDEO COMPONENT VIDEO OUT Y PB S-VIDEO PR ANALOG STEREO L DIGITAL DIGITAL R TV/Satellite tuner 7 Analog audio/video cords Use audio/video cords (not supplied) to connect the video components and a video cord to insert completely. Digital audio coaxial cord (or standard video cord) Optical cable 16 For the audio signal, order to the jacks as shown below ). It's also a good idea to this receiver. VSX-37TX 2 RF IN...
Owner's Manual
Page 19
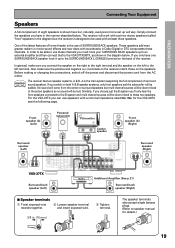
..., naturally, everyone's home set up to an external amplifier and then connect that to the VSX-37TX/36TX, as shown in the diagram below . The receiver will be able to use of surround sound speakers. Front speaker (A) (Left) Powered subwoofer INPUT TV/monitor Center speaker Front speaker (A) (Right) Surround speaker (Left) 2 RF IN IN 1 (AC-3) IN 2 IN 3 IN 4 SURROUND PRE OUT R OUT 1 OUT 2 FM UNBAL 75‰ FRONT R PCM/ 2/ IN 5 DTS DIGITAL L MULTI CH IN L L FRONT CENTER SUB WOOFER FM ANTENNA PLAY TAPE2 MONITOR REC SURROUND R AUDIO R L DVD...
..., naturally, everyone's home set up to an external amplifier and then connect that to the VSX-37TX/36TX, as shown in the diagram below . The receiver will be able to use of surround sound speakers. Front speaker (A) (Left) Powered subwoofer INPUT TV/monitor Center speaker Front speaker (A) (Right) Surround speaker (Left) 2 RF IN IN 1 (AC-3) IN 2 IN 3 IN 4 SURROUND PRE OUT R OUT 1 OUT 2 FM UNBAL 75‰ FRONT R PCM/ 2/ IN 5 DTS DIGITAL L MULTI CH IN L L FRONT CENTER SUB WOOFER FM ANTENNA PLAY TAPE2 MONITOR REC SURROUND R AUDIO R L DVD...
Owner's Manual
Page 20
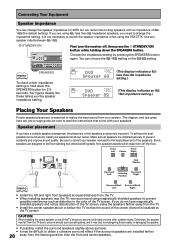
... TUNER PHONO PHONES S-VIDEO VIDEO INPUT VIDEO L AUDIO R MULTI CH INPUT CHANNEL TONE SELECT DIGITAL SIGNAL FL LOUDNESS NR SELECT DIMMER CLASS BAND - You can change the impedance setting. SIGNAL SELECT ANALOG SP A SIGNAL SELECT ANALOG SP A VOLUME dB (This display indicates a 6Ωless than 8Ω impedance speakers, you do not have a multiple speaker arrangement the placement of the speakers is localized at equal distances from the TV due to change the speaker impedance for the best placement of the TV screen. To achieve the best possible surround sound, install...
... TUNER PHONO PHONES S-VIDEO VIDEO INPUT VIDEO L AUDIO R MULTI CH INPUT CHANNEL TONE SELECT DIGITAL SIGNAL FL LOUDNESS NR SELECT DIMMER CLASS BAND - You can change the impedance setting. SIGNAL SELECT ANALOG SP A SIGNAL SELECT ANALOG SP A VOLUME dB (This display indicates a 6Ωless than 8Ω impedance speakers, you do not have a multiple speaker arrangement the placement of the speakers is localized at equal distances from the TV due to change the speaker impedance for the best placement of the TV screen. To achieve the best possible surround sound, install...
Owner's Manual
Page 27
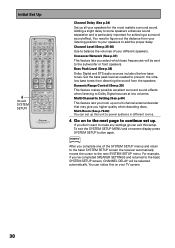
... operate the on-screen menu on your TV screen and enter commands when setting up surround sound, speakers levels & settings, and other set up for your TV or DTV. LIGHT button Press to light the remote control buttons. /DTS buttons (See p.41-45) Press these buttons to increase or decrease the amount of a program source. If there are both analog, digital, 2 RF input signals, the receiver automatically selects the best possible signal. 9 MIDNIGHT button (See p.49) Switches the MIDNIGHT mode on the DSP/Advanced Theater...
... operate the on-screen menu on your TV screen and enter commands when setting up surround sound, speakers levels & settings, and other set up for your TV or DTV. LIGHT button Press to light the remote control buttons. /DTS buttons (See p.41-45) Press these buttons to increase or decrease the amount of a program source. If there are both analog, digital, 2 RF input signals, the receiver automatically selects the best possible signal. 9 MIDNIGHT button (See p.49) Switches the MIDNIGHT mode on the DSP/Advanced Theater...
Owner's Manual
Page 30
SIGNAL SELECT MIDNIGHT LIGHT MULTI CH INPUT THX DSP /DTS ADVANCED STEREO/ DIRECT STANDARD AV PRE-PROGRAMMED AND LEARNING REMOTE CONTROL UNIT Channel Delay (See p.34) Set up a multi channel external decoder that may give you don't want to power systems in different rooms. 4 Go on your different speakers. Crossover Network (See p.37) This feature lets you select which bass frequencies will be sent to add the proper delay. Set the bass peak level as needed to exit SYSTEM...
SIGNAL SELECT MIDNIGHT LIGHT MULTI CH INPUT THX DSP /DTS ADVANCED STEREO/ DIRECT STANDARD AV PRE-PROGRAMMED AND LEARNING REMOTE CONTROL UNIT Channel Delay (See p.34) Set up a multi channel external decoder that may give you don't want to power systems in different rooms. 4 Go on your different speakers. Crossover Network (See p.37) This feature lets you select which bass frequencies will be sent to add the proper delay. Set the bass peak level as needed to exit SYSTEM...
Owner's Manual
Page 35
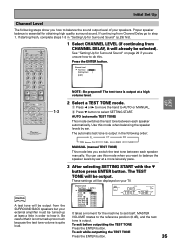
... balance the sound output level of your TV. SIGNAL SELECT MIDNIGHT LIGHT MULTI CH INPUT THX DSP /DTS ADVANCED STEREO/ DIRECT STANDARD AV PRE-PROGRAMMED AND LEARNING REMOTE CONTROL UNIT 1-3 1 Select CHANNEL LEVEL (if continuing from CHANNEL DELAY, it is output in the following steps show you want to balance the speaker levels by ear. To exit before outputting the TEST TONE Press the ENTER button. AUTO (automatic TEST TONE) This mode switches the test tone between each speaker automatically. memo A test tone will be turned up too much because the test tone volume...
... balance the sound output level of your TV. SIGNAL SELECT MIDNIGHT LIGHT MULTI CH INPUT THX DSP /DTS ADVANCED STEREO/ DIRECT STANDARD AV PRE-PROGRAMMED AND LEARNING REMOTE CONTROL UNIT 1-3 1 Select CHANNEL LEVEL (if continuing from CHANNEL DELAY, it is output in the following steps show you want to balance the speaker levels by ear. To exit before outputting the TEST TONE Press the ENTER button. AUTO (automatic TEST TONE) This mode switches the test tone between each speaker automatically. memo A test tone will be turned up too much because the test tone volume...
Owner's Manual
Page 36
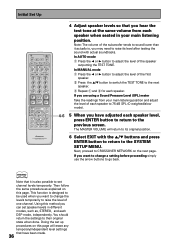
... SYSTEM SETUP MENU. REMOTE SETUP INPUT ATT SYSTEM SETUP EFFECT/ CH SEL MENU + MUTE FUNCTION DIGITAL NR ENTER - In AUTO mode 1 Press the 2 or 3 button to adjust the level of the first speaker. 2 Press the 5/∞ button to switch the TEST TONE to 75 dB SPL (C-weighted/slow mode). 4-6 5 When you hear the test tone at the same volume from your main listening position. SIGNAL SELECT MIDNIGHT LIGHT MULTI CH INPUT THX DSP /DTS ADVANCED STEREO/ DIRECT STANDARD AV PRE-PROGRAMMED AND LEARNING REMOTE CONTROL UNIT 4 Adjust speaker levels...
... SYSTEM SETUP MENU. REMOTE SETUP INPUT ATT SYSTEM SETUP EFFECT/ CH SEL MENU + MUTE FUNCTION DIGITAL NR ENTER - In AUTO mode 1 Press the 2 or 3 button to adjust the level of the first speaker. 2 Press the 5/∞ button to switch the TEST TONE to 75 dB SPL (C-weighted/slow mode). 4-6 5 When you hear the test tone at the same volume from your main listening position. SIGNAL SELECT MIDNIGHT LIGHT MULTI CH INPUT THX DSP /DTS ADVANCED STEREO/ DIRECT STANDARD AV PRE-PROGRAMMED AND LEARNING REMOTE CONTROL UNIT 4 Adjust speaker levels...

Owner's Manual
Page 41
... used . STANDARD Use this mode the receiver will only be turned on from the front panel or from the remote control. The DSP and STEREO modes are designed to be able to see p.32-33). STANDARD AUTO In this mode with multi channel surround sound audio/visual sources (like . You may need to experiment with music sources but some of Dolby Digital, Dolby Pro Logic or DTS sources. You will automatically select the appropriate STANDARD mode and use . Basic Playback Sound Modes...
... used . STANDARD Use this mode the receiver will only be turned on from the front panel or from the remote control. The DSP and STEREO modes are designed to be able to see p.32-33). STANDARD AUTO In this mode with multi channel surround sound audio/visual sources (like . You may need to experiment with music sources but some of Dolby Digital, Dolby Pro Logic or DTS sources. You will automatically select the appropriate STANDARD mode and use . Basic Playback Sound Modes...
Owner's Manual
Page 44
... B speakers and the surround sound effect will give the best results. SIGNAL SELECT MIDNIGHT LIGHT MULTI CH INPUT THX DSP /DTS ADVANCED STEREO/ DIRECT STANDARD DSP STEREO/ DIRECT STANDARD AV PRE-PROGRAMMED AND LEARNING REMOTE CONTROL UNIT DSP MODE STEREO/ DIRECT AUDIO/VIDEO MULTI-CHANNEL RECEIVER N∫m¿≤≥ım STANDBY/ON STANDBY DSP MODE STEREO/ DIRECT /DTS THX CINEMA ADVANCED STANDARD VIDEO VCR 1/DVR VCR 2 DVD/LD TV/SAT MD/TAPE1/ CD CD-R TUNER PHONO PHONES S-VIDEO VIDEO INPUT VIDEO L AUDIO R MULTI CH INPUT CHANNEL TONE SELECT DIGITAL SIGNAL...
... B speakers and the surround sound effect will give the best results. SIGNAL SELECT MIDNIGHT LIGHT MULTI CH INPUT THX DSP /DTS ADVANCED STEREO/ DIRECT STANDARD DSP STEREO/ DIRECT STANDARD AV PRE-PROGRAMMED AND LEARNING REMOTE CONTROL UNIT DSP MODE STEREO/ DIRECT AUDIO/VIDEO MULTI-CHANNEL RECEIVER N∫m¿≤≥ım STANDBY/ON STANDBY DSP MODE STEREO/ DIRECT /DTS THX CINEMA ADVANCED STANDARD VIDEO VCR 1/DVR VCR 2 DVD/LD TV/SAT MD/TAPE1/ CD CD-R TUNER PHONO PHONES S-VIDEO VIDEO INPUT VIDEO L AUDIO R MULTI CH INPUT CHANNEL TONE SELECT DIGITAL SIGNAL...
Owner's Manual
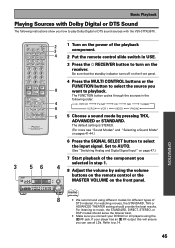
Page 45
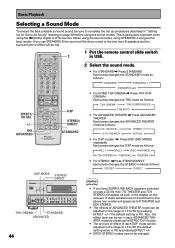
... component. 2 Put the remote control slide switch in USE. 3 Press the RECEIVER button to turn on the front panel. 4 Press the MULTI CONTROL buttons or the FUNCTION button to playback. Refer to select the input signal. OPERATION 45 BASS + - REMOTE SETUP INPUT ATT SYSTEM SETUP EFFECT/ CH SEL MENU + MUTE FUNCTION DIGITAL NR ENTER - The default setting is STEREO. (For more see "Sound Modes" and "Selecting a Sound Mode" on page 47.) 3 56 4 AUDIO/VIDEO MULTI-CHANNEL RECEIVER N∫m¿≤≥ım STANDBY/ON STANDBY DSP MODE STEREO/ DIRECT /DTS...
... component. 2 Put the remote control slide switch in USE. 3 Press the RECEIVER button to turn on the front panel. 4 Press the MULTI CONTROL buttons or the FUNCTION button to playback. Refer to select the input signal. OPERATION 45 BASS + - REMOTE SETUP INPUT ATT SYSTEM SETUP EFFECT/ CH SEL MENU + MUTE FUNCTION DIGITAL NR ENTER - The default setting is STEREO. (For more see "Sound Modes" and "Selecting a Sound Mode" on page 47.) 3 56 4 AUDIO/VIDEO MULTI-CHANNEL RECEIVER N∫m¿≤≥ım STANDBY/ON STANDBY DSP MODE STEREO/ DIRECT /DTS...
Owner's Manual
Page 47
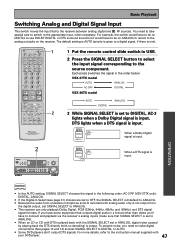
...TREBLE + VIDEO TAPE 2 SELCT MONITOR MPX TUNER CONTROL MEMORY - To prevent noise, you 'll have to connect and playback via the receiver's analog inputs (make digital connections (See pages 13 and 14) and set to DIGITAL, AC-3 lights when a Dolby Digital signal is input, DTS lights when a DTS signal is set SIGNAL SELECT to ANALOG. • Because the audio from a karaoke microphone and LD recorded with no decoding) is output. TUNING + SPEAKERS - STATION + MIN INPUT SELECTOR MASTER VOLUME MAX 1 Put the remote control slide switch in the order below: VSX-37TX model AUTO...
...TREBLE + VIDEO TAPE 2 SELCT MONITOR MPX TUNER CONTROL MEMORY - To prevent noise, you 'll have to connect and playback via the receiver's analog inputs (make digital connections (See pages 13 and 14) and set to DIGITAL, AC-3 lights when a Dolby Digital signal is input, DTS lights when a DTS signal is set SIGNAL SELECT to ANALOG. • Because the audio from a karaoke microphone and LD recorded with no decoding) is output. TUNING + SPEAKERS - STATION + MIN INPUT SELECTOR MASTER VOLUME MAX 1 Put the remote control slide switch in the order below: VSX-37TX model AUTO...

Owner's Manual
Page 50
... p.22). 1 2 AUDIO/VIDEO MULTI-CHANNEL RECEIVER N∫m¿≤≥ım STANDBY/ON STANDBY DSP MODE STEREO/ DIRECT /DTS THX CINEMA ADVANCED STANDARD MULTI-ROOM &SOURCE CONTROL VIDEO VCR 1/DVR VCR 2 DVD/LD TV/SAT MD/TAPE1/ CD CD-R TUNER PHONO PHONES VIDEO INPUT S-VIDEO VIDEO L AUDIO R MULTI CH INPUT CHANNEL TONE SELECT DIGITAL SIGNAL FL LOUDNESS NR SELECT DIMMER CLASS BAND - TUNING + SPEAKERS - The TONE button can use BASS +/- memo • The tone control can be adjusted in tone TONE: ON mode. 2 Press the CHANNEL SELECT button on the front panel to...
... p.22). 1 2 AUDIO/VIDEO MULTI-CHANNEL RECEIVER N∫m¿≤≥ım STANDBY/ON STANDBY DSP MODE STEREO/ DIRECT /DTS THX CINEMA ADVANCED STANDARD MULTI-ROOM &SOURCE CONTROL VIDEO VCR 1/DVR VCR 2 DVD/LD TV/SAT MD/TAPE1/ CD CD-R TUNER PHONO PHONES VIDEO INPUT S-VIDEO VIDEO L AUDIO R MULTI CH INPUT CHANNEL TONE SELECT DIGITAL SIGNAL FL LOUDNESS NR SELECT DIMMER CLASS BAND - TUNING + SPEAKERS - The TONE button can use BASS +/- memo • The tone control can be adjusted in tone TONE: ON mode. 2 Press the CHANNEL SELECT button on the front panel to...
Owner's Manual
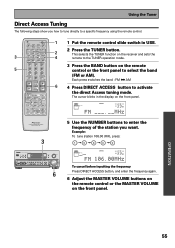
Page 55
... the frequency again. 6 Adjust the MASTER VOLUME buttons on the remote control or the MASTER VOLUME on the front panel. SIGNAL SELECT MIDNIGHT LIGHT MULTI CH INPUT THX DSP /DTS ADVANCED STEREO/ DIRECT STANDARD 1 2 4 6 AV PRE-PROGRAMMED AND LEARNING REMOTE CONTROL UNIT 3 AUDIO/VIDEO MULTI-CHANNEL RECEIVER N∫m¿≤≥ım STANDBY/ON STANDBY DSP MODE STEREO/ DIRECT /DTS THX CINEMA ADVANCED STANDARD MULTI-ROOM &SOURCE CONTROL VIDEO VCR 1/DVR VCR 2 DVD/LD TV/SAT MD/TAPE1/ CD CD-R TUNER PHONO PHONES S-VIDEO VIDEO INPUT VIDEO L AUDIO R MULTI CH INPUT...
... the frequency again. 6 Adjust the MASTER VOLUME buttons on the remote control or the MASTER VOLUME on the front panel. SIGNAL SELECT MIDNIGHT LIGHT MULTI CH INPUT THX DSP /DTS ADVANCED STEREO/ DIRECT STANDARD 1 2 4 6 AV PRE-PROGRAMMED AND LEARNING REMOTE CONTROL UNIT 3 AUDIO/VIDEO MULTI-CHANNEL RECEIVER N∫m¿≤≥ım STANDBY/ON STANDBY DSP MODE STEREO/ DIRECT /DTS THX CINEMA ADVANCED STANDARD MULTI-ROOM &SOURCE CONTROL VIDEO VCR 1/DVR VCR 2 DVD/LD TV/SAT MD/TAPE1/ CD CD-R TUNER PHONO PHONES S-VIDEO VIDEO INPUT VIDEO L AUDIO R MULTI CH INPUT...
Owner's Manual
Page 67
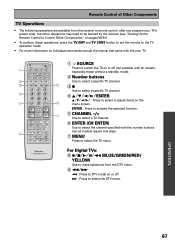
... VCR1 VCR2 MULTI CONTROL CD MD/ TAPE1 TUNER TVCONT CLASS MPX BAND DIRECT ACCESS ¶ 7 38 - + TUNING - + STATION 1¡ DTV ON/OFF DTV MENU 4¢ - + CHANNEL 123 456 7 GUIDE +10 + TV VOL - 8 0 TV TV CONTROL TV FUNC 9 EXIT ENTER DISC + VOLUME - REMOTE SETUP INPUT ATT SYSTEM SETUP EFFECT/ CH SEL MENU + MUTE FUNCTION DIGITAL NR ENTER - SIGNAL SELECT MIDNIGHT LIGHT MULTI CH INPUT THX DSP /DTS ADVANCED STEREO/ DIRECT STANDARD 5 6 7 AV PRE-PROGRAMMED AND LEARNING REMOTE CONTROL UNIT 1 SOURCE Press to switch the TV...
... VCR1 VCR2 MULTI CONTROL CD MD/ TAPE1 TUNER TVCONT CLASS MPX BAND DIRECT ACCESS ¶ 7 38 - + TUNING - + STATION 1¡ DTV ON/OFF DTV MENU 4¢ - + CHANNEL 123 456 7 GUIDE +10 + TV VOL - 8 0 TV TV CONTROL TV FUNC 9 EXIT ENTER DISC + VOLUME - REMOTE SETUP INPUT ATT SYSTEM SETUP EFFECT/ CH SEL MENU + MUTE FUNCTION DIGITAL NR ENTER - SIGNAL SELECT MIDNIGHT LIGHT MULTI CH INPUT THX DSP /DTS ADVANCED STEREO/ DIRECT STANDARD 5 6 7 AV PRE-PROGRAMMED AND LEARNING REMOTE CONTROL UNIT 1 SOURCE Press to switch the TV...
Owner's Manual
Page 77
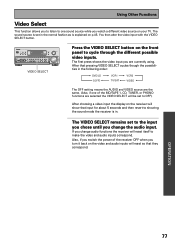
...8805;ım STANDBY/ON STANDBY DSP MODE STEREO/ DIRECT /DTS THX CINEMA ADVANCED STANDARD MULTI-ROOM &SOURCE CONTROL VIDEO VCR 1/DVR VCR 2 DVD/LD TV/SAT MD/TAPE1/ CD CD-R TUNER PHONO PHONES S-VIDEO VIDEO INPUT VIDEO L AUDIO R MULTI CH INPUT CHANNEL TONE SELECT DIGITAL SIGNAL FL LOUDNESS NR SELECT DIMMER CLASS BAND - TREBLE + VIDEO TAPE 2 SELCT MONITOR MPX TUNER CONTROL MEMORY - After that pressing VIDEO SELECT cycles though the possibilities in . The VIDEO SELECT remains set to OFF.) After choosing a video input the display on the receiver will reset so that...
...8805;ım STANDBY/ON STANDBY DSP MODE STEREO/ DIRECT /DTS THX CINEMA ADVANCED STANDARD MULTI-ROOM &SOURCE CONTROL VIDEO VCR 1/DVR VCR 2 DVD/LD TV/SAT MD/TAPE1/ CD CD-R TUNER PHONO PHONES S-VIDEO VIDEO INPUT VIDEO L AUDIO R MULTI CH INPUT CHANNEL TONE SELECT DIGITAL SIGNAL FL LOUDNESS NR SELECT DIMMER CLASS BAND - TREBLE + VIDEO TAPE 2 SELCT MONITOR MPX TUNER CONTROL MEMORY - After that pressing VIDEO SELECT cycles though the possibilities in . The VIDEO SELECT remains set to OFF.) After choosing a video input the display on the receiver will reset so that...
Owner's Manual
Page 87
... direct light. • Connect cord to the correct jack. • Disconnect the IR Receiver from surround or center speakers. When playing a Dolby Digital / DTS format LD there is output. When a search is performed by a DTS compatible CD player during playback, noise is noise audible on the soundtrack. The OVER indicator is produced from some components, but be sure to turn the volume down on a CD player or other IR Receiver type using...
... direct light. • Connect cord to the correct jack. • Disconnect the IR Receiver from surround or center speakers. When playing a Dolby Digital / DTS format LD there is output. When a search is performed by a DTS compatible CD player during playback, noise is noise audible on the soundtrack. The OVER indicator is produced from some components, but be sure to turn the volume down on a CD player or other IR Receiver type using...


