Owner's Manual
Page 4
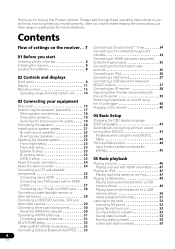
...receiver 8 Loading the batteries 8 02 Controls and displays Front panel 9 Display 11 Remote control 13 Operating range of remote control unit . . . . 14 03 Connecting your equipment Rear panel 15 ...device for Advanced MCACC output 37 Connecting an IR receiver 38 Operating other Pioneer components with this Pioneer product. Thank you for buying this unit's sensor 39 Switching components on...DVD recorder, VCR and other video sources 29 Connecting other audio components 30 About the WMA9 Pro decoder 30 Connecting AM/FM antennas 31 Connecting external antennas 31 MULTI-ZONE setup ...
...receiver 8 Loading the batteries 8 02 Controls and displays Front panel 9 Display 11 Remote control 13 Operating range of remote control unit . . . . 14 03 Connecting your equipment Rear panel 15 ...device for Advanced MCACC output 37 Connecting an IR receiver 38 Operating other Pioneer components with this Pioneer product. Thank you for buying this unit's sensor 39 Switching components on...DVD recorder, VCR and other video sources 29 Connecting other audio components 30 About the WMA9 Pro decoder 30 Connecting AM/FM antennas 31 Connecting external antennas 31 MULTI-ZONE setup ...
Owner's Manual
Page 5
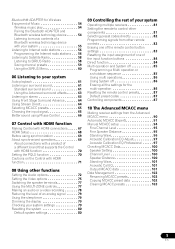
...Controlling the rest of your system Operating multiple receivers 81 Setting the remote to control other components 81 Selecting preset codes directly 82 Programming signals from other remote controls 82 Erasing one of the remote control button settings 83 Resetting the input assignment of one of ...a shutdown sequence 85 Using multi operations 86 Using System off 86 Erasing all the settings for the multi-operation 86 Resetting the remote control presets 87 Default preset codes 87 Controlling components 87 10 The Advanced MCACC menu Making receiver settings from the Advanced MCACC menu...
...Controlling the rest of your system Operating multiple receivers 81 Setting the remote to control other components 81 Selecting preset codes directly 82 Programming signals from other remote controls 82 Erasing one of the remote control button settings 83 Resetting the input assignment of one of ...a shutdown sequence 85 Using multi operations 86 Using System off 86 Erasing all the settings for the multi-operation 86 Resetting the remote control presets 87 Default preset codes 87 Controlling components 87 10 The Advanced MCACC menu Making receiver settings from the Advanced MCACC menu...

Owner's Manual
Page 6
... Network Setup menu 108 IP address/Proxy setting 108 Checking the MAC address 109 The Other Setup menu 110 Volume Setup 110 Remote Control Mode Setup 111 Flicker Reduction Setup 111 12 Additional information Troubleshooting 112 Power 112 No sound 113 Other audio problems 115 Video... 116 Settings 117 Professional Calibration EQ graphical output 118 Display 118 Remote control 119 HDMI 120 Important information regarding the HDMI connection 121 USB interface 122 ADAPTER PORT 123 Internet radio 123 SIRIUS radio ...
... Network Setup menu 108 IP address/Proxy setting 108 Checking the MAC address 109 The Other Setup menu 110 Volume Setup 110 Remote Control Mode Setup 111 Flicker Reduction Setup 111 12 Additional information Troubleshooting 112 Power 112 No sound 113 Other audio problems 115 Video... 116 Settings 117 Professional Calibration EQ graphical output 118 Display 118 Remote control 119 HDMI 120 Important information regarding the HDMI connection 121 USB interface 122 ADAPTER PORT 123 Internet radio 123 SIRIUS radio ...
Owner's Manual
Page 7
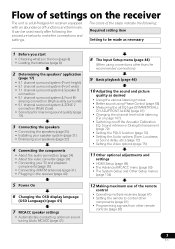
... menu (page 90) • The System Setup and Other Setup menus (page 104) 12 Making maximum use of the remote control • Operating multiple receivers (page 81) • Setting the remote to control other components (page 81) • Programming signals from other than the recommended connections) 9 Basic playback (page 46...
... menu (page 90) • The System Setup and Other Setup menus (page 104) 12 Making maximum use of the remote control • Operating multiple receivers (page 81) • Setting the remote to control other components (page 81) • Programming signals from other than the recommended connections) 9 Basic playback (page 46...

Owner's Manual
Page 8
... 1: Before you start Checking what's in the box Please check that you've received the following supplied accessories: • Setup microphone (cable: 5 m (16.4 ft.)) • Remote control unit • AAA size IEC R03 dry cell batteries (to confirm system operation) x2 • AM loop antenna • FM wire antenna • iPod...
... 1: Before you start Checking what's in the box Please check that you've received the following supplied accessories: • Setup microphone (cable: 5 m (16.4 ft.)) • Remote control unit • AAA size IEC R03 dry cell batteries (to confirm system operation) x2 • AM loop antenna • FM wire antenna • iPod...
Owner's Manual
Page 9
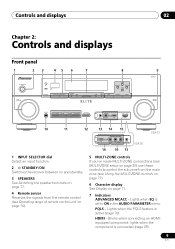
... USB VIDEO CAMERA HDMI 5 10 11 12 13 14 15 VIDEO 2 INPUT USB iPod iPhone VIDEO L AUDIO R MCACC SETUP MIC 14 16 13 VSX-30 VSX-31 1 INPUT SELECTOR dial Select an input function. 2 STANDBY/ON Switches the receiver between on and standby. 3 SPEAKERS See Switching the... speaker terminals on page 77. 4 Remote sensor Receives the signals from the remote control (see Operating range of remote control unit on page 14). 5 MULTI-ZONE controls If you've made MULTI-ZONE connections (see Using the MULTI...
... USB VIDEO CAMERA HDMI 5 10 11 12 13 14 15 VIDEO 2 INPUT USB iPod iPhone VIDEO L AUDIO R MCACC SETUP MIC 14 16 13 VSX-30 VSX-31 1 INPUT SELECTOR dial Select an input function. 2 STANDBY/ON Switches the receiver between on and standby. 3 SPEAKERS See Switching the... speaker terminals on page 77. 4 Remote sensor Receives the signals from the remote control (see Operating range of remote control unit on page 14). 5 MULTI-ZONE controls If you've made MULTI-ZONE connections (see Using the MULTI...

Owner's Manual
Page 12
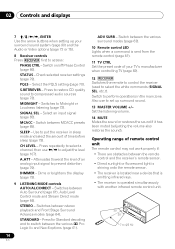
...:6 - Lights when a broadcast is on, this lights to indicate Neo:6 processing (page 61). 18 Character display Displays various system information. 19 Remote control mode indicator Lights to indicate the receiver's remote control mode setting. (Not displayed when set (page 77). 16 SLEEP Lights when the receiver is in auto stereo mode. 02...
...:6 - Lights when a broadcast is on, this lights to indicate Neo:6 processing (page 61). 18 Character display Displays various system information. 19 Remote control mode indicator Lights to indicate the receiver's remote control mode setting. (Not displayed when set (page 77). 16 SLEEP Lights when the receiver is in auto stereo mode. 02...

Owner's Manual
Page 13
... signal. Select channels. RETURN - Receiver control, TV control • Blue - Use to input the preset code when making remote control settings and to set the remote control mode (page 81). 3 Input function buttons Press to select control of the TV. INPUT - VOL +/- - VIDEO ...LEVEL A.ATT DIMMER 7 8 9 D.ACCESS CLASS CH / CLR 0 ENTER AUTO / ALC / 9 DIRECT STEREO STANDARD ADV SURR LISTENING MODE RECEIVER The remote has been conveniently color-coded according to access: AUDIO PARAMETER - Use to access the Video options (page 75). Use to perform multi operations (page ...
... signal. Select channels. RETURN - Receiver control, TV control • Blue - Use to input the preset code when making remote control settings and to set the remote control mode (page 81). 3 Input function buttons Press to select control of the TV. INPUT - VOL +/- - VIDEO ...LEVEL A.ATT DIMMER 7 8 9 D.ACCESS CLASS CH / CLR 0 ENTER AUTO / ALC / 9 DIRECT STEREO STANDARD ADV SURR LISTENING MODE RECEIVER The remote has been conveniently color-coded according to access: AUDIO PARAMETER - Use to access the Video options (page 75). Use to perform multi operations (page ...
Owner's Manual
Page 14
...107). STANDARD - Also use / to set up your TV's manufacturer when controlling TV (page 82). 12 RECEIVER Switches the remote to control the receiver (used to Midnight or Loudness listening (page 72). SLEEP - A.ATT - STEREO - Check selected receiver settings (page...to compressed audio sources (page 73). Switch between the various surround modes (page 63). 10 Remote control LED Lights when a command is operated simultaneously with another infrared remote control unit. 30° 30° 7 m (23 ft.) Switch to put the receiver in the main zone. STATUS...
...107). STANDARD - Also use / to set up your TV's manufacturer when controlling TV (page 82). 12 RECEIVER Switches the remote to control the receiver (used to Midnight or Loudness listening (page 72). SLEEP - A.ATT - STEREO - Check selected receiver settings (page...to compressed audio sources (page 73). Switch between the various surround modes (page 63). 10 Remote control LED Lights when a command is operated simultaneously with another infrared remote control unit. 30° 30° 7 m (23 ft.) Switch to put the receiver in the main zone. STATUS...

Owner's Manual
Page 32
... speakers and TV monitor1 for the sub zone (ZONE 2). b.VSX-30 only. Basic MULTI-ZONE setup (ZONE 2) 1 Connect a...remote or front panel controls. Sub zone Main zone VSX-31 only VIDEO IN AUDIO IN R L VSX-31 HDMI BD IN IN 1 IN ASSIGNABLE 1 4 COMPONENT VIDEO ASSIGNABLE IN 1 IN 2 (DVD) (DVR) Y Y AUDIO L PB PB R ZONE 2 PR PR OUT MONITOR Y OUT VIDEO 12 V TR PB (OUTPUT RS-232C TOTAL 50 1 PR Note 1 VSX-30...CD-R/TAPE, TUNER, ADAPTER PORT, SIRIUS (Outputs analog audio and composite video.) a.VSX-31 only. You will also need a separate amplifier if you have made the ...
... speakers and TV monitor1 for the sub zone (ZONE 2). b.VSX-30 only. Basic MULTI-ZONE setup (ZONE 2) 1 Connect a...remote or front panel controls. Sub zone Main zone VSX-31 only VIDEO IN AUDIO IN R L VSX-31 HDMI BD IN IN 1 IN ASSIGNABLE 1 4 COMPONENT VIDEO ASSIGNABLE IN 1 IN 2 (DVD) (DVR) Y Y AUDIO L PB PB R ZONE 2 PR PR OUT MONITOR Y OUT VIDEO 12 V TR PB (OUTPUT RS-232C TOTAL 50 1 PR Note 1 VSX-30...CD-R/TAPE, TUNER, ADAPTER PORT, SIRIUS (Outputs analog audio and composite video.) a.VSX-31 only. You will also need a separate amplifier if you have made the ...

Owner's Manual
Page 35
Connecting to the front panel video terminal (VSX-30 only) Front video connections are standard audio/video jacks. Connecting your equipment 03 Connecting an HDMI-equipped component to ...same way you made the rear panel connections. HDMI-equipped components other than video cameras can be connected to the front panel input (VSX-31 only) There is an HDMI input terminal on the front panel. CONTROL ON / OFF MASTER VOLUME CONTROL ON / OFF ... 35 En High quality pictures can also be viewed via the INPUT SELECTOR dial (front panel) or INPUT SELECT buttons (remote control).
Connecting to the front panel video terminal (VSX-30 only) Front video connections are standard audio/video jacks. Connecting your equipment 03 Connecting an HDMI-equipped component to ...same way you made the rear panel connections. HDMI-equipped components other than video cameras can be connected to the front panel input (VSX-31 only) There is an HDMI input terminal on the front panel. CONTROL ON / OFF MASTER VOLUME CONTROL ON / OFF ... 35 En High quality pictures can also be viewed via the INPUT SELECTOR dial (front panel) or INPUT SELECT buttons (remote control).

Owner's Manual
Page 38
... may not be possible if direct light from a strong fluorescent lamp is shining on the front panel. 38 En Refer to the manual that other Pioneer components with your component to check for the connection. • If you can use the IR terminology. CONTROL IR IN OUT IN HDMI BD IN... IN IN MONITOR Y OUT VIDEO 12 V TRIGGER PB RS-232C (OUTPUT 12 V TOTAL 50 mA MAX) 12 IR CONTROL IN OUT IN OUT PR VSX-31 IR receiver Note 1 • Remote operation may not use an optional IR receiver (such as a Niles or Xantech unit) to control your system instead of the...
... may not be possible if direct light from a strong fluorescent lamp is shining on the front panel. 38 En Refer to the manual that other Pioneer components with your component to check for the connection. • If you can use the IR terminology. CONTROL IR IN OUT IN HDMI BD IN... IN IN MONITOR Y OUT VIDEO 12 V TRIGGER PB RS-232C (OUTPUT 12 V TOTAL 50 mA MAX) 12 IR CONTROL IN OUT IN OUT PR VSX-31 IR receiver Note 1 • Remote operation may not use an optional IR receiver (such as a Niles or Xantech unit) to control your system instead of the...

Owner's Manual
Page 39
...IN OUT IN OUT PR VSX-31 Important • Note that if you use just the remote sensor of analog audio, video or HDMI jacks connected to another Pioneer component. Connecting your components using this receiver's remote control, see Setting the remote to control other Pioneer components with a mono mini-...be able to control this feature, make sure that component to use the remote sensor of. Use a cable with this unit's sensor Many Pioneer components have SR CONTROL jacks which you'll point the corresponding remote control. 2 Connect the CONTROL OUT jack of that you have at ...
...IN OUT IN OUT PR VSX-31 Important • Note that if you use just the remote sensor of analog audio, video or HDMI jacks connected to another Pioneer component. Connecting your components using this receiver's remote control, see Setting the remote to control other Pioneer components with a mono mini-...be able to control this feature, make sure that component to use the remote sensor of. Use a cable with this unit's sensor Many Pioneer components have SR CONTROL jacks which you'll point the corresponding remote control. 2 Connect the CONTROL OUT jack of that you have at ...

Owner's Manual
Page 41
... the System Setup menu reappears automatically. Use and ENTER to navigate through the screens and select menu items. Press RETURN to Playing a source on the remote control, then press HOME MENU. Automatically conducting optimum sound tuning (Auto MCACC The Auto MCACC Setup measures the acoustic characteristics of test tones to change...
... the System Setup menu reappears automatically. Use and ENTER to navigate through the screens and select menu items. Press RETURN to Playing a source on the remote control, then press HOME MENU. Automatically conducting optimum sound tuning (Auto MCACC The Auto MCACC Setup measures the acoustic characteristics of test tones to change...

Owner's Manual
Page 44
...to the terminals on the rear panel (such as DVD) which, in turn, correspond with the names on the remote control. 6 Select the input(s) to which terminal so the buttons on the remote control correspond to the components you've connected. 1 Switch on the receiver and your TV. This setting should ...ENTER to navigate through the screens and select menu items. Press RETURN to the default settings (see Input function default and possible settings on the remote control, then press HOME MENU. You can correct the setting manually using the Auto MCACC Setup If the room environment is hooked up to ...
...to the terminals on the rear panel (such as DVD) which, in turn, correspond with the names on the remote control. 6 Select the input(s) to which terminal so the buttons on the remote control correspond to the components you've connected. 1 Switch on the receiver and your TV. This setting should ...ENTER to navigate through the screens and select menu items. Press RETURN to the default settings (see Input function default and possible settings on the remote control, then press HOME MENU. You can correct the setting manually using the Auto MCACC Setup If the room environment is hooked up to ...
Owner's Manual
Page 46
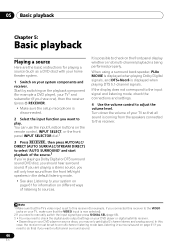
... jacks on the front panel display whether or not multi-channel playback is coming from the front left/right speakers in surround sound on the remote control, INPUT SELECT, or the front panel INPUT SELECTOR dial.2 3 Press RECEIVER , then press AUTO/ALC/ DIRECT (AUTO SURR/ALC/STREAM DIRECT) to adjust the...
... jacks on the front panel display whether or not multi-channel playback is coming from the front left/right speakers in surround sound on the remote control, INPUT SELECT, or the front panel INPUT SELECTOR dial.2 3 Press RECEIVER , then press AUTO/ALC/ DIRECT (AUTO SURR/ALC/STREAM DIRECT) to adjust the...

Owner's Manual
Page 47
... be controlled using the INPUT SELECTOR dial on the front panel or by #. • VSX-30 only: iPod/USB function cannot be selected for example, HDMI 1). When the display shows the... using this receiver, and we recommend switching the equalizer off before connecting. • Pioneer cannot under any circumstances accept responsibility for any direct or indirect loss arising from any inconvenience...alphanumeric letters and numbers cannot be displayed and will be replaced by pressing HDMI on the remote control repeatedly. • Set the HDMI parameter in the GUI screen while the receiver ...
... be controlled using the INPUT SELECTOR dial on the front panel or by #. • VSX-30 only: iPod/USB function cannot be selected for example, HDMI 1). When the display shows the... using this receiver, and we recommend switching the equalizer off before connecting. • Pioneer cannot under any circumstances accept responsibility for any direct or indirect loss arising from any inconvenience...alphanumeric letters and numbers cannot be displayed and will be replaced by pressing HDMI on the remote control repeatedly. • Set the HDMI parameter in the GUI screen while the receiver ...

Owner's Manual
Page 48
... During Audiobook playback, press / to switch the playback speed: Faster Normal Slower 3 You cannot use this receiver's remote control and GUI screen become inactive. 2 Press iPod CTRL again to switch back to the iPod/USB operation mode. AUDIO PARAMETER LIST VIDEO PARAMETER TUNE...artist. 05 Basic playback Finding what you want to play When your iPod is connected. 48 En Basic playback controls This receiver's remote control buttons can be used for basic playback of files stored on your iPod, and this function, when an iPod of fifth generation...
... During Audiobook playback, press / to switch the playback speed: Faster Normal Slower 3 You cannot use this receiver's remote control and GUI screen become inactive. 2 Press iPod CTRL again to switch back to the iPod/USB operation mode. AUDIO PARAMETER LIST VIDEO PARAMETER TUNE...artist. 05 Basic playback Finding what you want to play When your iPod is connected. 48 En Basic playback controls This receiver's remote control buttons can be used for basic playback of files stored on your iPod, and this function, when an iPod of fifth generation...

Owner's Manual
Page 49
... of data that cannot be displayed on this receiver are too high for USB playback. • Pioneer cannot guarantee compatibility (operation and/or bus power) with a large capacity is connected, it may ... nor the artist name is present, the row is displayed as a blank space. • VSX-31 only: iPod/USB function cannot be used for the MULTI-ZONE feature (page 77). •... play, then press to start playback.6 Basic playback controls This receiver's remote control buttons can display and play back up to 30 000 folders and files within a USB memory device.5 1 Use /...
... of data that cannot be displayed on this receiver are too high for USB playback. • Pioneer cannot guarantee compatibility (operation and/or bus power) with a large capacity is connected, it may ... nor the artist name is present, the row is displayed as a blank space. • VSX-31 only: iPod/USB function cannot be used for the MULTI-ZONE feature (page 77). •... play, then press to start playback.6 Basic playback controls This receiver's remote control buttons can display and play back up to 30 000 folders and files within a USB memory device.5 1 Use /...

Owner's Manual
Page 52
... selected band, press and hold TUNE / for more on this case, you can be selected also with different input signal formats on the remote control. 1 Press TUNER to select the tuner. 2 Use BAND to 106.00 (FM), press 1, 0, 6, 0, 0. This should improve the sound quality and allow you want , see...
... selected band, press and hold TUNE / for more on this case, you can be selected also with different input signal formats on the remote control. 1 Press TUNER to select the tuner. 2 Use BAND to 106.00 (FM), press 1, 0, 6, 0, 0. This should improve the sound quality and allow you want , see...


