

Owner's Manual
Page 4
...perform many tasks, this receiver and is the latest and most demanding Dolby Digital and DTS program sources. Direct Energy MOS amplifier The VSX-29TX receiver incorporates 5 independent 120 watt built in standby mode, refer to "Specifications" on automatically according to the input signal, all ...you the capability of transforming your living room into this remote can access a huge amount of different buttons. Features Decoding of Dolby Digital, Dolby Pro Logic and DTS (Digital Theater Systems) R ...
...perform many tasks, this receiver and is the latest and most demanding Dolby Digital and DTS program sources. Direct Energy MOS amplifier The VSX-29TX receiver incorporates 5 independent 120 watt built in standby mode, refer to "Specifications" on automatically according to the input signal, all ...you the capability of transforming your living room into this remote can access a huge amount of different buttons. Features Decoding of Dolby Digital, Dolby Pro Logic and DTS (Digital Theater Systems) R ...

Owner's Manual
Page 5
PREPARATION SET UP Table of Contents Before You Start 6 Checking the Supplied Accessories 6 How to Use This Manual 6 Preparing the Remote Control 6 Installing the Receiver 7 Opening the Front Panel 7 Connecting Your Equipment 8 Audio Components 8 Video Components 9 Digital Connections 10 External Decoder ... Connections (AC OUTLETS 15 Displays & Controls 16 Front Panel 16 Display ...18 Remote Control 19 Basic Receiver LCD Screens 20 Initial Set Up 21 On Screen Display 21 Setting Up the Remote Control 21 Setting Up for Surround Sound 23 Basic Playback 33 Playing Source with ...
PREPARATION SET UP Table of Contents Before You Start 6 Checking the Supplied Accessories 6 How to Use This Manual 6 Preparing the Remote Control 6 Installing the Receiver 7 Opening the Front Panel 7 Connecting Your Equipment 8 Audio Components 8 Video Components 9 Digital Connections 10 External Decoder ... Connections (AC OUTLETS 15 Displays & Controls 16 Front Panel 16 Display ...18 Remote Control 19 Basic Receiver LCD Screens 20 Initial Set Up 21 On Screen Display 21 Setting Up the Remote Control 21 Setting Up for Surround Sound 23 Basic Playback 33 Playing Source with ...
Owner's Manual
Page 6
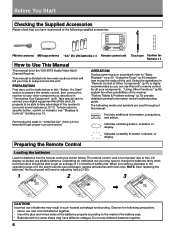
... to use the radio of battery life. "Techno Tidbits & Problem-solving" (p.70) provide detailed technical information and a troubleshooting guide. Preparing the Remote Control Loading the batteries Load the batteries into two main sections which will need re-adjusting (see p.21-22). 1 2 3 · &#...use alkaline batteries. Before You Start Checking the Supplied Accessories Please check that you can use this unit's remote control for the VSX-29TX Audio/Video MultiChannel Receiver. This manual is highly recommended so you have received all batteries with the same shape...
... to use the radio of battery life. "Techno Tidbits & Problem-solving" (p.70) provide detailed technical information and a troubleshooting guide. Preparing the Remote Control Loading the batteries Load the batteries into two main sections which will need re-adjusting (see p.21-22). 1 2 3 · &#...use alkaline batteries. Before You Start Checking the Supplied Accessories Please check that you can use this unit's remote control for the VSX-29TX Audio/Video MultiChannel Receiver. This manual is highly recommended so you have received all batteries with the same shape...
Owner's Manual
Page 7
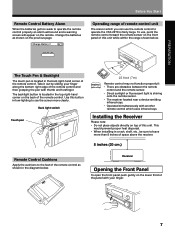
... or fluorescent light is fairly large. OPERATION 7 To use the remote control to the feet of the remote control as shown on top of space above the receiver. 8 inches (20 cm.) Remote Control Cushions Apply the cushions to operate the VSX-29TX is shining onto the remote sensor. • The receiver located near a device emitting infrared...
... or fluorescent light is fairly large. OPERATION 7 To use the remote control to the feet of the remote control as shown on top of space above the receiver. 8 inches (20 cm.) Remote Control Cushions Apply the cushions to operate the VSX-29TX is shining onto the remote sensor. • The receiver located near a device emitting infrared...

Owner's Manual
Page 8
... OUT VIDEO S2 IN S2 IN S2 IN S2 OUT IN S2 IN VCR2 OUT S2 OUT MD/ TAPE1 VIDEO OUT VIDEO OUT IN PHONO REMOTE IN MULTI-ROOM & SOURCE SWITCHED UNSWITCHED TOTAL 100W(0.8A)MAX 100W(0.8A)MAX AC OUTLETS AC 120V 60Hz TO MONITOR TV S2 OUT FR FL...
... OUT VIDEO S2 IN S2 IN S2 IN S2 OUT IN S2 IN VCR2 OUT S2 OUT MD/ TAPE1 VIDEO OUT VIDEO OUT IN PHONO REMOTE IN MULTI-ROOM & SOURCE SWITCHED UNSWITCHED TOTAL 100W(0.8A)MAX 100W(0.8A)MAX AC OUTLETS AC 120V 60Hz TO MONITOR TV S2 OUT FR FL...
Owner's Manual
Page 9
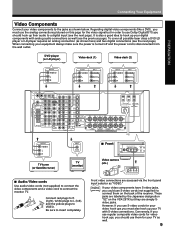
... for the video signal but in order to use S-video cords (not supplied) to connect them for video hook ups, you use them on the VSX-29TX but they are simply Svideo jacks. Conversely, if you use regular composite video cords for your video components to the jacks as "VIDEO." DVD player... OUT VIDEO S2 IN S2 IN S2 IN S2 OUT IN S2 IN VCR2 OUT S2 OUT MD/ TAPE1 VIDEO OUT VIDEO OUT IN PHONO REMOTE IN MULTI-ROOM & source SWITCHED UNSWITCHED TOTAL 100W(0.8A)MAX 100W(0.8A)MAX AC OUTLETS AC 120V 60Hz TO MONITOR TV S2 OUT FR FL...
... for the video signal but in order to use S-video cords (not supplied) to connect them for video hook ups, you use them on the VSX-29TX but they are simply Svideo jacks. Conversely, if you use regular composite video cords for your video components to the jacks as "VIDEO." DVD player... OUT VIDEO S2 IN S2 IN S2 IN S2 OUT IN S2 IN VCR2 OUT S2 OUT MD/ TAPE1 VIDEO OUT VIDEO OUT IN PHONO REMOTE IN MULTI-ROOM & source SWITCHED UNSWITCHED TOTAL 100W(0.8A)MAX 100W(0.8A)MAX AC OUTLETS AC 120V 60Hz TO MONITOR TV S2 OUT FR FL...
Owner's Manual
Page 10
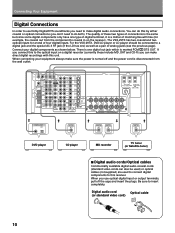
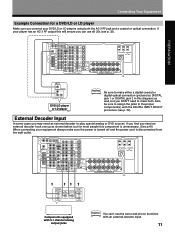
For the VSX-29TX, DVD/LD player or LD player should be used) or optical cables (not supplied) are used to connect ... one ) as well as shown below. You can make sure the power is turned off the caps and insert the plugs. The VSX-29TX has two coaxial and two optical inputs for example, the coaxial out from the component to a digital jack and the special AC-3...IN S2 IN S2 IN S2 OUT IN S2 IN VCR2 OUT S2 OUT MD/ TAPE1 VIDEO OUT VIDEO OUT IN PHONO REMOTE IN MULTI-ROOM & SOURCE SWITCHED UNSWITCHED TOTAL 100W(0.8A)MAX 100W(0.8A)MAX AC OUTLETS AC 120V 60Hz TO MONITOR TV ...
For the VSX-29TX, DVD/LD player or LD player should be used) or optical cables (not supplied) are used to connect ... one ) as well as shown below. You can make sure the power is turned off the caps and insert the plugs. The VSX-29TX has two coaxial and two optical inputs for example, the coaxial out from the component to a digital jack and the special AC-3...IN S2 IN S2 IN S2 OUT IN S2 IN VCR2 OUT S2 OUT MD/ TAPE1 VIDEO OUT VIDEO OUT IN PHONO REMOTE IN MULTI-ROOM & SOURCE SWITCHED UNSWITCHED TOTAL 100W(0.8A)MAX 100W(0.8A)MAX AC OUTLETS AC 120V 60Hz TO MONITOR TV ...
Owner's Manual
Page 11
... OUT VIDEO S2 IN S2 IN S2 IN S2 OUT IN S2 IN VCR2 OUT S2 OUT MD/ TAPE1 VIDEO OUT VIDEO OUT IN PHONO REMOTE IN MULTI-ROOM & SOURCE SWITCHED UNSWITCHED TOTAL 100W(0.8A)MAX 100W(0.8A)MAX AC OUTLETS AC 120V 60Hz TO MONITOR TV S2 OUT FR FL... OUT VIDEO S2 IN S2 IN S2 IN S2 OUT IN S2 IN VCR2 OUT S2 OUT MD/ TAPE1 VIDEO OUT VIDEO OUT IN PHONO REMOTE IN MULTI-ROOM & SOURCE SWITCHED UNSWITCHED TOTAL 100W(0.8A)MAX 100W(0.8A)MAX AC OUTLETS AC 120V 60Hz TO MONITOR TV S2 OUT FR FL...
... OUT VIDEO S2 IN S2 IN S2 IN S2 OUT IN S2 IN VCR2 OUT S2 OUT MD/ TAPE1 VIDEO OUT VIDEO OUT IN PHONO REMOTE IN MULTI-ROOM & SOURCE SWITCHED UNSWITCHED TOTAL 100W(0.8A)MAX 100W(0.8A)MAX AC OUTLETS AC 120V 60Hz TO MONITOR TV S2 OUT FR FL... OUT VIDEO S2 IN S2 IN S2 IN S2 OUT IN S2 IN VCR2 OUT S2 OUT MD/ TAPE1 VIDEO OUT VIDEO OUT IN PHONO REMOTE IN MULTI-ROOM & SOURCE SWITCHED UNSWITCHED TOTAL 100W(0.8A)MAX 100W(0.8A)MAX AC OUTLETS AC 120V 60Hz TO MONITOR TV S2 OUT FR FL...

Owner's Manual
Page 12
... OUT VIDEO S2 IN S2 IN S2 IN S2 OUT IN S2 IN VCR2 OUT S2 OUT MD/ TAPE1 VIDEO OUT VIDEO OUT IN PHONO REMOTE IN MULTI-ROOM & SOURCE SWITCHED UNSWITCHED TOTAL 100W(0.8A)MAX 100W(0.8A)MAX AC OUTLETS AC 120V 60Hz TO MONITOR TV S2 OUT FR FL...
... OUT VIDEO S2 IN S2 IN S2 IN S2 OUT IN S2 IN VCR2 OUT S2 OUT MD/ TAPE1 VIDEO OUT VIDEO OUT IN PHONO REMOTE IN MULTI-ROOM & SOURCE SWITCHED UNSWITCHED TOTAL 100W(0.8A)MAX 100W(0.8A)MAX AC OUTLETS AC 120V 60Hz TO MONITOR TV S2 OUT FR FL...
Owner's Manual
Page 13
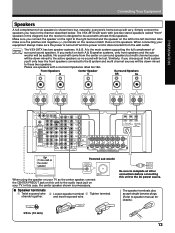
The VSX-29TX will be audible. When connecting your TV as the center speaker) Powered sub woofer INPUT When...the receiver match those on the left to the left terminal. Please use speakers with at least three speakers. strands together. memo The VSX-29TX has two speaker systems, A & B. Also make sure the power is turned off and the power cord is shown here but, ...S2 IN S2 IN S2 OUT IN S2 IN VCR2 OUT S2 OUT MD/ TAPE1 VIDEO OUT VIDEO OUT IN PHONO REMOTE IN MULTI-ROOM & SOURCE SWITCHED UNSWITCHED TOTAL 100W(0.8A)MAX 100W(0.8A)MAX AC OUTLETS AC 120V 60Hz TO MONITOR ...
The VSX-29TX will be audible. When connecting your TV as the center speaker) Powered sub woofer INPUT When...the receiver match those on the left to the left terminal. Please use speakers with at least three speakers. strands together. memo The VSX-29TX has two speaker systems, A & B. Also make sure the power is turned off and the power cord is shown here but, ...S2 IN S2 IN S2 OUT IN S2 IN VCR2 OUT S2 OUT MD/ TAPE1 VIDEO OUT VIDEO OUT IN PHONO REMOTE IN MULTI-ROOM & SOURCE SWITCHED UNSWITCHED TOTAL 100W(0.8A)MAX 100W(0.8A)MAX AC OUTLETS AC 120V 60Hz TO MONITOR ...
Owner's Manual
Page 15
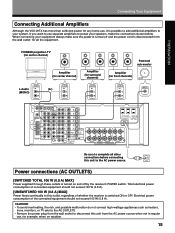
Connecting Your Equipment Connecting Additional Amplifiers Although the VSX-29TX has more than sufficient power for any home use, ...S2 OUT IN S2 IN VCR2 OUT S2 OUT MD/ TAPE1 VIDEO OUT VIDEO OUT IN PHONO REMOTE IN MULTI-ROOM & SOURCE SWITCHED UNSWITCHED TOTAL 100W(0.8A)MAX 100W(0.8A)MAX AC OUTLETS AC ...SPEAKERS SURROUND SPEAKERS FRONT B SPEAKERS SEE INSTRUCTION MANUAL SE REPORTER AU MOODE D'EMPLOI Be sure to this unit to your system. PREPARATION PIONEER projection TV (for center channel) L-Audio (MONO) AUDIO IN L R Amplifier (for center channel) (or) AUDIO IN L R...
Connecting Your Equipment Connecting Additional Amplifiers Although the VSX-29TX has more than sufficient power for any home use, ...S2 OUT IN S2 IN VCR2 OUT S2 OUT MD/ TAPE1 VIDEO OUT VIDEO OUT IN PHONO REMOTE IN MULTI-ROOM & SOURCE SWITCHED UNSWITCHED TOTAL 100W(0.8A)MAX 100W(0.8A)MAX AC OUTLETS AC ...SPEAKERS SURROUND SPEAKERS FRONT B SPEAKERS SEE INSTRUCTION MANUAL SE REPORTER AU MOODE D'EMPLOI Be sure to this unit to your system. PREPARATION PIONEER projection TV (for center channel) L-Audio (MONO) AUDIO IN L R Amplifier (for center channel) (or) AUDIO IN L R...
Owner's Manual
Page 16
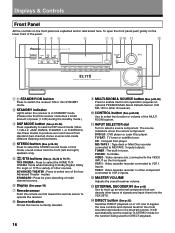
Displays & Controls Front Panel All the controls on the lower third of the panel. 1 2 34 5 6 7 8 90 - = AUDIO/VIDEO MULTI-CHANNEL RECEIVER N∫m¿ To open the front panel push gently on the front panel are explained and/or referenced here.
Displays & Controls Front Panel All the controls on the lower third of the panel. 1 2 34 5 6 7 8 90 - = AUDIO/VIDEO MULTI-CHANNEL RECEIVER N∫m¿ To open the front panel push gently on the front panel are explained and/or referenced here.
Owner's Manual
Page 19
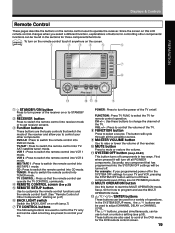
...These buttons can be used once they are not PIONEER products. = MULTI OPERATION button Use this LCD remote control changes when you select a different function, explanations of the TV. VOL + VOL - VCR 1 : Press to switch the remote control into the SYSTEM OFF settings will turn off... will cycle through all PIONEER components. The %˜fi buttons, pressed simultaneously, can operate the TV CONTROL commands. 4 REMOTE CONTROL screen (See p.20) 5 REMOTE SETUP button. Use to customize the remote control functions and the remote control itself. (See "Remote Control of the receiver ...
...These buttons can be used once they are not PIONEER products. = MULTI OPERATION button Use this LCD remote control changes when you select a different function, explanations of the TV. VOL + VOL - VCR 1 : Press to switch the remote control into the SYSTEM OFF settings will turn off... will cycle through all PIONEER components. The %˜fi buttons, pressed simultaneously, can operate the TV CONTROL commands. 4 REMOTE CONTROL screen (See p.20) 5 REMOTE SETUP button. Use to customize the remote control functions and the remote control itself. (See "Remote Control of the receiver ...

Owner's Manual
Page 20
... until you get the mode) and then increase or decrease the amount of that can decode other types of signals and input them into the VSX-29TX. 7 TAPE 2 MONITOR button (see p.59) Selects the tape deck (or MD recorder, etc.) connected to put the receiver in the selected ... automatically put the receiver in STEREO mode for the function being made. 20 In this button to select the main receiver screen (above ) when the remote control is the default. Displays & Controls Basic Receiver LCD Screens Receiver MAIN Screen 1 2 Receiver 0 MAIN SUB 9 DSP STEREO / dts EFFECT THX ...
... until you get the mode) and then increase or decrease the amount of that can decode other types of signals and input them into the VSX-29TX. 7 TAPE 2 MONITOR button (see p.59) Selects the tape deck (or MD recorder, etc.) connected to put the receiver in the selected ... automatically put the receiver in STEREO mode for the function being made. 20 In this button to select the main receiver screen (above ) when the remote control is the default. Displays & Controls Basic Receiver LCD Screens Receiver MAIN Screen 1 2 Receiver 0 MAIN SUB 9 DSP STEREO / dts EFFECT THX ...
Owner's Manual
Page 21
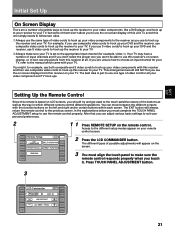
...arrangement would still NOT let you see any picture from this receiver to hook up your TV. SET UP Setting Up the Remote Control Since this remote is based on LCD screens, you should try and get used to the manual which different screens control different operations. The ...different types of possible adjustments will always return the remote control to the different setup modes appear on your TV. After that you can move between the different screens with this receiver and ...
...arrangement would still NOT let you see any picture from this receiver to hook up your TV. SET UP Setting Up the Remote Control Since this remote is based on LCD screens, you should try and get used to the manual which different screens control different operations. The ...different types of possible adjustments will always return the remote control to the different setup modes appear on your TV. After that you can move between the different screens with this receiver and ...

Owner's Manual
Page 22
...show the word "COMPLETE" and automatically return to the LCD COMMANDER screen. 5 Decide which other adjustments you have sent a command (pushed a button) the remote control will turn off . If no commands are entered. memo You can set up mode. 22 LCD TIMER : In order to save the battery a ...When you've touched all fixed to escape this set this button (the default setting is 10 seconds. LCD CONTRAST : You can turn the remote control off after 60 seconds.) 6 When finished with the LCD panel underneath. You can lighten or darken the contrast on 60 seconds. This ...
...show the word "COMPLETE" and automatically return to the LCD COMMANDER screen. 5 Decide which other adjustments you have sent a command (pushed a button) the remote control will turn off . If no commands are entered. memo You can set up mode. 22 LCD TIMER : In order to save the battery a ...When you've touched all fixed to escape this set this button (the default setting is 10 seconds. LCD CONTRAST : You can turn the remote control off after 60 seconds.) 6 When finished with the LCD panel underneath. You can lighten or darken the contrast on 60 seconds. This ...
Owner's Manual
Page 23
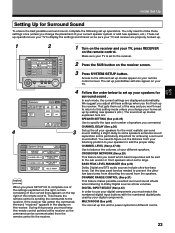
... SELECT (See p.32) In order to use your TV to the receiver. 2 Press the SUB button on your different speakers. MAIN SUB REMOTE SETUP BASS TREBLE MD/TAPE1 CD TUNER VCR2 CH LEVEL SYSTEM SETUP TV CONTROL 4 3 RECEIVER DVD/LD System Setup EXIT SPEAKER SETTING BASS PEAK... LEVEL MANAGER REMOTE SETUP MD/TAPE1 TV/SAT CHANNEL DELAY DYNAMIC RANGE CONTROL CD VCR1 CHANNEL LEVEL DIGITAL INPUT SELECT TUNER VCR2 CROSSOVER NETWORK MULTI ROOM TV...
... SELECT (See p.32) In order to use your TV to the receiver. 2 Press the SUB button on your different speakers. MAIN SUB REMOTE SETUP BASS TREBLE MD/TAPE1 CD TUNER VCR2 CH LEVEL SYSTEM SETUP TV CONTROL 4 3 RECEIVER DVD/LD System Setup EXIT SPEAKER SETTING BASS PEAK... LEVEL MANAGER REMOTE SETUP MD/TAPE1 TV/SAT CHANNEL DELAY DYNAMIC RANGE CONTROL CD VCR1 CHANNEL LEVEL DIGITAL INPUT SELECT TUNER VCR2 CROSSOVER NETWORK MULTI ROOM TV...

Owner's Manual
Page 25
... the bass sounds to change. If you may actually experience a decrease in the display, perform the setup operations from the first step again. Hold the remote control pointed towards the receiver until you want to the sub woofer by selecting SMALL for your ears judge which sounds best. Initial Set Up...
... the bass sounds to change. If you may actually experience a decrease in the display, perform the setup operations from the first step again. Hold the remote control pointed towards the receiver until you want to the sub woofer by selecting SMALL for your ears judge which sounds best. Initial Set Up...

Owner's Manual
Page 26
...first step again. 10ft 10ft 10ft 10ft SIGNAL SELECT ANALOG SP A VOLUME dB 10ft 10ft SETUP OK These settings will appear on your remote control screen. The CHANNEL DELAY speaker settings will be displayed on your TV. If "ERROR" flashes in "Setting Up for each ... speakers is necessary to step 1. CHANNEL LEVEL CROSSOVER NETWORK DIGITAL INPUT SELECT MULTI ROOM 2 Select each speaker. SETUP OK 3 Hold the remote control pointed towards the receiver until you specify the speaker distances, the receiver calculates the correct delay times automatically. You need to figure out...
...first step again. 10ft 10ft 10ft 10ft SIGNAL SELECT ANALOG SP A VOLUME dB 10ft 10ft SETUP OK These settings will appear on your remote control screen. The CHANNEL DELAY speaker settings will be displayed on your TV. If "ERROR" flashes in "Setting Up for each ... speakers is necessary to step 1. CHANNEL LEVEL CROSSOVER NETWORK DIGITAL INPUT SELECT MULTI ROOM 2 Select each speaker. SETUP OK 3 Hold the remote control pointed towards the receiver until you specify the speaker distances, the receiver calculates the correct delay times automatically. You need to figure out...

Owner's Manual
Page 27
... ROOM 2 Channel Level AUTO TEST TONE MANUAL TEST TONE SETUP OK 1 Press the CHANNEL LEVEL button. NOTE : Be prepared! These settings will appear on your remote control screen. 2 Select a test tone mode by accident the TEST TONE will automatically sound from CHANNEL DELAY go to exit the process Press SETUP OK...
... ROOM 2 Channel Level AUTO TEST TONE MANUAL TEST TONE SETUP OK 1 Press the CHANNEL LEVEL button. NOTE : Be prepared! These settings will appear on your remote control screen. 2 Select a test tone mode by accident the TEST TONE will automatically sound from CHANNEL DELAY go to exit the process Press SETUP OK...


