
Operating Instructions
Page 3
... the original part. If you are not sure of the type of power source indicated on the product. Power-supply cords should be taken to qualified service personnel under the following the operating instructions. SET UP IMPORTANT SAFETY INSTRUCTIONS READ INSTRUCTIONS - The power cord of the grounding type plug. DAMAGE REQUIRING SERVICE - VENTILATION - FOLLOW INSTRUCTIONS - Use only with furniture wax, benzine, insecticides or other products (including amplifiers) that...
... the original part. If you are not sure of the type of power source indicated on the product. Power-supply cords should be taken to qualified service personnel under the following the operating instructions. SET UP IMPORTANT SAFETY INSTRUCTIONS READ INSTRUCTIONS - The power cord of the grounding type plug. DAMAGE REQUIRING SERVICE - VENTILATION - FOLLOW INSTRUCTIONS - Use only with furniture wax, benzine, insecticides or other products (including amplifiers) that...
Operating Instructions
Page 4
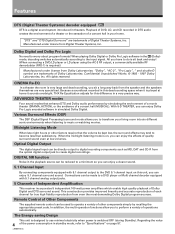
... hall (MUSICAL). Dolby Digital and Dolby Pro Logic No need to the input signal. ADVANCED THEATER modes Four sound modes that the volume be directly output to digital recording components such as MD, DAT and CD-R from even the most demanding Dolby Digital program sources. The Energy-saving Design This unit is played at low volumes. THX Re-Equalization adjusts for true high fidelity reproduction from the optical digital output jack to operate a variety of Dolby Digital and DTS surround sound. Midnight Listening Mode When late...
... hall (MUSICAL). Dolby Digital and Dolby Pro Logic No need to the input signal. ADVANCED THEATER modes Four sound modes that the volume be directly output to digital recording components such as MD, DAT and CD-R from even the most demanding Dolby Digital program sources. The Energy-saving Design This unit is played at low volumes. THX Re-Equalization adjusts for true high fidelity reproduction from the optical digital output jack to operate a variety of Dolby Digital and DTS surround sound. Midnight Listening Mode When late...
Operating Instructions
Page 5
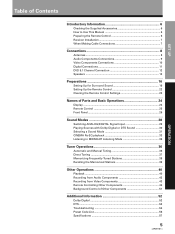
...the Remote Control 6 Receiver Installation 7 When Making Cable Connections 7 Connections 8 Antennas ...8 Audio Components Connections 9 Video Components Connections 10 Digital Connections 11 DVD 5.1 Channel Connection 12 Speakers 13 Preparations 16 Setting Up for Surround Sound 16 Setting Up the Remote Control 22 Clearing the Remote Control Settings 23 Names of Parts and Basic Operations 24 Display ...24 Remote Control 25 Front Panel 26 Sound Modes 28 Switching ANALOG/DIGITAL Signal Input 29 Playing Sources with Dolby Digital or DTS Sound 30 Selecting a Sound Mode 31 CINEMA...
...the Remote Control 6 Receiver Installation 7 When Making Cable Connections 7 Connections 8 Antennas ...8 Audio Components Connections 9 Video Components Connections 10 Digital Connections 11 DVD 5.1 Channel Connection 12 Speakers 13 Preparations 16 Setting Up for Surround Sound 16 Setting Up the Remote Control 22 Clearing the Remote Control Settings 23 Names of Parts and Basic Operations 24 Display ...24 Remote Control 25 Front Panel 26 Sound Modes 28 Switching ANALOG/DIGITAL Signal Input 29 Playing Sources with Dolby Digital or DTS Sound 30 Selecting a Sound Mode 31 CINEMA...
Operating Instructions
Page 9
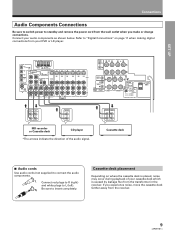
... you make or change connections. SET UP Connections Audio Components Connections Be sure to switch power to standby and remove the power cord from the receiver. Refer to L (left). Cassette deck 7 Audio cords Use audio cords (not supplied) to insert completely. OPERATION 9 Cassette deck placement Depending on page 11 when making digital connections from the transformer in the receiver. Connect your DVD or LD player. L Connect red plugs to R (right) and white plugs to "Digital Connections" on where the cassette deck is placed, noise...
... you make or change connections. SET UP Connections Audio Components Connections Be sure to switch power to standby and remove the power cord from the receiver. Refer to L (left). Cassette deck 7 Audio cords Use audio cords (not supplied) to insert completely. OPERATION 9 Cassette deck placement Depending on page 11 when making digital connections from the transformer in the receiver. Connect your DVD or LD player. L Connect red plugs to R (right) and white plugs to "Digital Connections" on where the cassette deck is placed, noise...

Operating Instructions
Page 10
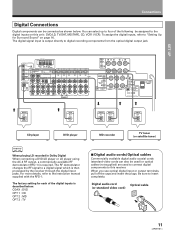
... R SUBWOOFER PREOUT CENTER SPEAKER R L SURROUND SPEAKERS A B CAUTION: SEE INSTRUCTION MANUAL ATTENTION: SEE INSTRUCTION MANUAL 6~LESS THAN 8Ω /SPEAKER 6~MOINS DE 8Ω /HAUTPARLEUR 8~16Ω / SPEAKER 8~16Ω / SPEAKER IMPEDANCE SELECTOR AC OUTLET AC 120V 60Hz 7 Front VIDEO INPUT S-VIDEO VIDEO L AUDIO R Video camera (etc.) VIDEO INPUT L R » OUTPUT V L R TV tuner (or satellite tuner) » OUTPUT V L R DVD player (or LD player) memo When connecting components equipped with S-video jacks, you can be made as shown below. Therefore, the signal from...
... R SUBWOOFER PREOUT CENTER SPEAKER R L SURROUND SPEAKERS A B CAUTION: SEE INSTRUCTION MANUAL ATTENTION: SEE INSTRUCTION MANUAL 6~LESS THAN 8Ω /SPEAKER 6~MOINS DE 8Ω /HAUTPARLEUR 8~16Ω / SPEAKER 8~16Ω / SPEAKER IMPEDANCE SELECTOR AC OUTLET AC 120V 60Hz 7 Front VIDEO INPUT S-VIDEO VIDEO L AUDIO R Video camera (etc.) VIDEO INPUT L R » OUTPUT V L R TV tuner (or satellite tuner) » OUTPUT V L R DVD player (or LD player) memo When connecting components equipped with S-video jacks, you can be made as shown below. Therefore, the signal from...
Operating Instructions
Page 11
... factory setting for Surround Sound" on this receiver. COAX : DVD OPT 1 : CD OPT 2 : MD OPT 3 : TV MD recorder TV tuner (or satellite tuner) 7 Digital audio cords/Optical cables Commercially available digital audio coaxial cords (standard video cords can also be used) or optical cables (not supplied) are used to connect digital components to a digital signal which is output directly to digital recording components from the optical digital output jack. When you use optical digital input or output terminals, pull off the caps and insert the plugs. Digital audio cord Optical cable...
... factory setting for Surround Sound" on this receiver. COAX : DVD OPT 1 : CD OPT 2 : MD OPT 3 : TV MD recorder TV tuner (or satellite tuner) 7 Digital audio cords/Optical cables Commercially available digital audio coaxial cords (standard video cords can also be used) or optical cables (not supplied) are used to connect digital components to a digital signal which is output directly to digital recording components from the optical digital output jack. When you use optical digital input or output terminals, pull off the caps and insert the plugs. Digital audio cord Optical cable...
Operating Instructions
Page 13
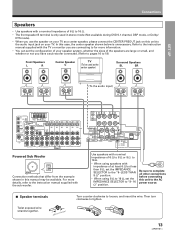
... used as a center speaker, please connect the CENTER PREOUT jack on this unit to the AC power source. 7 Speaker terminals Twist exposed wire strands together. 3/8 in stereo mode (Not available during DVD 5.1 channel, DSP mode, or Dolby/ DTS mode). • When you have a sub woofer connected. (Refer to pages 16 to tighten. 13 For more information. • You can set the IMPEDANCE SELECTOR to the instruction manual supplied with the sub woofer. FRONT PREOUT L R FRONT SPEAKERS R L CENTER PREOUT L SORROUND PREOUT R SUBWOOFER...
... used as a center speaker, please connect the CENTER PREOUT jack on this unit to the AC power source. 7 Speaker terminals Twist exposed wire strands together. 3/8 in stereo mode (Not available during DVD 5.1 channel, DSP mode, or Dolby/ DTS mode). • When you have a sub woofer connected. (Refer to pages 16 to tighten. 13 For more information. • You can set the IMPEDANCE SELECTOR to the instruction manual supplied with the sub woofer. FRONT PREOUT L R FRONT SPEAKERS R L CENTER PREOUT L SORROUND PREOUT R SUBWOOFER...

Operating Instructions
Page 14
...CENTER PREOUT jack if you have already connected a center speaker to the CENTER SPEAKER terminal.) PIONEER projection TV (for center channel) Powered sub woofer Amplifier (for center channel) L-Audio (MONO) (or) AUDIO IN L R » Amplifier (for front channel) AUDIO IN L R » Amplifier (for rear channel) AUDIO IN L R » ANTENNA DIGITAL IN OPT 1 PCM/ /DTS FM UNBAL 75Ω OPT DVD 5.1 CH 2 INPUT OPT 3 SURROUND L SUBWOOFER AM LOOP ANTENNA S2 TO OUT MONITOR TV OPT DIGITAL OUT COAX R IN L PCM/ /DTS DIGITAL IN R CENTER OUT PLAY REC MD/TAPE 1 CONTROL...
...CENTER PREOUT jack if you have already connected a center speaker to the CENTER SPEAKER terminal.) PIONEER projection TV (for center channel) Powered sub woofer Amplifier (for center channel) L-Audio (MONO) (or) AUDIO IN L R » Amplifier (for front channel) AUDIO IN L R » Amplifier (for rear channel) AUDIO IN L R » ANTENNA DIGITAL IN OPT 1 PCM/ /DTS FM UNBAL 75Ω OPT DVD 5.1 CH 2 INPUT OPT 3 SURROUND L SUBWOOFER AM LOOP ANTENNA S2 TO OUT MONITOR TV OPT DIGITAL OUT COAX R IN L PCM/ /DTS DIGITAL IN R CENTER OUT PLAY REC MD/TAPE 1 CONTROL...
Operating Instructions
Page 16
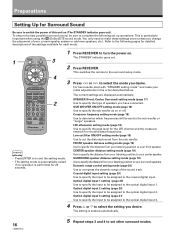
... important when using the (Dolby)/DTS sound mode. Optical digital input 2 setting (page 20) Use to specify the input to be assigned to your front speaker. Preparations Setting Up for rerouted bass frequencies. FQ VOL VOL CHANNEL MULTI CONTROL DVD/LD TV/SAT CD VCR 1 TVCONTROL TUNER VCR 2 RECEIVER MD/TAPE DSP MODE MIDNIGHT 12 34 CH.SELECT TEST TONE ATT SIG.SELECT 56 7 8 CN.LEVEL 90 EFFECT +10 MEMU CLASS TV/VCR FUNCTION DIRECT FL DIMMER MODE CHECK COMMANDER SET UP Î AUDIO/VIDEO PRE-PROGRAMMED REMOTE CONTROL UNIT...
... important when using the (Dolby)/DTS sound mode. Optical digital input 2 setting (page 20) Use to specify the input to be assigned to your front speaker. Preparations Setting Up for rerouted bass frequencies. FQ VOL VOL CHANNEL MULTI CONTROL DVD/LD TV/SAT CD VCR 1 TVCONTROL TUNER VCR 2 RECEIVER MD/TAPE DSP MODE MIDNIGHT 12 34 CH.SELECT TEST TONE ATT SIG.SELECT 56 7 8 CN.LEVEL 90 EFFECT +10 MEMU CLASS TV/VCR FUNCTION DIRECT FL DIMMER MODE CHECK COMMANDER SET UP Î AUDIO/VIDEO PRE-PROGRAMMED REMOTE CONTROL UNIT...

Operating Instructions
Page 22
... operate the respective component. SIGNAL SELECT ANALOG SP A dB 2 MULTI CONTROL DVD/LD TV/SAT CD VCR 1 TVCONTROL TUNER SIGNAL SELECT ANALOG SP A VCR 2 RECEIVER MD/TAPE DSP MODE MIDNIGHT dB 12 34 CH.SELECT TEST TONE ATT SIG.SELECT 56 7 8 CN.LEVEL 90 EFFECT +10 MEMU CLASS TV/VCR FUNCTION DIRECT FL DIMMER To cancel the preset mode Press COMMANDER SET UP. MODE CHECK COMMANDER SET UP Î AUDIO/VIDEO PRE-PROGRAMMED REMOTE CONTROL UNIT 1 2 Press the MULTI CONTROL button for the component you how to recall preset codes...
... operate the respective component. SIGNAL SELECT ANALOG SP A dB 2 MULTI CONTROL DVD/LD TV/SAT CD VCR 1 TVCONTROL TUNER SIGNAL SELECT ANALOG SP A VCR 2 RECEIVER MD/TAPE DSP MODE MIDNIGHT dB 12 34 CH.SELECT TEST TONE ATT SIG.SELECT 56 7 8 CN.LEVEL 90 EFFECT +10 MEMU CLASS TV/VCR FUNCTION DIRECT FL DIMMER To cancel the preset mode Press COMMANDER SET UP. MODE CHECK COMMANDER SET UP Î AUDIO/VIDEO PRE-PROGRAMMED REMOTE CONTROL UNIT 1 2 Press the MULTI CONTROL button for the component you how to recall preset codes...
Operating Instructions
Page 23
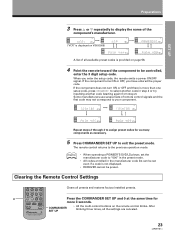
...MODE CHECK COMMANDER SET UP Î AUDIO/VIDEO PRE-PROGRAMMED REMOTE CONTROL UNIT COMMANDER SET UP • All the multi-control buttons on VSX-D508) SIGNAL SELECT ANALOG SP A dB SP A dB SIGNAL SELECT ANALOG SIGNAL SELECT ANALOG SP A dB SP A dB A list of all available preset codes is not displayed. • RECEIVER cannot be controlled, enter the 3 digit setup code. After blinking three times, all presets and restores factory installed presets. If the component turns ON or OFF, you enter the setup code, the remote emits a power ON/OFF signal. CH.SELECT TEST TONE...
...MODE CHECK COMMANDER SET UP Î AUDIO/VIDEO PRE-PROGRAMMED REMOTE CONTROL UNIT COMMANDER SET UP • All the multi-control buttons on VSX-D508) SIGNAL SELECT ANALOG SP A dB SP A dB SIGNAL SELECT ANALOG SIGNAL SELECT ANALOG SP A dB SP A dB A list of all available preset codes is not displayed. • RECEIVER cannot be controlled, enter the 3 digit setup code. After blinking three times, all presets and restores factory installed presets. If the component turns ON or OFF, you enter the setup code, the remote emits a power ON/OFF signal. CH.SELECT TEST TONE...
Operating Instructions
Page 24
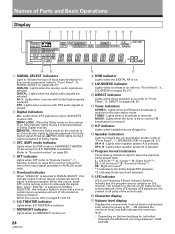
... the auto stereo mode. Names of Parts and Basic Operations Display 1 2 3 4 5 6 78 9 0 -= ~ SIGNAL SELECT ANALOG PRO LOGIC DIGITAL DIGITAL AC-3 L C R DTS LS S RS LFE SFC ATT 5-D THEATER MIDNIGHT DNR DIRECT H.P MONO LOUDNESS STEREO TUNED SP AB dB !@ 1 SIGNAL SELECT indicators Light to indicate the type of input signal selected for the current component (refer to "Front Panel", @, SIGNAL SELECT on the remote control to attenuate the signal. AC-3 : Lights when a source with DTS audio signals is played. 2 Digital indicators dts : Lights when DTS signals are plugged in SIGNAL SELECT...
... the auto stereo mode. Names of Parts and Basic Operations Display 1 2 3 4 5 6 78 9 0 -= ~ SIGNAL SELECT ANALOG PRO LOGIC DIGITAL DIGITAL AC-3 L C R DTS LS S RS LFE SFC ATT 5-D THEATER MIDNIGHT DNR DIRECT H.P MONO LOUDNESS STEREO TUNED SP AB dB !@ 1 SIGNAL SELECT indicators Light to indicate the type of input signal selected for the current component (refer to "Front Panel", @, SIGNAL SELECT on the remote control to attenuate the signal. AC-3 : Lights when a source with DTS audio signals is played. 2 Digital indicators dts : Lights when DTS signals are plugged in SIGNAL SELECT...
Operating Instructions
Page 25
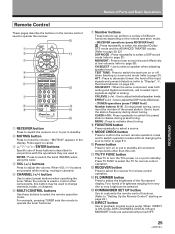
... VOL CHANNEL MULTI CONTROL DVD/LD TV/SAT CD VCR 1 TVCONTROL TUNER VCR 2 RECEIVER MD/TAPE DSP MODE MIDNIGHT 12 34 CH.SELECT TEST TONE ATT SIG.SELECT 56 7 8 CN.LEVEL 90 EFFECT +10 MEMU CLASS TV/VCR FUNCTION DIRECT FL DIMMER MODE CHECK COMMANDER SET UP Î AUDIO/VIDEO PRE-PROGRAMMED REMOTE CONTROL UNIT - = ~ ! @ 1 RECEIVER button Press to switch the receiver on or to put in standby. TEST TONE : Press to switch the test tone on or off when listening to a surround mode (refer to "Display...
... VOL CHANNEL MULTI CONTROL DVD/LD TV/SAT CD VCR 1 TVCONTROL TUNER VCR 2 RECEIVER MD/TAPE DSP MODE MIDNIGHT 12 34 CH.SELECT TEST TONE ATT SIG.SELECT 56 7 8 CN.LEVEL 90 EFFECT +10 MEMU CLASS TV/VCR FUNCTION DIRECT FL DIMMER MODE CHECK COMMANDER SET UP Î AUDIO/VIDEO PRE-PROGRAMMED REMOTE CONTROL UNIT - = ~ ! @ 1 RECEIVER button Press to switch the receiver on or to put in standby. TEST TONE : Press to switch the test tone on or off when listening to a surround mode (refer to "Display...
Operating Instructions
Page 26
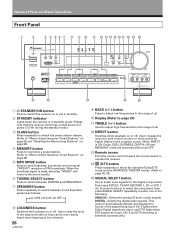
... control circuitry or level control for the digital components. TREBLE (+/-) button Used to select one of Parts and Basic Operations Front Panel 1 2 3 4 56 7 8 9 0 AUDIO/VIDEO MULTI-CHANNEL RECEIVER STANDBY STANDBY/ON MPX CLASS MEMORY MODE STATION TUNING SELECT FREQUENCY / DTS DSP MODE Cinema Re - First press DVD/LD, TV/SAT, MD/TAPE 1, CD or VCR 1 ((, Function buttons) to select the component, then press SIGNAL SELECT repeatedly to adjust high frequencies in the range of the signal being input. EQ SIGNAL SELECT MIDNIGHT DIGITAL NR MASTER VOLUME PHONES SPEAKERS...
... control circuitry or level control for the digital components. TREBLE (+/-) button Used to select one of Parts and Basic Operations Front Panel 1 2 3 4 56 7 8 9 0 AUDIO/VIDEO MULTI-CHANNEL RECEIVER STANDBY STANDBY/ON MPX CLASS MEMORY MODE STATION TUNING SELECT FREQUENCY / DTS DSP MODE Cinema Re - First press DVD/LD, TV/SAT, MD/TAPE 1, CD or VCR 1 ((, Function buttons) to select the component, then press SIGNAL SELECT repeatedly to adjust high frequencies in the range of the signal being input. EQ SIGNAL SELECT MIDNIGHT DIGITAL NR MASTER VOLUME PHONES SPEAKERS...
Operating Instructions
Page 27
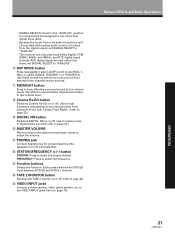
... This receiver can only play back Dolby Digital, PCM (32kHz, 44kHz, and 48kHz), and DTS digital signal formats. Each press switches the DVD/LD input between DVD/LD and DVD 5.1 channel. _ TAPE 2 MONITOR button Switches the TAPE 2 monitor on the desired component, rotate to adjust the volume. * PHONES jack Connect headphones for components not assigned to one of Parts and Basic Operations OPERATION 27 With digital signal formats other than these modes to produce surround sound from the digital output, set SIGNAL SELECT to "ANALOG". # DSP MODE button Press repeatedly to select the preset...
... This receiver can only play back Dolby Digital, PCM (32kHz, 44kHz, and 48kHz), and DTS digital signal formats. Each press switches the DVD/LD input between DVD/LD and DVD 5.1 channel. _ TAPE 2 MONITOR button Switches the TAPE 2 monitor on the desired component, rotate to adjust the volume. * PHONES jack Connect headphones for components not assigned to one of Parts and Basic Operations OPERATION 27 With digital signal formats other than these modes to produce surround sound from the digital output, set SIGNAL SELECT to "ANALOG". # DSP MODE button Press repeatedly to select the preset...
Operating Instructions
Page 29
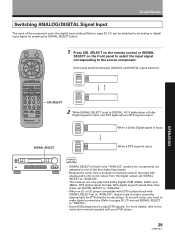
... switches between ANALOG and DIGITAL signal selection. FQ VOL VOL CHANNEL MULTI CONTROL DVD/LD TV/SAT CD VCR 1 TVCONTROL TUNER VCR 2 RECEIVER MD/TAPE DSP MODE MIDNIGHT 12 34 CH.SELECT TEST TONE ATT SIG.SELECT 56 7 8 CN.LEVEL 90 EFFECT +10 MEMU CLASS TV/VCR FUNCTION DIRECT FL DIMMER MODE CHECK COMMANDER SET UP Î AUDIO/VIDEO PRE-PROGRAMMED REMOTE CONTROL UNIT 1 Press SIG. SELECT on the remote control or SIGNAL SELECT on the front panel to select the input signal corresponding to "DIGITAL". • Some DVD players don't output DTS signals...
... switches between ANALOG and DIGITAL signal selection. FQ VOL VOL CHANNEL MULTI CONTROL DVD/LD TV/SAT CD VCR 1 TVCONTROL TUNER VCR 2 RECEIVER MD/TAPE DSP MODE MIDNIGHT 12 34 CH.SELECT TEST TONE ATT SIG.SELECT 56 7 8 CN.LEVEL 90 EFFECT +10 MEMU CLASS TV/VCR FUNCTION DIRECT FL DIMMER MODE CHECK COMMANDER SET UP Î AUDIO/VIDEO PRE-PROGRAMMED REMOTE CONTROL UNIT 1 Press SIG. SELECT on the remote control or SIGNAL SELECT on the front panel to select the input signal corresponding to "DIGITAL". • Some DVD players don't output DTS signals...
Operating Instructions
Page 30
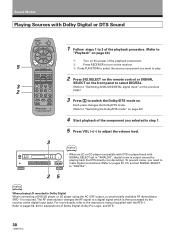
... the remote control or SIGNAL 3 2 VCR 2 RECEIVER MD/TAPE DSP MODE MIDNIGHT 12 34 CH.SELECT TEST TONE ATT SIG.SELECT 56 7 8 CN.LEVEL 90 EFFECT +10 MEMU SELECT on the front panel to select DIGITAL. (Refer to "Switching ANALOG/DIGITAL signal input" on the previous page.) CLASS TV/VCR FUNCTION DIRECT FL DIMMER MODE CHECK COMMANDER SET UP 3 Press to a digital signal which is output caused by the receiver at the digital input jacks. The RF demodulator changes the RF signal to switch the Dolby/DTS mode...
... the remote control or SIGNAL 3 2 VCR 2 RECEIVER MD/TAPE DSP MODE MIDNIGHT 12 34 CH.SELECT TEST TONE ATT SIG.SELECT 56 7 8 CN.LEVEL 90 EFFECT +10 MEMU SELECT on the front panel to select DIGITAL. (Refer to "Switching ANALOG/DIGITAL signal input" on the previous page.) CLASS TV/VCR FUNCTION DIRECT FL DIMMER MODE CHECK COMMANDER SET UP 3 Press to a digital signal which is output caused by the receiver at the digital input jacks. The RF demodulator changes the RF signal to switch the Dolby/DTS mode...
Operating Instructions
Page 31
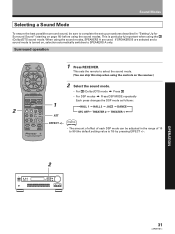
... sets the remote to select the sound mode. (You can be sure to SPEAKERS A only. SET UP Sound Modes Selecting a Sound Mode To ensure the best possible surround sound, be adjusted in "Setting Up for Surround Sound" (starting on the receiver.) ENTER - If SPEAKERS B are used. VOL VOL CHANNEL • For (Dolby)/DTS mode \ Press MULTI CONTROL DVD/LD TV/SAT CD • For DSP modes \ Press DSP MODE repeatedly Each press changes the DSP mode as follows: 2 VCR 1 TVCONTROL TUNER VCR 2 RECEIVER MD/TAPE DSP MODE MIDNIGHT 12 34 CH.SELECT TEST TONE...
... sets the remote to select the sound mode. (You can be sure to SPEAKERS A only. SET UP Sound Modes Selecting a Sound Mode To ensure the best possible surround sound, be adjusted in "Setting Up for Surround Sound" (starting on the receiver.) ENTER - If SPEAKERS B are used. VOL VOL CHANNEL • For (Dolby)/DTS mode \ Press MULTI CONTROL DVD/LD TV/SAT CD • For DSP modes \ Press DSP MODE repeatedly Each press changes the DSP mode as follows: 2 VCR 1 TVCONTROL TUNER VCR 2 RECEIVER MD/TAPE DSP MODE MIDNIGHT 12 34 CH.SELECT TEST TONE...

Operating Instructions
Page 36
... panel to select the band (FM or AM). When using the automatic (search) and manual (step) tuning functions. FQ VOL VOL CHANNEL MULTI CONTROL DVD/LD TV/SAT CD VCR 1 TVCONTROL TUNER VCR 2 RECEIVER MD/TAPE DSP MODE MIDNIGHT 12 34 CH.SELECT TEST TONE ATT SIG.SELECT 56 7 8 CN.LEVEL 90 EFFECT +10 MEMU CLASS TV/VCR FUNCTION DIRECT FL DIMMER MODE CHECK COMMANDER SET UP Î AUDIO/VIDEO PRE-PROGRAMMED REMOTE CONTROL UNIT 3 MPX MODE 2 1 Press FUNCTION repeatedly on the remote...
... panel to select the band (FM or AM). When using the automatic (search) and manual (step) tuning functions. FQ VOL VOL CHANNEL MULTI CONTROL DVD/LD TV/SAT CD VCR 1 TVCONTROL TUNER VCR 2 RECEIVER MD/TAPE DSP MODE MIDNIGHT 12 34 CH.SELECT TEST TONE ATT SIG.SELECT 56 7 8 CN.LEVEL 90 EFFECT +10 MEMU CLASS TV/VCR FUNCTION DIRECT FL DIMMER MODE CHECK COMMANDER SET UP Î AUDIO/VIDEO PRE-PROGRAMMED REMOTE CONTROL UNIT 3 MPX MODE 2 1 Press FUNCTION repeatedly on the remote...

Operating Instructions
Page 37
... FUNCTION DIRECT FL DIMMER 3 SIGNAL SELECT ANALOG SP A dB MODE CHECK COMMANDER SET UP Î AUDIO/VIDEO PRE-PROGRAMMED REMOTE CONTROL UNIT 4 Use the number buttons to select the tuner. RECEIVER TV MUTING FQ TV FUNC + ENTER - VCR 2 RECEIVER MD/TAPE DSP MODE MIDNIGHT The cursor blinks in the display on the front panel to enter the frequency of the station you want. Each press switches the band: FM j AM MULTI CONTROL DVD/LD TV/SAT CD 1 VCR 1 TVCONTROL TUNER 3 Press MENU to the tuner operation mode...
... FUNCTION DIRECT FL DIMMER 3 SIGNAL SELECT ANALOG SP A dB MODE CHECK COMMANDER SET UP Î AUDIO/VIDEO PRE-PROGRAMMED REMOTE CONTROL UNIT 4 Use the number buttons to select the tuner. RECEIVER TV MUTING FQ TV FUNC + ENTER - VCR 2 RECEIVER MD/TAPE DSP MODE MIDNIGHT The cursor blinks in the display on the front panel to enter the frequency of the station you want. Each press switches the band: FM j AM MULTI CONTROL DVD/LD TV/SAT CD 1 VCR 1 TVCONTROL TUNER 3 Press MENU to the tuner operation mode...


