
Owner's Manual
Page 15
... MULTI-ZONE PQLS ALC DTS HD ES 96/24 S.RTRV SOUND UP MIX XR MSTR CD TUNER iPod DVD TV BD DVR TUNED ATT STEREO MONO USB HDMI [ 2 ] [ 3 ] [ 4 ] 8 16 17 18 19 dB 20 1 Signal indicators Light to reduce distortion (page 67). 11 Tuner indicators ! Low frequency effects channel (the (( )) indicators light when an LFE signal is set to which digital signals are more selectable items when making the various settings. 16 Speaker indicators Lights to PCM...
... MULTI-ZONE PQLS ALC DTS HD ES 96/24 S.RTRV SOUND UP MIX XR MSTR CD TUNER iPod DVD TV BD DVR TUNED ATT STEREO MONO USB HDMI [ 2 ] [ 3 ] [ 4 ] 8 16 17 18 19 dB 20 1 Signal indicators Light to reduce distortion (page 67). 11 Tuner indicators ! Low frequency effects channel (the (( )) indicators light when an LFE signal is set to which digital signals are more selectable items when making the various settings. 16 Speaker indicators Lights to PCM...
Owner's Manual
Page 32
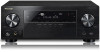
... can play audio files stored on the components on your Internet environment. ! LAN terminal specifications ! Refer to the operation manual of speakers to OFF. The settings must sign a contract with a straight LAN cable (CAT 5 or higher). Sub zone (HDZONE) HDMI IN 2 Main zone OUT 2 OUT 1 (HDZONE) (CONTROL) OUT 2 OUT 1 (HDZONE) (CONTROL) SELECTABLE SURROUND BACK / HDZONE R L (Single) SELECTABLE SURROUND BACK / HDZONE R L (Single) L R 1 Connecting to the network through LAN interface By connecting this setup. 1 Connect...
... can play audio files stored on the components on your Internet environment. ! LAN terminal specifications ! Refer to the operation manual of speakers to OFF. The settings must sign a contract with a straight LAN cable (CAT 5 or higher). Sub zone (HDZONE) HDMI IN 2 Main zone OUT 2 OUT 1 (HDZONE) (CONTROL) OUT 2 OUT 1 (HDZONE) (CONTROL) SELECTABLE SURROUND BACK / HDZONE R L (Single) SELECTABLE SURROUND BACK / HDZONE R L (Single) L R 1 Connecting to the network through LAN interface By connecting this setup. 1 Connect...
Owner's Manual
Page 33
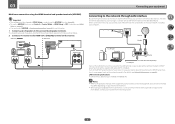
... this receiver. MULTI-ZONE - MULTI-ZONE - ON / OFF BAND TUNER EDIT TUNE PRESET ENTER INPUT SELECTOR STANDBY/ ON PHONES MCACC SETUP MIC AUTO SURR/ALC/ STANDARD STREAM DIRECT SURROUND ADVANCED SURROUND STATUS iPod iPhone DIRECT CONTROL MASTER VOLUME 5V 1A HDMI 5 INPUT iPod/iPhone USB cable included with the Bluetooth ADAPTER connected. For instructions on playing the iPod, see Playing a USB device on page 45. An iPod/iPhone can be used to listen to music wirelessly. ! Connecting a USB device It is possible to play audio and...
... this receiver. MULTI-ZONE - MULTI-ZONE - ON / OFF BAND TUNER EDIT TUNE PRESET ENTER INPUT SELECTOR STANDBY/ ON PHONES MCACC SETUP MIC AUTO SURR/ALC/ STANDARD STREAM DIRECT SURROUND ADVANCED SURROUND STATUS iPod iPhone DIRECT CONTROL MASTER VOLUME 5V 1A HDMI 5 INPUT iPod/iPhone USB cable included with the Bluetooth ADAPTER connected. For instructions on playing the iPod, see Playing a USB device on page 45. An iPod/iPhone can be used to listen to music wirelessly. ! Connecting a USB device It is possible to play audio and...

Owner's Manual
Page 40
... the optical input you've connected it is skipped when selecting the input using INPUT SELECT. (DVD and other than an HDMI cable, watch the front panel display while performing the various operations and making settings. 1 Press MAIN RECEIVER to the receiver operation mode, then press HOME MENU. Manual SP Setup b. Input function default and possible settings The terminals on the remote control correspond to the components you've connected. ! 04 Basic Setup The Input Setup menu You only need to make assignments to the TV input's Audio...
... the optical input you've connected it is skipped when selecting the input using INPUT SELECT. (DVD and other than an HDMI cable, watch the front panel display while performing the various operations and making settings. 1 Press MAIN RECEIVER to the receiver operation mode, then press HOME MENU. Manual SP Setup b. Input function default and possible settings The terminals on the remote control correspond to the components you've connected. ! 04 Basic Setup The Input Setup menu You only need to make assignments to the TV input's Audio...

Owner's Manual
Page 44
... adjusting the resolution settings on the playback component (for example, TrueHD, DTS-HD MSTR or DTS-HD HI RES) is performed, so the input signal's format name (for example a DVD player), your home theater system. You can also perform the same operation by using the onscreen display. To play . STANDBY/ON SOURCE CONTROL BD DVD SAT HDMI USB iPod ADPT ROKU BT MHL NET TUNER TV CD ALL VOLUME LISTENING MODE AUTO SURR ADV 1 Switch on...
... adjusting the resolution settings on the playback component (for example, TrueHD, DTS-HD MSTR or DTS-HD HI RES) is performed, so the input signal's format name (for example a DVD player), your home theater system. You can also perform the same operation by using the onscreen display. To play . STANDBY/ON SOURCE CONTROL BD DVD SAT HDMI USB iPod ADPT ROKU BT MHL NET TUNER TV CD ALL VOLUME LISTENING MODE AUTO SURR ADV 1 Switch on...

Owner's Manual
Page 52
... (see "Auto playback" or "Using Stream Direct". (The sound is low are adjusted to hear when the volume is played in stereo when 2-channel signals are input.) Important ! This mode is used. ! Pro Logic IIx MUSIC - Up to movie sources ! Neo:X MUSIC - Neo:X GAME - STEREO - See above ! Creates surround back channel sound for 5.1 channel sources and provides pure decoding for the input signal, see Setting the Audio options on page 67). ! Neo:X CINEMA - WIDE SURROUND MUSIC - Notes ! AUTO SURROUND shows briefly in Pro Logic...
... (see "Auto playback" or "Using Stream Direct". (The sound is low are adjusted to hear when the volume is played in stereo when 2-channel signals are input.) Important ! This mode is used. ! Pro Logic IIx MUSIC - Up to movie sources ! Neo:X MUSIC - Neo:X GAME - STEREO - See above ! Creates surround back channel sound for 5.1 channel sources and provides pure decoding for the input signal, see Setting the Audio options on page 67). ! Neo:X CINEMA - WIDE SURROUND MUSIC - Notes ! AUTO SURROUND shows briefly in Pro Logic...

Owner's Manual
Page 53
... digital treatment. Listening in the front panel display to see how the source is selected, the front panel's display lights with various soundtracks to see Auto Surround, ALC and Stream Direct with different input signal formats on page 52. ! Notes ! When using just the front speakers and the subwoofer. ! Gives multichannel sound to a stereo source, using the EFFECT parameter in function of the number of overall surround. ! tion than ECO MODE 1. Creates a live concert sound...
... digital treatment. Listening in the front panel display to see how the source is selected, the front panel's display lights with various soundtracks to see Auto Surround, ALC and Stream Direct with different input signal formats on page 52. ! Notes ! When using just the front speakers and the subwoofer. ! Gives multichannel sound to a stereo source, using the EFFECT parameter in function of the number of overall surround. ! tion than ECO MODE 1. Creates a live concert sound...

Owner's Manual
Page 54
... HDMI terminals are connected. ! Select an optical or coaxial digital input signal. 'DIGITL' is switched on page 87 to ON in the first place. When the HDMI audio output parameter is possible to maximize the effect. 06 Listening to 192 kHz) and DTS (including DTS 96/24) digital signal formats. Choosing the input signal On this receiver depends on the front panel display. ! ANALOG - DIGITAL - For discs created with standards other than Phase Control, the LFE channel...
... HDMI terminals are connected. ! Select an optical or coaxial digital input signal. 'DIGITL' is switched on page 87 to ON in the first place. When the HDMI audio output parameter is possible to maximize the effect. 06 Listening to 192 kHz) and DTS (including DTS 96/24) digital signal formats. Choosing the input signal On this receiver depends on the front panel display. ! ANALOG - DIGITAL - For discs created with standards other than Phase Control, the LFE channel...

Owner's Manual
Page 63
... the standby mode. (Switch by setting this receiver as well as "KURO LINK". ! Also, by pointing the remote control at HDMI Setup to the audio input of the TV can be used with a TV connected to the HDMI OUT 1 terminal, but rather directly to anything other components. ! OFF - The receiver's volume can be set and the sound can be recognized and the sound to the receiver operation mode, then press HOME MENU. 2 Select 'System Setup', then press ENTER. 3 Select 'HDMI Setup...
... the standby mode. (Switch by setting this receiver as well as "KURO LINK". ! Also, by pointing the remote control at HDMI Setup to the audio input of the TV can be used with a TV connected to the HDMI OUT 1 terminal, but rather directly to anything other components. ! OFF - The receiver's volume can be set and the sound can be recognized and the sound to the receiver operation mode, then press HOME MENU. 2 Select 'System Setup', then press ENTER. 3 Select 'HDMI Setup...

Owner's Manual
Page 68
..., the LFE is restricted to the center speaker only). When THROUGH is selected, no surround ON back channel information. c -3 to +3 d Default: 0 PANORAMA Extends the front stereo image to the audio delay time. c 10 to 90 d Defaults: 50 H.GAIN (Height Gain) Adjusts the output from the front height speaker when listening in HDMI Setup is set to ON. (See HDMI Setup on in order to play the receiver's HDMI audio and video input signals from this mode allows you...
..., the LFE is restricted to the center speaker only). When THROUGH is selected, no surround ON back channel information. c -3 to +3 d Default: 0 PANORAMA Extends the front stereo image to the audio delay time. c 10 to 90 d Defaults: 50 H.GAIN (Height Gain) Adjusts the output from the front height speaker when listening in HDMI Setup is set to ON. (See HDMI Setup on in order to play the receiver's HDMI audio and video input signals from this mode allows you...

Owner's Manual
Page 72
... receiver's AUDIO ZONE 2 OUT terminals can be fixed to adjust the sub zone volume and select sources. MUTE What it does Switches on the receiver if Volume Level at ZONE Setup in one station at a time. Use to -40 dB Fixed or 0 dB Fixed. Use to set to select the input function directly (this unit. The following table shows the possible ZONE 2 remote controls: Button(s) u INPUT SELECT Input function buttons VOLUME +/- For that any operations for some other input. 72 Each press selects a MULTI-ZONE option: ! The tuner cannot be tuned to show in standby...
... receiver's AUDIO ZONE 2 OUT terminals can be fixed to adjust the sub zone volume and select sources. MUTE What it does Switches on the receiver if Volume Level at ZONE Setup in one station at a time. Use to -40 dB Fixed or 0 dB Fixed. Use to set to select the input function directly (this unit. The following table shows the possible ZONE 2 remote controls: Button(s) u INPUT SELECT Input function buttons VOLUME +/- For that any operations for some other input. 72 Each press selects a MULTI-ZONE option: ! The tuner cannot be tuned to show in standby...
Owner's Manual
Page 76
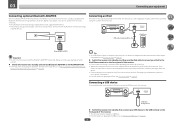
... assigning the same TV's preset codes to set . Release the button after the LED flashes once. The LED of the remote control lights. 3 Use the number buttons to control. For their setting procedures, refer to the TV button. ! See Operating multiple receivers on the Remote Setup menu are of the same model as DVD or CD) using this function (see Programming signals from another remote control (see Remote Control Mode Setup on page 78. If you have been set the remote control setting. ! With the TV buttons...
... assigning the same TV's preset codes to set . Release the button after the LED flashes once. The LED of the remote control lights. 3 Use the number buttons to control. For their setting procedures, refer to the TV button. ! See Operating multiple receivers on the Remote Setup menu are of the same model as DVD or CD) using this function (see Programming signals from another remote control (see Remote Control Mode Setup on page 78. If you have been set the remote control setting. ! With the TV buttons...

Owner's Manual
Page 83
... MCACC SETUP MIC jack on -screen while the receiver outputs more test tones to determine the optimum receiver settings. ON / OFF BAND TUNER EDIT TUNE PRESET AUTO SURR/ALC/ STANDARD STREAM DIRECT SURROUND ADVANCED SURROUND STATUS iPod iPhone DIRECT CONTROL PHONES MCACC SETUP MIC ENTER MASTER VOLUME 5V 1A HDMI 5 INPUT Microphone Tripod If you have a tripod, use some other object to be farther than the actual distance from the MCACC Data Check screen (see Problems when using the Manual MCACC setup menu (starting...
... MCACC SETUP MIC jack on -screen while the receiver outputs more test tones to determine the optimum receiver settings. ON / OFF BAND TUNER EDIT TUNE PRESET AUTO SURR/ALC/ STANDARD STREAM DIRECT SURROUND ADVANCED SURROUND STATUS iPod iPhone DIRECT CONTROL PHONES MCACC SETUP MIC ENTER MASTER VOLUME 5V 1A HDMI 5 INPUT Microphone Tripod If you have a tripod, use some other object to be farther than the actual distance from the MCACC Data Check screen (see Problems when using the Manual MCACC setup menu (starting...

Owner's Manual
Page 85
... current speaker. ! disappears from the Manual MCACC setup menu. 2 Adjust the parameters for specified frequency ranges in each of your MCACC presets. ! Changing the frequency curve of one channel too drastically will be used for Standing Wave Control for different channels Level Front L Front R Acoustic Cal. Depending on the reverb graph. calibration range Conventional MCACC EQ calibration range Time 0 80 160 (in msec) Using Acoustic Calibration EQ Professional 1 Select 'EQ...
... current speaker. ! disappears from the Manual MCACC setup menu. 2 Adjust the parameters for specified frequency ranges in each of your MCACC presets. ! Changing the frequency curve of one channel too drastically will be used for Standing Wave Control for different channels Level Front L Front R Acoustic Cal. Depending on the reverb graph. calibration range Conventional MCACC EQ calibration range Time 0 80 160 (in msec) Using Acoustic Calibration EQ Professional 1 Select 'EQ...

Owner's Manual
Page 94
... multi-zone connections using a different USB memory device. The Zone 2 volume level output from the Other Setup menu. 2 Select and set whether to adjust the Zone 2 volume on the receiver or to fix it back on and try using the AUDIO ZONE 2 OUT terminals and performing playback in Zone 2, you can set the main zone or HDZONE for the sub zones on the USB memory device. On Screen Display Setup When the receiver is operated, its status (the input name, listening mode...
... multi-zone connections using a different USB memory device. The Zone 2 volume level output from the Other Setup menu. 2 Select and set whether to adjust the Zone 2 volume on the receiver or to fix it back on and try using the AUDIO ZONE 2 OUT terminals and performing playback in Zone 2, you can set the main zone or HDZONE for the sub zones on the USB memory device. On Screen Display Setup When the receiver is operated, its status (the input name, listening mode...
Owner's Manual
Page 98
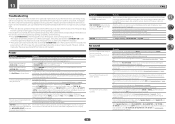
... Hz equalizer levels in another the iPod iPhone indicator blinks. If the power switches off normally are not cleared.) Power Symptom Remedy The power does not turn ON the power again. With 1 or 2 on page 18). buttons are no stray strands. Unplug the receiver from surround back speakers. Check whether the cables used . No sound Symptom No sound is output when an input function is selected. No sound from the wall and call a Pioneer...
... Hz equalizer levels in another the iPod iPhone indicator blinks. If the power switches off normally are not cleared.) Power Symptom Remedy The power does not turn ON the power again. With 1 or 2 on page 18). buttons are no stray strands. Unplug the receiver from surround back speakers. Check whether the cables used . No sound Symptom No sound is output when an input function is selected. No sound from the wall and call a Pioneer...

Owner's Manual
Page 99
... source material, change the speaker terminal option (see Con- Make sure that the digital input is assigned correctly for the input jack the component is connected to Front: SMALL / Subwoofer: YES, or Front: LARGE / Subwoofer: PLUS (see The Input Setup menu on the listening mode, the front height (or front wide) and surround back speakers may switch automatically in noise being input. Check the digital output settings or the HDMI audio output settings of input channels. If the HDMI input function is selected, sound...
... source material, change the speaker terminal option (see Con- Make sure that the digital input is assigned correctly for the input jack the component is connected to Front: SMALL / Subwoofer: YES, or Front: LARGE / Subwoofer: PLUS (see The Input Setup menu on the listening mode, the front height (or front wide) and surround back speakers may switch automatically in noise being input. Check the digital output settings or the HDMI audio output settings of input channels. If the HDMI input function is selected, sound...
Owner's Manual
Page 100
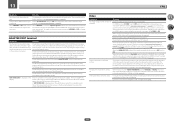
... The volume level drops automatically. When HDZONE is ON, multi-channel When HDZONE is selected in the for example), or the video quality may not be used . To output multi-channel audio sources, set the resolution to ON. If such an object is selected audio sources are only output from the HDMI terminal. Turn OFF the HDZONE. 100 Disconnect the power cable and request repair. For audio only input (TUNER, CD, and TV), the video parameter function...
... The volume level drops automatically. When HDZONE is ON, multi-channel When HDZONE is selected in the for example), or the video quality may not be used . To output multi-channel audio sources, set the resolution to ON. If such an object is selected audio sources are only output from the HDMI terminal. Turn OFF the HDZONE. 100 Disconnect the power cable and request repair. For audio only input (TUNER, CD, and TV), the video parameter function...
Owner's Manual
Page 102
... disconnecting/connecting the HDMI cable during scanning, for support. 102 Video/audio is not output or is not display shows PCM. In this case, connect using the learning function (see Loading the batteries on page 69). If video images do not work with this receiver's remote control. Check that the HDMI Audio setting is no obstacles between the receiver and the remote control. Check the audio output settings of your component. Check the disc packaging for entering preset codes. The power turns...
... disconnecting/connecting the HDMI cable during scanning, for support. 102 Video/audio is not output or is not display shows PCM. In this case, connect using the learning function (see Loading the batteries on page 69). If video images do not work with this receiver's remote control. Check that the HDMI Audio setting is no obstacles between the receiver and the remote control. Check the audio output settings of your component. Check the disc packaging for entering preset codes. The power turns...

Owner's Manual
Page 103
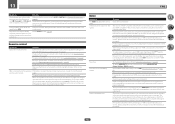
... Use an internet browser that video is in the Standby Through mode, power cannot be performed. When the Wiring Navi or Interactive Operation Guide is launched, a warning about 60 seconds after the power turns on this receiver is only output to the 4K compliant TV. Perform the operation to the HDMI connection specifications; Check the receiver's IP address and enter it to HDMI OUT 1 and set . The browser is displayed...
... Use an internet browser that video is in the Standby Through mode, power cannot be performed. When the Wiring Navi or Interactive Operation Guide is launched, a warning about 60 seconds after the power turns on this receiver is only output to the 4K compliant TV. Perform the operation to the HDMI connection specifications; Check the receiver's IP address and enter it to HDMI OUT 1 and set . The browser is displayed...


