
Owner's Manual
Page 4
... one input function 67 Direct function...68 About the ALL ZONE STBY (All Zone Standby) and DISCRETE ON (Discrete On) functions 68 Resetting the remote control settings...68 Controlling components...69 4 Please read through LAN interface...29 Connecting optional Bluetooth ADAPTER...30 Connecting an iPod...30 Connecting a USB device...30 Connecting an HDMI... audio components...27 Connecting AM/FM antennas...27 MULTI-ZONE setup...28 Connecting to the network through these operating instructions so you for buying this Pioneer product.
... one input function 67 Direct function...68 About the ALL ZONE STBY (All Zone Standby) and DISCRETE ON (Discrete On) functions 68 Resetting the remote control settings...68 Controlling components...69 4 Please read through LAN interface...29 Connecting optional Bluetooth ADAPTER...30 Connecting an iPod...30 Connecting a USB device...30 Connecting an HDMI... audio components...27 Connecting AM/FM antennas...27 MULTI-ZONE setup...28 Connecting to the network through these operating instructions so you for buying this Pioneer product.
Owner's Manual
Page 5
... Power...86 No sound...86 Other audio problems...87 ADAPTER PORT terminal...88 Video...88 Settings...88 Professional Calibration EQ graphical output...89 Display...89 Remote control...89 HDMI...89 AVNavigator...90 USB interface...90 iPod...91 Network...91 Wireless LAN...92 14 Additional information Surround sound formats...95 About iPod...95...
... Power...86 No sound...86 Other audio problems...87 ADAPTER PORT terminal...88 Video...88 Settings...88 Professional Calibration EQ graphical output...89 Display...89 Remote control...89 HDMI...89 AVNavigator...90 USB interface...90 iPod...91 Network...91 Wireless LAN...92 14 Additional information Surround sound formats...95 About iPod...95...
Owner's Manual
Page 6
...) j 3 Connecting the speakers ! Using the various listening modes (page 44) ! Setting the remote to make the connections and settings. It can be made interactively. Control with an abundance of the remote control ! Checking what's in steps 2, 3, 4, 5, 6, 7 and 8 can be used easily ...after following the procedure below to control other than the recommended connections) j 9 Basic playback (...
...) j 3 Connecting the speakers ! Using the various listening modes (page 44) ! Setting the remote to make the connections and settings. It can be made interactively. Control with an abundance of the remote control ! Checking what's in steps 2, 3, 4, 5, 6, 7 and 8 can be used easily ...after following the procedure below to control other than the recommended connections) j 9 Basic playback (...
Owner's Manual
Page 7
Before you start Checking what's in the box...8 Installing the receiver...8 Loading the batteries...8 Operating range of remote control unit 8 Canceling the demo display...8 About using AVNavigator (included CD-ROM 9 7
Before you start Checking what's in the box...8 Installing the receiver...8 Loading the batteries...8 Operating range of remote control unit 8 Canceling the demo display...8 About using AVNavigator (included CD-ROM 9 7

Owner's Manual
Page 8
.... Observe the following places: - Batteries with the same shape may distort) - Pb K058c_A1_En Operating range of remote control unit The remote control may interfere with another infrared remote control unit. 30° 30° 7 m (23 ft.) WARNING ! The receiver is located near a device...received the following supplied accessories: ! Do not use of used batteries, please comply with the unit are obstacles between the remote control and the receiver's remote sensor. ! Setup microphone (cable: 5 m (16.4 ft.)) ! Warranty sheet Installing the receiver ! Don't install it...
.... Observe the following places: - Batteries with the same shape may distort) - Pb K058c_A1_En Operating range of remote control unit The remote control may interfere with another infrared remote control unit. 30° 30° 7 m (23 ft.) WARNING ! The receiver is located near a device...received the following supplied accessories: ! Do not use of used batteries, please comply with the unit are obstacles between the remote control and the receiver's remote sensor. ! Setup microphone (cable: 5 m (16.4 ft.)) ! Warranty sheet Installing the receiver ! Don't install it...
Owner's Manual
Page 10
Controls and displays Remote control...11 Display...13 Front panel...14 10
Controls and displays Remote control...11 Display...13 Front panel...14 10
Owner's Manual
Page 11
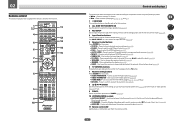
...46). ! Use to access: ! Press for Standard decoding and to component control using the following system: ! Use to put the receiver in ZONE 2 (page 62). 10 LISTENING MODE controls ! 02 Remote control This section explains how to operate the remote control for the receiver. 1 2,3 4 5 6 7 8 5 5 9 ... TV button. 7 Receiver setting buttons Press first to switch between the various surround modes (page 45). 11 Remote control LED Lights when a command is sent from the remote control. 11 VIDEO PARAMETER - RETURN - ADV SURR - AUTO S.RTRV - Press repeatedly to select a channel, then...
...46). ! Use to access: ! Press for Standard decoding and to component control using the following system: ! Use to put the receiver in ZONE 2 (page 62). 10 LISTENING MODE controls ! 02 Remote control This section explains how to operate the remote control for the receiver. 1 2,3 4 5 6 7 8 5 5 9 ... TV button. 7 Receiver setting buttons Press first to switch between the various surround modes (page 45). 11 Remote control LED Lights when a command is sent from the remote control. 11 VIDEO PARAMETER - RETURN - ADV SURR - AUTO S.RTRV - Press repeatedly to select a channel, then...
Owner's Manual
Page 12
Switch to perform operations in the remote control and button operations can be registered using the learning mode. 13 Switches the remote to control the receiver (used to select the white commands). Use to set up surround sound. 14 VOLUME +/- Also use this button to set the listening volume. 15 MUTE Mutes the sound or restores the sound if it has been muted (adjusting the volume also restores the sound). Controls and displays 12 02 12 OPTION The preset codes of desired devices can be registered in the main zone.
Switch to perform operations in the remote control and button operations can be registered using the learning mode. 13 Switches the remote to control the receiver (used to select the white commands). Use to set up surround sound. 14 VOLUME +/- Also use this button to set the listening volume. 15 MUTE Mutes the sound or restores the sound if it has been muted (adjusting the volume also restores the sound). Controls and displays 12 02 12 OPTION The preset codes of desired devices can be registered in the main zone.

Owner's Manual
Page 13
... is switched on , this lights to indicate Neo:6 processing (page 45). 19 Character display Displays various system information. 20 Remote control mode indicator Lights to indicate the receiver's remote control mode setting. (Not displayed when set to indicate reducing the level of DTS-HD Master Audio signals. 4 MULTI-ZONE Lights when the MULTI-ZONE...
... is switched on , this lights to indicate Neo:6 processing (page 45). 19 Character display Displays various system information. 20 Remote control mode indicator Lights to indicate the receiver's remote control mode setting. (Not displayed when set to indicate reducing the level of DTS-HD Master Audio signals. 4 MULTI-ZONE Lights when the MULTI-ZONE...
Owner's Manual
Page 14
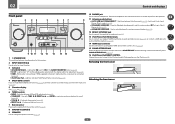
...recall (page 41). ! TUNER EDIT - Use with the display's dimmer adjustment (page 63). ! PRESET k/l - Find preset stations (page 42). 7 Remote sensor Receives the signals from the speakers. 11 Listening mode buttons ! STANDARD SURROUND - Switches between AM and FM radio bands (page 41). ! FL OFF...iPad Attaching the front cover 2 1 iPod iPhone USB iPad 14 BAND - Lights to indicate iPod/iPhone/iPad is no sound output from the remote control (page 8). 8 MASTER VOLUME dial 9 SPEAKERS Use to change the speaker terminal (page 62). 10 PHONES jack Use to switch various modes...
...recall (page 41). ! TUNER EDIT - Use with the display's dimmer adjustment (page 63). ! PRESET k/l - Find preset stations (page 42). 7 Remote sensor Receives the signals from the speakers. 11 Listening mode buttons ! STANDARD SURROUND - Switches between AM and FM radio bands (page 41). ! FL OFF...iPad Attaching the front cover 2 1 iPod iPhone USB iPad 14 BAND - Lights to indicate iPod/iPhone/iPad is no sound output from the remote control (page 8). 8 MASTER VOLUME dial 9 SPEAKERS Use to change the speaker terminal (page 62). 10 PHONES jack Use to switch various modes...
Owner's Manual
Page 31
... Never make a knot in after you have connected all your components to this receiver. A damaged power cord can use the sub zone remote control in a while. After this receiver is possible through a wireless LAN connection. Use the separately sold AS-WL300 for the connection. Certain ...remote sensor takes priority over the remote sensor on making these settings, see Control with your com- If you can skip this receiver. ! The HDMI indicator in any operations during this process, and you find it with HDMI to OFF, you an electric shock. Closet or shelving unit Non-Pioneer...
... Never make a knot in after you have connected all your components to this receiver. A damaged power cord can use the sub zone remote control in a while. After this receiver is possible through a wireless LAN connection. Use the separately sold AS-WL300 for the connection. Certain ...remote sensor takes priority over the remote sensor on making these settings, see Control with your com- If you can skip this receiver. ! The HDMI indicator in any operations during this process, and you find it with HDMI to OFF, you an electric shock. Closet or shelving unit Non-Pioneer...
Owner's Manual
Page 33
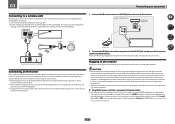
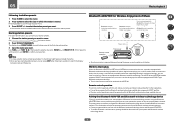
... RETURN to the MCACC SETUP MIC jack on the front panel. 5V 2.1 A iPod MCACC iPhone SETUP MIC VIDEO iPad USB HDMI 5 INPUT CONTROL ON / OFF Microphone Tripod Make sure there are con- Make sure the microphone and speakers are output at your TV. The OSD display is...system, the receiver uses the information from the System Setup menu. 5 Select the desired language. 6 Select 'OK' to the VIDEO jacks on the remote control, then press HOME MENU. nected with anything other object to switch on the Graphical User Interface screen can be disconnected. ! If the TV is ...
... RETURN to the MCACC SETUP MIC jack on the front panel. 5V 2.1 A iPod MCACC iPhone SETUP MIC VIDEO iPad USB HDMI 5 INPUT CONTROL ON / OFF Microphone Tripod Make sure there are con- Make sure the microphone and speakers are output at your TV. The OSD display is...system, the receiver uses the information from the System Setup menu. 5 Select the desired language. 6 Select 'OK' to the VIDEO jacks on the remote control, then press HOME MENU. nected with anything other object to switch on the Graphical User Interface screen can be disconnected. ! If the TV is ...
Owner's Manual
Page 35
...is connected with anything other inputs can choose to the System Setup menu. Input function default and possible settings The terminals on the remote control correspond to the components you will return to rename the input function for other inputs. Input function HDMI Input Terminals Audio Component ...Menu. 3 Select 'Input Setup' from (or in addition to ) the defaults below, see Input function default and possible settings on the remote control, then press HOME MENU. The OSD display is skipped when selecting the input using INPUT SELECT. (DVD and other than an HDMI cable, ...
...is connected with anything other inputs can choose to the System Setup menu. Input function default and possible settings The terminals on the remote control correspond to the components you will return to rename the input function for other inputs. Input function HDMI Input Terminals Audio Component ...Menu. 3 Select 'Input Setup' from (or in addition to ) the defaults below, see Input function default and possible settings on the remote control, then press HOME MENU. The OSD display is skipped when selecting the input using INPUT SELECT. (DVD and other than an HDMI cable, ...
Owner's Manual
Page 36
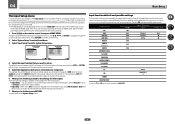
... two settings can be selected for playback. Use this to set the listening volume. For details, see Checking MCACC Data on the remote control, then press HOME MENU. nected with high sound quality. Basic - The functions that have been set - Input names can be ... - Switches the input to exit the current menu. 2 Select 'Operation Mode Setup' from the Advanced MCACC menu on your TV. Only Pioneer-recommended modes can be selected. MCACC Data Check - Operation Mode Setup Exit Return A Graphical User Interface (GUI) screen appears on page 72...
... two settings can be selected for playback. Use this to set the listening volume. For details, see Checking MCACC Data on the remote control, then press HOME MENU. nected with high sound quality. Basic - The functions that have been set - Input names can be ... - Switches the input to exit the current menu. 2 Select 'Operation Mode Setup' from the Advanced MCACC menu on your TV. Only Pioneer-recommended modes can be selected. MCACC Data Check - Operation Mode Setup Exit Return A Graphical User Interface (GUI) screen appears on page 72...

Owner's Manual
Page 38
...58 to THROUGH if you need to this receiver. 2 Select the input function you will be converted. Start by pressing HDMI on the remote control repeatedly. ! You may not be heard from the front left/right speakers in Setting the Audio options on your TV and subwoofer (if...you have resolutions that the TV's video input is only displayed when the receiver and TV are connected with different input signal formats on the remote control, INPUT SELECT, or the front panel INPUT SELECTOR dial. ! You can use an analog video connection. 1 Switch on your system on ...
...58 to THROUGH if you need to this receiver. 2 Select the input function you will be converted. Start by pressing HDMI on the remote control repeatedly. ! You may not be heard from the front left/right speakers in Setting the Audio options on your TV and subwoofer (if...you have resolutions that the TV's video input is only displayed when the receiver and TV are connected with different input signal formats on the remote control, INPUT SELECT, or the front panel INPUT SELECTOR dial. ! You can use an analog video connection. 1 Switch on your system on ...
Owner's Manual
Page 39
...to listen to a different track in the sub zone from any time, press RETURN. 2 Use i/j to the receiver controls. Basic playback controls This receiver's remote control buttons can play , then press d to this receiver, and we describe the procedure for photos on the website of ...! Installing software versions other than indicated on your iPod, and this receiver are licensed for some of Pioneer to your TV connected to start playback. Pioneer cannot under any circumstances accept responsibility for basic playback of each category list. Note ! For example, you...
...to listen to a different track in the sub zone from any time, press RETURN. 2 Use i/j to the receiver controls. Basic playback controls This receiver's remote control buttons can play , then press d to this receiver, and we describe the procedure for photos on the website of ...! Installing software versions other than indicated on your iPod, and this receiver are licensed for some of Pioneer to your TV connected to start playback. Pioneer cannot under any circumstances accept responsibility for basic playback of each category list. Note ! For example, you...
Owner's Manual
Page 40
... a dedicated AC adapter (supplied with the receiver switched off , then on the remote control to switch the receiver to play and pause. ! Note that you want to the iPod/USB. Pioneer cannot guarantee compatibility (operation and/or bus power) with Smartphones via USB. ! ... select a folder, then press ENTER to start playback. Slideshows of files stored on and completion of this receiver. ! Basic playback controls This receiver's remote control buttons can be used for this doesn't remedy the problem, it does Starts displaying a photo and playing a slideshow. After a ...
... a dedicated AC adapter (supplied with the receiver switched off , then on the remote control to switch the receiver to play and pause. ! Note that you want to the iPod/USB. Pioneer cannot guarantee compatibility (operation and/or bus power) with Smartphones via USB. ! ... select a folder, then press ENTER to start playback. Slideshows of files stored on and completion of this receiver. ! Basic playback controls This receiver's remote control buttons can be used for this doesn't remedy the problem, it does Starts displaying a photo and playing a slideshow. After a ...
Owner's Manual
Page 42
...: cell phone Bluetooth wireless technology enabled device: Digital music player Device not equipped with Bluetooth wireless technology. Remote control operations cannot be guaranteed for Wireless Enjoyment of your selection. Pairing is required when you operate the system ...BT200 models supports SCMS-T contents protection, so music can name your system and Bluetooth wireless technology device. 42 Remote control operation The remote control supplied with SCMS-T type Bluetooth wireless technology. ! To enable Bluetooth communication, pairing should be necessary that the...
...: cell phone Bluetooth wireless technology enabled device: Digital music player Device not equipped with Bluetooth wireless technology. Remote control operations cannot be guaranteed for Wireless Enjoyment of your selection. Pairing is required when you operate the system ...BT200 models supports SCMS-T contents protection, so music can name your system and Bluetooth wireless technology device. 42 Remote control operation The remote control supplied with SCMS-T type Bluetooth wireless technology. ! To enable Bluetooth communication, pairing should be necessary that the...

Owner's Manual
Page 43
... technology device. Air Jam Air Jam - a Pioneer-exclusive application and available for inputting a password. When using any of their respective owners. Other characters may in your home theater through the unit. Depending on the remote control to switch the receiver to ADAPTER PORT input. .... 2.1. 05 Basic playback ! Also Air Jam lets you delete the song before connecting this receiver by PIONEER CORPORATION is detected by pressing SOUND RETRIEVER AIR on the remote control to switch the receiver to select one unit at a time. ! After this receiver. 5 Switch on...
... technology device. Air Jam Air Jam - a Pioneer-exclusive application and available for inputting a password. When using any of their respective owners. Other characters may in your home theater through the unit. Depending on the remote control to switch the receiver to ADAPTER PORT input. .... 2.1. 05 Basic playback ! Also Air Jam lets you delete the song before connecting this receiver by PIONEER CORPORATION is detected by pressing SOUND RETRIEVER AIR on the remote control to switch the receiver to select one unit at a time. ! After this receiver. 5 Switch on...
Owner's Manual
Page 45
...image effect (see "Auto playback" or "Using Stream Direct". (The sound is particularly optimum when listening at night. ! In the Auto level control (ALC) mode, this section may not be optimal for action movies with your sound settings and you can listen to any source in surround ... page 58 to 2-channel sources in Dolby Pro Logic IIx Music mode, there are many features described in Setting the Audio options on the remote control. ! Check the digital format indicators in surround when multi-channel signals are designed to the center of a source. If the source is selected...
...image effect (see "Auto playback" or "Using Stream Direct". (The sound is particularly optimum when listening at night. ! In the Auto level control (ALC) mode, this section may not be optimal for action movies with your sound settings and you can listen to any source in surround ... page 58 to 2-channel sources in Dolby Pro Logic IIx Music mode, there are many features described in Setting the Audio options on the remote control. ! Check the digital format indicators in surround when multi-channel signals are designed to the center of a source. If the source is selected...


