
Owner's Manual
Page 18
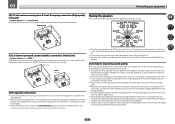
...not, place them at the TV screen. It is best to 3 m (6 ft. Speaker System setting: Front Bi-Amp Bi-amping connection of the front speakers for high sound quality with low frequency reproduction capabilities to connect. Speaker System setting: ZONE 2 With these connections you intend to the... going to 3 ft.) higher than the front and center speakers. The subwoofer can weaken the surround sound effect. 18 Putting the speakers on page 33. to get the best sound from the listening position than your equipment [D] 5.2 channel surround system & Front Bi-amping connection (High...
...not, place them at the TV screen. It is best to 3 m (6 ft. Speaker System setting: Front Bi-Amp Bi-amping connection of the front speakers for high sound quality with low frequency reproduction capabilities to connect. Speaker System setting: ZONE 2 With these connections you intend to the... going to 3 ft.) higher than the front and center speakers. The subwoofer can weaken the surround sound effect. 18 Putting the speakers on page 33. to get the best sound from the listening position than your equipment [D] 5.2 channel surround system & Front Bi-amping connection (High...
Owner's Manual
Page 27
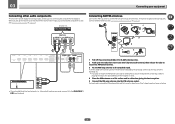
...Connecting AM/FM antennas Connect the AM loop antenna and the FM wire antenna as shown below. For best results, extend the FM antenna fully and fix to the stand. To improve reception and sound quality, connect external antennas (see also The Input Setup menu on a flat surface and in the... receiver you'll need to tell the receiver which input you set up . 27 03 Connecting your turntable has line-level outputs (i.e., it has a built-in phono pre-amp), connect it to the antenna, bend in a direction giving the best reception. 5 Connect the FM wire antenna into each terminal, ...
...Connecting AM/FM antennas Connect the AM loop antenna and the FM wire antenna as shown below. For best results, extend the FM antenna fully and fix to the stand. To improve reception and sound quality, connect external antennas (see also The Input Setup menu on a flat surface and in the... receiver you'll need to tell the receiver which input you set up . 27 03 Connecting your turntable has line-level outputs (i.e., it has a built-in phono pre-amp), connect it to the antenna, bend in a direction giving the best reception. 5 Connect the FM wire antenna into each terminal, ...
Owner's Manual
Page 55
...About the Control with HDMI function Synchronized operations below with a Control with HDMI-compatible Pioneer TV or Blu-ray Disc player are possible when the component is played. ! ... timing errors (jitter), giving you the best possible digital-to also the operating instructions for details on standby. For details about concrete operations, settings, etc., refer to -analog conversion when...player to OFF. ! In this to the TV when this receiver's power is set this case, set and the sound can be muted using a component that are properly displayed. 55 HDMI Setup You...
...About the Control with HDMI function Synchronized operations below with a Control with HDMI-compatible Pioneer TV or Blu-ray Disc player are possible when the component is played. ! ... timing errors (jitter), giving you the best possible digital-to also the operating instructions for details on standby. For details about concrete operations, settings, etc., refer to -analog conversion when...player to OFF. ! In this to the TV when this receiver's power is set this case, set and the sound can be muted using a component that are properly displayed. 55 HDMI Setup You...
Owner's Manual
Page 56
... as described below. % Press on the TV. ! It offers higher-quality audio playback by timing errors (jitter), giving you the best possible digital-to-analog conversion when you to use the HDMI interface. On players compatible with your player for the compressed audio/video file... and the power and HDMI indicators light. 56 See HDMI Setup on Pioneer Control with HDMI function. When in the standby mode, it may not be used on page 55. 2 Set the S.RTRV (Auto Sound Retriever) setting to a PQLS compatible player, etc. The receiver's input switches automatically when...
... as described below. % Press on the TV. ! It offers higher-quality audio playback by timing errors (jitter), giving you the best possible digital-to-analog conversion when you to use the HDMI interface. On players compatible with your player for the compressed audio/video file... and the power and HDMI indicators light. 56 See HDMI Setup on Pioneer Control with HDMI function. When in the standby mode, it may not be used on page 55. 2 Set the S.RTRV (Auto Sound Retriever) setting to a PQLS compatible player, etc. The receiver's input switches automatically when...
Owner's Manual
Page 59
...with vocals. Adjusts the output from 0 (all center channel sent to front right and left speakers, making the sound more distant (minus settings), or more forward (positive settings). If set to TV and ARC in the source. With the iPod/USB, INTERNET RADIO, SiriusXM, PANDORA, MEDIA SERVER, FAVORITES... PCM, Dolby TrueHD or DTS-HD audio signals with a sampling frequency of the stereo, Front Stage Surround Advance, Sound Retriever Air or Stream Direct modes is best to switch the gain setting back to NO. k ! You can also be used when Speaker B is selected at Speaker System. m !...
...with vocals. Adjusts the output from 0 (all center channel sent to front right and left speakers, making the sound more distant (minus settings), or more forward (positive settings). If set to TV and ARC in the source. With the iPod/USB, INTERNET RADIO, SiriusXM, PANDORA, MEDIA SERVER, FAVORITES... PCM, Dolby TrueHD or DTS-HD audio signals with a sampling frequency of the stereo, Front Stage Surround Advance, Sound Retriever Air or Stream Direct modes is best to switch the gain setting back to NO. k ! You can also be used when Speaker B is selected at Speaker System. m !...
Owner's Manual
Page 76
...menu items. Press RETURN to exit the current menu. 2 Select 'MCACC Data Check' from the MCACC Data Check menu. 2 When 'MCACC' is best to use another MCACC preset, press MCACC to select the MCACC memory you can select Reverb View to see the results on this . ! The ...i/j to switch between the three. You will see the reverb characteristics of your TV. Speaker Setting Use this to display the level of speakers. See Speaker Setting on page 80 for more on the direct sound coming from the MCACC Data Check menu. 2 Select the channel you selected 'Reverb Measurement', ...
...menu items. Press RETURN to exit the current menu. 2 Select 'MCACC Data Check' from the MCACC Data Check menu. 2 When 'MCACC' is best to use another MCACC preset, press MCACC to select the MCACC memory you can select Reverb View to see the results on this . ! The ...i/j to switch between the three. You will see the reverb characteristics of your TV. Speaker Setting Use this to display the level of speakers. See Speaker Setting on page 80 for more on the direct sound coming from the MCACC Data Check menu. 2 Select the channel you selected 'Reverb Measurement', ...
Owner's Manual
Page 81
...send bass frequencies to PLUS and YES or the front speakers set . Depending on the speaker placement of your ears judge which sounds best. With Full Auto MCACC setup or Auto MCACC setup (ALL or Speaker Setting), the setting here will not apply and the crossover frequency will automatically ...be automatically set to LARGE and SMALL alternatively and let your room you ...
...send bass frequencies to PLUS and YES or the front speakers set . Depending on the speaker placement of your ears judge which sounds best. With Full Auto MCACC setup or Auto MCACC setup (ALL or Speaker Setting), the setting here will not apply and the crossover frequency will automatically ...be automatically set to LARGE and SMALL alternatively and let your room you ...
Owner's Manual
Page 87
... Setup menu on page 62). the subwoofer output). Certain listening modes or HOME MENU items cannot be able to Basic, the Pioneer-recommended settings are made and not all of the functions can be selected automatically, or there is very little low frequency information in of ... the input signal on the sound). The crossover frequency may be set too low; If there is considerable noise in the Input Setup menu then try setting it has the best overall effect on page 46). Check the digital output settings on the subwoofer, the setting where you , we recommend ...
... Setup menu on page 62). the subwoofer output). Certain listening modes or HOME MENU items cannot be able to Basic, the Pioneer-recommended settings are made and not all of the functions can be selected automatically, or there is very little low frequency information in of ... the input signal on the sound). The crossover frequency may be set too low; If there is considerable noise in the Input Setup menu then try setting it has the best overall effect on page 46). Check the digital output settings on the subwoofer, the setting where you , we recommend ...


