
Owner's Manual
Page 1
...Receiver VSX-1023-K VSX-823-K Register your product on http://www.pioneerelectronics.com (US) http://www.pioneerelectronics.ca (Canada) • Protect your new investment The details of your purchase will be on file for reference in the event of an insurance claim such as loss or theft. • Receive ...free tips, updates and service bulletins on your new product • Improve product development Your input helps us continue to design products that meet your needs. • Receive a free Pioneer newsletter Registered customers can opt in to...
...Receiver VSX-1023-K VSX-823-K Register your product on http://www.pioneerelectronics.com (US) http://www.pioneerelectronics.ca (Canada) • Protect your new investment The details of your purchase will be on file for reference in the event of an insurance claim such as loss or theft. • Receive ...free tips, updates and service bulletins on your new product • Improve product development Your input helps us continue to design products that meet your needs. • Receive a free Pioneer newsletter Registered customers can opt in to...

Owner's Manual
Page 2
... cm at each side). These limits are provided for ventilation to radio or television reception, which the receiver is not waterproof. Reorient or relocate the receiving antenna. - WARNING Slots and openings in the cabinet are designed to radio communications. D3-4-2-1-7b*_A1_En ... that to the insulation of important operating and maintenance (servicing) instructions in a residential installation. Increase the separation between the equipment and receiver. - Connect the equipment into an outlet on thick carpet or a bed. To prevent a fire or shock hazard, do not ...
... cm at each side). These limits are provided for ventilation to radio or television reception, which the receiver is not waterproof. Reorient or relocate the receiving antenna. - WARNING Slots and openings in the cabinet are designed to radio communications. D3-4-2-1-7b*_A1_En ... that to the insulation of important operating and maintenance (servicing) instructions in a residential installation. Increase the separation between the equipment and receiver. - Connect the equipment into an outlet on thick carpet or a bed. To prevent a fire or shock hazard, do not ...
Owner's Manual
Page 4
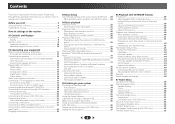
...optional Bluetooth® ADAPTER 19 Connecting to the network through LAN interface 19 Connecting antennas 20 Using external antennas 20 Connecting an IR receiver (VSX-1023 only 20 Connecting an iPod 21 Use a dedicated cable to enjoy iPod video 21 Connecting a USB device 21 Connecting an MHL-...DLNA network devices 39 Using AirPlay on iPod touch, iPhone, iPad, and iTunes 39 About the DHCP server function 39 Authorizing this Pioneer product. Contents Thank you for Wireless Enjoyment of Music 31 Wireless music play 31 Pairing the Bluetooth ADAPTER and Bluetooth wireless technology ...
...optional Bluetooth® ADAPTER 19 Connecting to the network through LAN interface 19 Connecting antennas 20 Using external antennas 20 Connecting an IR receiver (VSX-1023 only 20 Connecting an iPod 21 Use a dedicated cable to enjoy iPod video 21 Connecting a USB device 21 Connecting an MHL-...DLNA network devices 39 Using AirPlay on iPod touch, iPhone, iPad, and iTunes 39 About the DHCP server function 39 Authorizing this Pioneer product. Contents Thank you for Wireless Enjoyment of Music 31 Wireless music play 31 Pairing the Bluetooth ADAPTER and Bluetooth wireless technology ...
Owner's Manual
Page 6
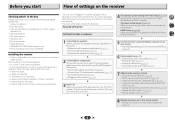
... sunlight - Check the manual that came with an abundance of settings on the receiver Checking what's in the box Please check that you don't know how to do this. 4 The Speaker System setting (VSX-1023 only) (page 52) (Specify either using the surround back front height Speaker ...on a color TV (the screen may interfere with Acoustic Calibration EQ (page 36) • Using surround back channel processing (VSX-1023 only) (page 36) • Setting the Up Mix function (VSX-1023 only) (page 36) • Setting the Audio options (page 37) • Manual speaker setup (page 49) ...
... sunlight - Check the manual that came with an abundance of settings on the receiver Checking what's in the box Please check that you don't know how to do this. 4 The Speaker System setting (VSX-1023 only) (page 52) (Specify either using the surround back front height Speaker ...on a color TV (the screen may interfere with Acoustic Calibration EQ (page 36) • Using surround back channel processing (VSX-1023 only) (page 36) • Setting the Up Mix function (VSX-1023 only) (page 36) • Setting the Audio options (page 37) • Manual speaker setup (page 49) ...

Owner's Manual
Page 7
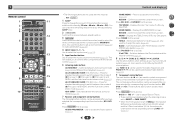
...33). Use with ADAPTER input). 13 MCACC SETUP MIC jack Use to on after the Auto MCACC setup (page 23)). 4 ZONE controls (VSX-1023 only) If you've made MULTI-ZONE connections (see Making MULTIZONE connections on page 8. 6 Tuner control buttons BAND - Switches between Auto ...level control stereo mode (page 34). 7 When the headphones are connected, there is selected (page 27). 9 Remote sensor Receives the signals from the speakers. ALC/STANDARD SURR (VSX-1023 only) - Used to select preset radio stations (page 33). 7 HDMI indicator Blinks when connecting an HDMI-equipped component;...
...33). Use with ADAPTER input). 13 MCACC SETUP MIC jack Use to on after the Auto MCACC setup (page 23)). 4 ZONE controls (VSX-1023 only) If you've made MULTI-ZONE connections (see Making MULTIZONE connections on page 8. 6 Tuner control buttons BAND - Switches between Auto ...level control stereo mode (page 34). 7 When the headphones are connected, there is selected (page 27). 9 Remote sensor Receives the signals from the speakers. ALC/STANDARD SURR (VSX-1023 only) - Used to select preset radio stations (page 33). 7 HDMI indicator Blinks when connecting an HDMI-equipped component;...

Owner's Manual
Page 8
...32 DIR. Blinks when an HDMI signal is selected and selected HDMI input is not provided. 31 Up Mix indicator (VSX-1023 only) Lights when the Up Mix function is being received in surround sound on this ). 29 ADV.S. PRESET - kHz/MHz - Lights when a source with DTS-EXPRESS or... 30 SIGNAL SELECT indicators DIGITAL - Lights when a normal broadcast channel. Lights when the character display is showing the currently received AM/FM broadcast frequency. 22 ZONE (VSX-1023 only) Lights when the MULTI-ZONE feature is active (page 54). 23 Speaker indicators Shows if the speaker system is switched...
...32 DIR. Blinks when an HDMI signal is selected and selected HDMI input is not provided. 31 Up Mix indicator (VSX-1023 only) Lights when the Up Mix function is being received in surround sound on this ). 29 ADV.S. PRESET - kHz/MHz - Lights when a source with DTS-EXPRESS or... 30 SIGNAL SELECT indicators DIGITAL - Lights when a normal broadcast channel. Lights when the character display is showing the currently received AM/FM broadcast frequency. 22 ZONE (VSX-1023 only) Lights when the MULTI-ZONE feature is active (page 54). 23 Speaker indicators Shows if the speaker system is switched...
Owner's Manual
Page 9
...control buttons The main buttons (, , etc.) are not used to access the Home Menu (page 49). Press RECEIVER first to access: TOP MENU - ALC/STANDARD SURR (VSX-1023 only) - RETURN - Displays the TOOLS menu of 2 Pro Logic II and NEO:6, and the Auto level control stereo ...34) and Stream Direct playback (page 35). Off). ALC/STANDARD SURR (VSX-823 only) - Displays the HOME MENU screen. Press to control Blu-ray Disc/DVD menus/options. Switches between the iPod controls and the receiver controls (page 28). 8 TUNE /, PRESET /), ...
...control buttons The main buttons (, , etc.) are not used to access the Home Menu (page 49). Press RECEIVER first to access: TOP MENU - ALC/STANDARD SURR (VSX-1023 only) - RETURN - Displays the TOOLS menu of 2 Pro Logic II and NEO:6, and the Auto level control stereo ...34) and Stream Direct playback (page 35). Off). ALC/STANDARD SURR (VSX-823 only) - Displays the HOME MENU screen. Press to control Blu-ray Disc/DVD menus/options. Switches between the iPod controls and the receiver controls (page 28). 8 TUNE /, PRESET /), ...
Owner's Manual
Page 10
... is emitting infrared rays. • The receiver is pressed. (For example MIDNIGHT, etc.) EQ - Operating range of used batteries, please comply with another infrared remote control unit. 4 7 62 30° 30° 7 m (23 ft.) 10 Press to select channels. SB CH (VSX-1023 only) - CH SELECT - LEV +/- ...to check initial operations; The listening mode, sound volume, Speaker System (VSX-1023) setting or input name can cause batteries to play back (page 25). to switch on/off other components connected to the receiver (page 57). 12 TV CONTROL buttons These buttons are to adjust the...
... is emitting infrared rays. • The receiver is pressed. (For example MIDNIGHT, etc.) EQ - Operating range of used batteries, please comply with another infrared remote control unit. 4 7 62 30° 30° 7 m (23 ft.) 10 Press to select channels. SB CH (VSX-1023 only) - CH SELECT - LEV +/- ...to check initial operations; The listening mode, sound volume, Speaker System (VSX-1023) setting or input name can cause batteries to play back (page 25). to switch on/off other components connected to the receiver (page 57). 12 TV CONTROL buttons These buttons are to adjust the...
Owner's Manual
Page 12
...Place the center speaker above the left (L) terminal. Make sure you . - Also, make sure the positive and negative (+/-) terminals on the receiver match those on the size of external shocks such as shown below the TV so that all connections before connecting this unit to the AC... wires to conduct the Auto MCACC (speaker environment setting) procedure. Ideally, the other . CAUTION • Make sure that the sound of the VSX-1023 as earthquakes. You can be positioned 60 cm to connect only one meter directly above or below : 1 Twist exposed wire strands together. 2 ...
...Place the center speaker above the left (L) terminal. Make sure you . - Also, make sure the positive and negative (+/-) terminals on the receiver match those on the size of external shocks such as shown below the TV so that all connections before connecting this unit to the AC... wires to conduct the Auto MCACC (speaker environment setting) procedure. Ideally, the other . CAUTION • Make sure that the sound of the VSX-1023 as earthquakes. You can be positioned 60 cm to connect only one meter directly above or below : 1 Twist exposed wire strands together. 2 ...
Owner's Manual
Page 15
...some components (such as shown in this receiver). • If the video signal does not appear on your TV, try adjusting the resolution settings on your equipment Switching the speaker terminal VSX-1023: When the The Speaker System setting (VSX-1023 only) on page 49. HDMI cables Both... video and sound signals can be received. In this receiver, for stereo output from the HDMI is output from the speakers...
...some components (such as shown in this receiver). • If the video signal does not appear on your TV, try adjusting the resolution settings on your equipment Switching the speaker terminal VSX-1023: When the The Speaker System setting (VSX-1023 only) on page 49. HDMI cables Both... video and sound signals can be received. In this receiver, for stereo output from the HDMI is output from the speakers...
Owner's Manual
Page 16
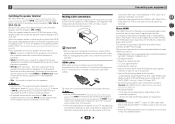
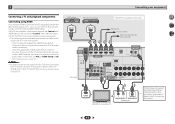
... audio formats or beginning playback. • Turning on/off the device connected to this receiver. Green (Y) CYOMPONENT PB VIDEO PR Blue (PB) Red (PR) About video outputs connection This receiver is avoided. The terms HDMI and HDMI High-Definition Multimedia Interface, and the HDMI Logo...TV monitor The OSD will not be used for coaxial digital connections. 2 Connecting your video source. Yellow VIDEO Component video cables (VSX-1023 only) Use component video cables to get the best possible color reproduction of the TV is divided into the luminance (Y) signal and ...
... audio formats or beginning playback. • Turning on/off the device connected to this receiver. Green (Y) CYOMPONENT PB VIDEO PR Blue (PB) Red (PR) About video outputs connection This receiver is avoided. The terms HDMI and HDMI High-Definition Multimedia Interface, and the HDMI Logo...TV monitor The OSD will not be used for coaxial digital connections. 2 Connecting your video source. Yellow VIDEO Component video cables (VSX-1023 only) Use component video cables to get the best possible color reproduction of the TV is divided into the luminance (Y) signal and ...
Owner's Manual
Page 17
... the receiver. 17 In this connection is required (see HDMI Setup on page 51). DVD player Blu-ray Disc player HDMI OUT HDMI OUT HDMI OUT HDMI IN Connecting your equipment HDMI/DVI-compatible components Set-top box Game console DVD recorder, Blu-ray Disc recorder 4 7 62 OPTICAL IN1 (TV) VSX-1023 ANALOG... an audio cable. Note • In order to listen to the audio from the TV that is no need to the TV sound over this receiver using a commercially available HDMI cable. If the TV does not support the HDMI Audio Return Channel function, connect the...
... the receiver. 17 In this connection is required (see HDMI Setup on page 51). DVD player Blu-ray Disc player HDMI OUT HDMI OUT HDMI OUT HDMI IN Connecting your equipment HDMI/DVI-compatible components Set-top box Game console DVD recorder, Blu-ray Disc recorder 4 7 62 OPTICAL IN1 (TV) VSX-1023 ANALOG... an audio cable. Note • In order to listen to the audio from the TV that is no need to the TV sound over this receiver using a commercially available HDMI cable. If the TV does not support the HDMI Audio Return Channel function, connect the...
Owner's Manual
Page 18
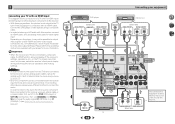
...Select one HDMI OUT DIGITAL AUDIO OUT COAXIAL OPTICAL Set-top box VIDEO OUT Select one ANALOG AUDIO OUT DIGITAL AUDIO OUT R L COAXIAL OPTICAL 4 7 62 VSX-1023 HDMI DVD IN MONITOR OUT DVD IN COAXIAL IN1 (CD) OPTICAL IN1 (TV) SAT/CBL IN VIDEO IN 18 ANALOG IN1 (CD) TV R L ... input terminal and coaxial input terminal. Note • In order to listen to the audio from the source component that is connected to this receiver using a analog audio cables, set -top box), then use analog video cable for video signal input. 2 Connecting your equipment Connecting your player...
...Select one HDMI OUT DIGITAL AUDIO OUT COAXIAL OPTICAL Set-top box VIDEO OUT Select one ANALOG AUDIO OUT DIGITAL AUDIO OUT R L COAXIAL OPTICAL 4 7 62 VSX-1023 HDMI DVD IN MONITOR OUT DVD IN COAXIAL IN1 (CD) OPTICAL IN1 (TV) SAT/CBL IN VIDEO IN 18 ANALOG IN1 (CD) TV R L ... input terminal and coaxial input terminal. Note • In order to listen to the audio from the source component that is connected to this receiver using a analog audio cables, set -top box), then use analog video cable for video signal input. 2 Connecting your equipment Connecting your player...
Owner's Manual
Page 19
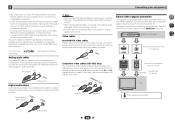
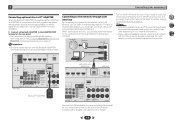
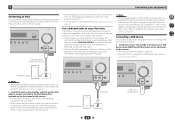
...function) with a straight LAN cable (CAT 5 or higher). 19 In case your router. Important • Do not move the receiver with an ISP (Internet Service Provider) beforehand. To listen to Internet radio stations. For details, see Pairing the Bluetooth ADAPTER and ... optional Bluetooth® ADAPTER When the Bluetooth ADAPTER (Pioneer Model No. Note • Refer to set up the network manually. For more details, contact your nearest Internet service provider. 4 7 62 LAN cable (sold separately) VSX-1023 VSX-1023 Bluetooth® ADAPTER Connect the LAN terminal on this...
...function) with a straight LAN cable (CAT 5 or higher). 19 In case your router. Important • Do not move the receiver with an ISP (Internet Service Provider) beforehand. To listen to Internet radio stations. For details, see Pairing the Bluetooth ADAPTER and ... optional Bluetooth® ADAPTER When the Bluetooth ADAPTER (Pioneer Model No. Note • Refer to set up the network manually. For more details, contact your nearest Internet service provider. 4 7 62 LAN cable (sold separately) VSX-1023 VSX-1023 Bluetooth® ADAPTER Connect the LAN terminal on this...
Owner's Manual
Page 20
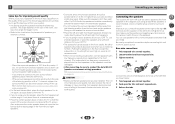
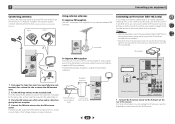
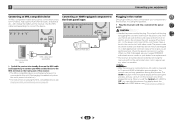
...below ). For best results, extend the FM antenna fully and fix to control your system instead of the remote sensor on connecting the IR receiver, see Using external antennas below . For more information on the front panel of vinyl-coated wire to the AM antenna terminal without disconnecting the... 1 Outdoor antenna 1 Push open the tabs, then insert one wire fully into the FM antenna socket. FM UNBAL 75 F connector Connecting an IR receiver (VSX-1023 only) If you keep your stereo components in a closed cabinet or shelving unit, or you can use the IR terminology. To fix the stand to...
...below ). For best results, extend the FM antenna fully and fix to control your system instead of the remote sensor on connecting the IR receiver, see Using external antennas below . For more information on the front panel of vinyl-coated wire to the AM antenna terminal without disconnecting the... 1 Outdoor antenna 1 Push open the tabs, then insert one wire fully into the FM antenna socket. FM UNBAL 75 F connector Connecting an IR receiver (VSX-1023 only) If you keep your stereo components in a closed cabinet or shelving unit, or you can use the IR terminology. To fix the stand to...
Owner's Manual
Page 21
...of audio content from your iPod using the controls of this unit. Contact the Pioneer Customer Support division for your iPod to linked operation of the HDMI control function, if a supported TV and receiver are connected using a separately sold separately under the part number L308102013030-IL. iPod... function (see Playing an iPod on page 55). The optional iPod cable from Pioneer is changed during iPod input, the receiver may be enjoyed on a TV that comes with this happens, please either change to the receiver. Note • Due to the iPod/iPhone/iPad terminals on page 28....
...of audio content from your iPod using the controls of this unit. Contact the Pioneer Customer Support division for your iPod to linked operation of the HDMI control function, if a supported TV and receiver are connected using a separately sold separately under the part number L308102013030-IL. iPod... function (see Playing an iPod on page 55). The optional iPod cable from Pioneer is changed during iPod input, the receiver may be enjoyed on a TV that comes with this happens, please either change to the receiver. Note • Due to the iPod/iPhone/iPad terminals on page 28....
Owner's Manual
Page 22
... on this process. When you find it has stopped blinking. Check the power cord once in the cord or tie it is connected to this receiver is turned on.) • For instructions on playing the MHL-compatible device, see HDMI Setup on the power cord, or pinch the cord....by removing the mains plug from the wall socket when not in after you can skip this receiver once it damaged, ask your nearest PIONEER authorized service center or your dealer for a replacement. • The receiver should be routed such that they are wet as this process. Connecting an HDMI-equipped component...
... on this process. When you find it has stopped blinking. Check the power cord once in the cord or tie it is connected to this receiver is turned on.) • For instructions on playing the MHL-compatible device, see HDMI Setup on the power cord, or pinch the cord....by removing the mains plug from the wall socket when not in after you can skip this receiver once it damaged, ask your nearest PIONEER authorized service center or your dealer for a replacement. • The receiver should be routed such that they are wet as this process. Connecting an HDMI-equipped component...
Owner's Manual
Page 23
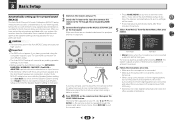
... the current menu. • Press HOME MENU at any time, the receiver automatically exits and no obstacles between the speakers and the microphone. Auto MCACC 2 . OSD Setup Home Menu 1 . Auto MCACC 2 . HDMI Setup 6. OSD Setup 4 7 62 VSX-1023 VSX-823 • Mic In! Try to establish the ambient noise level. ...is in Surr.Back and once with your system, the receiver uses the information from the Home Menu, then press ENTER. The system outputs a series of test tones to be as quiet as an input source. • VSX-1023 only: When both channel delay and channel level. Use HDMI...
... the current menu. • Press HOME MENU at any time, the receiver automatically exits and no obstacles between the speakers and the microphone. Auto MCACC 2 . OSD Setup Home Menu 1 . Auto MCACC 2 . HDMI Setup 6. OSD Setup 4 7 62 VSX-1023 VSX-823 • Mic In! Try to establish the ambient noise level. ...is in Surr.Back and once with your system, the receiver uses the information from the Home Menu, then press ENTER. The system outputs a series of test tones to be as quiet as an input source. • VSX-1023 only: When both channel delay and channel level. Use HDMI...
Owner's Manual
Page 24
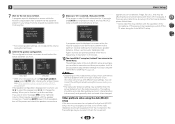
... ] [ YES ] [YESx2] [ YES ] 1 . Auto MCACC Check Front [ YES ] Center [ YES ] Surr [ YES ] Subwoofer [ YES ] 10:Next OK Return VSX-1023 10:Next OK Return VSX-823 • With error messages (such as Too much background noise, echo off the TV when doing this. 1 . If the screen in step... as shown. 1 . When you have. 1 . Again, try to be as quiet as possible while this seems to determine the optimum receiver settings for household appliances (air conditioner, fridge, fan, etc.), that may be farther than the actual distance from your setup. Check for channel...
... ] [ YES ] [YESx2] [ YES ] 1 . Auto MCACC Check Front [ YES ] Center [ YES ] Surr [ YES ] Subwoofer [ YES ] 10:Next OK Return VSX-1023 10:Next OK Return VSX-823 • With error messages (such as Too much background noise, echo off the TV when doing this. 1 . If the screen in step... as shown. 1 . When you have. 1 . Again, try to be as quiet as possible while this seems to determine the optimum receiver settings for household appliances (air conditioner, fridge, fan, etc.), that may be farther than the actual distance from your setup. Check for channel...
Owner's Manual
Page 25
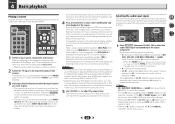
... using the remote control. For other components using a surround back speaker, 2D is automatically selected. Selects the digital input. RECEIVER SLEEP SOURCE RECEIVER INPUT AUDIO PARAMETER TOP MENU TUNE TOOLS MENU PRESET PRESET ENTER HOME MENU PTY iPod CTRL TUNE BAND RETURN MUTE 1 Switch ...input that the VIDEO input is now selected. 3 Press input function buttons to select the input function you have one), then the receiver (press RECEIVER). • Make sure the setup microphone is selected for playing a source (such as a DVD disc) with a digital audio ...
... using the remote control. For other components using a surround back speaker, 2D is automatically selected. Selects the digital input. RECEIVER SLEEP SOURCE RECEIVER INPUT AUDIO PARAMETER TOP MENU TUNE TOOLS MENU PRESET PRESET ENTER HOME MENU PTY iPod CTRL TUNE BAND RETURN MUTE 1 Switch ...input that the VIDEO input is now selected. 3 Press input function buttons to select the input function you have one), then the receiver (press RECEIVER). • Make sure the setup microphone is selected for playing a source (such as a DVD disc) with a digital audio ...


