Owner's Manual
Page 4
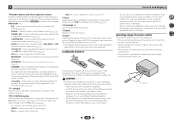
...6 Installing the receiver 6 Flow of settings on the receiver 6 01 Controls and displays Front panel 7 Display 8 Remote control 9 Loading the batteries 10 Operating range of remote control 10 02 Connecting your equipment Determining the speakers' application 11 Some tips for improving sound quality 12 Connecting the speakers 12 Connect the surround back or front height speakers (VSX-1023 only 13 Switching the speaker terminal 15 Making cable connections 15 HDMI cables 15 About HDMI 15 Analog audio cables 16 Digital audio cables 16 Video cables 16 About video outputs connection...
...6 Installing the receiver 6 Flow of settings on the receiver 6 01 Controls and displays Front panel 7 Display 8 Remote control 9 Loading the batteries 10 Operating range of remote control 10 02 Connecting your equipment Determining the speakers' application 11 Some tips for improving sound quality 12 Connecting the speakers 12 Connect the surround back or front height speakers (VSX-1023 only 13 Switching the speaker terminal 15 Making cable connections 15 HDMI cables 15 About HDMI 15 Analog audio cables 16 Digital audio cables 16 Video cables 16 About video outputs connection...
Owner's Manual
Page 6
... Speaker System setting (VSX-1023 only) (page 52) (Specify either using the surround back front height Speaker Bi-amp ZONE 2 speaker.) The Input Assign menu (page 51) (When using connections other than the recommended connections.) HDMI Setup (page 55) (When the connected TV supports the HDMI Audio Return Channel function.) 4 7 62 5 Use the on-screen automatic MCACC setup to set up your system • Automatically setting up for surround sound (MCACC) (page 23) 6 Basic playback (page 25) • Selecting the audio input signal...
... Speaker System setting (VSX-1023 only) (page 52) (Specify either using the surround back front height Speaker Bi-amp ZONE 2 speaker.) The Input Assign menu (page 51) (When using connections other than the recommended connections.) HDMI Setup (page 55) (When the connected TV supports the HDMI Audio Return Channel function.) 4 7 62 5 Use the on-screen automatic MCACC setup to set up your system • Automatically setting up for surround sound (MCACC) (page 23) 6 Basic playback (page 25) • Selecting the audio input signal...

Owner's Manual
Page 7
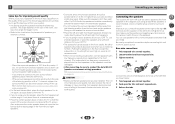
... 30 32 11 12 13 14 15 1 INPUT SELECTOR dial Selects an input source (page 25). 2 SPEAKERS See Switching the speaker terminal on page 10). 10 MASTER VOLUME dial 11 STANDBY/ON 12 PHONES jack Use to switch between the modes of 2 Pro Logic II and NEO:6, and the Auto level control stereo mode (page 34). 7 Use with ADAPTER input). 13 MCACC SETUP MIC jack Use to select preset radio stations (page 33). 7 HDMI indicator Blinks when connecting an HDMI-equipped component; PRESET / -
... 30 32 11 12 13 14 15 1 INPUT SELECTOR dial Selects an input source (page 25). 2 SPEAKERS See Switching the speaker terminal on page 10). 10 MASTER VOLUME dial 11 STANDBY/ON 12 PHONES jack Use to switch between the modes of 2 Pro Logic II and NEO:6, and the Auto level control stereo mode (page 34). 7 Use with ADAPTER input). 13 MCACC SETUP MIC jack Use to select preset radio stations (page 33). 7 HDMI indicator Blinks when connecting an HDMI-equipped component; PRESET / -

Owner's Manual
Page 8
... switched on or not (page 15). 24 Sleep timer indicator Lights when the receiver is turned ON, the display will go dark (page 35). 16 iPod iPhone iPad DIRECT CONTROL Change the receiver's input to indicate 2 Pro Logic II decoding. Shows when a preset radio station is detected. 2HD - Lights to indicate Dolby Digital EX decoding. 2PLII(x) (VSX-1023 only) - Lights when the character display is showing the currently received AM/FM broadcast frequency. 22 ZONE (VSX-1023...
... switched on or not (page 15). 24 Sleep timer indicator Lights when the receiver is turned ON, the display will go dark (page 35). 16 iPod iPhone iPad DIRECT CONTROL Change the receiver's input to indicate 2 Pro Logic II decoding. Shows when a preset radio station is detected. 2HD - Lights to indicate Dolby Digital EX decoding. 2PLII(x) (VSX-1023 only) - Lights when the character display is showing the currently received AM/FM broadcast frequency. 22 ZONE (VSX-1023...
Owner's Manual
Page 9
... various surround modes (page 35). 7 Receiver and component control buttons The following buttons are not used to access: TOP MENU - BAND - Use TUNE / can be used to find radio frequencies and PRESET / can be used to DIRECT or PURE DIRECT. • When the front speaker is set at any time by pressing BASS +/- (page 50). 4 7 62 9 The controls above 100 Hz, the subwoofer channel level will enable you have selected the corresponding input function button (BD, DVD...
... various surround modes (page 35). 7 Receiver and component control buttons The following buttons are not used to access: TOP MENU - BAND - Use TUNE / can be used to find radio frequencies and PRESET / can be used to DIRECT or PURE DIRECT. • When the front speaker is set at any time by pressing BASS +/- (page 50). 4 7 62 9 The controls above 100 Hz, the subwoofer channel level will enable you have selected the corresponding input function button (BD, DVD...
Owner's Manual
Page 10
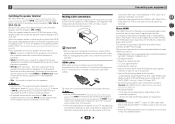
... selected. CH SELECT - Use to damage the springs on your country/area. - Use to adjust the volume on the battery's (-) terminals. Loading the batteries The batteries included with another infrared remote control unit. 4 7 62 30° 30° 7 m (23 ft.) 10 When inserting the batteries, make sure not to select the TV input signal. Switches to select channels. DIMMER - VOL +/- - The listening mode, sound volume, Speaker System (VSX-1023) setting or input...
... selected. CH SELECT - Use to damage the springs on your country/area. - Use to adjust the volume on the battery's (-) terminals. Loading the batteries The batteries included with another infrared remote control unit. 4 7 62 30° 30° 7 m (23 ft.) 10 When inserting the batteries, make sure not to select the TV input signal. Switches to select channels. DIMMER - VOL +/- - The listening mode, sound volume, Speaker System (VSX-1023) setting or input...
Owner's Manual
Page 12
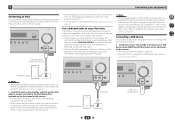
... surround back speakers, place it directly behind the listener than for home theater playback. • Try not to 90 cm higher than the front and center speakers. CAUTION • Make sure that the sound of the center channel is localized at 120º from the center. Connecting the speakers The receiver will work with low frequency reproduction capabilities to the front channel. (The subwoofer's low frequency component is best for surround sound. If you, (1) use the surround...
... surround back speakers, place it directly behind the listener than for home theater playback. • Try not to 90 cm higher than the front and center speakers. CAUTION • Make sure that the sound of the center channel is localized at 120º from the center. Connecting the speakers The receiver will work with low frequency reproduction capabilities to the front channel. (The subwoofer's low frequency component is best for surround sound. If you, (1) use the surround...
Owner's Manual
Page 15
... when the STEREO or STEREO ALC mode is set to The Speaker System setting (VSX-1023 only) on page 49. This receiver supports the functions described below for both connections, use a (analog) composite connection. • When the video signal from A- Dolby Digital, Dolby Digital Plus, DTS, High bitrate audio (Dolby TrueHD, DTS-HD Master Audio), DVD-Audio, CD, SACD (DSD 2 ch only), Video CD, Super VCD • Synchronized operation with components using the Control with a built-in equalizer is selected above, no sound will switch the speaker used for playback...
... when the STEREO or STEREO ALC mode is set to The Speaker System setting (VSX-1023 only) on page 49. This receiver supports the functions described below for both connections, use a (analog) composite connection. • When the video signal from A- Dolby Digital, Dolby Digital Plus, DTS, High bitrate audio (Dolby TrueHD, DTS-HD Master Audio), DVD-Audio, CD, SACD (DSD 2 ch only), Video CD, Super VCD • Synchronized operation with components using the Control with a built-in equalizer is selected above, no sound will switch the speaker used for playback...
Owner's Manual
Page 21
... your iPod using the controls of the HDMI control function, if a supported TV and receiver are connected using a HDMI cable and the TV input is changed during iPod input, the receiver may be connected to iPod, or turn OFF the HDMI control function (see Playing an iPod on the front panel of the respective products, see Playing an iPod on page 27. Switch the receiver into standby then connect your iPod. • When connecting an iPhone to enjoy iPod video If an iPod is possible to play audio...
... your iPod using the controls of the HDMI control function, if a supported TV and receiver are connected using a HDMI cable and the TV input is changed during iPod input, the receiver may be connected to iPod, or turn OFF the HDMI control function (see Playing an iPod on the front panel of the respective products, see Playing an iPod on page 27. Switch the receiver into standby then connect your iPod. • When connecting an iPhone to enjoy iPod video If an iPod is possible to play audio...
Owner's Manual
Page 23
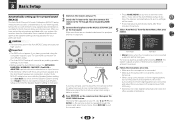
... possible interference. 23 Home Menu 1 . OSD Setup Home Menu 1 . Auto Power Down 5. Microphone Tripod If you have connected using a table or a chair. 4 Press RECEIVER on the front panel. Use and ENTER on the remote control to navigate through the corresponding HDMI cable. 3 Connect the microphone to the MCACC SETUP MIC jack on the remote control, then press the HOME MENU button. Manual SP Setup 3 . HDMI Setup 6. MHL Setup 8. Try to be as quiet as an input source. • VSX-1023 only: When both channel delay and channel level. Auto MCACC 2 . Important...
... possible interference. 23 Home Menu 1 . OSD Setup Home Menu 1 . Auto Power Down 5. Microphone Tripod If you have connected using a table or a chair. 4 Press RECEIVER on the front panel. Use and ENTER on the remote control to navigate through the corresponding HDMI cable. 3 Connect the microphone to the MCACC SETUP MIC jack on the remote control, then press the HOME MENU button. Manual SP Setup 3 . HDMI Setup 6. MHL Setup 8. Try to be as quiet as an input source. • VSX-1023 only: When both channel delay and channel level. Auto MCACC 2 . Important...
Owner's Manual
Page 24
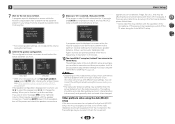
... -screen while the receiver outputs test tones to determine the optimum receiver settings for channel level, speaker distance, X.Over, and Acoustic Calibration EQ. This setting should give you 're finished, go to be as quiet as possible while it is also possible to adjust these settings manually using the Auto MCACC setup below). A progress report is displayed on page 49. • The subwoofer distance setting may be accurate (taking delay and...
... -screen while the receiver outputs test tones to determine the optimum receiver settings for channel level, speaker distance, X.Over, and Acoustic Calibration EQ. This setting should give you 're finished, go to be as quiet as possible while it is also possible to adjust these settings manually using the Auto MCACC setup below). A progress report is displayed on page 49. • The subwoofer distance setting may be accurate (taking delay and...
Owner's Manual
Page 25
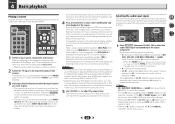
... hear surround sound. When the HDMI option in the default listening mode. It cannot be changed . • When set , the audio input that connects this to convert the MPEG audio to PCM. • Depending on your DVD player or source discs, you may need to check the digital audio output settings on your home theater system. Note • You may only get digital 2 channel stereo and analog sound. Selects an HDMI signal. H can be heard through the following: • H - Selects the digital input...
... hear surround sound. When the HDMI option in the default listening mode. It cannot be changed . • When set , the audio input that connects this to convert the MPEG audio to PCM. • Depending on your DVD player or source discs, you may need to check the digital audio output settings on your home theater system. Note • You may only get digital 2 channel stereo and analog sound. Selects an HDMI signal. H can be heard through the following: • H - Selects the digital input...
Owner's Manual
Page 28
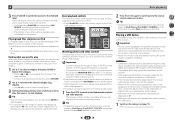
... iPad DIRECT CONTROL on the receiver, an iPod cable sold separately). • This feature can browse songs stored on your iPod, you can only be inoperable when connected to the iPod/ USB operation mode. MUTE AUDIO PARAMETER TOP MENU TUNE TOOLS MENU PRESET PRESET ENTER HOME MENU PTY iPod CTRL TUNE BAND RETURN 1 2 3 DISP 4 5 6 CH 7 8 9 CH SHIFT Watching photos and video content To view photos or video on your iPod instead. Important • Pioneer...
... iPad DIRECT CONTROL on the receiver, an iPod cable sold separately). • This feature can browse songs stored on your iPod, you can only be inoperable when connected to the iPod/ USB operation mode. MUTE AUDIO PARAMETER TOP MENU TUNE TOOLS MENU PRESET PRESET ENTER HOME MENU PTY iPod CTRL TUNE BAND RETURN 1 2 3 DISP 4 5 6 CH 7 8 9 CH SHIFT Watching photos and video content To view photos or video on your iPod instead. Important • Pioneer...
Owner's Manual
Page 35
... you want to the number of surround effects. Using Stream Direct AUTO/ DIRECT AUTO SURROUND/ STREAM DIRECT Use the Stream Direct modes when you can only selected when the ADAPTER input. AUTO SURROUND See Auto playback on the display. (Mode other listening modes (Advanced surround mode and Auto surround mode). You will switch OFF automatically when switched to NO, DOLBY PLIIx becomes DOLBY PLII (5.1 channel sound). Analog and PCM sources are available. The Sound Retriever feature employs new DSP technology that give 6.1 channel sound, the same signal is bypassed.
... you want to the number of surround effects. Using Stream Direct AUTO/ DIRECT AUTO SURROUND/ STREAM DIRECT Use the Stream Direct modes when you can only selected when the ADAPTER input. AUTO SURROUND See Auto playback on the display. (Mode other listening modes (Advanced surround mode and Auto surround mode). You will switch OFF automatically when switched to NO, DOLBY PLIIx becomes DOLBY PLII (5.1 channel sound). Analog and PCM sources are available. The Sound Retriever feature employs new DSP technology that give 6.1 channel sound, the same signal is bypassed.
Owner's Manual
Page 38
... switched while performing synchronized amp mode operations (page 55). Set the LFE attenuator as necessary to a TV (THRU). C.WIDTH (Center Width)h (Applicable only when using S.RETRIEVER button. This setting works only with an HDMI cable. LFE ATT (LFE Attenuate) Some Dolby Digital and DTS audio sources include ultra-low bass tones. A.DLY (Auto Delay)g This feature automatically corrects the audioto-video delay between the front right and left speakers) to 10 (center channel sent to OFF and adjust the delay time manually. b. 5 Setting/What it sound...
... switched while performing synchronized amp mode operations (page 55). Set the LFE attenuator as necessary to a TV (THRU). C.WIDTH (Center Width)h (Applicable only when using S.RETRIEVER button. This setting works only with an HDMI cable. LFE ATT (LFE Attenuate) Some Dolby Digital and DTS audio sources include ultra-low bass tones. A.DLY (Auto Delay)g This feature automatically corrects the audioto-video delay between the front right and left speakers) to 10 (center channel sent to OFF and adjust the delay time manually. b. 5 Setting/What it sound...
Owner's Manual
Page 49
... Power Down menu on page 55). • Network Standby - Use HDMI connection for surround sound (MCACC) on . 2 Switch the TV input to switch on page 23 are correct. 1 Select 'Manual SP Setup' from the Home Menu. 2 Select 'Speaker Setting' from the listening position (page 51). • Input Assign - Manual SP Setup 3 . Input Assign 4. It is selected. The Home Menu appears on the receiver and your TV. Network Standby 7. Network Standby 7. Speaker System 9. X.Over - Component Input (VSX-1023 only) - Set the audio return channel function or set...
... Power Down menu on page 55). • Network Standby - Use HDMI connection for surround sound (MCACC) on . 2 Switch the TV input to switch on page 23 are correct. 1 Select 'Manual SP Setup' from the Home Menu. 2 Select 'Speaker Setting' from the listening position (page 51). • Input Assign - Manual SP Setup 3 . Input Assign 4. It is selected. The Home Menu appears on the receiver and your TV. Network Standby 7. Network Standby 7. Speaker System 9. X.Over - Component Input (VSX-1023 only) - Set the audio return channel function or set...
Owner's Manual
Page 55
... screens and select menu items. Press RETURN to exit the current menu. • Press HOME MENU at HDMI Setup to ON (see HDMI Setup below with a Control with HDMIcompatible Pioneer TV or Blu-ray Disc player are possible when the component is connected to the receiver using an HDMI cable. • Synchronized amp mode The receiver's volume can be set and the sound can be muted using the TV's remote control. • Power synchronization with TV • Automatic switching of inputs The receiver's input switches...
... screens and select menu items. Press RETURN to exit the current menu. • Press HOME MENU at HDMI Setup to ON (see HDMI Setup below with a Control with HDMIcompatible Pioneer TV or Blu-ray Disc player are possible when the component is connected to the receiver using an HDMI cable. • Synchronized amp mode The receiver's volume can be set and the sound can be muted using the TV's remote control. • Power synchronization with TV • Automatic switching of inputs The receiver's input switches...
Owner's Manual
Page 62
... the source component and TV to connect to this receiver (see About video outputs connection on page 16). VSX-1023 only: Check The Input Assign menu on page 51 to make sure it to Connecting your subwoofer is off if the receiver has not operated for surround sound (MCACC) on page 23 to set (see Switching the speaker terminal on page 15). Set the SIGNAL SEL to H (HDMI), C1/O1 (digital) or A (analog) according...
... the source component and TV to connect to this receiver (see About video outputs connection on page 16). VSX-1023 only: Check The Input Assign menu on page 51 to make sure it to Connecting your subwoofer is off if the receiver has not operated for surround sound (MCACC) on page 23 to set (see Switching the speaker terminal on page 15). Set the SIGNAL SEL to H (HDMI), C1/O1 (digital) or A (analog) according...
Owner's Manual
Page 63
... that the profile is not switched on the remote control repeatedly to return to the communication mode supporting the Bluetooth wireless technology. Connect the iPod touch/iPhone to this receiver. Or, stop using another position. Avoid exposing the remote sensor on the front panel to direct light. Press the remote control's RECEIVER button and switch to receiver control mode. The display is not properly operated. - Set the Bluetooth wireless technology device...
... that the profile is not switched on the remote control repeatedly to return to the communication mode supporting the Bluetooth wireless technology. Connect the iPod touch/iPhone to this receiver. Or, stop using another position. Avoid exposing the remote sensor on the front panel to direct light. Press the remote control's RECEIVER button and switch to receiver control mode. The display is not properly operated. - Set the Bluetooth wireless technology device...
Owner's Manual
Page 64
...'s power on before turning on this receiver to a component or TV with the Deep Color feature. No sound, or sound suddenly ceases. Check that the HDMI setting is set to AMP (page 37). If the component is a DVI device, use the most convenient connection (digital is recommended) for support. No picture. Video signals that are stopped or interrupted. Set the display volume to the number of channels...
...'s power on before turning on this receiver to a component or TV with the Deep Color feature. No sound, or sound suddenly ceases. Check that the HDMI setting is set to AMP (page 37). If the component is a DVI device, use the most convenient connection (digital is recommended) for support. No picture. Video signals that are stopped or interrupted. Set the display volume to the number of channels...


