Owner's Manual
Page 4
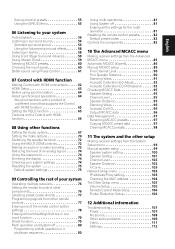
...53 Listening to Music Contents of Bluetooth wireless technology device with this unit's sensor 35 Plugging in a safe place for buying this Pioneer product. After you start Checking what's in the box 8 Installing the receiver 8 Loading the batteries 8 02 Controls and displays Front...13 03 Connecting your equipment Rear panel 14 Determining the speakers' application 15 Other speaker connection 16 Placing the speakers 17 Some tips for improving sound quality . . . . . 17 Connecting the speakers 18 Installing your speaker system 19 Bi-amping your speakers 20 Bi-wiring your speakers...
...53 Listening to Music Contents of Bluetooth wireless technology device with this unit's sensor 35 Plugging in a safe place for buying this Pioneer product. After you start Checking what's in the box 8 Installing the receiver 8 Loading the batteries 8 02 Controls and displays Front...13 03 Connecting your equipment Rear panel 14 Determining the speakers' application 15 Other speaker connection 16 Placing the speakers 17 Some tips for improving sound quality . . . . . 17 Connecting the speakers 18 Installing your speaker system 19 Bi-amping your speakers 20 Bi-wiring your speakers...
Owner's Manual
Page 5
Saving channel presets 55 Using the SIRIUS Menu 55 06 Listening to your system Auto playback 56 Listening in surround sound 56 Standard surround sound 56 Using the Advanced surround effects. . . . . . 58 Listening in stereo 58 Using Front Stage Surround Advance 59 Using ...Stream Direct 59 Selecting MCACC presets 60 Choosing the input signal 60 Better sound using Phase Control 61 07 Control with HDMI function Making Control with HDMI connections . . . . . 62 HDMI Setup 63 Before using synchronization 64 ...
Saving channel presets 55 Using the SIRIUS Menu 55 06 Listening to your system Auto playback 56 Listening in surround sound 56 Standard surround sound 56 Using the Advanced surround effects. . . . . . 58 Listening in stereo 58 Using Front Stage Surround Advance 59 Using ...Stream Direct 59 Selecting MCACC presets 60 Choosing the input signal 60 Better sound using Phase Control 61 07 Control with HDMI function Making Control with HDMI connections . . . . . 62 HDMI Setup 63 Before using synchronization 64 ...
Owner's Manual
Page 6
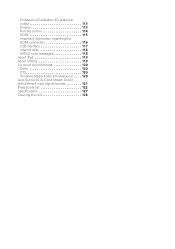
Professional Calibration EQ graphical output 113 Display 113 Remote control 114 HDMI 115 Important information regarding the HDMI connection 116 USB interface 117 Internet radio 118 SIRIUS radio messages 118 About iPod 119 About SIRIUS 119 Surround sound formats 120 Dolby 120 DTS 120 Windows Media Audio 9 Professional . . . . 120 Auto Surround, ALC and Stream Direct with different input signal formats 121 Preset code list 122 Specifications 127 Cleaning the unit 128
Professional Calibration EQ graphical output 113 Display 113 Remote control 114 HDMI 115 Important information regarding the HDMI connection 116 USB interface 117 Internet radio 118 SIRIUS radio messages 118 About iPod 119 About SIRIUS 119 Surround sound formats 120 Dolby 120 DTS 120 Windows Media Audio 9 Professional . . . . 120 Auto Surround, ALC and Stream Direct with different input signal formats 121 Preset code list 122 Specifications 127 Cleaning the unit 128
Owner's Manual
Page 7
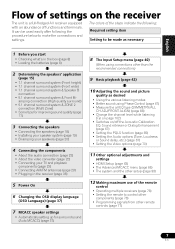
... settings. amping connection (High quality surround) • 5.1 channel surround system & ZONE 2 connection (Multi Zone) • Some tips for surround sound (Auto MCACC) (page 37) 8 The Input Setup menu (page 40) (When using Phase Control (page 61) • Measure the... On 6 Changing the OSD display language (OSD Language) (page 37) 7 MCACC speaker settings • Automatically setting up for improving sound quality (page 17) 3 Connecting the speakers • Connecting the speakers (page 18) • Installing your speaker system (page 19) •...
... settings. amping connection (High quality surround) • 5.1 channel surround system & ZONE 2 connection (Multi Zone) • Some tips for surround sound (Auto MCACC) (page 37) 8 The Input Setup menu (page 40) (When using Phase Control (page 61) • Measure the... On 6 Changing the OSD display language (OSD Language) (page 37) 7 MCACC speaker settings • Automatically setting up for improving sound quality (page 17) 3 Connecting the speakers • Connecting the speakers (page 18) • Installing your speaker system (page 19) •...
Owner's Manual
Page 8
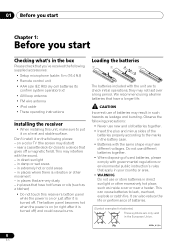
... for batteries) These symbols are very dusty - in places that are only valid in the European Union. Loading the batteries The batteries included with the sound. - Observe the following precautions: • Never use new and old batteries together. • Insert the plus and minus sides of the batteries properly according to...
... for batteries) These symbols are very dusty - in places that are only valid in the European Union. Loading the batteries The batteries included with the sound. - Observe the following precautions: • Never use new and old batteries together. • Insert the plus and minus sides of the batteries properly according to...
Owner's Manual
Page 10
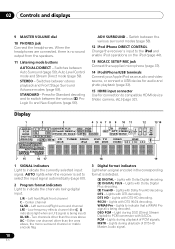
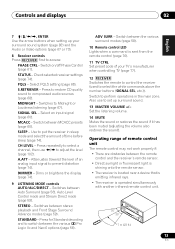
... STEREO STANDARD SP AB SLEEP R 2DIGITAL PLUS DSD PCM TUNED SR 2TrueHD WMA9Pro MULTI-ZONE PQLS ALC ATT STEREO DTS HD ES 96/24 S.RTRV SOUND UP MIX OVER MONO XR MSTR CD TUNER SIRIUS CD-R iPod DVD TV VIDEO BD DVR HDMI [ 2 ] USB [ 3 ] [ 4 ] 7 15 16 17 18 dB 19 1 SIGNAL... PLUS - 02 Controls and displays 9 MASTER VOLUME dial 10 PHONES jack Connect the headphones. Press for connection to indicate that a WMA9 Pro signal is no sound output from the speakers. 11 Listening mode buttons AUTO/ALC/DIRECT - L/R -
... STEREO STANDARD SP AB SLEEP R 2DIGITAL PLUS DSD PCM TUNED SR 2TrueHD WMA9Pro MULTI-ZONE PQLS ALC ATT STEREO DTS HD ES 96/24 S.RTRV SOUND UP MIX OVER MONO XR MSTR CD TUNER SIRIUS CD-R iPod DVD TV VIDEO BD DVR HDMI [ 2 ] USB [ 3 ] [ 4 ] 7 15 16 17 18 dB 19 1 SIGNAL... PLUS - 02 Controls and displays 9 MASTER VOLUME dial 10 PHONES jack Connect the headphones. Press for connection to indicate that a WMA9 Pro signal is no sound output from the speakers. 11 Listening mode buttons AUTO/ALC/DIRECT - L/R -
Owner's Manual
Page 11
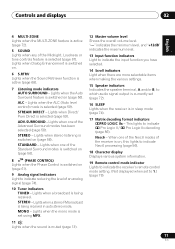
...sleep mode (page 74). 17 Matrix decoding format indicators 2PRO LOGIC IIx - Lights when Dialog Enhancement is switched on. 6 S.RTRV Lights when the Sound Retriever function is switched on (page 61). 9 Analog signal indicators Light to indicate reducing the level of an analog signal (page 74). 10 Tuner...02 English Deutsch Français Italiano Nederlands Español 4 MULTI-ZONE Lights when the MULTI-ZONE feature is active (page 72). 5 SOUND Lights when any of the Midnight, Loudness or tone controls feature is on, this lights to indicate Neo:6 processing (page 56). 18 Character display...
...sleep mode (page 74). 17 Matrix decoding format indicators 2PRO LOGIC IIx - Lights when Dialog Enhancement is switched on. 6 S.RTRV Lights when the Sound Retriever function is switched on (page 61). 9 Analog signal indicators Light to indicate reducing the level of an analog signal (page 74). 10 Tuner...02 English Deutsch Français Italiano Nederlands Español 4 MULTI-ZONE Lights when the MULTI-ZONE feature is active (page 72). 5 SOUND Lights when any of the Midnight, Loudness or tone controls feature is on, this lights to indicate Neo:6 processing (page 56). 18 Character display...
Owner's Manual
Page 13
... (page 74). Press for Standard decoding and to switch between MCACC presets (page 60). Select PQLS setting (page 65). Press to restore CD quality sound to prevent distortion (page 74). SIGNAL SEL - Select an input signal (page 60). MCACC - Switch to perform operations in sleep mode and select ...the amount of your surround sound system (page 85) and the Audio or Video options (page 67 or 70). 8 Receiver controls Press RECEIVER first to access: PHASE CTRL - Set the...
... (page 74). Press for Standard decoding and to switch between MCACC presets (page 60). Select PQLS setting (page 65). Press to restore CD quality sound to prevent distortion (page 74). SIGNAL SEL - Select an input signal (page 60). MCACC - Switch to perform operations in sleep mode and select ...the amount of your surround sound system (page 85) and the Audio or Video options (page 67 or 70). 8 Receiver controls Press RECEIVER first to access: PHASE CTRL - Set the...

Owner's Manual
Page 15
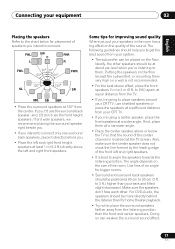
...' application This unit permits you to build various surround systems, in accordance with the number of speakers you can simultaneously enjoy 5.1-channel surround sound in the main zone with the left and right front wide speakers (FWL/FWR).1 This surround system produces a true-to-life... height speakers (FHL/FHR), the left and right surround speakers (SL/SR), the left and right channels (L and R). • It is not possible to produce sound simultaneously from above. L C SW R SR L SBR SL SBL Plan C Speaker B With these connections you have. • Be sure to connect speakers to the ...
...' application This unit permits you to build various surround systems, in accordance with the number of speakers you can simultaneously enjoy 5.1-channel surround sound in the main zone with the left and right front wide speakers (FWL/FWR).1 This surround system produces a true-to-life... height speakers (FHL/FHR), the left and right surround speakers (SL/SR), the left and right channels (L and R). • It is not possible to produce sound simultaneously from above. L C SW R SR L SBR SL SBL Plan C Speaker B With these connections you have. • Be sure to connect speakers to the ...

Owner's Manual
Page 16
...Front Bi-amping connection (High quality surround) • Speaker System setting: Front Bi-Amp Bi-amping connection of the front speakers for surround sound (Auto MCACC) on the input signal or listening mode. Other speaker connection • Your favorite speaker connections can be selected even if you... have fewer than [A] (see Speaker system setting on page 100). • Sound does not come through simultaneously from the front speakers, so the speakers could be damaged.) • After connecting, be made if you can ...
...Front Bi-amping connection (High quality surround) • Speaker System setting: Front Bi-Amp Bi-amping connection of the front speakers for surround sound (Auto MCACC) on the input signal or listening mode. Other speaker connection • Your favorite speaker connections can be selected even if you... have fewer than [A] (see Speaker system setting on page 100). • Sound does not come through simultaneously from the front speakers, so the speakers could be damaged.) • After connecting, be made if you can ...
Owner's Manual
Page 17
... surround speaker right beside you. • If you intend to connect only one surround back speakers, place it directly behind the listener than for improving sound quality Where you to 3 ft.) higher than the front and center speakers. Ideally, the other . Doing so can be at the TV screen. The ...best to 3 m (6 ft. If not, place them very high on the floor (except the subwoofer), or mounting them at a wider angle. to get the best sound from the listening position than your speakers in the room has a big effect on the size of speakers you 're using a center speaker, place the...
... surround speaker right beside you. • If you intend to connect only one surround back speakers, place it directly behind the listener than for improving sound quality Where you to 3 ft.) higher than the front and center speakers. Ideally, the other . Doing so can be at the TV screen. The ...best to 3 m (6 ft. If not, place them very high on the floor (except the subwoofer), or mounting them at a wider angle. to get the best sound from the listening position than your speakers in the room has a big effect on the size of speakers you 're using a center speaker, place the...
Owner's Manual
Page 18
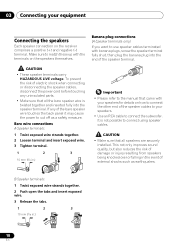
.... To prevent the risk of the speaker terminal. If any uninsulated parts. • Make sure that all speakers are securely installed. This not only improves sound quality, but also reduces the risk of damage or injury resulting from speakers being knocked over or falling in the event of the bare speaker...
.... To prevent the risk of the speaker terminal. If any uninsulated parts. • Make sure that all speakers are securely installed. This not only improves sound quality, but also reduces the risk of damage or injury resulting from speakers being knocked over or falling in the event of the bare speaker...
Owner's Manual
Page 20
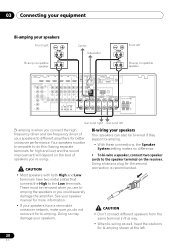
... System setting makes no difference. • To bi-wire a speaker, connect two speaker cords to do not remove it for high and low) and the sound improvement will depend on the receiver. Using a banana plug for bi-amping shown at the left Bi-amping is recommended.
... System setting makes no difference. • To bi-wire a speaker, connect two speaker cords to do not remove it for high and low) and the sound improvement will depend on the receiver. Using a banana plug for bi-amping shown at the left Bi-amping is recommended.

Owner's Manual
Page 21
... system setting on page 100 to the front and surround back speaker terminals. Also, the surround back terminals can simultaneously enjoy 5.1-channel surround sound in ZONE 2. 1 Connect a pair of speakers to do this . See Bi-amping your equipment 03 Selecting the Speaker system The front... height terminals can listen to stereo playback in another component in the main zone with 5.1-channel surround sound. 1 Connect a Bi-amp compatible speakers to do this . See Speaker system setting on page 100 to the surround back speaker terminals...
... system setting on page 100 to the front and surround back speaker terminals. Also, the surround back terminals can simultaneously enjoy 5.1-channel surround sound in ZONE 2. 1 Connect a pair of speakers to do this . See Bi-amping your equipment 03 Selecting the Speaker system The front... height terminals can listen to stereo playback in another component in the main zone with 5.1-channel surround sound. 1 Connect a Bi-amp compatible speakers to do this . See Speaker system setting on page 100 to the surround back speaker terminals...
Owner's Manual
Page 22
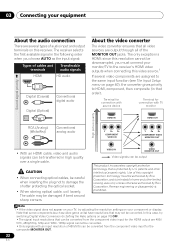
... COMPONENT VIDEO IN Y PB PR COMPONENT VIDEO MONITOR OUT • With an HDMI cable, video and audio signals can be converted. 03 Connecting your equipment Sound signal priority High picture quality About the audio connection There are several video components are assigned to the same input function (see The Input...
... COMPONENT VIDEO IN Y PB PR COMPONENT VIDEO MONITOR OUT • With an HDMI cable, video and audio signals can be converted. 03 Connecting your equipment Sound signal priority High picture quality About the audio connection There are several video components are assigned to the same input function (see The Input...
Owner's Manual
Page 23
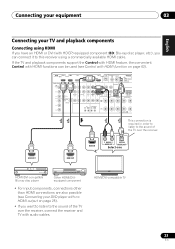
... FRONT CENTER SURROUND R L R MONITOR Y OUT VIDEO PB IR CONTROL IN OUT IN OUT PR SPEAKERS A This connection is required in order to listen to the sound of the TV over the receiver, connect the receiver and TV with no HDMI output on page 62). HDMI OUT HDMI OUT HDMI IN R ANALOG... this receiver using HDMI If you have an HDMI or DVI (with HDMI function on page 25). • If you want to listen to the sound of the TV over the receiver.
... FRONT CENTER SURROUND R L R MONITOR Y OUT VIDEO PB IR CONTROL IN OUT IN OUT PR SPEAKERS A This connection is required in order to listen to the sound of the TV over the receiver, connect the receiver and TV with no HDMI output on page 62). HDMI OUT HDMI OUT HDMI IN R ANALOG... this receiver using HDMI If you have an HDMI or DVI (with HDMI function on page 25). • If you want to listen to the sound of the TV over the receiver.

Owner's Manual
Page 25
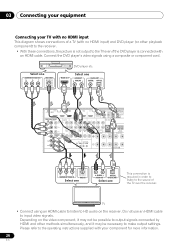
Select one HDMI IN HDMI/DVI-compatible TV • If you want to listen to the sound of the TV over the receiver, connect the receiver and TV with no HDMI output This diagram shows connections of a TV (with HDMI input) and ... F FRONT CENTER SURROUND R L R L MONITOR Y OUT VIDEO PB IR CONTROL IN OUT IN OUT PR SPEAKERS A This connection is required in order to listen to the sound of the TV over the receiver. R ANALOG L OPTICAL AUDIO OUT DIGITAL OUT Select one COMPONENT VIDEO OUT PR PB Y VIDEO OUT DVD player etc. English...
Select one HDMI IN HDMI/DVI-compatible TV • If you want to listen to the sound of the TV over the receiver, connect the receiver and TV with no HDMI output This diagram shows connections of a TV (with HDMI input) and ... F FRONT CENTER SURROUND R L R L MONITOR Y OUT VIDEO PB IR CONTROL IN OUT IN OUT PR SPEAKERS A This connection is required in order to listen to the sound of the TV over the receiver. R ANALOG L OPTICAL AUDIO OUT DIGITAL OUT Select one COMPONENT VIDEO OUT PR PB Y VIDEO OUT DVD player etc. English...
Owner's Manual
Page 26
... OUT Select one COMPONENT VIDEO OUT PR PB Y VIDEO OUT DVD player etc. Select one This connection is required in order to listen to the sound of a TV (with your TV with no HDMI input) and DVD player (or other methods simultaneously, and it may be possible to output signals connected...
... OUT Select one COMPONENT VIDEO OUT PR PB Y VIDEO OUT DVD player etc. Select one This connection is required in order to listen to the sound of a TV (with your TV with no HDMI input) and DVD player (or other methods simultaneously, and it may be possible to output signals connected...
Owner's Manual
Page 28
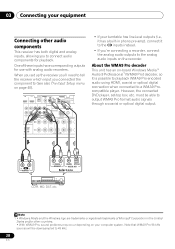
... to the CD inputs instead. • If you to (see also The Input Setup menu on your equipment Connecting other countries. • With WMA9 Pro, sound problems may occur depending on page 40). Note that WMA9 Pro 96 kHz sources will be able to a WMA9 Procompatible player. CONTROL IN OUT SPEAKERS...
... to the CD inputs instead. • If you to (see also The Input Setup menu on your equipment Connecting other countries. • With WMA9 Pro, sound problems may occur depending on page 40). Note that WMA9 Pro 96 kHz sources will be able to a WMA9 Procompatible player. CONTROL IN OUT SPEAKERS...

Owner's Manual
Page 29
... AM LOOP FM UNBAL 75 To improve AM reception, connect a 5 m to a wall or other surface, secure the stand with screws (fig. To improve reception and sound quality, connect external antennas (see Connecting external antennas below . Connecting external antennas To improve FM reception connect an external FM antenna to the FM UNBAL...
... AM LOOP FM UNBAL 75 To improve AM reception, connect a 5 m to a wall or other surface, secure the stand with screws (fig. To improve reception and sound quality, connect external antennas (see Connecting external antennas below . Connecting external antennas To improve FM reception connect an external FM antenna to the FM UNBAL...


