
Owner's Manual
Page 2
... user's right to operate the equipment. Wash hands after removal. Product Name: AUDIO/VIDEO MULTI-CHANNEL RECEIVER Model Number: VSX-1020 Responsible Party Name: PIONEER ELECTRONICS (USA) INC. WARNING This equipment is subject to the following two conditions: (1) This device may not cause harmful...10-3a_A1_En Information to User Alterations or modifications carried out without appropriate authorization may expose you want to use in a particular installation. Operation is not waterproof. RECORD THESE NUMBERS ON YOUR ENCLOSED WARRANTY CARD AND KEEP IN A SAFE PLACE FOR FUTURE REFERENCE...
... user's right to operate the equipment. Wash hands after removal. Product Name: AUDIO/VIDEO MULTI-CHANNEL RECEIVER Model Number: VSX-1020 Responsible Party Name: PIONEER ELECTRONICS (USA) INC. WARNING This equipment is subject to the following two conditions: (1) This device may not cause harmful...10-3a_A1_En Information to User Alterations or modifications carried out without appropriate authorization may expose you want to use in a particular installation. Operation is not waterproof. RECORD THESE NUMBERS ON YOUR ENCLOSED WARRANTY CARD AND KEEP IN A SAFE PLACE FOR FUTURE REFERENCE...
Owner's Manual
Page 3
...openings. D3-4-2-1-7a_A1_En CAUTION The STANDBY/ON switch on this apparatus during lightning storms or when unused for connection with the apparatus. Install in locations exposed to high humidity or direct sunlight (or strong artificial light) D3-4-2-1-7c*_A1_En 11) Only use attachments/accessories specified... prevent fire hazard, the Class 2 Wiring Cable should also be used , use this unit, make sure the unit has been installed so that may be easily unplugged from the AC outlet when left unused for ventilation to ensure reliable operation of electric shock to ...
...openings. D3-4-2-1-7a_A1_En CAUTION The STANDBY/ON switch on this apparatus during lightning storms or when unused for connection with the apparatus. Install in locations exposed to high humidity or direct sunlight (or strong artificial light) D3-4-2-1-7c*_A1_En 11) Only use attachments/accessories specified... prevent fire hazard, the Class 2 Wiring Cable should also be used , use this unit, make sure the unit has been installed so that may be easily unplugged from the AC outlet when left unused for ventilation to ensure reliable operation of electric shock to ...
Owner's Manual
Page 4
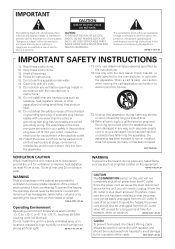
... application 15 Other speaker connection 16 Placing the speakers 17 Some tips for improving sound quality . . . . . 17 Connecting the speakers 18 Installing your speaker system 19 Bi-amping your speakers 20 Bi-wiring your speakers 20 Selecting the Speaker system 21 Front height setup 21 Front wide...set-top box 27 Connecting a HDD/DVD recorder, VCR and other video sources 27 Connecting other Pioneer components with this unit's sensor 35 Plugging in a safe place for buying this Pioneer product. Thank you will know how to operate your TV with Your System 51 Listening to ...
... application 15 Other speaker connection 16 Placing the speakers 17 Some tips for improving sound quality . . . . . 17 Connecting the speakers 18 Installing your speaker system 19 Bi-amping your speakers 20 Bi-wiring your speakers 20 Selecting the Speaker system 21 Front height setup 21 Front wide...set-top box 27 Connecting a HDD/DVD recorder, VCR and other video sources 27 Connecting other Pioneer components with this unit's sensor 35 Plugging in a safe place for buying this Pioneer product. Thank you will know how to operate your TV with Your System 51 Listening to ...
Owner's Manual
Page 7
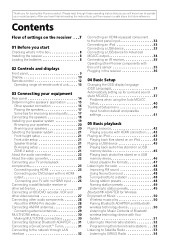
... system & ZONE 2 connection (Multi Zone) • Some tips for improving sound quality (page 17) 3 Connecting the speakers • Connecting the speakers (page 18) • Installing your speaker system (page 19) • Bi-amping your speakers (page 20) 4 Connecting the components • About the audio connection (page 22) • About...
... system & ZONE 2 connection (Multi Zone) • Some tips for improving sound quality (page 17) 3 Connecting the speakers • Connecting the speakers (page 18) • Installing your speaker system (page 19) • Bi-amping your speakers (page 20) 4 Connecting the components • About the audio connection (page 22) • About...
Owner's Manual
Page 8
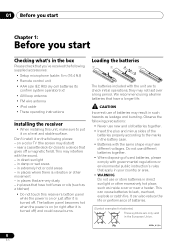
... dry cell batteries (to confirm system operation) x2 • AM loop antenna • FM wire antenna • iPod cable • These operating instructions Installing the receiver • When installing this receiver's bottom panel while the power is on a color TV (the screen may distort) - in places where there is on a level and... cause batteries to a device that gives off . Do not use of batteries. (Symbol examples for batteries) These symbols are only valid in direct sunlight - Don't install it is turned off a magnetic field).
... dry cell batteries (to confirm system operation) x2 • AM loop antenna • FM wire antenna • iPod cable • These operating instructions Installing the receiver • When installing this receiver's bottom panel while the power is on a color TV (the screen may distort) - in places where there is on a level and... cause batteries to a device that gives off . Do not use of batteries. (Symbol examples for batteries) These symbols are only valid in direct sunlight - Don't install it is turned off a magnetic field).
Owner's Manual
Page 18
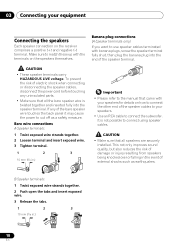
... negative (-) terminal. It is twisted together and inserted fully into the end of the speaker terminal. CAUTION • Make sure that all speakers are securely installed. Banana plug connections (A-Speaker terminals only) If you want to connect using speaker cables. This not only improves sound quality, but also reduces the risk...
... negative (-) terminal. It is twisted together and inserted fully into the end of the speaker terminal. CAUTION • Make sure that all speakers are securely installed. Banana plug connections (A-Speaker terminals only) If you want to connect using speaker cables. This not only improves sound quality, but also reduces the risk...

Owner's Manual
Page 19
... terminals can also be connected to the left surround back terminal). Connecting your equipment 03 English Deutsch Français Italiano Nederlands Español Installing your main surround speakers should always be connected as a pair, but you can connect just one surround back speaker if you like (it must be...
... terminals can also be connected to the left surround back terminal). Connecting your equipment 03 English Deutsch Français Italiano Nederlands Español Installing your main surround speakers should always be connected as a pair, but you can connect just one surround back speaker if you like (it must be...

Owner's Manual
Page 34
... characteristics in the computer. The various MCACC parameters can be checked on a computer screen. MCACC data and parameters are transferred from the support area of Pioneer. 03 Connecting your equipment Connecting a USB device for Advanced MCACC output When using the software are also available here. If you have any questions regarding...
... characteristics in the computer. The various MCACC parameters can be checked on a computer screen. MCACC data and parameters are transferred from the support area of Pioneer. 03 Connecting your equipment Connecting a USB device for Advanced MCACC output When using the software are also available here. If you have any questions regarding...
Owner's Manual
Page 38
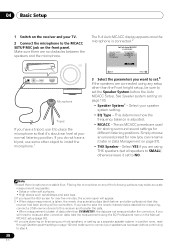
...04 Basic Setup 1 Switch on the receiver and your TV. 2 Connect the microphone to the MCACC SETUP MIC jack on a stable floor. Note 1 Install the microphone on the front panel. If you want to set all speakers to SMALL), otherwise leave it later in another room, read through Speaker... you are planning on bi-amping your front speakers, or setting up a separate speaker system in Data Management on any setup other object to install the microphone.1 The Full Auto MCACC display appears once the microphone is taken, the reverb characteristics data (both before the Auto MCACC Setup. Select...
...04 Basic Setup 1 Switch on the receiver and your TV. 2 Connect the microphone to the MCACC SETUP MIC jack on a stable floor. Note 1 Install the microphone on the front panel. If you want to set all speakers to SMALL), otherwise leave it later in another room, read through Speaker... you are planning on bi-amping your front speakers, or setting up a separate speaker system in Data Management on any setup other object to install the microphone.1 The Full Auto MCACC display appears once the microphone is taken, the reverb characteristics data (both before the Auto MCACC Setup. Select...
Owner's Manual
Page 54
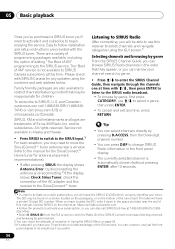
... time. 05 Basic playback Once you've purchased a SIRIUS tuner you will need the SIRIUS ID (SID) which uniquely identifies your tuner. Easy to follow installation and setup instructions are also available to begin enjoying the service. Please check with the SIRIUS tuner. SIRIUS, XM and all related marks and logos...
... time. 05 Basic playback Once you've purchased a SIRIUS tuner you will need the SIRIUS ID (SID) which uniquely identifies your tuner. Easy to follow installation and setup instructions are also available to begin enjoying the service. Please check with the SIRIUS tuner. SIRIUS, XM and all related marks and logos...
Owner's Manual
Page 87
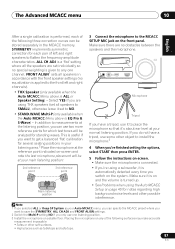
... Multi-P setting NO if you are no special weighting is ALL or Speaker Setting) - Placing the microphone on any one listening position. 3 Install the microphone on page 40 for several seating positions in the MCACC memory. In addition to measurements at the listening position, you switch on -screen...it 's about ear level at the reference point indicated on the system. This is useful if you have a tripod, use some other object to install the microphone.3 4 When you're finished setting the options, select START then press ENTER. 5 Follow the instructions on-screen. • Make sure...
... Multi-P setting NO if you are no special weighting is ALL or Speaker Setting) - Placing the microphone on any one listening position. 3 Install the microphone on page 40 for several seating positions in the MCACC memory. In addition to measurements at the listening position, you switch on -screen...it 's about ear level at the reference point indicated on the system. This is useful if you have a tripod, use some other object to install the microphone.3 4 When you're finished setting the options, select START then press ENTER. 5 Follow the instructions on-screen. • Make sure...
Owner's Manual
Page 112
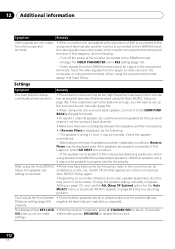
... the SURROUND BACK L (Single) terminals. • To use a 5.1-channel speaker set up properly). Remedy • When a monitor only compatible with resolutions of speakers and their installation conditions, Reverse Phase may be inverted. If this happens, select GO NEXT and continue. - Auto MCACC Setup again. • Depending on page 101, and use...
... the SURROUND BACK L (Single) terminals. • To use a 5.1-channel speaker set up properly). Remedy • When a monitor only compatible with resolutions of speakers and their installation conditions, Reverse Phase may be inverted. If this happens, select GO NEXT and continue. - Auto MCACC Setup again. • Depending on page 101, and use...
Owner's Manual
Page 259
..., Pioneer will investigate the dispute and will either: (1) respond to your unit or to locate an Authorized Service Company, please call 1-800-421-1404 and explain to the customer service representative the problem you are required to use due to a manufacturing defect when installed and...COVER THE COST OF PARTS OR LABOR WHICH WOULD BE OTHERWISE PROVIDED WITHOUT CHARGE UNDER THIS WARRANTY OBTAINED FROM ANY SOURCE OTHER THAN A PIONEER AUTHORIZED SERVICE COMPANY OR OTHER DESIGNATED LOCATION. ALTERED, DEFACED, OR REMOVED SERIAL NUMBERS VOID THIS ENTIRE WARRANTY NO OTHER WARRANTIES IN THE ...
..., Pioneer will investigate the dispute and will either: (1) respond to your unit or to locate an Authorized Service Company, please call 1-800-421-1404 and explain to the customer service representative the problem you are required to use due to a manufacturing defect when installed and...COVER THE COST OF PARTS OR LABOR WHICH WOULD BE OTHERWISE PROVIDED WITHOUT CHARGE UNDER THIS WARRANTY OBTAINED FROM ANY SOURCE OTHER THAN A PIONEER AUTHORIZED SERVICE COMPANY OR OTHER DESIGNATED LOCATION. ALTERED, DEFACED, OR REMOVED SERIAL NUMBERS VOID THIS ENTIRE WARRANTY NO OTHER WARRANTIES IN THE ...


