Owner's Manual
Page 36
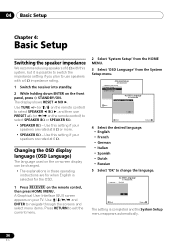
...8486; - Use this setting if your speakers are for when English is selected for the OSD. 1 Press RECEIVER on the front panel, press STANDBY/ON. Input Setup c. A Graphical User Interface (GUI) screen appears on the remote control) to select SPEAKER 8Ω or SPEAKER 6Ω. •... current menu. 2 Select 'System Setup' from the HOME MENU. 3 Select 'OSD Language' from the System Setup menu. 4.SystemSetup A/V RECEIVER a.Manual SP Setup b. Use and ENTER to navigate through the screens and select menu items. Press RETURN to change the language. Language : 4c.OSD Language...
...8486; - Use this setting if your speakers are for when English is selected for the OSD. 1 Press RECEIVER on the front panel, press STANDBY/ON. Input Setup c. A Graphical User Interface (GUI) screen appears on the remote control) to select SPEAKER 8Ω or SPEAKER 6Ω. •... current menu. 2 Select 'System Setup' from the HOME MENU. 3 Select 'OSD Language' from the System Setup menu. 4.SystemSetup A/V RECEIVER a.Manual SP Setup b. Use and ENTER to navigate through the screens and select menu items. Press RETURN to change the language. Language : 4c.OSD Language...
Owner's Manual
Page 39
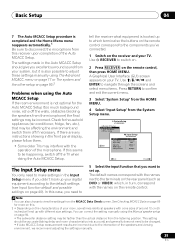
...around 12 cm (5 inches) will end up with different size settings. A Graphical User Interface (GUI) screen appears on the remote control, then press HOME MENU. Note 1 You can correct the setting manually using the Auto MCACC Setup If the room environment is also possible to the ... not optimal for household appliances (air conditioner, fridge, fan, etc.), that you excellent surround sound from the System Setup menu. 4.SystemSetup A/V RECEIVER a.Manual SP Setup b. The default names correspond with the names next to the terminals on the rear panel (such as DVD or VIDEO) which terminal...
...around 12 cm (5 inches) will end up with different size settings. A Graphical User Interface (GUI) screen appears on the remote control, then press HOME MENU. Note 1 You can correct the setting manually using the Auto MCACC Setup If the room environment is also possible to the ... not optimal for household appliances (air conditioner, fridge, fan, etc.), that you excellent surround sound from the System Setup menu. 4.SystemSetup A/V RECEIVER a.Manual SP Setup b. The default names correspond with the names next to the terminals on the rear panel (such as DVD or VIDEO) which terminal...
Owner's Manual
Page 77
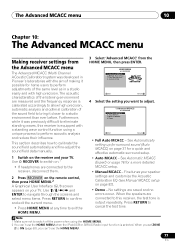
...was previously difficult to the receiver, disconnect them. 2 Press RECEIVER on the remote control, then press HOME MENU.2 A Graphical User Interface (GUI) screen appears on your speaker settings and customize the Acoustic Calibration EQ (see Manual MCACC setup on the receiver and your TV. Manual MCACC d. Auto MCACC ...are saved and no errors occur. This section describes how to adjust. 1.Advanced MCACC A/V RECEIVER a. When you set ZONE 2 to perform adjustments of making it was developed in Pioneer's laboratories with the aim of the same level as in a studio easily and with a...
...was previously difficult to the receiver, disconnect them. 2 Press RECEIVER on the remote control, then press HOME MENU.2 A Graphical User Interface (GUI) screen appears on your speaker settings and customize the Acoustic Calibration EQ (see Manual MCACC setup on the receiver and your TV. Manual MCACC d. Auto MCACC ...are saved and no errors occur. This section describes how to adjust. 1.Advanced MCACC A/V RECEIVER a. When you set ZONE 2 to perform adjustments of making it was developed in Pioneer's laboratories with the aim of the same level as in a studio easily and with a...
Owner's Manual
Page 89
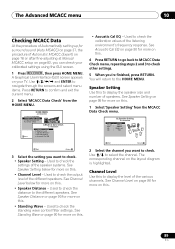
...from the HOME MENU. Used to display the speaker size and number of the different speakers. A Graphical User Interface (GUI) screen appears on your calibrated settings using the GUI screen. 1 Press RECEIVER , then press HOME MENU. MCACC Data Check 3. The corresponding channel on the layout diagram is highlighted...this . 89 En Speaker Setting Use this to check the settings of Automatic MCACC (Expert) on page 78 or after fine-adjusting at Manual MCACC setup on page 82, you 're finished, press RETURN. Use / to check the standing wave control filter settings....
...from the HOME MENU. Used to display the speaker size and number of the different speakers. A Graphical User Interface (GUI) screen appears on your calibrated settings using the GUI screen. 1 Press RECEIVER , then press HOME MENU. MCACC Data Check 3. The corresponding channel on the layout diagram is highlighted...this . 89 En Speaker Setting Use this to check the settings of Automatic MCACC (Expert) on page 78 or after fine-adjusting at Manual MCACC setup on page 82, you 're finished, press RETURN. Use / to check the standing wave control filter settings....
Owner's Manual
Page 93
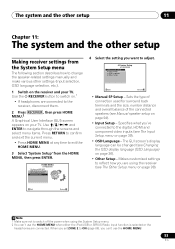
... Radio input function is selected or the headphones are connected to ON (page 69), you set ZONE 2 to the receiver, disconnect them. 2 Press RECEIVER , then press HOME MENU.2 A Graphical User Interface (GUI) screen appears on .1 • If headphones are connected. The system and the other setup 11 Chapter.... Press RETURN to confirm and exit the current menu. • Press HOME MENU at any time to change the speaker-related settings manually and make various other settings (input selection, OSD language selection, etc.). 1 Switch on page 94). • Input Setup - Other Setup Exit...
... Radio input function is selected or the headphones are connected to ON (page 69), you set ZONE 2 to the receiver, disconnect them. 2 Press RECEIVER , then press HOME MENU.2 A Graphical User Interface (GUI) screen appears on .1 • If headphones are connected. The system and the other setup 11 Chapter.... Press RETURN to confirm and exit the current menu. • Press HOME MENU at any time to change the speaker-related settings manually and make various other settings (input selection, OSD language selection, etc.). 1 Switch on page 94). • Input Setup - Other Setup Exit...
Owner's Manual
Page 98
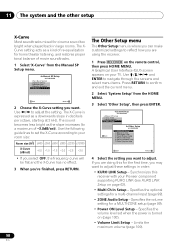
...Setup 3. Remote Control Mode Setup 7. If you can make customized settings to your Pioneer component supporting KURO LINK (see KURO LINK Setup on the remote control, then press HOME MENU. A Graphical User Interface (GUI) screen appears on (page 100). • Volume Limit Setup - ... (to a maximum of movie soundtracks. 1 Select 'X-Curve' from the HOME MENU. 3 Select 'Other Setup', then press ENTER. 4.SystemSetup A/V RECEIVER a.Manual SP Setup b. Specifies the optional settings for a MULTI-ZONE setup (page 99). • Power ON Level Setup - X-Curve Exit Return 2 Choose...
...Setup 3. Remote Control Mode Setup 7. If you can make customized settings to your Pioneer component supporting KURO LINK (see KURO LINK Setup on the remote control, then press HOME MENU. A Graphical User Interface (GUI) screen appears on (page 100). • Volume Limit Setup - ... (to a maximum of movie soundtracks. 1 Select 'X-Curve' from the HOME MENU. 3 Select 'Other Setup', then press ENTER. 4.SystemSetup A/V RECEIVER a.Manual SP Setup b. Specifies the optional settings for a MULTI-ZONE setup (page 99). • Power ON Level Setup - X-Curve Exit Return 2 Choose...
Owner's Manual
Page 127
... to your complaint, Pioneer will investigate the dispute and will not take , and in writing informing you have appointed a number of receiving your complaint in what action Pioneer will be issued. ...our response to any remedies, created by a traceable, insured method, to the owner's manual enclosed with the unit will take any action. The Complaint Resolution Program is first put into...Improvement Act, 15 U.S.C. 2301 et seq. PIONEER ELECTRONICS (USA) INC. THIS WARRANTY DOES NOT COVER THE CABINET OR ANY APPEARANCE ITEM, USER ATTACHED ANTENNA, ANY DAMAGE TO RECORDS OR...
... to your complaint, Pioneer will investigate the dispute and will not take , and in writing informing you have appointed a number of receiving your complaint in what action Pioneer will be issued. ...our response to any remedies, created by a traceable, insured method, to the owner's manual enclosed with the unit will take any action. The Complaint Resolution Program is first put into...Improvement Act, 15 U.S.C. 2301 et seq. PIONEER ELECTRONICS (USA) INC. THIS WARRANTY DOES NOT COVER THE CABINET OR ANY APPEARANCE ITEM, USER ATTACHED ANTENNA, ANY DAMAGE TO RECORDS OR...


