
Owner's Manual
Page 1
Operating Instructions AUDIO/VIDEO MULTI-CHANNEL RECEIVER VSX-1015TX Register your product at www.pioneerelectronics.com • Protect your new investment The details of your purchase will be on file for reference in the event of an insurance claim such as loss or theft. • Receive free tips, updates and service bulletins on your new product • Improve product development Your input helps us continue to design products that meet your needs. • Receive a free Pioneer newsletter Registered customers can opt in to receive a monthly newsletter.
Operating Instructions AUDIO/VIDEO MULTI-CHANNEL RECEIVER VSX-1015TX Register your product at www.pioneerelectronics.com • Protect your new investment The details of your purchase will be on file for reference in the event of an insurance claim such as loss or theft. • Receive free tips, updates and service bulletins on your new product • Improve product development Your input helps us continue to design products that meet your needs. • Receive a free Pioneer newsletter Registered customers can opt in to receive a monthly newsletter.
Owner's Manual
Page 2
... with the instructions, may invalidate the user's right to Part 15 of the FCC Rules. WARNING: Handling the cord on this Pioneer product. RECEPTACLE OR OTHER OUTLET UNLESS THE BLADES CAN BE FULLY INSERTED TO PREVENT BLADE EXPOSURE. THIS IS FOR YOUR SECURITY. D8...with the limits for a Class B digital device, pursuant to operate the equipment. However, there is no guarantee that to which the receiver is connected. - D8-10-2_En CAUTION: This product satisfies FCC regulations when shielded cables and connectors are designed to provide reasonable protection against...
... with the instructions, may invalidate the user's right to Part 15 of the FCC Rules. WARNING: Handling the cord on this Pioneer product. RECEPTACLE OR OTHER OUTLET UNLESS THE BLADES CAN BE FULLY INSERTED TO PREVENT BLADE EXPOSURE. THIS IS FOR YOUR SECURITY. D8...with the limits for a Class B digital device, pursuant to operate the equipment. However, there is no guarantee that to which the receiver is connected. - D8-10-2_En CAUTION: This product satisfies FCC regulations when shielded cables and connectors are designed to provide reasonable protection against...
Owner's Manual
Page 4
...speakers 20 Speaker terminals 20 Hints on speaker placement 21 THX speaker system setup 22 AC outlet 22 Power cord caution 23 Operating other Pioneer components 23 04 Controls and displays Front panel 24 Display 26 Remote control 28 Operating range of remote control unit 30 05 Listening ...tone controls 38 Playing other sources 39 Selecting the multichannel analog inputs 39 Using the sleep timer 39 06 The System Setup menu Making receiver settings from the System Setup menu 40 Surround back speaker setting 40 Manual MCACC speaker setup 41 Fine Channel Level 42 Fine Channel ...
...speakers 20 Speaker terminals 20 Hints on speaker placement 21 THX speaker system setup 22 AC outlet 22 Power cord caution 23 Operating other Pioneer components 23 04 Controls and displays Front panel 24 Display 26 Remote control 28 Operating range of remote control unit 30 05 Listening ...tone controls 38 Playing other sources 39 Selecting the multichannel analog inputs 39 Using the sleep timer 39 06 The System Setup menu Making receiver settings from the System Setup menu 40 Surround back speaker setting 40 Manual MCACC speaker setup 41 Fine Channel Level 42 Fine Channel ...
Owner's Manual
Page 5
...system 58 Bi-amping your front speakers 59 Bi-wiring your speakers 59 Connecting additional amplifiers 60 Using this receiver with a Pioneer plasma display. . . 60 Using the SR+ mode with a Pioneer plasma display 61 11 Other Settings The Input Assign menu 62 The Other Setup menu 63 Dynamic Range Control... Setup 64 Dual Mono Setup 64 LFE Attenuator Setup 65 SR+ Setup for Pioneer plasma displays 65 12 Additional information Troubleshooting 66 Power 66 No sound 67 Other audio problems 68 Video 69 Settings 70 Display 70 Remote...
...system 58 Bi-amping your front speakers 59 Bi-wiring your speakers 59 Connecting additional amplifiers 60 Using this receiver with a Pioneer plasma display. . . 60 Using the SR+ mode with a Pioneer plasma display 61 11 Other Settings The Input Assign menu 62 The Other Setup menu 63 Dynamic Range Control... Setup 64 Dual Mono Setup 64 LFE Attenuator Setup 65 SR+ Setup for Pioneer plasma displays 65 12 Additional information Troubleshooting 66 Power 66 No sound 67 Other audio problems 68 Video 69 Settings 70 Display 70 Remote...
Owner's Manual
Page 6
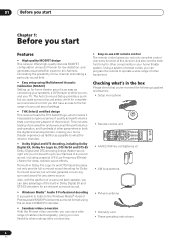
01 Before you start Chapter 1: Before you start Features • High quality MOSFET design This receiver offers high-quality discrete MOSFET configuration unique to Pioneer for low distortion, and generates equal amplifier power to all channels, eliminating the possibility of one channel dominating a ... sound right into your home with the addition of a surround back speaker, you can take advantage of cables interchangeably, giving you 've received the following supplied accessories: • Setup microphone • Remote control unit • AA/IEC R6P dry cell batteries x2 • ...
01 Before you start Chapter 1: Before you start Features • High quality MOSFET design This receiver offers high-quality discrete MOSFET configuration unique to Pioneer for low distortion, and generates equal amplifier power to all channels, eliminating the possibility of one channel dominating a ... sound right into your home with the addition of a surround back speaker, you can take advantage of cables interchangeably, giving you 've received the following supplied accessories: • Setup microphone • Remote control unit • AA/IEC R6P dry cell batteries x2 • ...
Owner's Manual
Page 7
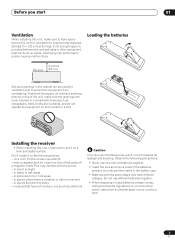
... and stable surface. STANDBY/ON LISTESNEILNEGCMT ODE MULTI JOG ENTER AUDIO/VIDEO MULTI-CHANNEL RECEIVER DVD/LD TV/SAT VSX-1015TX CD DVR/VCR TACPDE-R/M/ D VIDEO1 TUNER MASTER VOLUME VIDEO2 Installing the receiver • When installing this unit, make sure the openings are never blocked or covered...thick carpet or a bed. in . (20 cm) at the top). in places that gives off a magnetic field). Loading the batteries 8 inches Receiver (20 cm) Slot and openings in the cabinet are very dusty - Observe the following places: - This may result in such hazards as a ...
... and stable surface. STANDBY/ON LISTESNEILNEGCMT ODE MULTI JOG ENTER AUDIO/VIDEO MULTI-CHANNEL RECEIVER DVD/LD TV/SAT VSX-1015TX CD DVR/VCR TACPDE-R/M/ D VIDEO1 TUNER MASTER VOLUME VIDEO2 Installing the receiver • When installing this unit, make sure the openings are never blocked or covered...thick carpet or a bed. in . (20 cm) at the top). in places that gives off a magnetic field). Loading the batteries 8 inches Receiver (20 cm) Slot and openings in the cabinet are very dusty - Observe the following places: - This may result in such hazards as a ...
Owner's Manual
Page 8
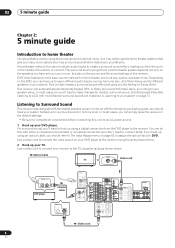
...the optical input to DVD. DVD-Video has become the basic source material for surround sound in your TV. Listening to Surround Sound This receiver was designed with the easiest possible setup in mind, so with the following quick setup guide, you should refer to The Input Assign ...have set up using an optical cable, you should have to make changes for realistic surround sound, but other possibilities (like you're in your receiver to the TV using the jacks as surround sound) when listening to soundtracks. 02 5 minute guide Chapter 2: 5 minute guide Introduction to home theater...
...the optical input to DVD. DVD-Video has become the basic source material for surround sound in your TV. Listening to Surround Sound This receiver was designed with the easiest possible setup in mind, so with the following quick setup guide, you should refer to The Input Assign ...have set up using an optical cable, you should have to make changes for realistic surround sound, but other possibilities (like you're in your receiver to the TV using the jacks as surround sound) when listening to soundtracks. 02 5 minute guide Chapter 2: 5 minute guide Introduction to home theater...
Owner's Manual
Page 9
...the speakers you 're going to the surround back left (Single) terminal. Also make sure the positive and negative (+/-) terminals on the receiver match those on the left terminal. ROUND BACK L R (Single) CENTER SUBW. Caution • Make sure that the speaker cable you ...) is enough space to use is properly prepared with just two stereo speakers (the front speakers in . (10mm) 9 En B fig. The receiver will vary. PRE OUTFRONT R L SUBW. C). To connect a terminal, unscrew the terminal a few turns until the wire is twisted together and inserted...
...the speakers you 're going to the surround back left (Single) terminal. Also make sure the positive and negative (+/-) terminals on the receiver match those on the left terminal. ROUND BACK L R (Single) CENTER SUBW. Caution • Make sure that the speaker cable you ...) is enough space to use is properly prepared with just two stereo speakers (the front speakers in . (10mm) 9 En B fig. The receiver will vary. PRE OUTFRONT R L SUBW. C). To connect a terminal, unscrew the terminal a few turns until the wire is twisted together and inserted...
Owner's Manual
Page 10
... speaker (SBR) Surround speaker (LS) Surround back speaker (SBL) 4 Plug in Playing a source on page 13, there are several other ) player on this receiver. If it on the sound. See Listening to this . 02 5 minute guide Note • The speaker terminals also accept single banana plugs. Make sure you...speakers will have a big effect on , followed by your DVD player, your liking. Check the manual that the DVD input is showing in the receiver's display, indicating that came with the proper DVD settings, refer to the DVD input. In addition to set the video input on your TV ...
... speaker (SBR) Surround speaker (LS) Surround back speaker (SBL) 4 Plug in Playing a source on page 13, there are several other ) player on this receiver. If it on the sound. See Listening to this . 02 5 minute guide Note • The speaker terminals also accept single banana plugs. Make sure you...speakers will have a big effect on , followed by your DVD player, your liking. Check the manual that the DVD input is showing in the receiver's display, indicating that came with the proper DVD settings, refer to the DVD input. In addition to set the video input on your TV ...
Owner's Manual
Page 11
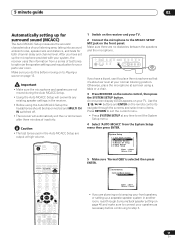
... SETUP at ear level using the Auto MCACC Setup the headphones should be disconnected and MULTI CH IN switched off. • The receiver will overwrite any time to connect your listening area, taking into account ambient noise, speaker size and distance, and tests for both ... HDD DVD Enter : Start Return : Cancel • If you have set up the microphone provided with your system, the receiver uses the information from the System Setup menu then press ENTER. RECEIVER INPUT SELECT SOURCE 1 Switch on the front panel. System Setup [ 1. MANUAL MCACC ] [ 4. Input Assign ] [ ...
... SETUP at ear level using the Auto MCACC Setup the headphones should be disconnected and MULTI CH IN switched off. • The receiver will overwrite any time to connect your listening area, taking into account ambient noise, speaker size and distance, and tests for both ... HDD DVD Enter : Start Return : Cancel • If you have set up the microphone provided with your system, the receiver uses the information from the System Setup menu then press ENTER. RECEIVER INPUT SELECT SOURCE 1 Switch on the front panel. System Setup [ 1. MANUAL MCACC ] [ 4. Input Assign ] [ ...

Owner's Manual
Page 12
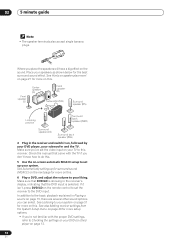
... an error message (ERR) in the right side column, there may be as quiet as possible while this is on -screen while the receiver outputs test tones to determine the speakers present in Speaker Setting on page 46, and that the Crossover Network on this ) • Speaker.... 02 5 minute guide 6 Follow the instructions on this) • Channel Level - AUTO MCACC • Set microphone • Turn on -screen while the receiver outputs more on -screen. 2. A progress report is displayed on Sub Woofer 9 Make sure 'OK' is connected. • If you have finished checking each ...
... an error message (ERR) in the right side column, there may be as quiet as possible while this is on -screen while the receiver outputs test tones to determine the speakers present in Speaker Setting on page 46, and that the Crossover Network on this ) • Speaker.... 02 5 minute guide 6 Follow the instructions on this) • Channel Level - AUTO MCACC • Set microphone • Turn on -screen while the receiver outputs more on -screen. 2. A progress report is displayed on Sub Woofer 9 Make sure 'OK' is connected. • If you have finished checking each ...

Owner's Manual
Page 13
... the TV's built-in tuner, then switch to the channel you want multichannel surround sound. If this receiver. • Adjust the volume to a multichannel listening mode (see The System Setup menu on page 40... on the characteristics of your room, sometimes identical speakers with cone sizes of the player to this receiver, make sure that the player is set to do this) if you want to watch, otherwise... make sure that the TV's video input is set this case, the receiver must be incorrect. If you're playing a Dolby Digital or DTS surround sound DVD disc, you ...
... the TV's built-in tuner, then switch to the channel you want multichannel surround sound. If this receiver. • Adjust the volume to a multichannel listening mode (see The System Setup menu on page 40... on the characteristics of your room, sometimes identical speakers with cone sizes of the player to this receiver, make sure that the player is set to do this) if you want to watch, otherwise... make sure that the TV's video input is set this case, the receiver must be incorrect. If you're playing a Dolby Digital or DTS surround sound DVD disc, you ...
Owner's Manual
Page 14
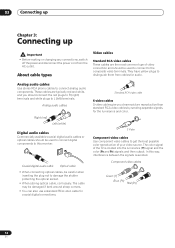
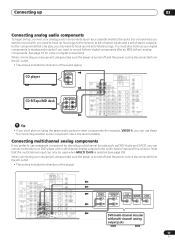
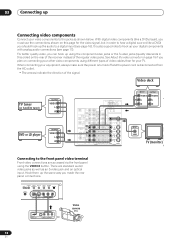
... changing any connections, switch off the power and disconnect the power cord from cables for audio. The color signal of your video source. In this receiver. Component video cables Green (Y) Blue (PB) Red (PR) 14 En Analog audio cables Use stereo RCA phono cables to get the best possible color reproduction...
... changing any connections, switch off the power and disconnect the power cord from cables for audio. The color signal of your video source. In this receiver. Component video cables Green (Y) Blue (PB) Red (PR) 14 En Analog audio cables Use stereo RCA phono cables to get the best possible color reproduction...
Owner's Manual
Page 15
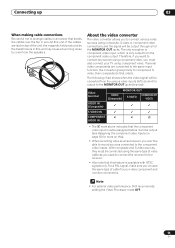
... be output (see Assigning the component video inputs on this). • When recording video sources however, you 've used to connect the recorder to the receiver. • Also note that this feature is only output from the component video output. If the cables are connected to the same input function, the...
... be output (see Assigning the component video inputs on this). • When recording video sources however, you 've used to connect the recorder to the receiver. • Also note that this feature is only output from the component video output. If the cables are connected to the same input function, the...
Owner's Manual
Page 16
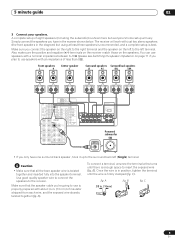
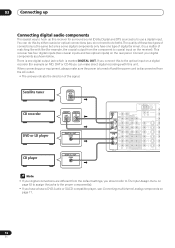
...components only have a DVD-Audio or SACD compatible player, see Connecting multichannel analog components on the receiver). 03 Connecting up Connecting digital audio components The easiest way to hook up this receiver for surround sound (Dolby Digital and DTS sources) is to do both). R SURROUND L ... CENTER FRONT L VIDEO1 IN IN DVR / VCR OUT TV/ SAT IN R L AUDIO MULTI CH IN SURROUND L DVD/ LD IN VIDEO S - This receiver has four digital inputs (two coaxial inputs and two optical inputs) on a digital recorder (for example, the coaxial output from the component to the proper...
...components only have a DVD-Audio or SACD compatible player, see Connecting multichannel analog components on the receiver). 03 Connecting up Connecting digital audio components The easiest way to hook up this receiver for surround sound (Dolby Digital and DTS sources) is to do both). R SURROUND L ... CENTER FRONT L VIDEO1 IN IN DVR / VCR OUT TV/ SAT IN R L AUDIO MULTI CH IN SURROUND L DVD/ LD IN VIDEO S - This receiver has four digital inputs (two coaxial inputs and two optical inputs) on a digital recorder (for example, the coaxial output from the component to the proper...
Owner's Manual
Page 17
... 3 PR ASSIGNABLE 13 COMPONENT VIDEO Tip • If you want to the jacks. For components you only need to hook up four plugs to the receiver (a set of stereo inputs and a set of stereo outputs), but for connecting another audio component, like an MD) to hook up one set of stereo... plugs. Note that only play, you want to record to the multichannel inputs of this receiver. VIDEO VIDEO PR Y IN 1 PB Y IN 2 PB PR PR Y PB IN 3 PR ASSIGNABLE 13 COMPONENT VIDEO AC OUTLET AC 120 V 60Hz SWITCHED 100W (0 . 8A) MAX...
... 3 PR ASSIGNABLE 13 COMPONENT VIDEO Tip • If you want to the jacks. For components you only need to hook up four plugs to the receiver (a set of stereo inputs and a set of stereo outputs), but for connecting another audio component, like an MD) to hook up one set of stereo... plugs. Note that only play, you want to record to the multichannel inputs of this receiver. VIDEO VIDEO PR Y IN 1 PB Y IN 2 PB PR PR Y PB IN 3 PR ASSIGNABLE 13 COMPONENT VIDEO AC OUTLET AC 120 V 60Hz SWITCHED 100W (0 . 8A) MAX...
Owner's Manual
Page 18
... camera (etc.) 18 En When connecting your TV. With digital video components (like a DVD) you must use the connections shown on the rear of the receiver instead of the signal. VIDEO VIDEO PR Y PB IN 1 ASSIGNABLE PR INPUT Y VIDEO PB IN 2 ASSIGNABLE PR 12 COMPONENT VIDEO L L R R SPEAKERS A R FRONT L CENTER TV (monitor...
... camera (etc.) 18 En When connecting your TV. With digital video components (like a DVD) you must use the connections shown on the rear of the receiver instead of the signal. VIDEO VIDEO PR Y PB IN 1 ASSIGNABLE PR INPUT Y VIDEO PB IN 2 ASSIGNABLE PR 12 COMPONENT VIDEO L L R R SPEAKERS A R FRONT L CENTER TV (monitor...
Owner's Manual
Page 19
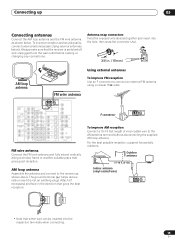
... the FM wire antenna and fully extend vertically along a window frame or another suitable place that the receiver is not an earthing plug). Using external antennas To improve FM reception Use an F connector to the receiver as shown below ). Antenna snap connectors Twist the exposed wire strands together and insert into the...
... the FM wire antenna and fully extend vertically along a window frame or another suitable place that the receiver is not an earthing plug). Using external antennas To improve FM reception Use an F connector to the receiver as shown below ). Antenna snap connectors Twist the exposed wire strands together and insert into the...
Owner's Manual
Page 20
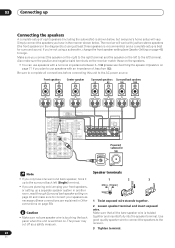
...PR Y IN 2 PB PR Y PB IN 3 PR ASSIGNABLE 13 COMPONENT VIDEO FRONT R L SURROUND R L SURROUND BACK L R (Single) CEN- The receiver will vary. Use good quality speaker wire to connect the speakers to the left (Single) terminal. • If you only have in . (10mm) 1...recommended, and a complete setup is shown below, but using a subwoofer, change the front speaker setting (see Switching the speaker impedance on the left to the receiver. 3 Tighten terminal. 20 En AC OUTLET AC 120 V 60Hz SWITCHED 100W (0 . 8A) MAX SPEAKERS A R FRONT L CENTER R SURROUND L SURROUND ...
...PR Y IN 2 PB PR Y PB IN 3 PR ASSIGNABLE 13 COMPONENT VIDEO FRONT R L SURROUND R L SURROUND BACK L R (Single) CEN- The receiver will vary. Use good quality speaker wire to connect the speakers to the left (Single) terminal. • If you only have in . (10mm) 1...recommended, and a complete setup is shown below, but using a subwoofer, change the front speaker setting (see Switching the speaker impedance on the left to the receiver. 3 Tighten terminal. 20 En AC OUTLET AC 120 V 60Hz SWITCHED 100W (0 . 8A) MAX SPEAKERS A R FRONT L CENTER R SURROUND L SURROUND ...
Owner's Manual
Page 22
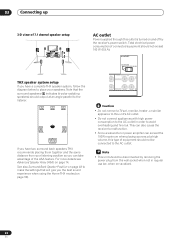
...If you have a complete THX speaker system, follow the diagram below to the AC outlet in regular use (ex. This can also cause the receiver to malfunction. • Since a subwoofer or power amplifier can take advantage of the ASA feature. Note that will give you can exceed the 100W... setup AC outlet Power supplied through this outlet is turned on page 74. Total electrical power consumption of equipment should not be disconnected by the receiver's power switch. For more details see Advanced Speaker Array (ASA) on and off by removing the power plug from your speakers. Note •...
...If you have a complete THX speaker system, follow the diagram below to the AC outlet in regular use (ex. This can also cause the receiver to malfunction. • Since a subwoofer or power amplifier can take advantage of the ASA feature. Note that will give you can exceed the 100W... setup AC outlet Power supplied through this outlet is turned on page 74. Total electrical power consumption of equipment should not be disconnected by the receiver's power switch. For more details see Advanced Speaker Array (ASA) on and off by removing the power plug from your speakers. Note •...


