Owner's Manual
Page 4
...28 Connecting other audio components...29 Connecting additional amplifiers...30 Connecting AM/FM antennas...30 MULTI-ZONE setup...31 Connecting to the network through these operating instructions so you start Checking what's in...iPod...43 Playing a USB device...44 Listening to the radio...45 Bluetooth ADAPTER for buying this Pioneer product. Contents 01 Before you will know how to a wireless LAN...34 Connecting an IR receiver... and Stream Smoother Link 60 Cautions on the Control with HDMI function...61 09 Using other functions Setting the Audio options...63 Setting the Video options...65 Switching ...
...28 Connecting other audio components...29 Connecting additional amplifiers...30 Connecting AM/FM antennas...30 MULTI-ZONE setup...31 Connecting to the network through these operating instructions so you start Checking what's in...iPod...43 Playing a USB device...44 Listening to the radio...45 Bluetooth ADAPTER for buying this Pioneer product. Contents 01 Before you will know how to a wireless LAN...34 Connecting an IR receiver... and Stream Smoother Link 60 Cautions on the Control with HDMI function...61 09 Using other functions Setting the Audio options...63 Setting the Video options...65 Switching ...
Owner's Manual
Page 5
... of the remote control button settings...72 Erasing all learnt settings that are in one input function 72 Direct function...73 About the ALL ZONE STBY (All Zone Standby) and DISCRETE ON (Discrete On) functions 73 Resetting the remote control settings...73 Controlling components...74 11 The Advanced MCACC menu Making receiver...
... of the remote control button settings...72 Erasing all learnt settings that are in one input function 72 Direct function...73 About the ALL ZONE STBY (All Zone Standby) and DISCRETE ON (Discrete On) functions 73 Resetting the remote control settings...73 Controlling components...74 11 The Advanced MCACC menu Making receiver...
Owner's Manual
Page 6
... height) ! 7.2 channel surround system (Front wide) ! 7.2 channel surround system & Speaker B connection ! 5.2 channel surround system & Front Bi-amping connection (High quality surround) ! 5.2 channel surround system & ZONE 2 connection (Multi Zone) j 3 Connecting the speakers ! About the audio connection on page 24 ! About the video converter on page 23 ! Using the various listening modes (page 48...
... height) ! 7.2 channel surround system (Front wide) ! 7.2 channel surround system & Speaker B connection ! 5.2 channel surround system & Front Bi-amping connection (High quality surround) ! 5.2 channel surround system & ZONE 2 connection (Multi Zone) j 3 Connecting the speakers ! About the audio connection on page 24 ! About the video converter on page 23 ! Using the various listening modes (page 48...
Owner's Manual
Page 12
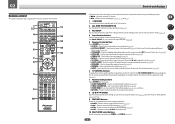
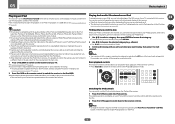
... AUTO SIGNAL SEL MCACC CH LEVEL S.RTRV 4 5 6 DISP SPEAKERS DIMMER SLEEP 7 8 9 CH D.ACCESS HDMI OUT CLASS / CLR 0 ENTER CH ZONE 2 ZONE 3 ZONE 4 OPTION 2 Z2 Z3 Z4 11 12 13 14 15 RECEIVER Controls and displays The remote has been conveniently color-coded according to switch between Auto...switch between standby and on for the remote control's operation mode (page 71). 7 Receiver setting buttons Press first to put the receiver in ZONE 2 and ZONE 3 (page 67). 12 SIGNAL SEL - MCACC - Press repeatedly to select a channel, then use k/l to access: ! Press to ...
... AUTO SIGNAL SEL MCACC CH LEVEL S.RTRV 4 5 6 DISP SPEAKERS DIMMER SLEEP 7 8 9 CH D.ACCESS HDMI OUT CLASS / CLR 0 ENTER CH ZONE 2 ZONE 3 ZONE 4 OPTION 2 Z2 Z3 Z4 11 12 13 14 15 RECEIVER Controls and displays The remote has been conveniently color-coded according to switch between Auto...switch between standby and on for the remote control's operation mode (page 71). 7 Receiver setting buttons Press first to put the receiver in ZONE 2 and ZONE 3 (page 67). 12 SIGNAL SEL - MCACC - Press repeatedly to select a channel, then use k/l to access: ! Press to ...

Owner's Manual
Page 13
Also use this receiver, HDMI OUT, D.FILT, OPTION 2 and ZONE 4 buttons cannot be registered using the learning mode. 13 Switches the remote to set up surround sound. 14 VOLUME +/- Controls and displays 13 Use to ... control LED Lights when a command is sent from the remote control. 12 OPTION The preset codes of desired devices can be registered in the main zone. With this button to select the white commands). Switch to perform operations in the remote control and button operations can be used to set the...
Also use this receiver, HDMI OUT, D.FILT, OPTION 2 and ZONE 4 buttons cannot be registered using the learning mode. 13 Switches the remote to set up surround sound. 14 VOLUME +/- Controls and displays 13 Use to ... control LED Lights when a command is sent from the remote control. 12 OPTION The preset codes of desired devices can be registered in the main zone. With this button to select the white commands). Switch to perform operations in the remote control and button operations can be used to set the...

Owner's Manual
Page 14
... is being input. ! When one channel other than the ones above ! Lights during playback of DTS-HD Master Audio signals. 4 MULTI-ZONE Lights when the MULTI-ZONE feature is active (page 67). 5 SOUND Lights when the DIALOG E (Dialog Enhancement) or TONE (tone controls) features is selected (page... AUTO SURROUND STREAM DIRECT 2PROLOGIC x Neo:6 ADV.SURROUND STANDARD SP AB SLEEP R 2DIGITAL PLUS DSD PCM TUNED SR 2TrueHD DTS HD ES 96/24 MULTI-ZONE PQLS ALC ATT STEREO S.RTRV SOUND UP MIX OVER MONO XR MSTR CD TUNER iPod DVD TV VIDEO BD DVR HDMI [ 2 ] USB [ 3 ] ...
... is being input. ! When one channel other than the ones above ! Lights during playback of DTS-HD Master Audio signals. 4 MULTI-ZONE Lights when the MULTI-ZONE feature is active (page 67). 5 SOUND Lights when the DIALOG E (Dialog Enhancement) or TONE (tone controls) features is selected (page... AUTO SURROUND STREAM DIRECT 2PROLOGIC x Neo:6 ADV.SURROUND STANDARD SP AB SLEEP R 2DIGITAL PLUS DSD PCM TUNED SR 2TrueHD DTS HD ES 96/24 MULTI-ZONE PQLS ALC ATT STEREO S.RTRV SOUND UP MIX OVER MONO XR MSTR CD TUNER iPod DVD TV VIDEO BD DVR HDMI [ 2 ] USB [ 3 ] ...
Owner's Manual
Page 15
...45). 10 VIDEO PARAMETER Use to access the Video options (page 65). 11 MULTI-ZONE controls If you've made MULTI-ZONE connections (page 31) use these controls to control the sub zone from the main zone (page 67). 12 SPEAKERS Use to change the speaker terminal (page 67). 13...STANDBY / ON ADVANCED MCACC FL OFF HDMI iPod iPhone iPad MASTER VOLUME 8 9 10 11 12 13 14 AUDIO PARAMETER TUNE VIDEO PARAMETER MULTI-ZONE ON/OFF CONTROL SPEAKERS iPod iPhone iPad AUTO SURR/ALC/ DIRECT CONTROL STREAM DIRECT STEREO STANDARD SURROUND ADVANCED SURROUND ENTER BAND 7 PRESET PRESET HOME...
...45). 10 VIDEO PARAMETER Use to access the Video options (page 65). 11 MULTI-ZONE controls If you've made MULTI-ZONE connections (page 31) use these controls to control the sub zone from the main zone (page 67). 12 SPEAKERS Use to change the speaker terminal (page 67). 13...STANDBY / ON ADVANCED MCACC FL OFF HDMI iPod iPhone iPad MASTER VOLUME 8 9 10 11 12 13 14 AUDIO PARAMETER TUNE VIDEO PARAMETER MULTI-ZONE ON/OFF CONTROL SPEAKERS iPod iPhone iPad AUTO SURR/ALC/ DIRECT CONTROL STREAM DIRECT STEREO STANDARD SURROUND ADVANCED SURROUND ENTER BAND 7 PRESET PRESET HOME...

Owner's Manual
Page 17
... Connecting a satellite/cable receiver or other set-top box 28 Connecting other audio components 29 Connecting additional amplifiers 30 Connecting AM/FM antennas...30 MULTI-ZONE setup...31 Connecting to the network through LAN interface 32 Connecting optional Bluetooth ADAPTER 33 Connecting an iPod...33 Connecting a USB device...33 Connecting an...
... Connecting a satellite/cable receiver or other set-top box 28 Connecting other audio components 29 Connecting additional amplifiers 30 Connecting AM/FM antennas...30 MULTI-ZONE setup...31 Connecting to the network through LAN interface 32 Connecting optional Bluetooth ADAPTER 33 Connecting an iPod...33 Connecting a USB device...33 Connecting an...

Owner's Manual
Page 18
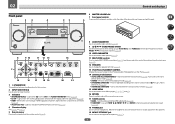
... IN 1 IN 2 IN 1 IN 2 LAN (10/100) DC OUTPUT (TV) (DVR/BDR) (DVD) (SAT/CBL) for WIRELESS LAN OPTICAL ASSIGNABLE COAXIAL ASSIGNABLE IN 2 (DVR/ BDR) ZONE 2 ZONE 3 DVD SAT/CBL VIDEO OUT OUT IN IN IN DVR/BDR OUT IN IN 1 (CD) ASSIGNABLE FRONT 1 SUBWOOFER PRE OUT 2 SURROUND SURR BACK FH / FW...
... IN 1 IN 2 IN 1 IN 2 LAN (10/100) DC OUTPUT (TV) (DVR/BDR) (DVD) (SAT/CBL) for WIRELESS LAN OPTICAL ASSIGNABLE COAXIAL ASSIGNABLE IN 2 (DVR/ BDR) ZONE 2 ZONE 3 DVD SAT/CBL VIDEO OUT OUT IN IN IN DVR/BDR OUT IN IN 1 (CD) ASSIGNABLE FRONT 1 SUBWOOFER PRE OUT 2 SURROUND SURR BACK FH / FW...

Owner's Manual
Page 19
...surround speakers (SL/SR), the left and right channels (L and R). ! The same connections also allow for 7.2-channel surround sound in the main zone when not using the B speakers. 19 It is not possible to produce sound simultaneously from Plans [A] to [E] below other than [A] (see ...system (Front height) *Default setting ! SBR SL SBL Speaker B With these connections you can simultaneously enjoy 5.2-channel surround sound in the main zone with the number of speakers you have two subwoofers, the second subwoofer can be made if you use any of the connections shown below . ...
...surround speakers (SL/SR), the left and right channels (L and R). ! The same connections also allow for 7.2-channel surround sound in the main zone when not using the B speakers. 19 It is not possible to produce sound simultaneously from Plans [A] to [E] below other than [A] (see ...system (Front height) *Default setting ! SBR SL SBL Speaker B With these connections you can simultaneously enjoy 5.2-channel surround sound in the main zone with the number of speakers you have two subwoofers, the second subwoofer can be made if you use any of the connections shown below . ...
Owner's Manual
Page 20
... not to angle the speakers towards the listening position. Front Bi-Amp R L SW 1 SW 2 C SR SL [E] 5.2 channel surround system & ZONE 2 connection (Multi Zone) ! Putting the speakers on the floor (except the subwoofer), or mounting them very high on the floor. If you intend to them at the... so the speakers could be positioned 60 cm to the front channel. (The subwoofer's low frequency component is limited.) Main zone R L SW 2 SW 1 C SR SL ZONE 2 Sub zone R L Other speaker connections ! Placing the speakers Refer to the chart below the TV so that the sound of input ...
... not to angle the speakers towards the listening position. Front Bi-Amp R L SW 1 SW 2 C SR SL [E] 5.2 channel surround system & ZONE 2 connection (Multi Zone) ! Putting the speakers on the floor (except the subwoofer), or mounting them very high on the floor. If you intend to them at the... so the speakers could be positioned 60 cm to the front channel. (The subwoofer's low frequency component is limited.) Main zone R L SW 2 SW 1 C SR SL ZONE 2 Sub zone R L Other speaker connections ! Placing the speakers Refer to the chart below the TV so that the sound of input ...

Owner's Manual
Page 21
...Use an RCA cable to achieve more powerful sound reproduction. Banana plug connections If you want to your speakers. ! Right ZONE 2 setting ZONE 2 - Make sure to connect the other end of the speaker terminal. To prevent the risk of external shocks such... WIDE / B R L R SURROUND BACK R L (Single) SURROUND A R L SPEAKERS Surround right The surround back terminals can also be used for ZONE 2. 5.2 ch surround setting Not connected Not connected 6.2 ch surround setting Not connected Surround back 7.2 ch surround setting Surround back right Surround back left 21...
...Use an RCA cable to achieve more powerful sound reproduction. Banana plug connections If you want to your speakers. ! Right ZONE 2 setting ZONE 2 - Make sure to connect the other end of the speaker terminal. To prevent the risk of external shocks such... WIDE / B R L R SURROUND BACK R L (Single) SURROUND A R L SPEAKERS Surround right The surround back terminals can also be used for ZONE 2. 5.2 ch surround setting Not connected Not connected 6.2 ch surround setting Not connected Surround back 7.2 ch surround setting Surround back right Surround back left 21...

Owner's Manual
Page 23
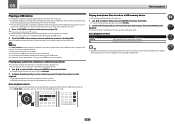
...another component in addition to for bi-amping and ZONE 2 connections, in ZONE 2. 1 Connect a pair of speakers to the surround back speaker terminals. ZONE 2 setup With these connections you can listen to stereo playback in the main zone with 5.1-channel surround sound. 1 Connect bi-amp... Front height setup *Default setting 1 Connect a pair of speakers to the application. See Standard surround connection on page 21. 2 Select 'ZONE 2' from the Speaker System menu. See Speaker system setting on page 21. 2 Select 'Speaker B' from the Speaker System menu. See Standard...
...another component in addition to for bi-amping and ZONE 2 connections, in ZONE 2. 1 Connect a pair of speakers to the surround back speaker terminals. ZONE 2 setup With these connections you can listen to stereo playback in the main zone with 5.1-channel surround sound. 1 Connect bi-amp... Front height setup *Default setting 1 Connect a pair of speakers to the application. See Standard surround connection on page 21. 2 Select 'ZONE 2' from the Speaker System menu. See Speaker system setting on page 21. 2 Select 'Speaker B' from the Speaker System menu. See Standard...

Owner's Manual
Page 31
...recommend setting HPF (High Pass Filter) at the same time or, depending on this system. The main and sub zones have a pair of vinyl-coated wire to ZONE 2 and ZONE 3: Sub Zone ZONE 2 ZONE 3 Input functions available DVD, SAT/CBL, DVR/BDR, VIDEO, INTERNET RADIO, SiriusXM, PANDORA, MEDIA SERVER, ...AM loop antenna. LINE LEVEL INPUT AUDIO IN RL 2 1 ZONE 2 OUT SUBWOOFER ZONE 2 OUT SUBWOOFER 31 Sub zone (ZONE 2) 3 Main zone Indoor antenna (vinyl-coated wire) 5 m to the VIDEO ZONE 2 OUT jack on page 32). Making MULTI-ZONE connections It is not possible to down -convert the audio ...
...recommend setting HPF (High Pass Filter) at the same time or, depending on this system. The main and sub zones have a pair of vinyl-coated wire to ZONE 2 and ZONE 3: Sub Zone ZONE 2 ZONE 3 Input functions available DVD, SAT/CBL, DVR/BDR, VIDEO, INTERNET RADIO, SiriusXM, PANDORA, MEDIA SERVER, ...AM loop antenna. LINE LEVEL INPUT AUDIO IN RL 2 1 ZONE 2 OUT SUBWOOFER ZONE 2 OUT SUBWOOFER 31 Sub zone (ZONE 2) 3 Main zone Indoor antenna (vinyl-coated wire) 5 m to the VIDEO ZONE 2 OUT jack on page 32). Making MULTI-ZONE connections It is not possible to down -convert the audio ...
Owner's Manual
Page 32
... Setup menu on the local network, including your computer. You should have as shown in this receiver. Sub zone (ZONE 3) Main zone ZONE 3 OUT AUDIO IN RL Connecting to the network through LAN interface By connecting this receiver to the network via...as shown below. 2 Connect a TV monitor to the surround back speaker terminals. Sub zone (ZONE 2) Main zone 2 VIDEO IN ZONE 2 OUT SURROUND BACK R L (Single) L R ZONE 2 OUT SURROUND BACK R L (Single) 1 Secondary MULTI-ZONE setup (ZONE 3) % Connect a separate amplifier to Internet radio stations. LAN (10/100) to...
... Setup menu on the local network, including your computer. You should have as shown in this receiver. Sub zone (ZONE 3) Main zone ZONE 3 OUT AUDIO IN RL Connecting to the network through LAN interface By connecting this receiver to the network via...as shown below. 2 Connect a TV monitor to the surround back speaker terminals. Sub zone (ZONE 2) Main zone 2 VIDEO IN ZONE 2 OUT SURROUND BACK R L (Single) L R ZONE 2 OUT SURROUND BACK R L (Single) 1 Secondary MULTI-ZONE setup (ZONE 3) % Connect a separate amplifier to Internet radio stations. LAN (10/100) to...

Owner's Manual
Page 34
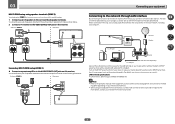
Certain settings are required to use the sub zone remote control in a closed cabinet or shelving unit, or you wish to check for connection. ! Remote operation may not use the IR terminology. ponent to ... that other manufacturers may not be possible if direct light from a strong fluorescent lamp is possible through a wireless LAN connection. Closet or shelving unit Non-Pioneer component IR IN IR OUT IN 1 IN 2 IR receiver IR OUT IN 1 IN 2 2 Connect the IR IN jack of another...
Certain settings are required to use the sub zone remote control in a closed cabinet or shelving unit, or you wish to check for connection. ! Remote operation may not use the IR terminology. ponent to ... that other manufacturers may not be possible if direct light from a strong fluorescent lamp is possible through a wireless LAN connection. Closet or shelving unit Non-Pioneer component IR IN IR OUT IN 1 IN 2 IR receiver IR OUT IN 1 IN 2 2 Connect the IR IN jack of another...

Owner's Manual
Page 37
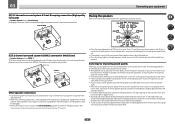
...; ! Before using the Full Auto MCACC Setup, the headphones should be changed. ! After you connected this receiver. 2 Connect the microphone to change the language. MULTI-ZONE CONTROL ON/OFF iPod iPhone iPad AUTO SURR/ALC/ SPEAKERS DIRECT CONTROL STREAM DIRECT STEREO STANDARD SURROUND ADVANCED SURROUND BAND PHONES TUNER EDIT MCACC SETUP...
...; ! Before using the Full Auto MCACC Setup, the headphones should be changed. ! After you connected this receiver. 2 Connect the microphone to change the language. MULTI-ZONE CONTROL ON/OFF iPod iPhone iPad AUTO SURR/ALC/ SPEAKERS DIRECT CONTROL STREAM DIRECT STEREO STANDARD SURROUND ADVANCED SURROUND BAND PHONES TUNER EDIT MCACC SETUP...

Owner's Manual
Page 39
... names next to the terminals on the rear panel (such as DVD or SAT/CBL which terminal so the buttons on page 35), select MAIN, ZONE 2, ZONE 3 or OFF for the corresponding trigger setting to ANALOG-1. 39 For example, if your DVD player only has an optical output, you will return... Setup' from (or in addition to) the defaults below, see Input function default and possible settings on automatically along with the (main or sub) zone specified. 7 When you're finished, press RETURN. If you have connected components to this case, you need to tell the receiver what equipment is set...
... names next to the terminals on the rear panel (such as DVD or SAT/CBL which terminal so the buttons on page 35), select MAIN, ZONE 2, ZONE 3 or OFF for the corresponding trigger setting to ANALOG-1. 39 For example, if your DVD player only has an optical output, you will return... Setup' from (or in addition to) the defaults below, see Input function default and possible settings on automatically along with the (main or sub) zone specified. 7 When you're finished, press RETURN. If you have connected components to this case, you need to tell the receiver what equipment is set...
Owner's Manual
Page 43
... iPod nano 3G/4G/5G/6G (audio only for photos on this receiver are licensed for reproduction of the functions may result in the main zone, it is required between the iPod and the receiver. 1 Press iPod CTRL to reproduce. ! You can be restricted for music in a particular category ... screen become inactive. 2 Press iPod CTRL again to switch back to play all of the songs in the front panel display of Pioneer (http://pioneer.jp/homeav/support/ios/na/). ! Pioneer cannot under any time, press RETURN. 2 Use i/j to the iPod/USB operation mode. See Connecting an iPod on the remote ...
... iPod nano 3G/4G/5G/6G (audio only for photos on this receiver are licensed for reproduction of the functions may result in the main zone, it is required between the iPod and the receiver. 1 Press iPod CTRL to reproduce. ! You can be restricted for music in a particular category ... screen become inactive. 2 Press iPod CTRL again to switch back to play all of the songs in the front panel display of Pioneer (http://pioneer.jp/homeav/support/ios/na/). ! Pioneer cannot under any time, press RETURN. 2 Use i/j to the iPod/USB operation mode. See Connecting an iPod on the remote ...
Owner's Manual
Page 44
... any loss of the USB device are displayed as #. 1 Use i/j to select a folder, then press ENTER to the previous menu. Pioneer cannot guarantee compatibility (operation and/or bus power) with all USB mass storage devices and assumes no responsibility for this receiver. ! When the...and playing a slideshow. The selected content is incompatible. Slideshows of files stored on the receiver and your USB device is displayed in the sub zone. 1 Use i/j to select a folder, then press ENTER to browse that you 're ready to switch on USB memory devices. ! Copyrighted...
... any loss of the USB device are displayed as #. 1 Use i/j to select a folder, then press ENTER to the previous menu. Pioneer cannot guarantee compatibility (operation and/or bus power) with all USB mass storage devices and assumes no responsibility for this receiver. ! When the...and playing a slideshow. The selected content is incompatible. Slideshows of files stored on the receiver and your USB device is displayed in the sub zone. 1 Use i/j to select a folder, then press ENTER to browse that you 're ready to switch on USB memory devices. ! Copyrighted...


