
Owner's Manual
Page 30
Make the connections shown below . In this case plug the amplifier into each terminal, then release the tabs to secure the AM antenna wires. 3 Fix the AM loop antenna to SP: OFF (page 67) or simply disconnect any home use the ...
Make the connections shown below . In this case plug the amplifier into each terminal, then release the tabs to secure the AM antenna wires. 3 Fix the AM loop antenna to SP: OFF (page 67) or simply disconnect any home use the ...

Owner's Manual
Page 45
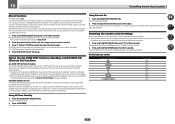
specifi- Pioneer does not guarantee playback. Once you are tuned to a station you can be playable but some file formats are not available for playback although they ... or AM), if necessary. 3 Tune to a station. Note that station. If you already know the frequency of the station you want . There are not supported; Release the button at a time, press TUNE +/-. ! Press MPX to select the noise cut modes can memorize the frequency for stations in to FM and AM...
specifi- Pioneer does not guarantee playback. Once you are tuned to a station you can be playable but some file formats are not available for playback although they ... or AM), if necessary. 3 Tune to a station. Note that station. If you already know the frequency of the station you want . There are not supported; Release the button at a time, press TUNE +/-. ! Press MPX to select the noise cut modes can memorize the frequency for stations in to FM and AM...

Owner's Manual
Page 71
... can be operated with the TV CONTROL function, press the TV CONTROL INPUT button. The receiver to be operated. Release the button after the LED flashes once. Release the button after the LED flashes once. To cancel the preset setup mode press RCU SETUP. 2 Press the input...After one TV set by pressing RCU SETUP. ! The different items on page 71. See Erasing all remote control unit settings you have multiple Pioneer receivers, amplifiers, etc., this receiver. When using multiple receivers, provided they are preset in the remote. The LED blinks once and flashes continuously...
... can be operated with the TV CONTROL function, press the TV CONTROL INPUT button. The receiver to be operated. Release the button after the LED flashes once. Release the button after the LED flashes once. To cancel the preset setup mode press RCU SETUP. 2 Press the input...After one TV set by pressing RCU SETUP. ! The different items on page 71. See Erasing all remote control unit settings you have multiple Pioneer receivers, amplifiers, etc., this receiver. When using multiple receivers, provided they are preset in the remote. The LED blinks once and flashes continuously...

Owner's Manual
Page 72
...current component repeat steps 3 and 4. The remote can store about 120 preset codes from other components (this has been tested with codes of Pioneer format only). The LED blinks once and flashes continuously. 3 Point the two remote controls towards each other, then press the button that ... programmed for three seconds. If it means the memory is sending (teaching) the signal to flash, the setting has been successfully completed. ! Release the button after assigning a preset code. To cancel the preset setup mode press RCU SETUP. 2 Press and hold RCU SETUP, then press ...
...current component repeat steps 3 and 4. The remote can store about 120 preset codes from other components (this has been tested with codes of Pioneer format only). The LED blinks once and flashes continuously. 3 Point the two remote controls towards each other, then press the button that ... programmed for three seconds. If it means the memory is sending (teaching) the signal to flash, the setting has been successfully completed. ! Release the button after assigning a preset code. To cancel the preset setup mode press RCU SETUP. 2 Press and hold RCU SETUP, then press ...
Owner's Manual
Page 73
...setting: On You can use the direct function feature to control one component using the remote control while at the same time, using separate Pioneer amplifiers/receivers for three seconds. About the ALL ZONE STBY (All Zone Standby) and DISCRETE ON (Discrete On) functions ALL ZONE STBY ...standby and all zones are set to your VCR while you , for the component you select (using multiple Pioneer amplifiers/receivers and their Remote Control Mode have been changed. Release the button after the LED flashes once. Also, when using your system Direct function ! To cancel the ...
...setting: On You can use the direct function feature to control one component using the remote control while at the same time, using separate Pioneer amplifiers/receivers for three seconds. About the ALL ZONE STBY (All Zone Standby) and DISCRETE ON (Discrete On) functions ALL ZONE STBY ...standby and all zones are set to your VCR while you , for the component you select (using multiple Pioneer amplifiers/receivers and their Remote Control Mode have been changed. Release the button after the LED flashes once. Also, when using your system Direct function ! To cancel the ...

Owner's Manual
Page 99
...If WLAN POW ERR is "192.168.1.1", set to conceal the SSID. ! Use the system in a place away from the wall and call a Pioneer authorized independent service company. For example, if the wireless LAN router's IP address is still displayed after repeating the above measures are connected to the...converter (including the DHCP setting). There is properly connected. After this case, the SSID may not be displayed on the receiver manually. Release the reset button. The IP address settings of the receiver and wireless LAN converter do not match the settings of the base unit (...
...If WLAN POW ERR is "192.168.1.1", set to conceal the SSID. ! Use the system in a place away from the wall and call a Pioneer authorized independent service company. For example, if the wireless LAN router's IP address is still displayed after repeating the above measures are connected to the...converter (including the DHCP setting). There is properly connected. After this case, the SSID may not be displayed on the receiver manually. Release the reset button. The IP address settings of the receiver and wireless LAN converter do not match the settings of the base unit (...
