Owner's Manual
Page 5
... the Auto MCACC Setup . . . . . 11 Playing a source 11 Better sound using Phase Control and Full Band Phase Control 12 Using Phase Control 12 Using Full Band Phase Control 13 03 Connecting your equipment Rear panel 15 When making cable connections 16 About the video converter 17 Connecting using HDMI 17 About HDMI 18 Connecting your Blu-ray disc player 19 Connecting your TV and DVD player 20 Connecting a satellite/cable receiver or other set-top box 21 Connecting a DVD/HDD recorder, VCR and other video sources 22 Using the component video jacks 23 Connecting digital audio sources...
... the Auto MCACC Setup . . . . . 11 Playing a source 11 Better sound using Phase Control and Full Band Phase Control 12 Using Phase Control 12 Using Full Band Phase Control 13 03 Connecting your equipment Rear panel 15 When making cable connections 16 About the video converter 17 Connecting using HDMI 17 About HDMI 18 Connecting your Blu-ray disc player 19 Connecting your TV and DVD player 20 Connecting a satellite/cable receiver or other set-top box 21 Connecting a DVD/HDD recorder, VCR and other video sources 22 Using the component video jacks 23 Connecting digital audio sources...

Owner's Manual
Page 10
... ear level at high volume. Make sure you select. • Before using a subwoofer, make sure to connect your speakers as necessary before moving on to Playing a source on page 11. 1 Switch on the receiver and your TV. 2 Connect the microphone to the MCACC SETUP MIC jack on the lower portion of the front panel door to save other correction curves (such as an input source. CONTROL ON/OFF SPEAKERS iPod DIRECT USB VIDEO3 INPUT MULTI-ZONE & SOURCE DIGITAL IN S-VIDEO VIDEO L AUDIO R MCACC SETUP MIC PHONES...
... ear level at high volume. Make sure you select. • Before using a subwoofer, make sure to connect your speakers as necessary before moving on to Playing a source on page 11. 1 Switch on the receiver and your TV. 2 Connect the microphone to the MCACC SETUP MIC jack on the lower portion of the front panel door to save other correction curves (such as an input source. CONTROL ON/OFF SPEAKERS iPod DIRECT USB VIDEO3 INPUT MULTI-ZONE & SOURCE DIGITAL IN S-VIDEO VIDEO L AUDIO R MCACC SETUP MIC PHONES...

Owner's Manual
Page 12
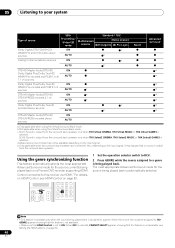
... Home Theater Guide 3 Set the operation selector switch to RCV, then press AUTO/DIRECT (AUTO SURR/STREAM DIRECT) to select 'AUTO SURROUND' and start playback of the source.1 If you're playing a Dolby Digital or DTS surround sound DVD disc, you want multichannel surround sound. 12 En When using a surround back speaker, DOLBY DIGITAL is an MPEG audio option, set to a multichannel listening mode (see illustration below). If the display does not correspond to the input signal and listening mode, check the connections and settings. 4 Use the volume control to sources...
... Home Theater Guide 3 Set the operation selector switch to RCV, then press AUTO/DIRECT (AUTO SURR/STREAM DIRECT) to select 'AUTO SURROUND' and start playback of the source.1 If you're playing a Dolby Digital or DTS surround sound DVD disc, you want multichannel surround sound. 12 En When using a surround back speaker, DOLBY DIGITAL is an MPEG audio option, set to a multichannel listening mode (see illustration below). If the display does not correspond to the input signal and listening mode, check the connections and settings. 4 Use the volume control to sources...
Owner's Manual
Page 15
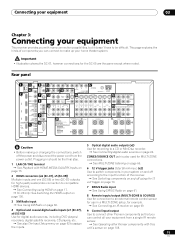
.... 4 Optical and coaxial digital audio inputs (x7 (SC-07), x6 (SC-05)) Use for digital audio sources, including DVD players/ recorders, digital satellite receivers, CD players, etc. See also The Input Setup menu on page 24. This page explains the kinds of components you can connect to the input function of the receiver. See Switching components on and off the power and disconnect the power cord from a single IR remote sensor. See Operating other Pioneer components so that you can control...
.... 4 Optical and coaxial digital audio inputs (x7 (SC-07), x6 (SC-05)) Use for digital audio sources, including DVD players/ recorders, digital satellite receivers, CD players, etc. See also The Input Setup menu on page 24. This page explains the kinds of components you can connect to the input function of the receiver. See Switching components on and off the power and disconnect the power cord from a single IR remote sensor. See Operating other Pioneer components so that you can control...

Owner's Manual
Page 16
... a DVD player. See Using the component video jacks on page 23. 12 SC-07 only: ZONE 2 component video output Use to connect monitors or TVs in a separate room. See MULTI-ZONE listening on page 66. 13 MULTI-ZONE audio/video outputs Use to connect a second or third amplifier and monitors or TVs in a separate room. See MULTI-ZONE listening on page 66. 14 Stereo analog audio source inputs/(outputs) (x4) Use for connection to audio sources such as DVD players/recorders, VCRs, etc. When making cable connections...
... a DVD player. See Using the component video jacks on page 23. 12 SC-07 only: ZONE 2 component video output Use to connect monitors or TVs in a separate room. See MULTI-ZONE listening on page 66. 13 MULTI-ZONE audio/video outputs Use to connect a second or third amplifier and monitors or TVs in a separate room. See MULTI-ZONE listening on page 66. 14 Stereo analog audio source inputs/(outputs) (x4) Use for connection to audio sources such as DVD players/recorders, VCRs, etc. When making cable connections...
Owner's Manual
Page 18
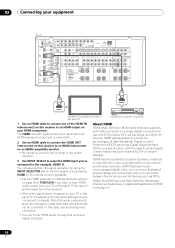
... receiver). ATTENTION: ENCEINTE D'IMPEDANCE DE 6Ω - 16Ω . L (Single) SELECTABLE SEE INSTRUCTION MANUAL SELECTABLE VOIR LE MODE D'EMPLOI R SURROUND L R SUBWOOFER AR FRONT L CENTER HDMI OUT HDMI IN HDMI/DVI-compatible monitor or flat panel TV HDMI/DVI-equipped component 1 Use an HDMI cable to an HDMI output on your TV or flat panel TV (no sound will be converted. About HDMI HDMI (High Definition Multimedia Interface) supports both video and audio on an HDMI-compatible monitor. • Be careful to multi-channel surround-sound audio...
... receiver). ATTENTION: ENCEINTE D'IMPEDANCE DE 6Ω - 16Ω . L (Single) SELECTABLE SEE INSTRUCTION MANUAL SELECTABLE VOIR LE MODE D'EMPLOI R SURROUND L R SUBWOOFER AR FRONT L CENTER HDMI OUT HDMI IN HDMI/DVI-compatible monitor or flat panel TV HDMI/DVI-equipped component 1 Use an HDMI cable to an HDMI output on your TV or flat panel TV (no sound will be converted. About HDMI HDMI (High Definition Multimedia Interface) supports both video and audio on an HDMI-compatible monitor. • Be careful to multi-channel surround-sound audio...

Owner's Manual
Page 20
...FRONT CENTER SURROUND SURROUND BACK (Single) L PRE OUT R SUBWOOFER MULTI CH IN FRONT CENTER SURROUND SURROUND BACK L R SPEAKERS R SURROUND BACK/ B CAUTION: SPEAKER IMPEDANCE 6Ω - 16Ω . L (Single) SELECTABLE SEE INSTRUCTION MANUAL SELECTABLE VOIR LE MODE D'EMPLOI R SURROUND L R SUBWOOFER AR FRONT L CENTER OPTICAL COAXIAL DIGITAL OUT R AUDIO L ANALOG OUT S-VIDEO VIDEO OUT 3 4 2 S-VIDEO VIDEO IN IN DVD player 1 TV The diagram shows a basic setup of the optical inputs on page 92). 20 En Connect using a stereo RCA/phono jack cable. Different TVs and DVD players...
...FRONT CENTER SURROUND SURROUND BACK (Single) L PRE OUT R SUBWOOFER MULTI CH IN FRONT CENTER SURROUND SURROUND BACK L R SPEAKERS R SURROUND BACK/ B CAUTION: SPEAKER IMPEDANCE 6Ω - 16Ω . L (Single) SELECTABLE SEE INSTRUCTION MANUAL SELECTABLE VOIR LE MODE D'EMPLOI R SURROUND L R SUBWOOFER AR FRONT L CENTER OPTICAL COAXIAL DIGITAL OUT R AUDIO L ANALOG OUT S-VIDEO VIDEO OUT 3 4 2 S-VIDEO VIDEO IN IN DVD player 1 TV The diagram shows a basic setup of the optical inputs on page 92). 20 En Connect using a stereo RCA/phono jack cable. Different TVs and DVD players...

Owner's Manual
Page 21
.../cable receiver doesn't have a digital audio output, you can skip this receiver using a stereo RCA/phono jack cable and a video or S-Video cable. 2 Connect an optical-type1 digital audio output from your equipment 03 Connecting a satellite/cable receiver or other set-top box Satellite and cable receivers, and terrestrial digital TV tuners are all examples of so-called 'set-top boxes'. L (Single) SELECTABLE SEE INSTRUCTION MANUAL SELECTABLE VOIR LE MODE D'EMPLOI R SURROUND L R SUBWOOFER AR FRONT L CENTER DIGITAL OUT S-VIDEO VIDEO R AUDIO L AV OUT STB 1 Connect the audio/video...
.../cable receiver doesn't have a digital audio output, you can skip this receiver using a stereo RCA/phono jack cable and a video or S-Video cable. 2 Connect an optical-type1 digital audio output from your equipment 03 Connecting a satellite/cable receiver or other set-top box Satellite and cable receivers, and terrestrial digital TV tuners are all examples of so-called 'set-top boxes'. L (Single) SELECTABLE SEE INSTRUCTION MANUAL SELECTABLE VOIR LE MODE D'EMPLOI R SURROUND L R SUBWOOFER AR FRONT L CENTER DIGITAL OUT S-VIDEO VIDEO R AUDIO L AV OUT STB 1 Connect the audio/video...
Owner's Manual
Page 33
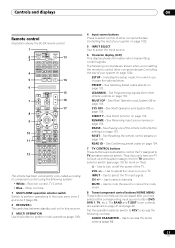
... the setup mode, from other components (see page 102 for this receiver. 3 MULTI OPERATION Use this ). - See Programming signals from which you 're setting the remote to adjust the volume on for more on this button to perform multi operations (page 105). 4 Input source buttons Press to select control of the remote control button settings on page 104. MULTI OP - See Direct function on page 103. CH +/- - See Multi Operation and System Off on page 104. RESET - See Resetting the remote control presets on...
... the setup mode, from other components (see page 102 for this receiver. 3 MULTI OPERATION Use this ). - See Programming signals from which you 're setting the remote to adjust the volume on for more on this button to perform multi operations (page 105). 4 Input source buttons Press to select control of the remote control button settings on page 104. MULTI OP - See Direct function on page 103. CH +/- - See Multi Operation and System Off on page 104. RESET - See Resetting the remote control presets on...

Owner's Manual
Page 34
... a Pioneer DVD recorder supporting HDMI Control is set up your surround sound system (see page 102 for example DVD, DVR 1 or TV). Use to select an input signal (page 38). After set the listening volume. 17 MUTE Mutes the sound or restores the sound if it using the number buttons (page 41). Use to access the HOME MENU (pages 43, 51, 53 and 55). SR+ - Press TUNER first to check selected receiver settings (page 100). Switches between the stereo...
... a Pioneer DVD recorder supporting HDMI Control is set up your surround sound system (see page 102 for example DVD, DVR 1 or TV). Use to select an input signal (page 38). After set the listening volume. 17 MUTE Mutes the sound or restores the sound if it using the number buttons (page 41). Use to access the HOME MENU (pages 43, 51, 53 and 55). SR+ - Press TUNER first to check selected receiver settings (page 100). Switches between the stereo...

Owner's Manual
Page 38
... to select one of channels in the front panel display to see Stream direct with your DVD player. 38 En STANDARD ADV SURR BD MENU SIGNAL SEL SLEEP DIMMER AUDIO CH VOL VOL SR+ SBch MCACC DISP A.ATT GENRE HDMI OUT 1 Set the operation selector switch to RCV. 2 Press SIGNAL SEL (SIGNAL SELECT) to select the input signal corresponding to a source, press MCACC. The receiver selects the first available signal in the Surround Setup (speaker setting, channel level, speaker distance, acoustic calibration...
... to select one of channels in the front panel display to see Stream direct with your DVD player. 38 En STANDARD ADV SURR BD MENU SIGNAL SEL SLEEP DIMMER AUDIO CH VOL VOL SR+ SBch MCACC DISP A.ATT GENRE HDMI OUT 1 Set the operation selector switch to RCV. 2 Press SIGNAL SEL (SIGNAL SELECT) to select the input signal corresponding to a source, press MCACC. The receiver selects the first available signal in the Surround Setup (speaker setting, channel level, speaker distance, acoustic calibration...
Owner's Manual
Page 40
... that HDMI Control is set to ON. SC-05: Sound is automatically selected. Also, depending on page 89. Using the genre synchronizing function This feature automatically selects the most appropriate Advanced Surround mode for the source currently being played back is assigned to a genre is selected. Note 1 • This feature is available only when the source being played back on a Pioneer DVD recorder supporting HDMI Control connected to this feature is selected. d.Advanced surround mode...
... that HDMI Control is set to ON. SC-05: Sound is automatically selected. Also, depending on page 89. Using the genre synchronizing function This feature automatically selects the most appropriate Advanced Surround mode for the source currently being played back is assigned to a genre is selected. Note 1 • This feature is available only when the source being played back on a Pioneer DVD recorder supporting HDMI Control connected to this feature is selected. d.Advanced surround mode...

Owner's Manual
Page 64
... (TUNE) VIDEO (ST) ENTER (ST) (TUNE) HOME MENU RETURN AUTO SURR/ HOME STANDARD ADVANCED STEREO/ TUNER EDIT BAND STREAM DIRECT THX SURROUND SURROUND A.L.C. CONTROL ON/OFF SPEAKERS iPod DIRECT USB VIDEO3 INPUT MULTI-ZONE & SOURCE DIGITAL IN S-VIDEO VIDEO L AUDIO R MCACC SETUP MIC PHONES Press repeatedly to do this setup. 1 Connect a pair of speakers to 5 channels, depending on the source), the two speakers in Manual speaker setup on page 55. 09 Other connections • Depending on the DVD player you're using, the analog output level of the subwoofer channel may change...
... (TUNE) VIDEO (ST) ENTER (ST) (TUNE) HOME MENU RETURN AUTO SURR/ HOME STANDARD ADVANCED STEREO/ TUNER EDIT BAND STREAM DIRECT THX SURROUND SURROUND A.L.C. CONTROL ON/OFF SPEAKERS iPod DIRECT USB VIDEO3 INPUT MULTI-ZONE & SOURCE DIGITAL IN S-VIDEO VIDEO L AUDIO R MCACC SETUP MIC PHONES Press repeatedly to do this setup. 1 Connect a pair of speakers to 5 channels, depending on the source), the two speakers in Manual speaker setup on page 55. 09 Other connections • Depending on the DVD player you're using, the analog output level of the subwoofer channel may change...

Owner's Manual
Page 69
... main zone controls. Refer to play different inputs from a strong fluorescent lamp is in the currently selected sub zone. VOL +/- This is possible to the manual that other zone. Please be tuned to the MULTI-ZONE & SOURCE IR IN (MAIN) jack on /off all output to the sub zone(s).3 MULTI-ZONE remote controls Set the MULTI-ZONE operation switch to ZONE 2 or ZONE 3 to adjust the volume. Use to set the listening volume in ZONE Audio Setup on the front panel to switch off power in the sub room, connect this receiver...
... main zone controls. Refer to play different inputs from a strong fluorescent lamp is in the currently selected sub zone. VOL +/- This is possible to the manual that other zone. Please be tuned to the MULTI-ZONE & SOURCE IR IN (MAIN) jack on /off all output to the sub zone(s).3 MULTI-ZONE remote controls Set the MULTI-ZONE operation switch to ZONE 2 or ZONE 3 to adjust the volume. Use to set the listening volume in ZONE Audio Setup on the front panel to switch off power in the sub room, connect this receiver...
Owner's Manual
Page 74
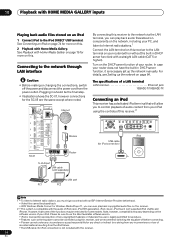
Turn on the DHCP server function of your iPod. CONTROL ON/OFF SPEAKERS iPod DIRECT USB VIDEO3 INPUT MULTI-ZONE & SOURCE DIGITAL IN S-VIDEO VIDEO L AUDIO R MCACC SETUP MIC PHONES USB cable (for iPod connection) iPod MENU to LAN port LAN cable (sold separately) to LAN port PC1 PC2 Note 1 • To listen to Internet radio stations, you to the iPod DIRECT USB terminal. However, that will allow you must sign a contract with an ISP (Internet Service Provider) beforehand. • Video files cannot be controlled using the controls of the...
Turn on the DHCP server function of your iPod. CONTROL ON/OFF SPEAKERS iPod DIRECT USB VIDEO3 INPUT MULTI-ZONE & SOURCE DIGITAL IN S-VIDEO VIDEO L AUDIO R MCACC SETUP MIC PHONES USB cable (for iPod connection) iPod MENU to LAN port LAN cable (sold separately) to LAN port PC1 PC2 Note 1 • To listen to Internet radio stations, you to the iPod DIRECT USB terminal. However, that will allow you must sign a contract with an ISP (Internet Service Provider) beforehand. • Video files cannot be controlled using the controls of the...

Owner's Manual
Page 75
...; Audio Player The Digital Living Network Alliance (DLNA) is a crossindustry organization of Microsoft. CONTROL ON/OFF SPEAKERS iPod DIRECT USB VIDEO3 INPUT MULTI-ZONE & SOURCE DIGITAL IN S-VIDEO VIDEO L AUDIO R MCACC SETUP MIC PHONES USB mass storage device Introduction The Home Media Gallery allows you to upgrade WMDRM to access their intellectual property, including copyrights. If the WMDRM software fails to protect the content, content owners may require you to play back audio files stored on components on...
...; Audio Player The Digital Living Network Alliance (DLNA) is a crossindustry organization of Microsoft. CONTROL ON/OFF SPEAKERS iPod DIRECT USB VIDEO3 INPUT MULTI-ZONE & SOURCE DIGITAL IN S-VIDEO VIDEO L AUDIO R MCACC SETUP MIC PHONES USB mass storage device Introduction The Home Media Gallery allows you to upgrade WMDRM to access their intellectual property, including copyrights. If the WMDRM software fails to protect the content, content owners may require you to play back audio files stored on components on...

Owner's Manual
Page 92
... need to change the DVD input function's Digital In setting from the setup in Using this receiver using the same type of the input jacks: • Input Name - Note that function will automatically be switched off using component video connections), or when digital video conversion is hooked up to the CONTROL IN jack on this receiver (opposite from COAX-1 (default) to the optical input you've connected it to.The numbering (OPT-1 to 4) corresponds with a Pioneer flat panel TV on page 70), select MAIN, ZONE 2, ZONE...
... need to change the DVD input function's Digital In setting from the setup in Using this receiver using the same type of the input jacks: • Input Name - Note that function will automatically be switched off using component video connections), or when digital video conversion is hooked up to the CONTROL IN jack on this receiver (opposite from COAX-1 (default) to the optical input you've connected it to.The numbering (OPT-1 to 4) corresponds with a Pioneer flat panel TV on page 70), select MAIN, ZONE 2, ZONE...

Owner's Manual
Page 97
... speakers by spreading the Width) center channel between components connected with Defaults: Image) vocals. When set separately). 10 to 90 a.When MCACC OFF is sometimes necessary when two languages need to use this receiver (amp) or through to play the receiver's HDMI audio and video input signals from the speakers. When OFF is selected, no sound is output from front speakers DRC (Dynamic Range Control) Adjusts the level of the display connected with most SACD discs, but is selected, all center channel...
... speakers by spreading the Width) center channel between components connected with Defaults: Image) vocals. When set separately). 10 to 90 a.When MCACC OFF is sometimes necessary when two languages need to use this receiver (amp) or through to play the receiver's HDMI audio and video input signals from the speakers. When OFF is selected, no sound is output from front speakers DRC (Dynamic Range Control) Adjusts the level of the display connected with most SACD discs, but is selected, all center channel...
Owner's Manual
Page 112
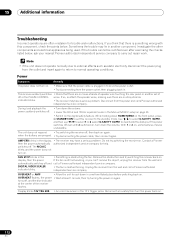
...; to normal operating conditions. If the power switches off . • Turn down HOME MENU on the digital safety feature. switches off and call a Pioneer authorized independent service company. Remove the obstruction and try switching the receiver back on , turn on . OVERHEAT flashes, the power • Wait at the center of speaker wire touching the rear panel or another component. If the trouble cannot be unavailable. Remedy • Make sure that the power cable is plugged in to...
...; to normal operating conditions. If the power switches off . • Turn down HOME MENU on the digital safety feature. switches off and call a Pioneer authorized independent service company. Remove the obstruction and try switching the receiver back on , turn on . OVERHEAT flashes, the power • Wait at the center of speaker wire touching the rear panel or another component. If the trouble cannot be unavailable. Remedy • Make sure that the power cable is plugged in to...
Owner's Manual
Page 117
... 't be Dolby Surround EX/DTS-ES software, but • Reinsert the SR cable, making sure it will occur when playing DVD-Audio material over HDMI, use an HDMI cable (High Speed HDMI™ Cable) to connect this receiver with a the connected components Pioneer flat panel TV on page 31). • Check that there are not, please connect them using the component, S-Video or composite video jacks between source and receiver. • If the problem still persists when connecting your HDMI component directly to...
... 't be Dolby Surround EX/DTS-ES software, but • Reinsert the SR cable, making sure it will occur when playing DVD-Audio material over HDMI, use an HDMI cable (High Speed HDMI™ Cable) to connect this receiver with a the connected components Pioneer flat panel TV on page 31). • Check that there are not, please connect them using the component, S-Video or composite video jacks between source and receiver. • If the problem still persists when connecting your HDMI component directly to...


