
Operating Instructions
Page 2
... power cord of the appliance ELECTRIC SERVICE EQUIPMENT GROUNDING CONDUCTORS (NEC SECTION 810-21) should not be unplugged from the outlet when left unattended is in proper operating condition. Do not defeat the you are installing an outside normal operation. Do not use a mounting accessory recommended by the supporting structure, grounding of the lead-in wire replacement parts specified by the operating instructions...
... power cord of the appliance ELECTRIC SERVICE EQUIPMENT GROUNDING CONDUCTORS (NEC SECTION 810-21) should not be unplugged from the outlet when left unattended is in proper operating condition. Do not defeat the you are installing an outside normal operation. Do not use a mounting accessory recommended by the supporting structure, grounding of the lead-in wire replacement parts specified by the operating instructions...

Operating Instructions
Page 4
NOTE After replacing or changing a fuse, the fuse cover in the plug must be loud and harmful to your equipment offers. model] Recording and playback of copyrighted material may not correspond with coloured markings identifying the terminals in your plug, proceed as follows: The wire which is unsuitable for your equipment by playing it at a safe level BEFORE your unit. CAUTION...
NOTE After replacing or changing a fuse, the fuse cover in the plug must be loud and harmful to your equipment offers. model] Recording and playback of copyrighted material may not correspond with coloured markings identifying the terminals in your plug, proceed as follows: The wire which is unsuitable for your equipment by playing it at a safe level BEFORE your unit. CAUTION...
Operating Instructions
Page 5
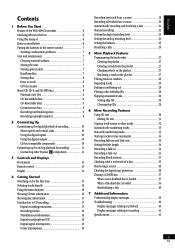
... length 34 Connecting up for analog playback & recording 11 Recording a fade in 34 Connecting other Pioneer Î components 11 Recording a fade out 34 3 Controls and Displays Recording blank sections 35 Front panel 12 Checking what's at the end of a disc 35 Remote control 13 Monitoring a source 36 Display 14 Checking for digital copy protection 36 4 Getting Started Switching on for the first time 15 Selecting tracks directly 16 Using the menu features...
... length 34 Connecting up for analog playback & recording 11 Recording a fade in 34 Connecting other Pioneer Î components 11 Recording a fade out 34 3 Controls and Displays Recording blank sections 35 Front panel 12 Checking what's at the end of a disc 35 Remote control 13 Monitoring a source 36 Display 14 Checking for digital copy protection 36 4 Getting Started Switching on for the first time 15 Selecting tracks directly 16 Using the menu features...
Operating Instructions
Page 6
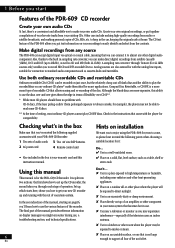
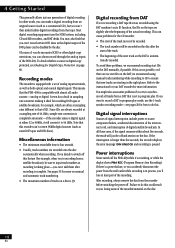
... stereo system that you can make direct digital recordings from the contents. Set up, $ Place on your recordings to easily identify and select from satellite (usually 32kHz), DCC and DAT (up and running with the analog line inputs, suitable for connection to standard audio components such as a table, shelf or stereo rack. Compact Disc Rewritable, or CD-RW, is dirty (from any source The PDR-609...
... stereo system that you can make direct digital recordings from the contents. Set up, $ Place on your recordings to easily identify and select from satellite (usually 32kHz), DCC and DAT (up and running with the analog line inputs, suitable for connection to standard audio components such as a table, shelf or stereo rack. Compact Disc Rewritable, or CD-RW, is dirty (from any source The PDR-609...

Operating Instructions
Page 9
... the following when using the PDR-609. • Replace the batteries when you notice a fall off in the operating range of the remote. 30 30 23ft. (7m) 9 En Avoid using remotes for equipment located near this situation may become unreliable if strong sunlight or fluorescent light is shining on the unit's remote sensor. • Remote controllers for different devices can use a disc for anything other...
... the following when using the PDR-609. • Replace the batteries when you notice a fall off in the operating range of the remote. 30 30 23ft. (7m) 9 En Avoid using remotes for equipment located near this situation may become unreliable if strong sunlight or fluorescent light is shining on the unit's remote sensor. • Remote controllers for different devices can use a disc for anything other...

Operating Instructions
Page 10
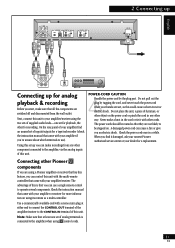
... amplifier/ receiver's tape inputs and outputs-see page 15 for future use the PDR-609 as this player to daisy-chain several units together for digital cable around sharp corners as a digital source. Using the digital outputs If you have another digital recorder, such as audio information from analog sources (like -having both optical plug and socket are readily available at each end (the same type of the PDR-609 to use . In this case, connect...
... amplifier/ receiver's tape inputs and outputs-see page 15 for future use the PDR-609 as this player to daisy-chain several units together for digital cable around sharp corners as a digital source. Using the digital outputs If you have another digital recorder, such as audio information from analog sources (like -having both optical plug and socket are readily available at each end (the same type of the PDR-609 to use . In this case, connect...
Operating Instructions
Page 11
... to connect the CONTROL OUT terminal of the amplifier/receiver to the amplifier, via the analog inputs of inputs/outputs for recording. Use a commercially available cord with a mono mini-plug at least one set up for a replacement. Using this set for playback, the other way. Do not pull out the plug by the plug part. The power cords should be stepped on. LINE REC PLAY IN OUT L R CONTROL TEXT IN DIGITAL IN OPTICAL COAXIAL DIGITAL OUT OPTICAL COAXIAL LR RL 2 Connecting...
... to connect the CONTROL OUT terminal of the amplifier/receiver to the amplifier, via the analog inputs of inputs/outputs for recording. Use a commercially available cord with a mono mini-plug at least one set up for a replacement. Using this set for playback, the other way. Do not pull out the plug by the plug part. The power cords should be stepped on. LINE REC PLAY IN OUT L R CONTROL TEXT IN DIGITAL IN OPTICAL COAXIAL DIGITAL OUT OPTICAL COAXIAL LR RL 2 Connecting...
Operating Instructions
Page 12
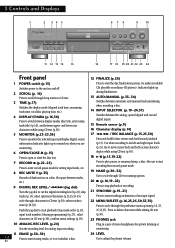
... monitor the selected input and display digital source information.Indicator lights up during programming) (p.27); confirm menu settings (p.16). 22 MENU/DELETE (p.16,23,25,30,33,35) Press to cycle through characters in CD text. 3 TIME (p.17) Switches the display mode (elapsed track time, remaining track time, total disc playing time, etc.) 4 DISPLAY/CHARA (p.16,30) Press to delete characters while editing CD text (p.30). 23 PHONES jack 10 ANALOG REC LEVEL (p.24) Sets...
... monitor the selected input and display digital source information.Indicator lights up during programming) (p.27); confirm menu settings (p.16). 22 MENU/DELETE (p.16,23,25,30,33,35) Press to cycle through characters in CD text. 3 TIME (p.17) Switches the display mode (elapsed track time, remaining track time, total disc playing time, etc.) 4 DISPLAY/CHARA (p.16,30) Press to delete characters while editing CD text (p.30). 23 PHONES jack 10 ANALOG REC LEVEL (p.24) Sets...
Operating Instructions
Page 13
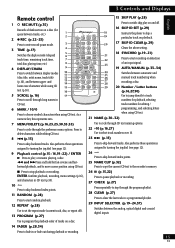
... clear the last track in a programmed playlist. 29 INPUT SELECTOR (p.19-24,37) Switches between the analog, optical digital and coaxial digital inputs. Also performs those operations assigned to turning the jog dial (see page 12). Also performs those operations assigned to skip backward tracks. and 13 14 lower-case characters while using CD text. 21 NAME (p.30-32) 7 MENU/DELETE (p.16,23,25,30,33...
... clear the last track in a programmed playlist. 29 INPUT SELECTOR (p.19-24,37) Switches between the analog, optical digital and coaxial digital inputs. Also performs those operations assigned to turning the jog dial (see page 12). Also performs those operations assigned to skip backward tracks. and 13 14 lower-case characters while using CD text. 21 NAME (p.30-32) 7 MENU/DELETE (p.16,23,25,30,33...
Operating Instructions
Page 15
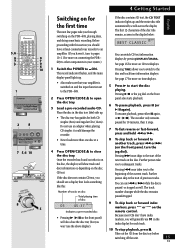
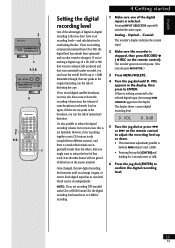
... across the display. WRITE AUTO MANUAL MONITOR INPUT SELECTOR 2 8 DIGITAL REC LEVEL ANALOG REC LEVEL ANALOG L REC BALANCE R TEXT PUSH ENTER MENU/ DELETE SYNCHRO CD TEXT Legato Link Conversion 7 5,6 10 REDCIGLITEAVLEL 8 PUSH ENTER 5 4 Getting Started Switching on and the input function set to the PDR-609. 2 Press OPEN/CLOSE 0 to close the disc tray (but you to the start the disc playing. Before proceeding with this : Number of tracks on disc Total playing time of...
... across the display. WRITE AUTO MANUAL MONITOR INPUT SELECTOR 2 8 DIGITAL REC LEVEL ANALOG REC LEVEL ANALOG L REC BALANCE R TEXT PUSH ENTER MENU/ DELETE SYNCHRO CD TEXT Legato Link Conversion 7 5,6 10 REDCIGLITEAVLEL 8 PUSH ENTER 5 4 Getting Started Switching on and the input function set to the PDR-609. 2 Press OPEN/CLOSE 0 to close the disc tray (but you to the start the disc playing. Before proceeding with this : Number of tracks on disc Total playing time of...
Operating Instructions
Page 17
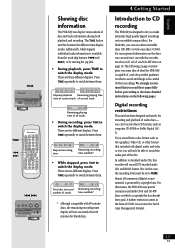
..., the PDR-609 uses special consumer-use with 80 minute discs, the remaining recording time display will only be set to switch between them : O9 45:37 Total disc time and number of disc and track information during both digital audio and video or text, you can and can display various kinds of tracks. English 17 En Press TIME repeatedly to 0dB). WRITE AUTO MANUAL MONITOR INPUT SELECTOR TIME 4 ¢ AUTO/ • REC SYNCHRO MANUAL TIME DISPLAY...
..., the PDR-609 uses special consumer-use with 80 minute discs, the remaining recording time display will only be set to switch between them : O9 45:37 Total disc time and number of disc and track information during both digital audio and video or text, you can and can display various kinds of tracks. English 17 En Press TIME repeatedly to 0dB). WRITE AUTO MANUAL MONITOR INPUT SELECTOR TIME 4 ¢ AUTO/ • REC SYNCHRO MANUAL TIME DISPLAY...
Operating Instructions
Page 18
... be disabled by the disc. Digital signal interruptions Sources of signal interruption include power or source component failure, accidental disconnection of the interconnect cord, and interruption of digital recording. If the interruption is longer than five seconds, the recorder displays the error message: DIN UNLOCK and recording is four seconds. • Usually, track numbers are slightly after the beginning of analog input terminals, as well...
... be disabled by the disc. Digital signal interruptions Sources of signal interruption include power or source component failure, accidental disconnection of the interconnect cord, and interruption of digital recording. If the interruption is longer than five seconds, the recorder displays the error message: DIN UNLOCK and recording is four seconds. • Usually, track numbers are slightly after the beginning of analog input terminals, as well...

Operating Instructions
Page 20
...;ÛB->?/ SCROLL ERASE TIME FINALIZE AUTO MANUAL TRACK NO. WRITE AUTO MANUAL MONITOR INPUT SELECTOR 2 6 AUTO/ • REC SYNCHRO MANUAL TIME DISPLAY /CHARA 1 GHI 4 ABC 2 JKL 5 SCROLL MENU/ DELETE PQRS 7 MARK 10/0 TUV 8 >10 4 CURSOR 3 DEF 3 MNO 6 WXYZ 9 NAME ¢ 1 ENTER ¡ 7 REPEAT RANDOM NAMECLIP 8 FADER PROGRAM CHECK CLEAR SKIP PLAY SKIP ID INPUT SELECTER SET CLEAR Î 3 2 20 En Recording all tracks from a source If you want...
...;ÛB->?/ SCROLL ERASE TIME FINALIZE AUTO MANUAL TRACK NO. WRITE AUTO MANUAL MONITOR INPUT SELECTOR 2 6 AUTO/ • REC SYNCHRO MANUAL TIME DISPLAY /CHARA 1 GHI 4 ABC 2 JKL 5 SCROLL MENU/ DELETE PQRS 7 MARK 10/0 TUV 8 >10 4 CURSOR 3 DEF 3 MNO 6 WXYZ 9 NAME ¢ 1 ENTER ¡ 7 REPEAT RANDOM NAMECLIP 8 FADER PROGRAM CHECK CLEAR SKIP PLAY SKIP ID INPUT SELECTER SET CLEAR Î 3 2 20 En Recording all tracks from a source If you want...

Operating Instructions
Page 21
...; If a digital signal is not in program-play mode; If the recorder detects no signal for possible remedies. 21 En English WRITE AUTO MANUAL MONITOR INPUT SELECTOR 2 AUTO/ • REC SYNCHRO MANUAL TIME DISPLAY /CHARA 1 GHI 4 ABC 2 JKL 5 SCROLL MENU/ DELETE PQRS 7 MARK 10/0 TUV 8 >10 4 CURSOR 3 DEF 3 MNO 6 WXYZ 9 NAME ¢ 1 ENTER ¡ 7 REPEAT RANDOM NAMECLIP 8 FADER PROGRAM CHECK CLEAR SKIP PLAY SKIP ID INPUT SELECTER SET CLEAR Î...
...; If a digital signal is not in program-play mode; If the recorder detects no signal for possible remedies. 21 En English WRITE AUTO MANUAL MONITOR INPUT SELECTOR 2 AUTO/ • REC SYNCHRO MANUAL TIME DISPLAY /CHARA 1 GHI 4 ABC 2 JKL 5 SCROLL MENU/ DELETE PQRS 7 MARK 10/0 TUV 8 >10 4 CURSOR 3 DEF 3 MNO 6 WXYZ 9 NAME ¢ 1 ENTER ¡ 7 REPEAT RANDOM NAMECLIP 8 FADER PROGRAM CHECK CLEAR SKIP PLAY SKIP ID INPUT SELECTER SET CLEAR Î...
Operating Instructions
Page 23
... the digital inputs is that track. WRITE AUTO MANUAL MONITOR INPUT SELECTOR 1 4,5,6 DIGITAL REC LEVEL ANALOG REC LEVEL ANALOG L REC BALANCE R TEXT PUSH ENTER MENU/ DELETE SYNCHRO CD TEXT Legato Link Conversion 3 3 5 4,6 AUTO/ • REC SYNCHRO MANUAL TIME DISPLAY /CHARA 1 GHI 4 ABC 2 JKL 5 SCROLL MENU/ DELETE PQRS 7 MARK 10/0 TUV 8 >10 4 CURSOR 3 DEF 3 MNO 6 WXYZ 9 NAME ¢ 1 ENTER ¡ 7 REPEAT RANDOM NAMECLIP 8 FADER PROGRAM CHECK CLEAR SKIP PLAY SKIP ID INPUT SELECTER SET...
... the digital inputs is that track. WRITE AUTO MANUAL MONITOR INPUT SELECTOR 1 4,5,6 DIGITAL REC LEVEL ANALOG REC LEVEL ANALOG L REC BALANCE R TEXT PUSH ENTER MENU/ DELETE SYNCHRO CD TEXT Legato Link Conversion 3 3 5 4,6 AUTO/ • REC SYNCHRO MANUAL TIME DISPLAY /CHARA 1 GHI 4 ABC 2 JKL 5 SCROLL MENU/ DELETE PQRS 7 MARK 10/0 TUV 8 >10 4 CURSOR 3 DEF 3 MNO 6 WXYZ 9 NAME ¢ 1 ENTER ¡ 7 REPEAT RANDOM NAMECLIP 8 FADER PROGRAM CHECK CLEAR SKIP PLAY SKIP ID INPUT SELECTER SET...

Operating Instructions
Page 24
... AUTO MANUAL MONITOR INPUT SELECTOR 1 2 4 DIGITAL REC LEVEL ANALOG REC LEVEL ANALOG L REC BALANCE R TEXT PUSH ENTER MENU/ DELETE SYNCHRO CD TEXT Legato Link Conversion ANALOG REC LEVEL 2 AUTO/ • REC SYNCHRO MANUAL TIME DISPLAY /CHARA 1 GHI 4 ABC 2 JKL 5 SCROLL MENU/ DELETE PQRS 7 MARK 10/0 TUV 8 >10 4 CURSOR 3 DEF 3 MNO 6 WXYZ 9 NAME ¢ 1 ENTER ¡ 7 REPEAT RANDOM NAMECLIP 8 FADER PROGRAM CHECK CLEAR SKIP PLAY SKIP ID INPUT SELECTER SET CLEAR Î 1 Setting the analog recording level...
... AUTO MANUAL MONITOR INPUT SELECTOR 1 2 4 DIGITAL REC LEVEL ANALOG REC LEVEL ANALOG L REC BALANCE R TEXT PUSH ENTER MENU/ DELETE SYNCHRO CD TEXT Legato Link Conversion ANALOG REC LEVEL 2 AUTO/ • REC SYNCHRO MANUAL TIME DISPLAY /CHARA 1 GHI 4 ABC 2 JKL 5 SCROLL MENU/ DELETE PQRS 7 MARK 10/0 TUV 8 >10 4 CURSOR 3 DEF 3 MNO 6 WXYZ 9 NAME ¢ 1 ENTER ¡ 7 REPEAT RANDOM NAMECLIP 8 FADER PROGRAM CHECK CLEAR SKIP PLAY SKIP ID INPUT SELECTER SET CLEAR Î 1 Setting the analog recording level...

Operating Instructions
Page 25
... MONITOR.) 3 Press MENU/DELETE. 4 Turn the jog dial until BALANCE appears in either direction for digital recording, and up to choose an input. Optical - Coaxial The recorder's display indicates the current input. 2 Make sure the recorder is generally not necessary to change the balance of the right or left channel for 3 seconds resets to center position. 6 Press the jog dial (ENTER) to ENTER. 5 Adjust the balance using the REC BALANCE buttons...
... MONITOR.) 3 Press MENU/DELETE. 4 Turn the jog dial until BALANCE appears in either direction for digital recording, and up to choose an input. Optical - Coaxial The recorder's display indicates the current input. 2 Make sure the recorder is generally not necessary to change the balance of the right or left channel for 3 seconds resets to center position. 6 Press the jog dial (ENTER) to ENTER. 5 Adjust the balance using the REC BALANCE buttons...

Operating Instructions
Page 33
... manually as 'silence'. Each input (analog, coaxial and optical) has its own threshold level, which can use manual track numbering. Turning the dial cycles through the following levels: -78dB to switch it on page 36. 3 DIGITAL REC LEVEL ANALOG REC LEVEL ANALOG L REC BALANCE R TEXT PUSH ENTER MENU/ DELETE SYNCHRO CD TEXT Legato Link Conversion 1 ◊ÛB->?/ SCROLL ERASE TIME FINALIZE AUTO MANUAL TRACK NO. The default is lit, press AUTO/MANUAL to -66dB - auto track numbering...
... manually as 'silence'. Each input (analog, coaxial and optical) has its own threshold level, which can use manual track numbering. Turning the dial cycles through the following levels: -78dB to switch it on page 36. 3 DIGITAL REC LEVEL ANALOG REC LEVEL ANALOG L REC BALANCE R TEXT PUSH ENTER MENU/ DELETE SYNCHRO CD TEXT Legato Link Conversion 1 ◊ÛB->?/ SCROLL ERASE TIME FINALIZE AUTO MANUAL TRACK NO. The default is lit, press AUTO/MANUAL to -66dB - auto track numbering...
Operating Instructions
Page 41
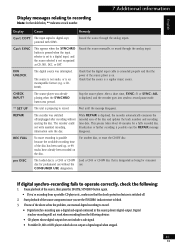
... number. Check that the digital input cable is connected properly and that the source is displayed, the recorder automatically examines the recorded area of the source player is on the disc. Check that the power of the disc and updates the track numbers and recording time data. The source player was already playing when the SYNCHRO button was interrupted. While REPAIR is a regular music source. Use another disc, or erase the CD-RW disc. CONSUMER USE...
... number. Check that the digital input cable is connected properly and that the source is displayed, the recorder automatically examines the recorded area of the source player is on the disc. Check that the power of the disc and updates the track numbers and recording time data. The source player was already playing when the SYNCHRO button was interrupted. While REPAIR is a regular music source. Use another disc, or erase the CD-RW disc. CONSUMER USE...
Operating Instructions
Page 42
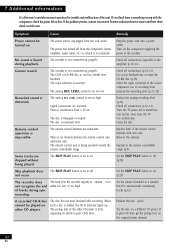
... occur. Signal connections are exhausted. Replace both of the unit. No sound is impossible. Remote control operation is heard during sync recording. The remote control unit is set to a suitable level for trouble and malfunction of the remote control batteries with the component, check the points below first. The SKIP PLAY button is set too low. Remedy Plug the power cord into a power outlet. Operate in use has already been finalized. The power was turned off or install this...
... occur. Signal connections are exhausted. Replace both of the unit. No sound is impossible. Remote control operation is heard during sync recording. The remote control unit is set to a suitable level for trouble and malfunction of the remote control batteries with the component, check the points below first. The SKIP PLAY button is set too low. Remedy Plug the power cord into a power outlet. Operate in use has already been finalized. The power was turned off or install this...


