
Owner's Manual
Page 3
...televisions, use shielded cables and connectors for connections. Address: P.O. Consult the dealer or an experienced radio/TV technician for a class B digital device, pursuant to comply with Canadian ICES-003. Information to User Alteration... between the equipment and receiver. - Product Name: Plasma Display System (Plasma Display) (Media Receiver) Model Number: PDP-5045HD PDP-4345HD (PDP-504PU) (PDP-434PU) (PDP-R05U) (PDP-R05U) Product Category: Class B Personal Computers & Peripherals Responsible Party Name: PIONEER ELECTRONICS (USA), INC., Customer Support Div. BOX...
...televisions, use shielded cables and connectors for connections. Address: P.O. Consult the dealer or an experienced radio/TV technician for a class B digital device, pursuant to comply with Canadian ICES-003. Information to User Alteration... between the equipment and receiver. - Product Name: Plasma Display System (Plasma Display) (Media Receiver) Model Number: PDP-5045HD PDP-4345HD (PDP-504PU) (PDP-434PU) (PDP-R05U) (PDP-R05U) Product Category: Class B Personal Computers & Peripherals Responsible Party Name: PIONEER ELECTRONICS (USA), INC., Customer Support Div. BOX...
Owner's Manual
Page 4
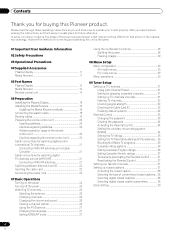
... Information 02 Safety Precautions 03 Operational Precautions 04 Supplied Accessories Plasma Display 11 Media Receiver 11 05 Part Names Plasma Display 12 Media Receiver 12 Remote control unit 14 06 Preparation Installing the Plasma Display 15 Installing the Media Receiver 16 Installing the Media ...for future reference. After you will know how to operate your favorite channels 37 Setting up TV channels 31 Using Auto Channel Preset 31 Setting for buying this Pioneer product. Please read through these operating instructions so you have finished reading the instructions, put them...
... Information 02 Safety Precautions 03 Operational Precautions 04 Supplied Accessories Plasma Display 11 Media Receiver 11 05 Part Names Plasma Display 12 Media Receiver 12 Remote control unit 14 06 Preparation Installing the Plasma Display 15 Installing the Media Receiver 16 Installing the Media ...for future reference. After you will know how to operate your favorite channels 37 Setting up TV channels 31 Using Auto Channel Preset 31 Setting for buying this Pioneer product. Please read through these operating instructions so you have finished reading the instructions, put them...
Owner's Manual
Page 6
... still/moving image. • After using the still picture mode from a TV, VCR, DVD player or any still image, it is strongly recommended. After-image and permanent effects on your plasma: • Whenever possible, avoid frequently displaying the same image or virtually still... same picture freeze-framed or paused continuously over a long period of the Pioneer PDP-5045HD/PDP-4345HD Plasma Display System will automatically power off in the screen are not covered by local warranties. 6 En Plasma Display Systems are not blocked. To ensure safety, please take the proper measures...
... still/moving image. • After using the still picture mode from a TV, VCR, DVD player or any still image, it is strongly recommended. After-image and permanent effects on your plasma: • Whenever possible, avoid frequently displaying the same image or virtually still... same picture freeze-framed or paused continuously over a long period of the Pioneer PDP-5045HD/PDP-4345HD Plasma Display System will automatically power off in the screen are not covered by local warranties. 6 En Plasma Display Systems are not blocked. To ensure safety, please take the proper measures...

Owner's Manual
Page 7
After-image (lag image) due to burning Avoid displaying the same image on the Plasma Display continuously over several days, a permanent after -image lagging. If the same image is operated through i.LINK. The after-images remaining on the screen will ... periods of time over a long period of the still images and the time they will disappear when moving images are displayed. About operations through i.LINK PIONEER shall not always assure normal video/audio recording or playback when a D-VHS is displayed continuously for several hours, or for the after -image lagging may...
After-image (lag image) due to burning Avoid displaying the same image on the Plasma Display continuously over several days, a permanent after -image lagging. If the same image is operated through i.LINK. The after-images remaining on the screen will ... periods of time over a long period of the still images and the time they will disappear when moving images are displayed. About operations through i.LINK PIONEER shall not always assure normal video/audio recording or playback when a D-VHS is displayed continuously for several hours, or for the after -image lagging may...

Owner's Manual
Page 8
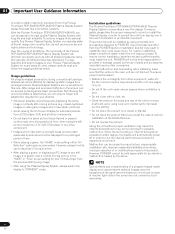
..., consult your dealer or local power company. 12. Request a qualified service person to service the product yourself. Do not expose the Plasma Display to prevent potential danger, please observe the following precautions carefully before the product is unstable, unpack, carry, and install the product ... manufacturer. 9. a. When the product does not operate properly as described in fire or personal injury. 24. The Plasma Display weighs about 38 kg (83.8 lbs.) for the PDP-504PU and about 30.5 kg (67.3 lbs.) for a long period of your safety and prolong the service life...
..., consult your dealer or local power company. 12. Request a qualified service person to service the product yourself. Do not expose the Plasma Display to prevent potential danger, please observe the following precautions carefully before the product is unstable, unpack, carry, and install the product ... manufacturer. 9. a. When the product does not operate properly as described in fire or personal injury. 24. The Plasma Display weighs about 38 kg (83.8 lbs.) for the PDP-504PU and about 30.5 kg (67.3 lbs.) for a long period of your safety and prolong the service life...
Owner's Manual
Page 9
... non-specified products. • Do not mount or remove the Plasma Display to or from the stand, with speakers attached. • It is strongly recommended to use the optional PIONEER mounting products. • PIONEER shall not be liable for the installation: Rear view Side view ...Mounting surface Mounting hole Mounting hole Median line Plasma Display Mounting bracket (or equivalent item) M8 screw 12 to 18...
... non-specified products. • Do not mount or remove the Plasma Display to or from the stand, with speakers attached. • It is strongly recommended to use the optional PIONEER mounting products. • PIONEER shall not be liable for the installation: Rear view Side view ...Mounting surface Mounting hole Mounting hole Median line Plasma Display Mounting bracket (or equivalent item) M8 screw 12 to 18...
Owner's Manual
Page 10
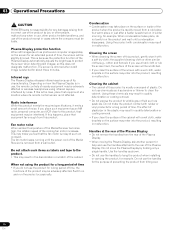
... slightly dimmed. This is detected for example. The screen is dimmed when a still image is because the protection function of the Plasma Display automatically adjusts the brightness to hang the product when installing or carrying the product, for help and use the handles for a... the cabinet. The effect of plasticizer in the plastic may result in the discoloration or scratch of the cabinet. 03 Operational Precautions PIONEER bears no responsibility for a long period of time, the functions of the product may be adversely affected. Radio interference While this product...
... slightly dimmed. This is detected for example. The screen is dimmed when a still image is because the protection function of the Plasma Display automatically adjusts the brightness to hang the product when installing or carrying the product, for help and use the handles for a... the cabinet. The effect of plasticizer in the plastic may result in the discoloration or scratch of the cabinet. 03 Operational Precautions PIONEER bears no responsibility for a long period of time, the functions of the product may be adversely affected. Radio interference While this product...

Owner's Manual
Page 11
...band × 3 Media Receiver Cleaning cloth Speed clamp × 3 Warranty card Speaker cushion × 3 (Use when installing the optional speakers at the bottom of the Plasma Display.) Power cord (2 m/6.6 feet) Remote control unit System cable (3 m/9.8 feet) AA size battery × 2 (Alkaline battery) Stand Screw × 4 (for ...stand) Screw hole cap × 4 VCR controller (1.8 m/5.9 feet) Operating Instructions Instruction guide • Always use the power cord supplied with the Plasma Display and the one supplied with the Media Receiver for each respective unit. 11 En
...band × 3 Media Receiver Cleaning cloth Speed clamp × 3 Warranty card Speaker cushion × 3 (Use when installing the optional speakers at the bottom of the Plasma Display.) Power cord (2 m/6.6 feet) Remote control unit System cable (3 m/9.8 feet) AA size battery × 2 (Alkaline battery) Stand Screw × 4 (for ...stand) Screw hole cap × 4 VCR controller (1.8 m/5.9 feet) Operating Instructions Instruction guide • Always use the power cord supplied with the Plasma Display and the one supplied with the Media Receiver for each respective unit. 11 En
Owner's Manual
Page 12
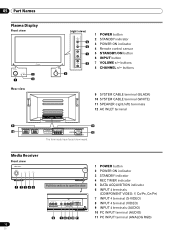
..., CR/PR) 7 INPUT 4 terminal (S-VIDEO) 8 INPUT 4 terminal (VIDEO) 9 INPUT 4 terminals (AUDIO) 10 PC INPUT terminal (AUDIO) 11 PC INPUT terminal (ANALOG RGB) 05 Part Names Plasma Display Front view Rear view (right view) 5 6 7 8 4 1 POWER button 2 STANDBY indicator 3 POWER ON indicator 4 Remote control sensor 5 STANDBY/ON button 6 INPUT button 7 VOLUME +/- buttons 8 CHANNEL...
..., CR/PR) 7 INPUT 4 terminal (S-VIDEO) 8 INPUT 4 terminal (VIDEO) 9 INPUT 4 terminals (AUDIO) 10 PC INPUT terminal (AUDIO) 11 PC INPUT terminal (ANALOG RGB) 05 Part Names Plasma Display Front view Rear view (right view) 5 6 7 8 4 1 POWER button 2 STANDBY indicator 3 POWER ON indicator 4 Remote control sensor 5 STANDBY/ON button 6 INPUT button 7 VOLUME +/- buttons 8 CHANNEL...
Owner's Manual
Page 14
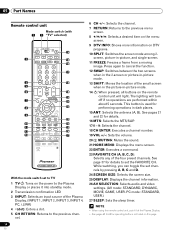
... the volume. 20 MUTING: Mutes the sound. 21 HOME MENU: Displays the menu screen. 22 ENTER: Executes a command. 23 FAVORITE CH (A, B, C, D): Selects any of the Plasma Display. (INPUT 1, INPUT 2, INPUT 3, INPUT 4, PC, i.LINK) 4 •(dot): Enters a dot. 5 CH RETURN: Returns to the previous channel. 14 En 6 CH +/-: Selects ...6 19 20 7 21 8 22 9 23 10 24 11 25 12 26 13 27 With the mode switch set to TV 1 TV : Turns on the power to the Plasma Display or places it at the Plasma Display. • See pages 62 to 68 for details to set channels by pressing A, B, C and D. 24 SCREEN ...
... the volume. 20 MUTING: Mutes the sound. 21 HOME MENU: Displays the menu screen. 22 ENTER: Executes a command. 23 FAVORITE CH (A, B, C, D): Selects any of the Plasma Display. (INPUT 1, INPUT 2, INPUT 3, INPUT 4, PC, i.LINK) 4 •(dot): Enters a dot. 5 CH RETURN: Returns to the previous channel. 14 En 6 CH +/-: Selects ...6 19 20 7 21 8 22 9 23 10 24 11 25 12 26 13 27 With the mode switch set to TV 1 TV : Turns on the power to the Plasma Display or places it at the Plasma Display. • See pages 62 to 68 for details to set channels by pressing A, B, C and D. 24 SCREEN ...
Owner's Manual
Page 15
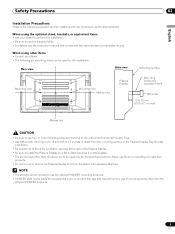
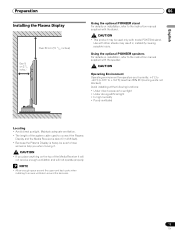
... • In high humidity • Poorly ventilated English Locating • Avoid direct sunlight. Preparation Installing the Plasma Display Over 50 cm (19 /11 16 inches) Over 10 cm (3 15/ 16 inches ) 06 Using the optional PIONEER stand For details on installation, refer to the instruction manual supplied with the stand. • This product...
... • In high humidity • Poorly ventilated English Locating • Avoid direct sunlight. Preparation Installing the Plasma Display Over 50 cm (19 /11 16 inches) Over 10 cm (3 15/ 16 inches ) 06 Using the optional PIONEER stand For details on installation, refer to the instruction manual supplied with the stand. • This product...
Owner's Manual
Page 16
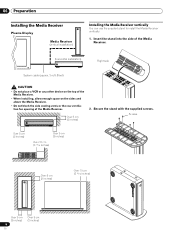
... cm (3 15/16 inches) POWER ON STANDBY REC TIMER DATA ACQUISITION Over 5 cm (2 inches) 16 En Over 5 cm (2 inches) 06 Preparation Installing the Media Receiver Plasma Display Media Receiver (vertical installation) ACQUISITION TIMER STANDBY ON DATA REC POWER Installing the Media Receiver vertically You can use the supplied stand to install...
... cm (3 15/16 inches) POWER ON STANDBY REC TIMER DATA ACQUISITION Over 5 cm (2 inches) 16 En Over 5 cm (2 inches) 06 Preparation Installing the Media Receiver Plasma Display Media Receiver (vertical installation) ACQUISITION TIMER STANDBY ON DATA REC POWER Installing the Media Receiver vertically You can use the supplied stand to install...
Owner's Manual
Page 18
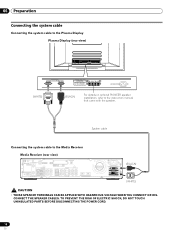
... PARTS BEFORE DISCONNECTING THE POWER CORD. 18 En 06 Preparation Connecting the system cable Connecting the system cable to the Plasma Display Plasma Display (rear view) (WHITE) (BLACK) For details on optional PIONEER speaker installation, refer to the Media Receiver Media Receiver (rear view) IN OUT VCR CONTROL CONTROL IN ANTENNA B ANTENNA/ CABLE...
... PARTS BEFORE DISCONNECTING THE POWER CORD. 18 En 06 Preparation Connecting the system cable Connecting the system cable to the Plasma Display Plasma Display (rear view) (WHITE) (BLACK) For details on optional PIONEER speaker installation, refer to the Media Receiver Media Receiver (rear view) IN OUT VCR CONTROL CONTROL IN ANTENNA B ANTENNA/ CABLE...

Owner's Manual
Page 19
... cables together so that time be difficult to undo once in place. Once properly bunched, follow the steps below , depending on the rear of the Plasma Display and snap [2] into an appropriate hole on your routing system. When the speakers are designed to be careful not to apply any force to...
... cables together so that time be difficult to undo once in place. Once properly bunched, follow the steps below , depending on the rear of the Plasma Display and snap [2] into an appropriate hole on your routing system. When the speakers are designed to be careful not to apply any force to...

Owner's Manual
Page 20
...• When any chemical leakage, wipe thoroughly with a cloth. • The batteries supplied with new ones if necessary. • The Plasma Display emits very weak infrared rays from the remote control sensor. The strength of infrared rays emitted from the screen differs, depending on images ...displayed on the installation environment, infrared rays from the Plasma Display may not function. • As the batteries become empty, the remote control unit can shorten the life of the remote control...
...• When any chemical leakage, wipe thoroughly with a cloth. • The batteries supplied with new ones if necessary. • The Plasma Display emits very weak infrared rays from the remote control sensor. The strength of infrared rays emitted from the screen differs, depending on images ...displayed on the installation environment, infrared rays from the Plasma Display may not function. • As the batteries become empty, the remote control unit can shorten the life of the remote control...
Owner's Manual
Page 23
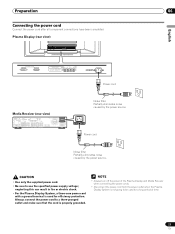
... cord to a three-pronged outlet and make sure that the cord is properly grounded. • Always turn off the power of the Plasma Display and Media Receiver when connecting the power cords. • Disconnect the power cord from the power outlet when the... going to use the specified power supply voltage; Preparation 06 Connecting the power cord Connect the power cord after all component connections have been completed. Plasma Display (rear view) English Power cord Media Receiver (rear view) IN OUT CONTROL VCR CONTROL IN ANTENNA B ANTENNA/ CABLE A IN Cable CARD S-VIDEO ...
... cord to a three-pronged outlet and make sure that the cord is properly grounded. • Always turn off the power of the Plasma Display and Media Receiver when connecting the power cords. • Disconnect the power cord from the power outlet when the... going to use the specified power supply voltage; Preparation 06 Connecting the power cord Connect the power cord after all component connections have been completed. Plasma Display (rear view) English Power cord Media Receiver (rear view) IN OUT CONTROL VCR CONTROL IN ANTENNA B ANTENNA/ CABLE A IN Cable CARD S-VIDEO ...
Owner's Manual
Page 24
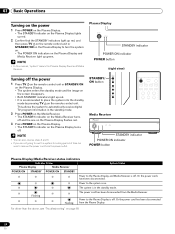
...3. • If you are not going to use this manual, "system" means the Plasma Display Panel and Media Receiver. (right view) Turning off the power 1 Press TV on the remote control unit or STANDBY/ON on the Plasma Display. • The system enters the standby mode and the image on the screen... system is recommended to place the system into the standby mode by pressing TV on the remote control unit. 07 Basic Operations Turning on the power 1 Press POWER on the Plasma Display. • The STANDBY indicator on the Plasma Display lights up red. 2 Confirm that the STANDBY indicators light up red...
...3. • If you are not going to use this manual, "system" means the Plasma Display Panel and Media Receiver. (right view) Turning off the power 1 Press TV on the remote control unit or STANDBY/ON on the Plasma Display. • The system enters the standby mode and the image on the screen... system is recommended to place the system into the standby mode by pressing TV on the remote control unit. 07 Basic Operations Turning on the power 1 Press POWER on the Plasma Display. • The STANDBY indicator on the Plasma Display lights up red. 2 Confirm that the STANDBY indicators light up red...

Owner's Manual
Page 25
...Plasma Display operates the same as necessary when in emergency situations. Press CH RETURN again to the previously tuned channel. To clear the channel banner, press DTV INFO. Selecting the antenna After confirming that the Mode switch on the remote control unit has been set up TV... CH RETURN to switch the currently tuned channel to restore the currently tuned channel. To decrease the channel number, press CH -. • CHANNEL +/- Plasma Display (right view) CHANNEL +/- Those messages are broadcasted by pressing buttons 0 to 9. Channel banner 12:33pm DTV 2 • 1002.102 A ...
...Plasma Display operates the same as necessary when in emergency situations. Press CH RETURN again to the previously tuned channel. To clear the channel banner, press DTV INFO. Selecting the antenna After confirming that the Mode switch on the remote control unit has been set up TV... CH RETURN to switch the currently tuned channel to restore the currently tuned channel. To decrease the channel number, press CH -. • CHANNEL +/- Plasma Display (right view) CHANNEL +/- Those messages are broadcasted by pressing buttons 0 to 9. Channel banner 12:33pm DTV 2 • 1002.102 A ...
Owner's Manual
Page 26
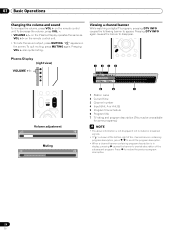
... at the bottom right of the subsequent program. 07 Basic Operations Changing the volume and sound To increase the volume, press VOL + on the Plasma Display operates the same as VOL +/- " " appears on the remote control unit. • To mute the sound output, press MUTING. Press...26 En Pressing VOL + also quits muting. To decrease the volume, press VOL -. • VOLUME +/- Viewing a channel banner While watching a digital TV program, pressing DTV INFO causes the following banner to disappear. Pressing DTV INFO again causes the banner to appear. A or Ant. on the screen. ...
... at the bottom right of the subsequent program. 07 Basic Operations Changing the volume and sound To increase the volume, press VOL + on the Plasma Display operates the same as VOL +/- " " appears on the remote control unit. • To mute the sound output, press MUTING. Press...26 En Pressing VOL + also quits muting. To decrease the volume, press VOL -. • VOLUME +/- Viewing a channel banner While watching a digital TV program, pressing DTV INFO causes the following banner to disappear. Pressing DTV INFO again causes the banner to appear. A or Ant. on the screen. ...

Owner's Manual
Page 27
...MONO mode to view the POD display. • If you have selected a digital TV program that are received through language setting is available when the channel or program is selected, the Plasma Display System sound remains mono even if the system receives a stereo broadcast. Each time... the display changes depending on the current broadcast. • If the language selected through the conventional VHF/UHF frequencies or conventional cable TV channels. • When stereo sound is difficult to hear, you have enabled data acquisition using the menu, POD information is automatically ...
...MONO mode to view the POD display. • If you have selected a digital TV program that are received through language setting is available when the channel or program is selected, the Plasma Display System sound remains mono even if the system receives a stereo broadcast. Each time... the display changes depending on the current broadcast. • If the language selected through the conventional VHF/UHF frequencies or conventional cable TV channels. • When stereo sound is difficult to hear, you have enabled data acquisition using the menu, POD information is automatically ...


