Owner's Manual
Page 3
... the Power Cord and Cables ...22 3 Basic Operations...24 3.1 Turn the Flat Panel Display ON / OFF ...24 3.2 Program Your Flat Panel Display...25 3.2.1 Choose an Input Source ...25 3.2.2 Explore the Home Menu ...25 3.2.3 Use the Simplified User Menu ...26 3.2.4 Assign a Language...27 4 Basic Picture and Sound Adjustment 28 4.1 Adjust the Picture Quality ...28 4.1.1 Adjust the Picture for Your Room Lighting ...28 4.1.2 General Picture (Video) Adjustment ...28 4.1.3 Compare Images When Adjusting the Picture...30 4.1.4 General Sound (Audio) Adjustment...31 4.2 Smart Starts for New Owners ...32...
... the Power Cord and Cables ...22 3 Basic Operations...24 3.1 Turn the Flat Panel Display ON / OFF ...24 3.2 Program Your Flat Panel Display...25 3.2.1 Choose an Input Source ...25 3.2.2 Explore the Home Menu ...25 3.2.3 Use the Simplified User Menu ...26 3.2.4 Assign a Language...27 4 Basic Picture and Sound Adjustment 28 4.1 Adjust the Picture Quality ...28 4.1.1 Adjust the Picture for Your Room Lighting ...28 4.1.2 General Picture (Video) Adjustment ...28 4.1.3 Compare Images When Adjusting the Picture...30 4.1.4 General Sound (Audio) Adjustment...31 4.2 Smart Starts for New Owners ...32...
Owner's Manual
Page 4
... 6.4.3 Control a Player...63 6.4.4 Add an AV Amp or a BD Player...64 6.5 Specific KURO LINK Commands ...65 6.5.1 Play Source Sound Using an HDMI Command 65 6.5.2 Turn OFF the Power With an HDMI Command 65 6.5.3 Turn ON the Power With an HDMI Command...65 6.5.4 Test the Power Control (On/Off) ...66 6.6 Connect a Game Console or Camcorder ...66 6.7 Use the IR REPEATER OUT ...66 6.8 Connect to a Network ...67 6.8.1 IP Control Setting ...68 6.8.2 Use the Web Control System...69 6.9 Assign a Serial Number...
... 6.4.3 Control a Player...63 6.4.4 Add an AV Amp or a BD Player...64 6.5 Specific KURO LINK Commands ...65 6.5.1 Play Source Sound Using an HDMI Command 65 6.5.2 Turn OFF the Power With an HDMI Command 65 6.5.3 Turn ON the Power With an HDMI Command...65 6.5.4 Test the Power Control (On/Off) ...66 6.6 Connect a Game Console or Camcorder ...66 6.7 Use the IR REPEATER OUT ...66 6.8 Connect to a Network ...67 6.8.1 IP Control Setting ...68 6.8.2 Use the Web Control System...69 6.9 Assign a Serial Number...
Owner's Manual
Page 11
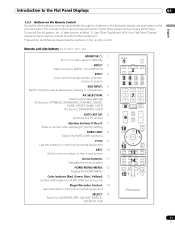
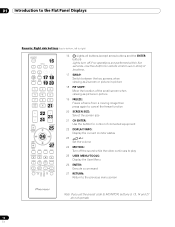
...) MONITOR : 1 Turn On or place panel in Standby INPUT: 2 Select a source (INPUT 1 thru INPUT 6) SPLIT: 3 Cycle view thru single-screen, 2-screen, picture-in-picture SUB INPUT: 4 Switch inputs for sub screens when viewing in multi-screen AV SELECTION: 5 Select audio/video settings AV Source: OPTIMUM, STANDARD, DYNAMIC, MOVIE, PURE, SPORT, GAME, USER PC Source: STANDARD, USER AUTO SET UP: 6 Optimize the PC screen Number buttons 0 thru 9: 7 Enter a number when applying IP Control Setting KURO LINK: 8 Select the KURO LINK functions P/CH: 9 Use the button for control of connected...
...) MONITOR : 1 Turn On or place panel in Standby INPUT: 2 Select a source (INPUT 1 thru INPUT 6) SPLIT: 3 Cycle view thru single-screen, 2-screen, picture-in-picture SUB INPUT: 4 Switch inputs for sub screens when viewing in multi-screen AV SELECTION: 5 Select audio/video settings AV Source: OPTIMUM, STANDARD, DYNAMIC, MOVIE, PURE, SPORT, GAME, USER PC Source: STANDARD, USER AUTO SET UP: 6 Optimize the PC screen Number buttons 0 thru 9: 7 Enter a number when applying IP Control Setting KURO LINK: 8 Select the KURO LINK functions P/CH: 9 Use the button for control of connected...
Owner's Manual
Page 12
... screen size 21 CH ENTER: Use the button for control of connected equipment 22 DISPLAY/INFO: Display the current monitor status 23 i +/-: Set the volume 24 MUTING: Turn off the sound while the video continues to play 25 USER MENU/TOOLS: Display the User Menu 26 ENTER: Execute a command 27 RETURN: Return to the previous menu screen Note: If you set the preset code to right) MONITOR INPUT 1 2 3 16 4 5 6 7 8 SUB PIP 17 18 SPLIT INPUT SWAP SHIFT AV AUTO SCREEN...
... screen size 21 CH ENTER: Use the button for control of connected equipment 22 DISPLAY/INFO: Display the current monitor status 23 i +/-: Set the volume 24 MUTING: Turn off the sound while the video continues to play 25 USER MENU/TOOLS: Display the User Menu 26 ENTER: Execute a command 27 RETURN: Return to the previous menu screen Note: If you set the preset code to right) MONITOR INPUT 1 2 3 16 4 5 6 7 8 SUB PIP 17 18 SPLIT INPUT SWAP SHIFT AV AUTO SCREEN...
Owner's Manual
Page 19
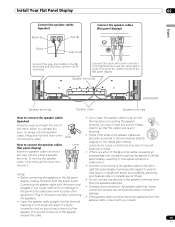
... connections of the speaker. Install Your Flat Panel Display 02 English Connect the speaker cables (speaker) Black Red Connect the speaker cables (flat panel display) Black Gray lined Connect the gray-lined cable to the terminals and the black cable to connect the speaker cables • If you insert the speaker cable too far so that the copper wire is a short in the power cord after making connections. Speaker terminals (KRP-600M) Speaker terminals Speaker cable Speaker terminals How to the terminals. To remove the speaker cable...
... connections of the speaker. Install Your Flat Panel Display 02 English Connect the speaker cables (speaker) Black Red Connect the speaker cables (flat panel display) Black Gray lined Connect the gray-lined cable to the terminals and the black cable to connect the speaker cables • If you insert the speaker cable too far so that the copper wire is a short in the power cord after making connections. Speaker terminals (KRP-600M) Speaker terminals Speaker cable Speaker terminals How to the terminals. To remove the speaker cable...
Owner's Manual
Page 20
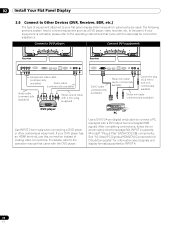
... equipment is not listed, please refer to the operating instructions that came with the DVD player. Connect a DVD player: Connect DVI equipment: Rear view Rear view RL Component video cable (commercially available) Audio cable (commercially available) Video cable (commercially available) Stereo sound cable RL with a DVI output terminal (digital RGB signal). For details, refer to the operation manual that came with the device(s) for information about signals and display formats supported by INPUT 4. 20 En INPUT 4 supports Microsoft "Plug & Play" (VESA DDC 2B) components...
... equipment is not listed, please refer to the operating instructions that came with the DVD player. Connect a DVD player: Connect DVI equipment: Rear view Rear view RL Component video cable (commercially available) Audio cable (commercially available) Video cable (commercially available) Stereo sound cable RL with a DVI output terminal (digital RGB signal). For details, refer to the operation manual that came with the device(s) for information about signals and display formats supported by INPUT 4. 20 En INPUT 4 supports Microsoft "Plug & Play" (VESA DDC 2B) components...
Owner's Manual
Page 21
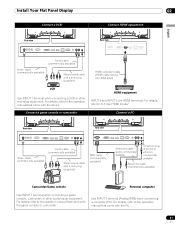
...HDMI equipment INPUT 5 and INPUT 6 are HDMI terminals. Install Your Flat Panel Display Connect a VCR: 02 Connect HDMI equipment: English Rear view Rear view RL Audio cable (commercially available) Video cable (commercially available) RL Stereo sound cable with a mini plug (supplied) RGB cable (commercially available) RL Stereo mini cable (audio, commercially available) Conversion plug (ø 3.5 mm to ø 2.5 mm, commercially available) Stereo mini cable (commercially available) Camcorder/Game console Personal computer Use INPUT 1 terminal when connecting a game...
...HDMI equipment INPUT 5 and INPUT 6 are HDMI terminals. Install Your Flat Panel Display Connect a VCR: 02 Connect HDMI equipment: English Rear view Rear view RL Audio cable (commercially available) Video cable (commercially available) RL Stereo sound cable with a mini plug (supplied) RGB cable (commercially available) RL Stereo mini cable (audio, commercially available) Conversion plug (ø 3.5 mm to ø 2.5 mm, commercially available) Stereo mini cable (commercially available) Camcorder/Game console Personal computer Use INPUT 1 terminal when connecting a game...
Owner's Manual
Page 25
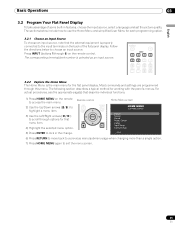
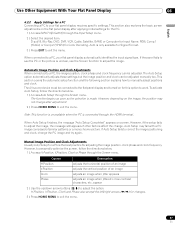
Press INPUT (buttons 1 through this menu. MONITOR INPUT 1 2 3 4 5 6 7 8 SUB PIP SPLIT INPUT SWAP SHIFT AV AUTO SCREEN SELECTION SET UP FREEZE SIZE 3.2.2 Explore the Home Menu The Home Menu is the main menu for working with the panel's menus. Remote control EXIT TOP MENU GUIDE HOME MENU ENTER 4) Highlight the selected menu option. USER MENU TOOLS RETURN Home Menu screen HOME MENU FLAT PANEL DISPLAY Picture Screen Sound Power Control Option Input Setup Control Setup Exit 6) Press RETURN to move back to a previous menu/submenu page when changing more than a single ...
Press INPUT (buttons 1 through this menu. MONITOR INPUT 1 2 3 4 5 6 7 8 SUB PIP SPLIT INPUT SWAP SHIFT AV AUTO SCREEN SELECTION SET UP FREEZE SIZE 3.2.2 Explore the Home Menu The Home Menu is the main menu for working with the panel's menus. Remote control EXIT TOP MENU GUIDE HOME MENU ENTER 4) Highlight the selected menu option. USER MENU TOOLS RETURN Home Menu screen HOME MENU FLAT PANEL DISPLAY Picture Screen Sound Power Control Option Input Setup Control Setup Exit 6) Press RETURN to move back to a previous menu/submenu page when changing more than a single ...
Owner's Manual
Page 26
... Setting Serial Setting 3.2.3 Use the Simplified User Menu For simplified menu selections, the User Menu provides quick access to "3.2.2 Explore the Home Menu". Press USER MENU on the picture (see page 35) reproduces theatre-quality images for film-based sources (see page 42) places the panel into Standby when the set time elapses (see page 34) controls the connected equipment with the panel's remote through HDMI (see page 60) 26 En USER MENU FLAT PANEL DISPLAY User Menu screen Input Change AV Selection Film Mode Sleep Timer...
... Setting Serial Setting 3.2.3 Use the Simplified User Menu For simplified menu selections, the User Menu provides quick access to "3.2.2 Explore the Home Menu". Press USER MENU on the picture (see page 35) reproduces theatre-quality images for film-based sources (see page 42) places the panel into Standby when the set time elapses (see page 34) controls the connected equipment with the panel's remote through HDMI (see page 60) 26 En USER MENU FLAT PANEL DISPLAY User Menu screen Input Change AV Selection Film Mode Sleep Timer...
Owner's Manual
Page 38
... without altering the input signal aspect ratio shows 16:9 screen display With WIDE 1 or WIDE 2 selected, a High Definition (HD) picture image or menu may cause temporary or permanent image retention depending on the type of the screen. Avoid showing signals that movie or program is available when receiving HD pictures. While watching video content, press SCREEN SIZE on the remote control to cycle the picture through Auto, FULL, Dot by...
... without altering the input signal aspect ratio shows 16:9 screen display With WIDE 1 or WIDE 2 selected, a High Definition (HD) picture image or menu may cause temporary or permanent image retention depending on the type of the screen. Avoid showing signals that movie or program is available when receiving HD pictures. While watching video content, press SCREEN SIZE on the remote control to cycle the picture through Auto, FULL, Dot by...
Owner's Manual
Page 40
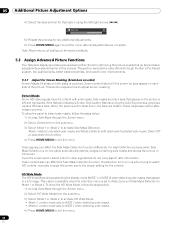
... Auto Size process, gray bars replace the black bars. If the flat panel display's Screen Size is set to Mode 1 or Mode 2. Select Off to deactivate this function. 4 ) Press HOME MENU to the factory defaults. 5.3 Assign Advanced Picture Functions Your flat panel display provides various advanced functions for optimizing the picture quality that go beyond basic adjustments explained earlier in this manual. 05 Additional Picture Adjustment Options 4 ) Select the desired level for that option using...
... Auto Size process, gray bars replace the black bars. If the flat panel display's Screen Size is set to Mode 1 or Mode 2. Select Off to deactivate this function. 4 ) Press HOME MENU to the factory defaults. 5.3 Assign Advanced Picture Functions Your flat panel display provides various advanced functions for optimizing the picture quality that go beyond basic adjustments explained earlier in this manual. 05 Additional Picture Adjustment Options 4 ) Select the desired level for that option using...

Owner's Manual
Page 56
...With Your Flat Panel Display 6.2 Apply Settings for Other Equipment This section provides setting hints for the connected equipment including devices using an HDMI cable can cause improper images to appear. Input Setup 1/2 INPUT 1 (Video) Input Name : Color System : INPUT 2 (Component) : Color Decoding INPUT 3 (D-Sub 15) Input Name : Color Decoding : INPUT 4 (DVI) Input Name : Signal Type : Video : Video Auto Component D-Sub 15 RGB DVI Video Auto Exit 2 ) Select the desired items. • INPUT 1(Video) Video, Blu-Ray, DVD, DVR, VCR, Cable, Satellite, GAME or Computer...
...With Your Flat Panel Display 6.2 Apply Settings for Other Equipment This section provides setting hints for the connected equipment including devices using an HDMI cable can cause improper images to appear. Input Setup 1/2 INPUT 1 (Video) Input Name : Color System : INPUT 2 (Component) : Color Decoding INPUT 3 (D-Sub 15) Input Name : Color Decoding : INPUT 4 (DVI) Input Name : Signal Type : Video : Video Auto Component D-Sub 15 RGB DVI Video Auto Exit 2 ) Select the desired items. • INPUT 1(Video) Video, Blu-Ray, DVD, DVR, VCR, Cable, Satellite, GAME or Computer...
Owner's Manual
Page 57
... Auto Setup through the Screen menu. This section also explores the basic screen adjustments on screen. D-sub15, Blu-Ray, DVD, DVR, VCR, Cable, Satellite, GAME or Computer for Color Decoding. The function begins as soon as the selection is connected through the Input Setup menu. 2 ) Select the desired item. Use Other Equipment With Your Flat Panel Display 06 English 6.2.2 Apply Settings for a PC Connecting a PC to your flat panel display automatically identifies the input signal type...
... Auto Setup through the Screen menu. This section also explores the basic screen adjustments on screen. D-sub15, Blu-Ray, DVD, DVR, VCR, Cable, Satellite, GAME or Computer for Color Decoding. The function begins as soon as the selection is connected through the Input Setup menu. 2 ) Select the desired item. Use Other Equipment With Your Flat Panel Display 06 English 6.2.2 Apply Settings for a PC Connecting a PC to your flat panel display automatically identifies the input signal type...
Owner's Manual
Page 58
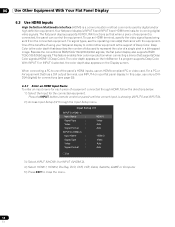
...the color of a single pixel in a bitmapped image. Input Setup 2/2 INPUT 5 (HDMI 1) Input Name : Signal Type : Video : Signal Format : INPUT 6 (HDMI 2) Input Name : Signal Type : Video : Signal Format : HDMI 1 Video Auto Auto HDMI 2 Video Auto Auto Exit 3 ) Select INPUT 5(HDMI 1) or INPUT 6(HDMI 2). 4 ) Select HDMI 1, HDMI 2, Blu-Ray, DVD, DVR, VCR, Cable, Satellite, GAME or Computer. 5 ) Press EXIT to control other equipment is the support of Deep Color. 06 Use Other Equipment With Your Flat Panel Display 6.3 Use HDMI Inputs High Definition Multimedia Interface (HDMI) is...
...the color of a single pixel in a bitmapped image. Input Setup 2/2 INPUT 5 (HDMI 1) Input Name : Signal Type : Video : Signal Format : INPUT 6 (HDMI 2) Input Name : Signal Type : Video : Signal Format : HDMI 1 Video Auto Auto HDMI 2 Video Auto Auto Exit 3 ) Select INPUT 5(HDMI 1) or INPUT 6(HDMI 2). 4 ) Select HDMI 1, HDMI 2, Blu-Ray, DVD, DVR, VCR, Cable, Satellite, GAME or Computer. 5 ) Press EXIT to control other equipment is the support of Deep Color. 06 Use Other Equipment With Your Flat Panel Display 6.3 Use HDMI Inputs High Definition Multimedia Interface (HDMI) is...
Owner's Manual
Page 60
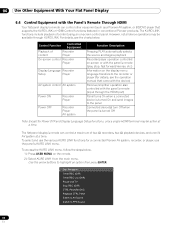
... CTRL Panel Switch to AV Sound Switch to highlight an option then press ENTER. However, not all device operations may be available through the HDMI port) Panel turns On when a connected device is turned On and send images to the recorder or player (for a connected Pioneer AV system, recorder, or player, use the panel's KURO LINK menu. 06 Use Other Equipment With Your Flat Panel Display 6.4 Control Equipment with the Panel's Remote Through HDMI Your flat panel display's remote can control...
... CTRL Panel Switch to AV Sound Switch to highlight an option then press ENTER. However, not all device operations may be available through the HDMI port) Panel turns On when a connected device is turned On and send images to the recorder or player (for a connected Pioneer AV system, recorder, or player, use the panel's KURO LINK menu. 06 Use Other Equipment With Your Flat Panel Display 6.4 Control Equipment with the Panel's Remote Through HDMI Your flat panel display's remote can control...
Owner's Manual
Page 72
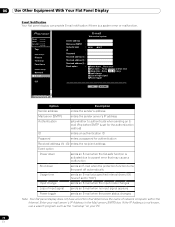
...-safe function is a system error or malfunction. Enter your PC. 72 En Model : ****** Name : ****** Location : ****** ****** To p Detail Settings Picture Terminal Functions Network Settings Network E-mail ISF E-mail Web control system Sender address : Mail server(SMTP) : Authentication : ID : Password : Received address (1) : Received address (2) : Received address (3) : Event option : ON OFF Power down ... Temp.,speaker and fan error Usage time ...Every 1000 hours Input change Loss of input signal Power toggle Set TEST MAIL Option Description...
...-safe function is a system error or malfunction. Enter your PC. 72 En Model : ****** Name : ****** Location : ****** ****** To p Detail Settings Picture Terminal Functions Network Settings Network E-mail ISF E-mail Web control system Sender address : Mail server(SMTP) : Authentication : ID : Password : Received address (1) : Received address (2) : Received address (3) : Event option : ON OFF Power down ... Temp.,speaker and fan error Usage time ...Every 1000 hours Input change Loss of input signal Power toggle Set TEST MAIL Option Description...

Owner's Manual
Page 74
... factory defaults: • Picture • Screen After entering the Integrator Mode, the following options remain unchanged: • Sound • Power Control • Option • Input Setup • Control Setup To switch to the Integrator Mode, follow the directions below . 1 ) Press INPUT to select the desired input. 2 ) Press DISPLAY to all input sources. 6.10 Select the Integrator Mode Integrator Mode provides alternative options when using a PC. (Use this option only when making picture adjustments for a specific device(s) connected...
... factory defaults: • Picture • Screen After entering the Integrator Mode, the following options remain unchanged: • Sound • Power Control • Option • Input Setup • Control Setup To switch to the Integrator Mode, follow the directions below . 1 ) Press INPUT to select the desired input. 2 ) Press DISPLAY to all input sources. 6.10 Select the Integrator Mode Integrator Mode provides alternative options when using a PC. (Use this option only when making picture adjustments for a specific device(s) connected...

Owner's Manual
Page 79
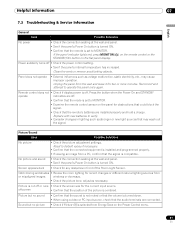
... deform the case. Replace both batteries immediately and carefully wipe the battery compartment clean. Can the signal from damage by automatically adjusting the screen brightness. The screen dims when a still image is visible leakage in direct sunlight as the picture changes on ? It may not receive commands from the flat panel display. There are experiencing. Check the power cord connection at the wall and on the...
... deform the case. Replace both batteries immediately and carefully wipe the battery compartment clean. Can the signal from damage by automatically adjusting the screen brightness. The screen dims when a still image is visible leakage in direct sunlight as the picture changes on ? It may not receive commands from the flat panel display. There are experiencing. Check the power cord connection at the wall and on the...
Owner's Manual
Page 81
... picture is turned ON. Reconnect and attempt to MONITOR. Remote control does not • Check if display power is turned down. • When using a video or PC input source, check that the volume is off. Screen appears dark • Check for obstructions that could block the signal. • Check that the position of the Room Light Sensor. If the panel indicator lights red, press MONITOR (a) on the remote control or the STANDBY/ON button...
... picture is turned ON. Reconnect and attempt to MONITOR. Remote control does not • Check if display power is turned down. • When using a video or PC input source, check that the volume is off. Screen appears dark • Check for obstructions that could block the signal. • Check that the position of the Room Light Sensor. If the panel indicator lights red, press MONITOR (a) on the remote control or the STANDBY/ON button...
Owner's Manual
Page 82
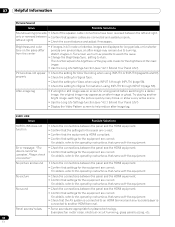
... image. • Use the Long Life Settings function (see "4.2.1 Extend Your Panel Life") • Display the Video Pattern screen to the operating instructions that came with the equipment. • Check the connections between the panel and the HDMI equipment. • Confirm that settings for the equipment are correct. Try playing another HDMI terminal. No sound • Check the connections between the panel and the HDMI equipment. • Confirm that settings...
... image. • Use the Long Life Settings function (see "4.2.1 Extend Your Panel Life") • Display the Video Pattern screen to the operating instructions that came with the equipment. • Check the connections between the panel and the HDMI equipment. • Confirm that settings for the equipment are correct. Try playing another HDMI terminal. No sound • Check the connections between the panel and the HDMI equipment. • Confirm that settings...


