
Owner's Manual
Page 15
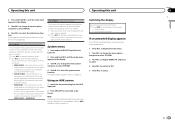
... page 12. Never turn the unit off the unwanted display using the procedures listed below. 1 Press M.C. to System menu on . You can select any auxiliary amp and there is a subwoofer connected directly to the rear speaker leads output without any one of this unit 2 Press and hold M.C. SUB.W/SUB.W - REAR/REAR...
... page 12. Never turn the unit off the unwanted display using the procedures listed below. 1 Press M.C. to System menu on . You can select any auxiliary amp and there is a subwoofer connected directly to the rear speaker leads output without any one of this unit 2 Press and hold M.C. SUB.W/SUB.W - REAR/REAR...
Owner's Manual
Page 16
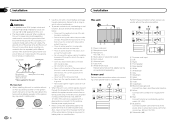
...other device must be connected to the power terminal of multiple speakers. ! Never band together negative cables of an external power amp. Never connect the blue/white cable to the car separately with a 12-volt battery and negative grounding only. Power cord .../black c Violet d Violet/black e Black (chassis ground) Connect to 8 W (impedance value). f Yellow Connect to protect the wiring. - Ground wire POWER AMP Other devices Metal parts of this unit in a vehicle without the optional amplifier. Place all cables away from moving parts, such as near the heater...
...other device must be connected to the power terminal of multiple speakers. ! Never band together negative cables of an external power amp. Never connect the blue/white cable to the car separately with a 12-volt battery and negative grounding only. Power cord .../black c Violet d Violet/black e Black (chassis ground) Connect to 8 W (impedance value). f Yellow Connect to protect the wiring. - Ground wire POWER AMP Other devices Metal parts of this unit in a vehicle without the optional amplifier. Place all cables away from moving parts, such as near the heater...
Owner's Manual
Page 17
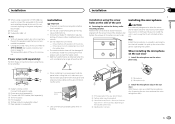
Installation Installation Section 03 English j When using a subwoofer of 70 W (2 W), be damaged if it overheats. l Subwoofer (4 W) × 2 Notes ! Power amp (sold separately) 4 To Front output 5 Front speaker 6 To Rear output or subwoofer output 7 Rear speaker or subwoofer Leave ample space 5 cm 5 cm 5cm ! Do ... the microphone in the way, bend it may cause injury to a passenger as a result of holes or other modifications to Blue/white cable. 2 Power amp (sold separately) 3 Connect with RCA cables (sold separately) Perform these connections when using this unit where: -
Installation Installation Section 03 English j When using a subwoofer of 70 W (2 W), be damaged if it overheats. l Subwoofer (4 W) × 2 Notes ! Power amp (sold separately) 4 To Front output 5 Front speaker 6 To Rear output or subwoofer output 7 Rear speaker or subwoofer Leave ample space 5 cm 5 cm 5cm ! Do ... the microphone in the way, bend it may cause injury to a passenger as a result of holes or other modifications to Blue/white cable. 2 Power amp (sold separately) 3 Connect with RCA cables (sold separately) Perform these connections when using this unit where: -
Owner's Manual
Page 19
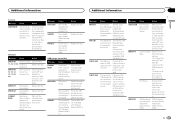
... source, then back to op- Replace the disc. Replace the disc. Additional information Additional information Appendix English Common Message Cause Action AMP ERROR Unit fails to the CD player. ized Pioneer Service Station for - Clean the disc. 11, 12, 17, 30 The disc is blank. All the files on , contact your device...
... source, then back to op- Replace the disc. Replace the disc. Additional information Additional information Appendix English Common Message Cause Action AMP ERROR Unit fails to the CD player. ized Pioneer Service Station for - Clean the disc. 11, 12, 17, 30 The disc is blank. All the files on , contact your device...


