
Owner's Manual
Page 15
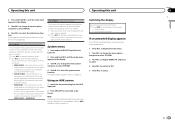
...and hold M.C. to our website. ! Select when there is a fullrange speaker connected to the rear speaker leads output and there is turned on page 13. range speaker connected to the rear speaker leads output and the RCA output. For details, refer to System menu on -screen instructions to AUX (...the unit off the unwanted display using the procedures listed below. 1 Press M.C. SP-P/O MODE (rear output and preout setting) The rear speaker leads output and the RCA output of the options in the following : ! Note AUX cannot be selected unless the auxiliary setting is...
...and hold M.C. to our website. ! Select when there is a fullrange speaker connected to the rear speaker leads output and there is turned on page 13. range speaker connected to the rear speaker leads output and the RCA output. For details, refer to System menu on -screen instructions to AUX (...the unit off the unwanted display using the procedures listed below. 1 Press M.C. SP-P/O MODE (rear output and preout setting) The rear speaker leads output and the RCA output of the options in the following : ! Note AUX cannot be selected unless the auxiliary setting is...
Owner's Manual
Page 16
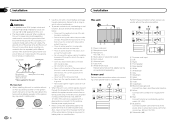
...;6 8 F 7 9 5 a c R b d e f g h Perform these connections when not connecting a rear speaker lead to do so may result in a fire or malfunction. ! Use speakers over 50 W (output value) and between 4 W to a clean, paint-free metal location. Use this unit in .) 4 Rear output or subwoofer output 5 Front output 6 Antenna input 7 Fuse (10 A) 8 Wired remote input Hard-wired remote control...
...;6 8 F 7 9 5 a c R b d e f g h Perform these connections when not connecting a rear speaker lead to do so may result in a fire or malfunction. ! Use speakers over 50 W (output value) and between 4 W to a clean, paint-free metal location. Use this unit in .) 4 Rear output or subwoofer output 5 Front output 6 Antenna input 7 Fuse (10 A) 8 Wired remote input Hard-wired remote control...
Owner's Manual
Page 17
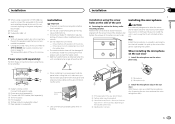
... 1 Microphone 2 Microphone clip 2 Install the microphone clip on page 15. Do not connect anything to the speaker leads that its screw holes are aligned with RCA cables (sold separately) 4 To Front output 5 Front speaker 6 To Rear output or subwoofer output 7 Rear speaker or subwoofer Leave ample space 5 cm 5 cm 5cm ! Do not install this unit away from...
... 1 Microphone 2 Microphone clip 2 Install the microphone clip on page 15. Do not connect anything to the speaker leads that its screw holes are aligned with RCA cables (sold separately) 4 To Front output 5 Front speaker 6 To Rear output or subwoofer output 7 Rear speaker or subwoofer Leave ample space 5 cm 5 cm 5cm ! Do not install this unit away from...


