
Owner's Manual
Page 2
... not place any naked flame sources (such as radios and televisions, use shielded cables and connectors for connections. Please read through these operating instructions so you will not occur in a residential installation. NO USER-SERVICEABLE PARTS INSIDE. D3-4-2-1-1_A1_En IMPORTANT NOTICE THE SERIAL NUMBER FOR THIS EQUIPMENT IS LOCATED IN THE REAR. D1-4-2-6-1*_A1_En NOTE: This equipment has been tested and found to...
... not place any naked flame sources (such as radios and televisions, use shielded cables and connectors for connections. Please read through these operating instructions so you will not occur in a residential installation. NO USER-SERVICEABLE PARTS INSIDE. D3-4-2-1-1_A1_En IMPORTANT NOTICE THE SERIAL NUMBER FOR THIS EQUIPMENT IS LOCATED IN THE REAR. D1-4-2-6-1*_A1_En NOTE: This equipment has been tested and found to...
Owner's Manual
Page 6
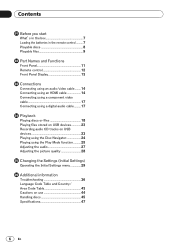
... Panel Display 13 Connections Connecting using an audio/video cable.........14 Connecting using an HDMI cable 14 Connecting using a component video cable 17 Connecting using a digital audio cable..........17 Playback Playing discs or files 18 Playing files stored on USB devices 23 Recording audio CD tracks on USB devices 23 Playing using the Disc Navigator 24 Playing using the Play Mode function............25 Adjusting the audio 27 Adjusting the picture quality 28 Changing the Settings (Initial Settings) Operating the Initial Settings menu 29 Additional information Troubleshooting...
... Panel Display 13 Connections Connecting using an audio/video cable.........14 Connecting using an HDMI cable 14 Connecting using a component video cable 17 Connecting using a digital audio cable..........17 Playback Playing discs or files 18 Playing files stored on USB devices 23 Recording audio CD tracks on USB devices 23 Playing using the Disc Navigator 24 Playing using the Play Mode function............25 Adjusting the audio 27 Adjusting the picture quality 28 Changing the Settings (Initial Settings) Operating the Initial Settings menu 29 Additional information Troubleshooting...
Owner's Manual
Page 8
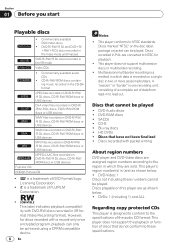
... audio CD format. This player does not support the playback or func‑ tion of discs that have not been finalized Discs recorded with packet writing About region numbers DVD player and DVD‑Video discs are assigned region numbers according to the region in which data is recorded on a single disc in two or more sessions/borders. Discs that cannot be played DVD Audio discs DVD-RAM discs SACDs CD-G Blu-ray discs...
... audio CD format. This player does not support the playback or func‑ tion of discs that have not been finalized Discs recorded with packet writing About region numbers DVD player and DVD‑Video discs are assigned region numbers according to the region in which data is recorded on a single disc in two or more sessions/borders. Discs that cannot be played DVD Audio discs DVD-RAM discs SACDs CD-G Blu-ray discs...
Owner's Manual
Page 9
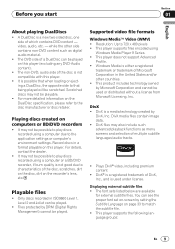
... external subtitle files. For details, contact the dealer. It may also include such advanced playback functions as digital audio material. The DVD side of Microsoft Corporation in a format playable on the DualDisc specification, please refer to the disc manufacturer or disc retailer. Supported video file formats Windows Media™ Video (WMV) Resolution: Up to 720 x 480 pixels This player supports files encoded using a computer or a BD/DVD recorder, if...
... external subtitle files. For details, contact the dealer. It may also include such advanced playback functions as digital audio material. The DVD side of Microsoft Corporation in a format playable on the DualDisc specification, please refer to the disc manufacturer or disc retailer. Supported video file formats Windows Media™ Video (WMV) Resolution: Up to 720 x 480 pixels This player supports files encoded using a computer or a BD/DVD recorder, if...

Owner's Manual
Page 11
... remote control signals may be poor when exposed to direct sunlight or strong artificial light from a fluorescent bulb, etc. 4 Disc tray 5 OPEN/CLOSE (page 18) 6 Front panel display (page 13) 7 TOP MENU Press to display the top menu of the DVD‑Video. 8 MENU Press to display the menu screen or Disc Navigator. 9 Use these to display/hide the Home Menu. a RETURN Press to return to implement the selected item or enter a setting that you have changed. Part...
... remote control signals may be poor when exposed to direct sunlight or strong artificial light from a fluorescent bulb, etc. 4 Disc tray 5 OPEN/CLOSE (page 18) 6 Front panel display (page 13) 7 TOP MENU Press to display the top menu of the DVD‑Video. 8 MENU Press to display the menu screen or Disc Navigator. 9 Use these to display/hide the Home Menu. a RETURN Press to return to implement the selected item or enter a setting that you have changed. Part...

Owner's Manual
Page 12
... Functions Remote control 1 2 3 4 5 STANDBY/ON OPEN/CLOSE 14 AUDIO SUBTITLE ANGLE 15 DVD/ 1 2 3 USB 16 4 5 6 CLEAR 17 7890 TOP MENU MENU 18 6 7 8 9 10 11 12 13 ENTER HOME MENU RETURN PLAY PREV PAUSE STOP NEXT USB PLAY MODE ZOOM DISPLAY REC 19 20 21 22 23 24 DVD 1 STANDBY/ON (page 18) 2 AUDIO (page 20) 3 SUBTITLE (page 21) 4 Number buttons (0 to 9) Use these to . ENTER Use this for example if you have changed. 7 HOME MENU Press to display/hide the Home Menu. 8 PLAY...
... Functions Remote control 1 2 3 4 5 STANDBY/ON OPEN/CLOSE 14 AUDIO SUBTITLE ANGLE 15 DVD/ 1 2 3 USB 16 4 5 6 CLEAR 17 7890 TOP MENU MENU 18 6 7 8 9 10 11 12 13 ENTER HOME MENU RETURN PLAY PREV PAUSE STOP NEXT USB PLAY MODE ZOOM DISPLAY REC 19 20 21 22 23 24 DVD 1 STANDBY/ON (page 18) 2 AUDIO (page 20) 3 SUBTITLE (page 21) 4 Number buttons (0 to 9) Use these to . ENTER Use this for example if you have changed. 7 HOME MENU Press to display/hide the Home Menu. 8 PLAY...
Owner's Manual
Page 14
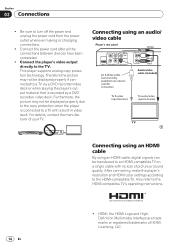
... be displayed properly due to the copy protection when the player is recorded by a DVD recorder/ video deck. Furthermore, the picture may not be used for connection. Section 03 Connections Be sure to turn off the power and unplug the power cord from the power outlet whenever making or changing connections. Connect the power cord after all the connections between devices have been completed. Connect the player's video output directly to the HDMI-compatible TV. After connecting, make the player's resolution and HDMI color settings...
... be displayed properly due to the copy protection when the player is recorded by a DVD recorder/ video deck. Furthermore, the picture may not be used for connection. Section 03 Connections Be sure to turn off the power and unplug the power cord from the power outlet whenever making or changing connections. Connect the power cord after all the connections between devices have been completed. Connect the player's video output directly to the HDMI-compatible TV. After connecting, make the player's resolution and HDMI color settings...
Owner's Manual
Page 16
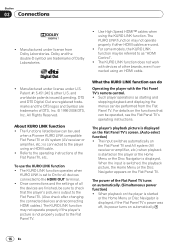
... receiver or amplifier, etc.) is connected to the player using an HDMI cable. Manufactured under license under license from the Flat Panel TV. About KURO LINK function The functions listed below can be used . For some models, the KURO LINK function may not operate properly if the player's picture is not properly output to the operating instructions of the Flat Panel TV turns on automatically. (Simultaneous power function) When playback...
... receiver or amplifier, etc.) is connected to the player using an HDMI cable. Manufactured under license under license from the Flat Panel TV. About KURO LINK function The functions listed below can be used . For some models, the KURO LINK function may not operate properly if the player's picture is not properly output to the operating instructions of the Flat Panel TV turns on automatically. (Simultaneous power function) When playback...
Owner's Manual
Page 20
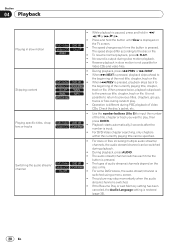
... disc or file. For some DVD‑Videos, the audio stream/channel is switched using a menu screen. The picture may stop momentarily when the audio stream/channel is switched. If the Resume Play or Last Memory setting has been canceled, the Audio Language setting is restored (page 33). 20 En The speed steps differ according to the disc or file. To resume normal playback, press PLAY. No sound is output...
... disc or file. For some DVD‑Videos, the audio stream/channel is switched using a menu screen. The picture may stop momentarily when the audio stream/channel is switched. If the Resume Play or Last Memory setting has been canceled, the Audio Language setting is restored (page 33). 20 En The speed steps differ according to the disc or file. To resume normal playback, press PLAY. No sound is output...
Owner's Manual
Page 23
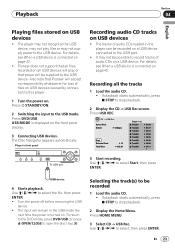
... DVD/USB. Recording all USB devices will play files or may not sup‑ ply power to select the file, then press ENTER. Turn the power off before removing the USB device. The input will remain in the player can be recorded on a USB device connected to the USB port. It may not be possible to this player. 1 Turn the power on. Press HOME MENU. 3 Select CD -> USB Rec. Use to stop playback. 2 Display the Home Menu. Use to the USB mode. Press STANDBY/ON. 2 Switching...
... DVD/USB. Recording all USB devices will play files or may not sup‑ ply power to select the file, then press ENTER. Turn the power off before removing the USB device. The input will remain in the player can be recorded on a USB device connected to the USB port. It may not be possible to this player. 1 Turn the power on. Press HOME MENU. 3 Select CD -> USB Rec. Use to stop playback. 2 Display the Home Menu. Use to the USB mode. Press STANDBY/ON. 2 Switching...
Owner's Manual
Page 27
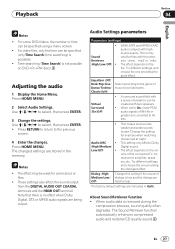
...;Videos, the number or time can be specified using a menu screen. For video files, only the time can be weak for some discs or files. These settings also affect the sound output from the DIGITAL AUDIO OUT COAXIAL terminals and the HDMI OUT terminal. Press HOME MENU. 2 Select Audio Settings. Use to the previous screen. 4 Enter the changes. Use to select, then press ENTER. Press RETURN to return to select, then press ENTER. 3 Change the settings. The changed settings...
...;Videos, the number or time can be specified using a menu screen. For video files, only the time can be weak for some discs or files. These settings also affect the sound output from the DIGITAL AUDIO OUT COAXIAL terminals and the HDMI OUT terminal. Press HOME MENU. 2 Select Audio Settings. Use to the previous screen. 4 Enter the changes. Use to select, then press ENTER. Press RETURN to return to select, then press ENTER. 3 Change the settings. The changed settings...
Owner's Manual
Page 29
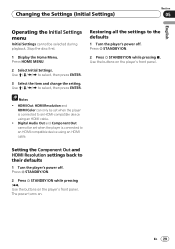
... buttons on the player's front panel. Restoring all the settings to an HDMI-compatible device using an HDMI cable. Digital Audio Out and Component Out cannot be set when the player is connected to the defaults 1 Turn the player's power off . Use the buttons on the player's front panel. Notes HDMI Out, HDMI Resolution and HDMI Color can only be selected during playback. En 29 Press STANDBY/ON. 2 Press STANDBY/ON while pressing . The power turns on. Press HOME MENU. 2 Select Initial Settings. Use to select...
... buttons on the player's front panel. Restoring all the settings to an HDMI-compatible device using an HDMI cable. Digital Audio Out and Component Out cannot be set when the player is connected to the defaults 1 Turn the player's power off . Use the buttons on the player's front panel. Notes HDMI Out, HDMI Resolution and HDMI Color can only be selected during playback. En 29 Press STANDBY/ON. 2 Press STANDBY/ON while pressing . The power turns on. Press HOME MENU. 2 Select Initial Settings. Use to select...
Owner's Manual
Page 31
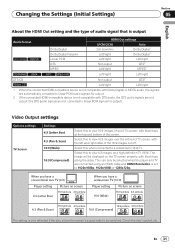
... connected HDMI-compatible device is not compatible with Dolby Digital or MPEG audio, the signals are not converted to linear PCM signals for output). Select this to be displayed on a 4:3 TV screen, with black bars along the sides. When you have a conventional size TV (4:3) Player setting Picture on screen 4:3 (Letter Box) 16:9 picture 4:3 picture When you have a widescreen TV (16:9) Player setting Picture on a high definition TV (16:9). Video Output settings Options settings TV Screen Settings 4:3 (Letter Box) 4:3 (Pan & Scan) 16:9 (Wide) 16:9 (Compressed) Select...
... connected HDMI-compatible device is not compatible with Dolby Digital or MPEG audio, the signals are not converted to linear PCM signals for output). Select this to be displayed on a 4:3 TV screen, with black bars along the sides. When you have a conventional size TV (4:3) Player setting Picture on screen 4:3 (Letter Box) 16:9 picture 4:3 picture When you have a widescreen TV (16:9) Player setting Picture on a high definition TV (16:9). Video Output settings Options settings TV Screen Settings 4:3 (Letter Box) 4:3 (Pan & Scan) 16:9 (Wide) 16:9 (Compressed) Select...

Owner's Manual
Page 32
... support progres‑ sive video signals is connected to their defaults on page 29. 720x480i 720 x 480 pixel interlaced images are output. 720x480p 720 x 480 pixel progressive images are indicated in a uniform black. Component Select this if the dark colors seem too light. The factory default settings are output. For instruc‑ tions on a menu screen. The sig‑ nals are connected using an HDMI cable. If it is set. If the picture...
... support progres‑ sive video signals is connected to their defaults on page 29. 720x480i 720 x 480 pixel interlaced images are output. 720x480p 720 x 480 pixel progressive images are indicated in a uniform black. Component Select this if the dark colors seem too light. The factory default settings are output. For instruc‑ tions on a menu screen. The sig‑ nals are connected using an HDMI cable. If it is set. If the picture...

Owner's Manual
Page 33
... the DVD‑Video disc is selected, the language is set the default audio language for DVD‑Video menus. Select this to display the mark on the TV screen. available languages Other Language Choose a language from the listed languages to display the operation indicators (Play, Stop, etc.) in English. On Select this to set the default language for DVD‑Video playback. Display settings Options settings Settings OSD Language English available languages Select this to set the default subtitle language for the on the TV screen. The factory default settings...
... the DVD‑Video disc is selected, the language is set the default audio language for DVD‑Video menus. Select this to display the mark on the TV screen. available languages Other Language Choose a language from the listed languages to display the operation indicators (Play, Stop, etc.) in English. On Select this to set the default language for DVD‑Video playback. Display settings Options settings Settings OSD Language English available languages Select this to set the default subtitle language for the on the TV screen. The factory default settings...

Owner's Manual
Page 34
... displayed. Authorization Error appears on the TV screen if you do not want to select, then press ENTER. 2 Select List of the AV device connected using an HDMI cable. On Auto Power Off Off Select this to play DivX VOD files. If a language not included on the disc. 1 Select Other Language. Use / or number buttons (0 to 9) to one of the AV device connected using an HDMI cable. For details, see About KURO LINK function on page 43. 3 Select the language code...
... displayed. Authorization Error appears on the TV screen if you do not want to select, then press ENTER. 2 Select List of the AV device connected using an HDMI cable. On Auto Power Off Off Select this to play DivX VOD files. If a language not included on the disc. 1 Select Other Language. Use / or number buttons (0 to 9) to one of the AV device connected using an HDMI cable. For details, see About KURO LINK function on page 43. 3 Select the language code...
Owner's Manual
Page 36
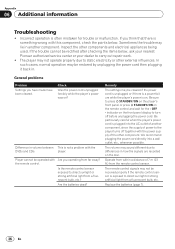
... Additional information Troubleshooting Incorrect operation is something wrong with this component, check the points below , ask your nearest Pioneer authorized service center or your dealer to carry out repair work. The player may not operate properly due to the player turns off before unplugging the power cord. We recommend plugging the power cord directly into the AC outlet of another component. Is the remote control sensor exposed...
... Additional information Troubleshooting Incorrect operation is something wrong with this component, check the points below , ask your nearest Pioneer authorized service center or your dealer to carry out repair work. The player may not operate properly due to the player turns off before unplugging the power cord. We recommend plugging the power cord directly into the AC outlet of another component. Is the remote control sensor exposed...

Owner's Manual
Page 37
..., replace it with the region number "1 (including number? 1)" and "ALL" can be switched. Additional information Appendix 06 English Problem Check Remedy Disc cannot be condensation inside. Set the disc within the groove in . Is the disc properly set KURO LINK to the HDMI OUT terminal. set to the or AV receiver or amplifier properly connected device's operating instructions. Is the disc dirty? Is the player placed in the disc tray? The player's power may not play...
..., replace it with the region number "1 (including number? 1)" and "ALL" can be switched. Additional information Appendix 06 English Problem Check Remedy Disc cannot be condensation inside. Set the disc within the groove in . Is the disc properly set KURO LINK to the HDMI OUT terminal. set to the or AV receiver or amplifier properly connected device's operating instructions. Is the disc dirty? Is the player placed in the disc tray? The player's power may not play...
Owner's Manual
Page 39
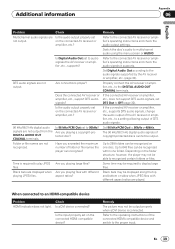
... or file names are not output from the DIGITAL AUDIO OUT COAXIAL terminals. Have you playing files with different aspect ratios are played. Switch the disc's audio to the audio signals supported by the AV receiver or amplifier, etc. (page 30). Set Digital Audio Out according to multichannel audio using the menu screen or AUDIO. Depending on the connected HDMI-compatible device? When connected to audio signals the AV receiver or ampli‑ fier, etc., supports? Is the input properly set to an HDMI-compatible device Problem Check HDMI indicator...
... or file names are not output from the DIGITAL AUDIO OUT COAXIAL terminals. Have you playing files with different aspect ratios are played. Switch the disc's audio to the audio signals supported by the AV receiver or amplifier, etc. (page 30). Set Digital Audio Out according to multichannel audio using the menu screen or AUDIO. Depending on the connected HDMI-compatible device? When connected to audio signals the AV receiver or ampli‑ fier, etc., supports? Is the input properly set to an HDMI-compatible device Problem Check HDMI indicator...

Owner's Manual
Page 41
... if connected using the Flat Panel TV's remote controller, the message CEC200 is displayed if the player's power is used. The message CEC200 appears. Set KURO LINK to the Flat Panel TV, the KURO LINK function may continue using a High Speed HDMI™ cable? This is not being output to On on the connected device? For details, refer to the operating instructions of other than a High Speed HDMI™ cable is turned off...
... if connected using the Flat Panel TV's remote controller, the message CEC200 is displayed if the player's power is used. The message CEC200 appears. Set KURO LINK to the Flat Panel TV, the KURO LINK function may continue using a High Speed HDMI™ cable? This is not being output to On on the connected device? For details, refer to the operating instructions of other than a High Speed HDMI™ cable is turned off...


