Other Manual
Page 1
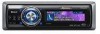
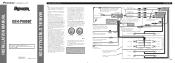
...; en Thaïlande UC N STAR N STAR MANUEL D'INSTALLATION Connecting the Units Note: • This unit is ground. IP-BUS input (Blue) Multi-CD player IP-BUS cable (sold separately). Fuse (10 A) + Front speaker ≠ Power amp (sold separately) Power amp (sold separately) Power amp (sold ... of the wiring short-circuiting to other products may be drained when you do not connect anything to the battery. Le code de couleur des câbles utilisé pour ce produit est conforme à CEMA. If this is black. INSTALLATION MANUAL OF OF DEH-P980BT This product ...
...; en Thaïlande UC N STAR N STAR MANUEL D'INSTALLATION Connecting the Units Note: • This unit is ground. IP-BUS input (Blue) Multi-CD player IP-BUS cable (sold separately). Fuse (10 A) + Front speaker ≠ Power amp (sold separately) Power amp (sold separately) Power amp (sold ... of the wiring short-circuiting to other products may be drained when you do not connect anything to the battery. Le code de couleur des câbles utilisé pour ce produit est conforme à CEMA. If this is black. INSTALLATION MANUAL OF OF DEH-P980BT This product ...

Other Manual
Page 2
...side. DIN Front-mount Installation with the rubber bush (Fig. 5) Dashboard 182 Holder After inserting the holder into place. Fastening the unit to the factory radio mounting bracket. (Fig. 9) (Fig. 10) Select a position where the screw holes of the bracket and the screw holes of the dashboard material ... and tighten the screws at the sides of the frame outwards in the figure, until they are not blocking the vents. porarily connect the wiring to the thickness of the head unit become aligned (are correct and the system works properly. • Use only the parts included with ...
...side. DIN Front-mount Installation with the rubber bush (Fig. 5) Dashboard 182 Holder After inserting the holder into place. Fastening the unit to the factory radio mounting bracket. (Fig. 9) (Fig. 10) Select a position where the screw holes of the bracket and the screw holes of the dashboard material ... and tighten the screws at the sides of the frame outwards in the figure, until they are not blocking the vents. porarily connect the wiring to the thickness of the head unit become aligned (are correct and the system works properly. • Use only the parts included with ...


