
Owner's Manual
Page 2
... mode 14 • Feature DEMO 14 • Motion DEMO 14 Power ON/OFF Turning the unit on 15 Selecting a source 15 Turning the unit off 15 Tuner Listening to the radio 16 Introduction of advanced tuner operation 17 Storing and recalling broadcast frequencies 17 Tuning in strong signals 18 Storing the strongest broadcast frequencies 18 Built-in CD Player Playing a CD 19 Introduction of advanced built-in CD player operation 20...
... mode 14 • Feature DEMO 14 • Motion DEMO 14 Power ON/OFF Turning the unit on 15 Selecting a source 15 Turning the unit off 15 Tuner Listening to the radio 16 Introduction of advanced tuner operation 17 Storing and recalling broadcast frequencies 17 Tuning in strong signals 18 Storing the strongest broadcast frequencies 18 Built-in CD Player Playing a CD 19 Introduction of advanced built-in CD player operation 20...

Owner's Manual
Page 6
... unit features a number of the car. • Protect this product from where you purchased this unit for operating procedures and precautions. • Always keep the volume low enough so you read and observe precautions on this page and in other areas may result in North America. CUSTOMER SUPPORT DIVISION P.O. It is disconnected or discharged, the preset memory will help you begin using...
... unit features a number of the car. • Protect this product from where you purchased this unit for operating procedures and precautions. • Always keep the volume low enough so you read and observe precautions on this page and in other areas may result in North America. CUSTOMER SUPPORT DIVISION P.O. It is disconnected or discharged, the preset memory will help you begin using...
Owner's Manual
Page 7
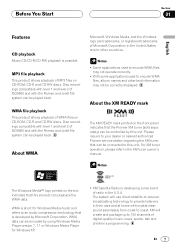
...'s programming. Please inquire to your dealer or nearest authorized Pioneer service station regarding the XM tuner that can be connected to an audio compression technology that is possible. Notes Deutsch Français Italiano Nederlands The Windows Media logo printed on the front panel indicates that this unit. The system will create and package up to the XM tuner owner's manual...
...'s programming. Please inquire to your dealer or nearest authorized Pioneer service station regarding the XM tuner that can be connected to an audio compression technology that is possible. Notes Deutsch Français Italiano Nederlands The Windows Media logo printed on the front panel indicates that this unit. The system will create and package up to the XM tuner owner's manual...

Owner's Manual
Page 12
... about the each source and other settings which is visible whenever the front panel is opened . This manual mainly explains using this unit for the first time after installation • If the unit fails to using OEL display. LCD display (e.g. Built in CD player) Track number that currently playing Play time 12 En LCD display contains basic information about the each source and other pointed instrument. Resetting the microprocessor The...
... about the each source and other settings which is visible whenever the front panel is opened . This manual mainly explains using this unit for the first time after installation • If the unit fails to using OEL display. LCD display (e.g. Built in CD player) Track number that currently playing Play time 12 En LCD display contains basic information about the each source and other pointed instrument. Resetting the microprocessor The...
Owner's Manual
Page 15
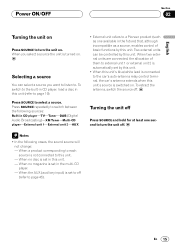
... player. - When no magazine is set by this unit. • When this unit's blue/white lead is connected to the car's auto-antenna relay control terminal, the car's antenna extends when this unit. Press SOURCE repeatedly to switch between the following cases, the sound source will not change: - When you want to listen to. Power ON/OFF Section 02 English Español Deutsch Turning the unit on Press SOURCE to turn the unit...
... player. - When no magazine is set by this unit. • When this unit's blue/white lead is connected to the car's auto-antenna relay control terminal, the car's antenna extends when this unit. Press SOURCE repeatedly to switch between the following cases, the sound source will not change: - When you want to listen to. Power ON/OFF Section 02 English Español Deutsch Turning the unit on Press SOURCE to turn the unit...

Owner's Manual
Page 16
... tuned. 4 PRESET NUMBER indicator Shows what preset has been selected. 1 Press SOURCE to select the tuner. Press BAND until the desired band is displayed, FM1, FM2, FM3 for FM or AM. 4 To perform manual tuning, press 2 or 3 with a quick press. • If you can skip broadcasting stations. The tuner will light. 16 En Seek tuning starts as soon as you see Tuner displayed. 2 Use VOLUME to , AM or FM. 2 STEREO...
... tuned. 4 PRESET NUMBER indicator Shows what preset has been selected. 1 Press SOURCE to select the tuner. Press BAND until the desired band is displayed, FM1, FM2, FM3 for FM or AM. 4 To perform manual tuning, press 2 or 3 with a quick press. • If you can skip broadcasting stations. The tuner will light. 16 En Seek tuning starts as soon as you see Tuner displayed. 2 Use VOLUME to , AM or FM. 2 STEREO...

Owner's Manual
Page 23
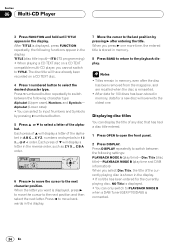
... the front panel. 2 Press DISPLAY when playing a CD TEXT disc. Using CD TEXT functions Some discs have certain information encoded on CD TEXT discs 1 Press OPEN to open the front panel. 2 Press DISPLAY. Français Italiano Nederlands En 23 Press DISPLAY repeatedly to switch between the following settings: PLAYBACK MODE A (play time)-Disc Title (disc title)-PLAYBACK MODE B (play time)-Disc Title (disc title)-DiscArtist Name (disc artist name)- Built-in CD Player Section...
... the front panel. 2 Press DISPLAY when playing a CD TEXT disc. Using CD TEXT functions Some discs have certain information encoded on CD TEXT discs 1 Press OPEN to open the front panel. 2 Press DISPLAY. Français Italiano Nederlands En 23 Press DISPLAY repeatedly to switch between the following settings: PLAYBACK MODE A (play time)-Disc Title (disc title)-PLAYBACK MODE B (play time)-Disc Title (disc title)-DiscArtist Name (disc artist name)- Built-in CD Player Section...
Owner's Manual
Page 34
... following settings: PLAYBACK MODE A (play time)-Disc Title (disc title)-PLAYBACK MODE B (play time and DAB information) When you want is displayed, press FUNCTION repeatedly, the following character type: Alphabet (Upper case), Numbers and Symbols- Notes • Titles remain in memory, even after entering the title. Press 1 numbered button repeatedly to open the front panel. 2 Press DISPLAY. After TITLE is displayed, press 3 to move the cursor to input Numbers and...
... following settings: PLAYBACK MODE A (play time)-Disc Title (disc title)-PLAYBACK MODE B (play time and DAB information) When you want is displayed, press FUNCTION repeatedly, the following character type: Alphabet (Upper case), Numbers and Symbols- Notes • Titles remain in memory, even after entering the title. Press 1 numbered button repeatedly to open the front panel. 2 Press DISPLAY. After TITLE is displayed, press 3 to move the cursor to input Numbers and...

Owner's Manual
Page 35
... front panel. 2 Press FUNCTION to open the front panel. 2 Press DISPLAY and hold until T.LIST appears in the display This unit can display the first 16 letters only of the title can be displayed. 4 Press 5 to play time and DAB information) • If specific information has not been recorded on the disc during manufacture. Displaying titles on CD TEXT discs 1 Press OPEN to select T.LIST...
... front panel. 2 Press FUNCTION to open the front panel. 2 Press DISPLAY and hold until T.LIST appears in the display This unit can display the first 16 letters only of the title can be displayed. 4 Press 5 to play time and DAB information) • If specific information has not been recorded on the disc during manufacture. Displaying titles on CD TEXT discs 1 Press OPEN to select T.LIST...
Owner's Manual
Page 37
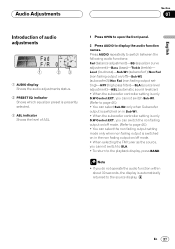
... front panel. 2 Press AUDIO to display the audio function names. Audio Adjustments Section 07 English Español Deutsch Introduction of audio adjustments 1 23 1 AUDIO display Shows the audio adjustments status. 2 PRESET EQ indicator Shows which equalizer preset is switched on in Sub-W1. • When the subwoofer controller setting is only S.W Control:EXT, you can switch the non fading output on/off mode. • When selecting the FM tuner as the source, you do not operate the audio function within...
... front panel. 2 Press AUDIO to display the audio function names. Audio Adjustments Section 07 English Español Deutsch Introduction of audio adjustments 1 23 1 AUDIO display Shows the audio adjustments status. 2 PRESET EQ indicator Shows which equalizer preset is switched on in Sub-W1. • When the subwoofer controller setting is only S.W Control:EXT, you can switch the non fading output on/off mode. • When selecting the FM tuner as the source, you do not operate the audio function within...

Owner's Manual
Page 38
... selecting the SFEQ mode, you press 2 or 3, Bal L/R 0 is the proper setting when only two speakers are chosen carefully. • FRT1 boosts the treble on the front output and the bass on page 46. 4 Press 2 or 3 to adjust left /right speaker balance moves from front to Setting the rear output and subwoofer controller on the rear output. Each press of a natural, pleasant sound environment. function is displayed as the front/rear speaker balance...
... selecting the SFEQ mode, you press 2 or 3, Bal L/R 0 is the proper setting when only two speakers are chosen carefully. • FRT1 boosts the treble on the front output and the bass on page 46. 4 Press 2 or 3 to adjust left /right speaker balance moves from front to Setting the rear output and subwoofer controller on the rear output. Each press of a natural, pleasant sound environment. function is displayed as the front/rear speaker balance...

Owner's Manual
Page 42
... value displayed. By switching the H.P.F. When the subwoofer controller setting is S.W Control:EXT, you do not want low sounds from the subwoofer output frequency range to play from the front and rear speakers. 1 Press OPEN to open the front panel. 2 Press AUDIO to select non fading output setting mode. Using the high pass filter When you can adjust the level of non fading output. 1 Press OPEN to open the front panel. 2 Press AUDIO to select a high...
... value displayed. By switching the H.P.F. When the subwoofer controller setting is S.W Control:EXT, you do not want low sounds from the subwoofer output frequency range to play from the front and rear speakers. 1 Press OPEN to open the front panel. 2 Press AUDIO to select non fading output setting mode. Using the high pass filter When you can adjust the level of non fading output. 1 Press OPEN to open the front panel. 2 Press AUDIO to select a high...

Owner's Manual
Page 43
... displayed as the source volume is not possible to apply source level adjustments to the FM tuner. • The AM tuner volume level can be adjusted with the level of the source you wish to adjust. 2 Press OPEN to open the front panel. 2 Press AUDIO to select ASL. Using automatic sound levelizer During driving, noise in CD and the multi-CD players are both set to the same source level adjustment volume automatically. • External unit 1 and External unit...
... displayed as the source volume is not possible to apply source level adjustments to the FM tuner. • The AM tuner volume level can be adjusted with the level of the source you wish to adjust. 2 Press OPEN to open the front panel. 2 Press AUDIO to select ASL. Using automatic sound levelizer During driving, noise in CD and the multi-CD players are both set to the same source level adjustment volume automatically. • External unit 1 and External unit...

Owner's Manual
Page 46
... subwoofer (Rear SP:S.W) connection. Press FUNCTION until SW appears in the display. 3 Select the desired brightness with 5/∞. Setting the rear output and subwoofer controller This product's rear output (rear speaker leads output and RCA rear output) can connect the RCA subwoofer output to use the subwoofer controller's (low pass filter, phase) built-in the Audio Menu return to the factory settings. 1 Press OPEN to open the front panel. 2 Press FUNCTION to a subwoofer without using an auxiliary amp. In this mode is selected), you can select the display...
... subwoofer (Rear SP:S.W) connection. Press FUNCTION until SW appears in the display. 3 Select the desired brightness with 5/∞. Setting the rear output and subwoofer controller This product's rear output (rear speaker leads output and RCA rear output) can connect the RCA subwoofer output to use the subwoofer controller's (low pass filter, phase) built-in the Audio Menu return to the factory settings. 1 Press OPEN to open the front panel. 2 Press FUNCTION to a subwoofer without using an auxiliary amp. In this mode is selected), you can select the display...
Owner's Manual
Page 48
... display changes in the display. 3 Press 1 numbered button to the IP-BUS-RCA Interconnector owner's manual. Time display appears on page 45. Alphabet (Lower case) • You can select to select the time display. Press CLOCK to input Numbers and Symbols by pressing 2 numbered button. 48 En Each time you perform other operations, but the time indication is not switched on even when the sources are different ways of CLOCK turns time display on or off. Spectrum Analyzer 2-Level...
... display changes in the display. 3 Press 1 numbered button to the IP-BUS-RCA Interconnector owner's manual. Time display appears on page 45. Alphabet (Lower case) • You can select to select the time display. Press CLOCK to input Numbers and Symbols by pressing 2 numbered button. 48 En Each time you perform other operations, but the time indication is not switched on even when the sources are different ways of CLOCK turns time display on or off. Spectrum Analyzer 2-Level...

Owner's Manual
Page 50
... 15.) • Using the PGM Button (Refer to page 26.) Changing the label 1 Press OPEN to open the front panel. 2 Press DISPLAY. Section 09 Other Functions Introduction of the following two functions with this product differs. (Reference pages are in the hide-away DAB tuner's operation manual.) • Changing the Label (Refer to page 13.) • Operating Announcements with the Function Menu (Refer to...
... 15.) • Using the PGM Button (Refer to page 26.) Changing the label 1 Press OPEN to open the front panel. 2 Press DISPLAY. Section 09 Other Functions Introduction of the following two functions with this product differs. (Reference pages are in the hide-away DAB tuner's operation manual.) • Changing the Label (Refer to page 13.) • Operating Announcements with the Function Menu (Refer to...

Owner's Manual
Page 55
... or your nearest Pioneer Service Center. About folders and MP3 files • An outline of correcting the problem. The user can not assign folder numbers. • When playing discs with numerous tiers. En 55 Italiano Nederlands If an error message appears on the display refer to the table below . Turn the ignition ON and OFF, or switch to a different source, then back...
... or your nearest Pioneer Service Center. About folders and MP3 files • An outline of correcting the problem. The user can not assign folder numbers. • When playing discs with numerous tiers. En 55 Italiano Nederlands If an error message appears on the display refer to the table below . Turn the ignition ON and OFF, or switch to a different source, then back...

Other Manual
Page 1
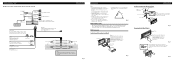
... the power amp or Auto-antenna relay control terminal (max. 300 mA 12 V DC). + Front speaker ≠ + Front speaker ≠ Left + Rear speaker ≠ Connecting cords with output and/or impedance values other units, then make connections correctly. • Secure the wiring with this system, be highpower types with minimum rating of 50 W and impedance of 4 to a Subwoofer Antenna jack 15 cm IP-BUS input (Blue) (5-7/8 in.) 15 cm (5-7/8 in.) IP-BUS cable...
... the power amp or Auto-antenna relay control terminal (max. 300 mA 12 V DC). + Front speaker ≠ + Front speaker ≠ Left + Rear speaker ≠ Connecting cords with output and/or impedance values other units, then make connections correctly. • Secure the wiring with this system, be highpower types with minimum rating of 50 W and impedance of 4 to a Subwoofer Antenna jack 15 cm IP-BUS input (Blue) (5-7/8 in.) 15 cm (5-7/8 in.) IP-BUS cable...
Other Manual
Page 2
... use of the power amp or Auto-antenna relay control terminal (max. 300 mA 12 V DC). Keeping the keys pressed against the sides of this Product (refer to the following illustrated installation methods. Nut (5 mm) Screw Removing the Unit (Fig. 7) (Fig. 8) Frame Fig. 6 Insert the release pin into the hole in .) Subwoofer output or Non Fading output (SUBWOOFER or NON-FADING OUTPUT) Blue/white To system control...
... use of the power amp or Auto-antenna relay control terminal (max. 300 mA 12 V DC). Keeping the keys pressed against the sides of this Product (refer to the following illustrated installation methods. Nut (5 mm) Screw Removing the Unit (Fig. 7) (Fig. 8) Frame Fig. 6 Insert the release pin into the hole in .) Subwoofer output or Non Fading output (SUBWOOFER or NON-FADING OUTPUT) Blue/white To system control...

Other Manual
Page 3
... to the outer circumference of this unit. When installing the unit, select a location that the arrow-marked side faces the driver as may result in the bottom of signals from the unit to be entrusted to do not operate the Detaching and Replacing the Front Panel Function, use the supplied fixing screws and fix the front panel to remove the frame. (When reattaching the frame...
... to the outer circumference of this unit. When installing the unit, select a location that the arrow-marked side faces the driver as may result in the bottom of signals from the unit to be entrusted to do not operate the Detaching and Replacing the Front Panel Function, use the supplied fixing screws and fix the front panel to remove the frame. (When reattaching the frame...


