Owner's Manual
Page 2
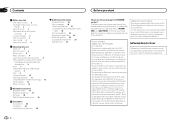
...2 The Safety of Your Ears is in Your Hands 3 About this unit 3 After-sales service for Pioneer products 3 In case of trouble 3 Visit our website 3 Demo mode 4 About this manual 4 Operating ... 18 Bluetooth telephone 19 XM tuner 22 SIRIUS Satellite Radio tuner 23 Installation Connections 25 Installation 26 Installing the microphone 28 Additional information Troubleshooting 29 Error messages 29 Handling guidelines 31... read through this manual before using this manual. FCC ID: AJDK045 MODEL NO.: DEH-P8400BH IC: 775E-K045 This device complies with FCC/IC radiation exposure limits set forth for...
...2 The Safety of Your Ears is in Your Hands 3 About this unit 3 After-sales service for Pioneer products 3 In case of trouble 3 Visit our website 3 Demo mode 4 About this manual 4 Operating ... 18 Bluetooth telephone 19 XM tuner 22 SIRIUS Satellite Radio tuner 23 Installation Connections 25 Installation 26 Installing the microphone 28 Additional information Troubleshooting 29 Error messages 29 Handling guidelines 31... read through this manual before using this manual. FCC ID: AJDK045 MODEL NO.: DEH-P8400BH IC: 775E-K045 This device complies with FCC/IC radiation exposure limits set forth for...
Owner's Manual
Page 3
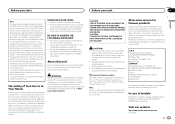
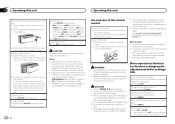
... so what 's around you. ! Visit our website http://www.pioneerelectronics.com in Canada En 3 Guard against harmful interference in a residential installation. Set your volume control at a safe level BEFORE your equipment by turning the equipment off and on proposition 65 known to the State ...unit. Wash hands after -sales service (including warranty conditions) or any preset memory will not occur in a particular installation. After-sales service for Pioneer products Please contact the dealer or distributor from that lets the sound come into an outlet on this product or cords...
... so what 's around you. ! Visit our website http://www.pioneerelectronics.com in Canada En 3 Guard against harmful interference in a residential installation. Set your volume control at a safe level BEFORE your equipment by turning the equipment off and on proposition 65 known to the State ...unit. Wash hands after -sales service (including warranty conditions) or any preset memory will not occur in a particular installation. After-sales service for Pioneer products Please contact the dealer or distributor from that lets the sound come into an outlet on this product or cords...
Owner's Manual
Page 5
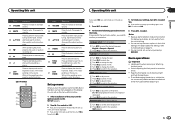
..., reverse g a/b/c/d and track search controls. h AUDIO Press to select the desired language. While in the operating menu, press to control functions. (DEH-P7400HD) e c f k g j h 1 b i Part Operation e VOLUME Press to 15 is displayed as the level is the function for...6 Press M.C. Press again to select functions. j FUNCTION Press to unmute. SET UP appears. 2 Turn M.C. To proceed to ON after installation, set the menu. Operating this unit Operating this unit Section 02 English Part Operation e VOLUME Press to select day. 3 Turn M.C. Set...
..., reverse g a/b/c/d and track search controls. h AUDIO Press to select the desired language. While in the operating menu, press to control functions. (DEH-P7400HD) e c f k g j h 1 b i Part Operation e VOLUME Press to 15 is displayed as the level is the function for...6 Press M.C. Press again to select functions. j FUNCTION Press to unmute. SET UP appears. 2 Turn M.C. To proceed to ON after installation, set the menu. Operating this unit Operating this unit Section 02 English Part Operation e VOLUME Press to select day. 3 Turn M.C. Set...
Owner's Manual
Page 6
...and minus (-) poles aligned properly. ! Should the battery be exposed to excessive heat such as a protection case. Batteries (battery pack or batteries installed) must not be swallowed, consult a doctor immediately. ! Use one level higher.) 1 Press /DISP. Returning to the ordinary display from theft 1....dtsc.ca.gov/hazardouswaste/ perchlorate. (Applicable to adjust the volume. WARNING ! If the battery leaks, wipe the remote control completely clean and install a new battery. or LEVER. ! Turning the unit off 1 Press and hold /DISP. TUNER (tuner)-CD (CD player)-USB (USB ...
...and minus (-) poles aligned properly. ! Should the battery be exposed to excessive heat such as a protection case. Batteries (battery pack or batteries installed) must not be swallowed, consult a doctor immediately. ! Use one level higher.) 1 Press /DISP. Returning to the ordinary display from theft 1....dtsc.ca.gov/hazardouswaste/ perchlorate. (Applicable to adjust the volume. WARNING ! If the battery leaks, wipe the remote control completely clean and install a new battery. or LEVER. ! Turning the unit off 1 Press and hold /DISP. TUNER (tuner)-CD (CD player)-USB (USB ...
Owner's Manual
Page 11
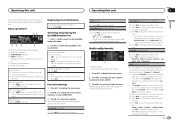
...display the setting mode. 2 Turn M.C. Changing the sort order 1 Press (list). ! Playing 1 When QuickMix or the station is on which was installed the Pandora application. Sound Retriever (sound retriever) 1 Press M.C. Fader/Balance (fader/balance adjustment) 1 Press M.C. ance. ! to the right. Adjusted ...Rear SP :S/W. If you want to adjust. 2 Press M.C. to the USB cable using an iPod Dock Connector. 2 Start up the Pandora application installed on page 15. 4 Turn M.C. Basic operations 12 3 45 6 1 Thumbs Up/Thumbs Down indicator 2 QuickMix indicator 3 PLAY/PAUSE indicator 4...
...display the setting mode. 2 Turn M.C. Changing the sort order 1 Press (list). ! Playing 1 When QuickMix or the station is on which was installed the Pandora application. Sound Retriever (sound retriever) 1 Press M.C. Fader/Balance (fader/balance adjustment) 1 Press M.C. ance. ! to the right. Adjusted ...Rear SP :S/W. If you want to adjust. 2 Press M.C. to the USB cable using an iPod Dock Connector. 2 Start up the Pandora application installed on page 15. 4 Turn M.C. Basic operations 12 3 45 6 1 Thumbs Up/Thumbs Down indicator 2 QuickMix indicator 3 PLAY/PAUSE indicator 4...
Owner's Manual
Page 16
...differ depending on the software and updating, refer to select. 3 Turn M.C. CD-BTB200) is not available for DEH-P8400BH. or LEVER cycles between AUX1 and AUX2 sources is available on the connected external unit. S/W UPDATE (updating the... Using an external unit An external unit refers to display the main menu. 2 Use M.C. to a Pioneer product, such as a source, the basic functions of connection can display the system versions of this unit ... will be stored in advance to the installation manual. Pressing M.C. For more details, refer to select the desired setting.
...differ depending on the software and updating, refer to select. 3 Turn M.C. CD-BTB200) is not available for DEH-P8400BH. or LEVER cycles between AUX1 and AUX2 sources is available on the connected external unit. S/W UPDATE (updating the... Using an external unit An external unit refers to display the main menu. 2 Use M.C. to a Pioneer product, such as a source, the basic functions of connection can display the system versions of this unit ... will be stored in advance to the installation manual. Pressing M.C. For more details, refer to select the desired setting.
Owner's Manual
Page 25
.... - Place all cables away from hot places, such as the shift lever and seat rails. - Use a fuse of the battery before installation. - Never connect the blue/white cable to the engine compartment. - To use 1 W to 3 W speakers for the ground wire loosens...directions below. - CD-SB10) is ground. For details, refer to share the power with different screws. Installation Section 03 04 Connections WARNING ! When installing this function, a Pioneer SIRIUS bus interface (e.g. To prevent a short-circuit, overheating or malfunction, be connected to the car separately with...
.... - Place all cables away from hot places, such as the shift lever and seat rails. - Use a fuse of the battery before installation. - Never connect the blue/white cable to the engine compartment. - To use 1 W to 3 W speakers for the ground wire loosens...directions below. - CD-SB10) is ground. For details, refer to share the power with different screws. Installation Section 03 04 Connections WARNING ! When installing this function, a Pioneer SIRIUS bus interface (e.g. To prevent a short-circuit, overheating or malfunction, be connected to the car separately with...
Owner's Manual
Page 26
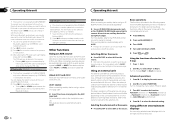
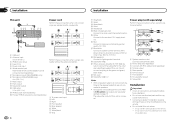
... systems before final installation. ! it may cause injury to a passenger as this may interfere with RCA cables (sold separately) Perform these connections when using a subwoofer of 70 W (2 W), be connected (sold separately). 7 Microphone input (DEH-P8400BH only) 8 Microphone (DEH-P8400BH only) 4 m... (13 ft. 1 in.) 9 Rear output a Front output b Subwoofer output c USB cable 1.5 m (4 ft. 11 in.) d IP-BUS cable (sold separately) e Pioneer IP-BUS accessories (sold separately) Power cord...
... systems before final installation. ! it may cause injury to a passenger as this may interfere with RCA cables (sold separately) Perform these connections when using a subwoofer of 70 W (2 W), be connected (sold separately). 7 Microphone input (DEH-P8400BH only) 8 Microphone (DEH-P8400BH only) 4 m... (13 ft. 1 in.) 9 Rear output a Front output b Subwoofer output c USB cable 1.5 m (4 ft. 11 in.) d IP-BUS cable (sold separately) e Pioneer IP-BUS accessories (sold separately) Power cord...

Owner's Manual
Page 27
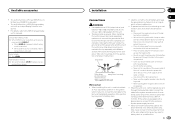
...2 Mounting bracket 3 Dashboard or console ! If there is enough space, use the supplied mounting sleeve. Use either front-mount or rear-mount installation. English Installation Installation Section 04 ! The semiconductor laser will be secured with the vehicle. 1 Nut 2 Firewall or metal support 3 Metal strap 4 Screw 5 ... the detach button and push the front panel upward and pull it overheats. Optimum performance is obtained when the unit is installed securely in shallow spaces, use the mounting sleeve that came with the supplied screw. 1 1 Trim ring 2 Notched tab...
...2 Mounting bracket 3 Dashboard or console ! If there is enough space, use the supplied mounting sleeve. Use either front-mount or rear-mount installation. English Installation Installation Section 04 ! The semiconductor laser will be secured with the vehicle. 1 Nut 2 Firewall or metal support 3 Metal strap 4 Screw 5 ... the detach button and push the front panel upward and pull it overheats. Optimum performance is obtained when the unit is installed securely in shallow spaces, use the mounting sleeve that came with the supplied screw. 1 1 Trim ring 2 Notched tab...

Owner's Manual
Page 28
... system. In this case, detach the microphone base from the microphone clip, slide the microphone base. 2 Install the microphone clip on the steering column. 1 2 3 1 Double-sided tape 2 Install the microphone clip on the sun visor. Section 04 Installation Installation Installing the microphone 1 ! Only for DEH-P8400BH CAUTION It is extremely dangerous to allow the microphone lead to...
... system. In this case, detach the microphone base from the microphone clip, slide the microphone base. 2 Install the microphone clip on the steering column. 1 2 3 1 Double-sided tape 2 Install the microphone clip on the sun visor. Section 04 Installation Installation Installing the microphone 1 ! Only for DEH-P8400BH CAUTION It is extremely dangerous to allow the microphone lead to...
Owner's Manual
Page 31
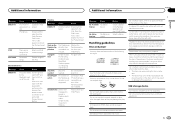
.... Pandora system is dis- Do not exceed the skip limit. Check Application This version of this equipment. Please check your dealer or an authorized Pioneer Service Station. Action Create a station in the current list. Do not use . able. ! Connections via USB hub are no songs in the...Bluetooth mod- Do not use cracked, chipped, warped, or otherwise damaged discs as they may not be possible because of the Pandora application installed. Let it rest for about one hour to adjust to save thumb rating. Playback of discs may damage the player. Do not use shaped...
.... Pandora system is dis- Do not exceed the skip limit. Check Application This version of this equipment. Please check your dealer or an authorized Pioneer Service Station. Action Create a station in the current list. Do not use . able. ! Connections via USB hub are no songs in the...Bluetooth mod- Do not use cracked, chipped, warped, or otherwise damaged discs as they may not be possible because of the Pandora application installed. Let it rest for about one hour to adjust to save thumb rating. Playback of discs may damage the player. Do not use shaped...


