
Owner's Manual
Page 2
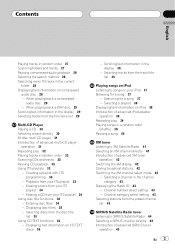
... RADIO READY mark 8 Protecting your model properly. Installing the battery 11 - FUNCTION button and AUDIO button 12 What's What Head unit 13 Remote control 13 Basic Operations Turning the unit on CD TEXT discs 24 - After you have finished reading the instructions, keep this Pioneer product. Reverse mode 11 - Contents Thank you for buying this manual in the current disc 22 Using disc title functions 23 - Displaying text information on 15 Selecting a source 15 Loading a disc 15 Adjusting the volume 16 Turning the unit...
... RADIO READY mark 8 Protecting your model properly. Installing the battery 11 - FUNCTION button and AUDIO button 12 What's What Head unit 13 Remote control 13 Basic Operations Turning the unit on CD TEXT discs 24 - After you have finished reading the instructions, keep this Pioneer product. Reverse mode 11 - Contents Thank you for buying this manual in the current disc 22 Using disc title functions 23 - Displaying text information on 15 Selecting a source 15 Loading a disc 15 Adjusting the volume 16 Turning the unit...
Owner's Manual
Page 3
... XM tuner operation 42 Switching the XM display 42 Storing broadcast stations 42 Switching the XM channel select mode 42 - Creating a playlist with ITS programming 33 - Erasing a CD from your ITS playlist 34 Using disc title functions 34 - Erasing a track from the track title list 36 Playing songs on iPod Listening to SIRIUS Satellite Radio 44 Selecting a SIRIUS channel directly 44 Introduction of advanced iPod adapter operation 39 Repeating play 32 Playing tracks in the display 36 - Displaying disc titles 35 - Selecting...
... XM tuner operation 42 Switching the XM display 42 Storing broadcast stations 42 Switching the XM channel select mode 42 - Creating a playlist with ITS programming 33 - Erasing a CD from your ITS playlist 34 Using disc title functions 34 - Erasing a track from the track title list 36 Playing songs on iPod Listening to SIRIUS Satellite Radio 44 Selecting a SIRIUS channel directly 44 Introduction of advanced iPod adapter operation 39 Repeating play 32 Playing tracks in the display 36 - Displaying disc titles 35 - Selecting...
Owner's Manual
Page 4
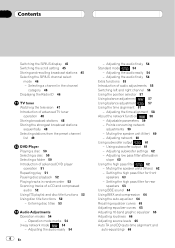
... Switching the SIRIUS display 45 Switching the scroll setting 45 Storing and recalling broadcast stations 45 Selecting the SIRIUS channel select mode 46 - Adjusting the audio finely 54 Standard mode 54 - Adjusting the time alignment 58 About the network function 58 - Adjusting subwoofer settings 62 - Setting the high pass filter for front speakers 63 - Adjusting the audio finely 54 Extra functions 55 Introduction of a CD and compressed audio 52 Using ITS playlist and disc title functions 52 Using disc title functions 52 - Using subwoofer output 61 - Selecting...
... Switching the SIRIUS display 45 Switching the scroll setting 45 Storing and recalling broadcast stations 45 Selecting the SIRIUS channel select mode 46 - Adjusting the audio finely 54 Standard mode 54 - Adjusting the time alignment 58 About the network function 58 - Adjusting subwoofer settings 62 - Setting the high pass filter for front speakers 63 - Adjusting the audio finely 54 Extra functions 55 Introduction of a CD and compressed audio 52 Using ITS playlist and disc title functions 52 Using disc title functions 52 - Using subwoofer output 61 - Selecting...

Owner's Manual
Page 5
... Switching the face auto open 71 Switching the auxiliary setting 71 Switching the dimmer setting 71 Adjusting the brightness 72 Selecting the illumination color 72 Correcting distorted sound 72 Resetting the audio functions 72 Switching the sound muting/attenuation 72 Setting the internal power amplifier 73 Switching the feature demo 73 Switching the reverse mode 73 Switching the Ever Scroll 74 Other Functions Turning the clock display on or off 75 Using the AUX source 75 - MP3 additional information 82 - Selecting the external unit as the source...
... Switching the face auto open 71 Switching the auxiliary setting 71 Switching the dimmer setting 71 Adjusting the brightness 72 Selecting the illumination color 72 Correcting distorted sound 72 Resetting the audio functions 72 Switching the sound muting/attenuation 72 Setting the internal power amplifier 73 Switching the feature demo 73 Switching the reverse mode 73 Switching the Ever Scroll 74 Other Functions Turning the clock display on or off 75 Using the AUX source 75 - MP3 additional information 82 - Selecting the external unit as the source...
Owner's Manual
Page 8
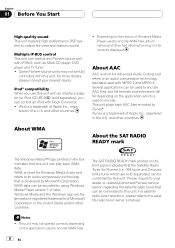
iPod® compatibility When you can be correctly displayed. Depending on the front panel indicates that this unit with an interface adapter for Windows Media Audio and refers to an audio compression technology that can be connected to your nearest dealer. and other countries. ! For satellite radio tuner operation, please refer to output the clear and realistic sound. iTunes is a trademark of Windows Media Player used to encode...
iPod® compatibility When you can be correctly displayed. Depending on the front panel indicates that this unit with an interface adapter for Windows Media Audio and refers to an audio compression technology that can be connected to your nearest dealer. and other countries. ! For satellite radio tuner operation, please refer to output the clear and realistic sound. iTunes is a trademark of Windows Media Player used to encode...
Owner's Manual
Page 14
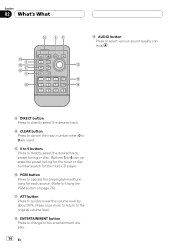
... button Press to operate the preprogrammed functions for each source. (Refer to Using the PGM button on page 78.) h ATT button Press to 6 can operate the preset tuning for the tuner or disc number search for the multi-CD player. e CLEAR button Press to cancel the input number when 0 to directly select the desired track. c d e d DIRECT button Press to 9 are used. i ENTERTAINMENT button Press to change to directly select the desired track, preset tuning or disc. f 0 to 9 buttons Press to the entertainment display...
... button Press to operate the preprogrammed functions for each source. (Refer to Using the PGM button on page 78.) h ATT button Press to 6 can operate the preset tuning for the tuner or disc number search for the multi-CD player. e CLEAR button Press to cancel the input number when 0 to directly select the desired track. c d e d DIRECT button Press to 9 are used. i ENTERTAINMENT button Press to change to directly select the desired track, preset tuning or disc. f 0 to 9 buttons Press to the entertainment display...
Owner's Manual
Page 24
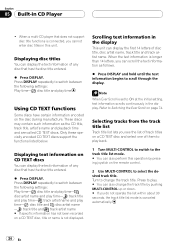
... following settings: Play time- : disc title and play back. 1 Turn MULTI-CONTROL to switch to the track title list mode. # You can display the text information of them to play time Using CD TEXT functions Some discs have certain information encoded on CD TEXT discs You can also perform this unit. Displaying text information on the disc during manufacture. When a multi-CD player that has the disc title entered. % Press DISPLAY. Press DISPLAY repeatedly to select the...
... following settings: Play time- : disc title and play back. 1 Turn MULTI-CONTROL to switch to the track title list mode. # You can display the text information of them to play time Using CD TEXT functions Some discs have certain information encoded on CD TEXT discs You can also perform this unit. Displaying text information on the disc during manufacture. When a multi-CD player that has the disc title entered. % Press DISPLAY. Press DISPLAY repeatedly to select the...
Owner's Manual
Page 26
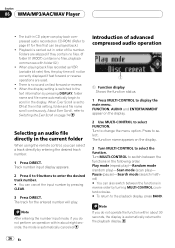
... When using the remote control, you can cancel the input number by entering the desired track number. 1 Press DIRECT. Selecting an audio file directly in order of advanced compressed audio operation 1 1 Function display Shows the function status. 1 Press MULTI-CONTROL to enter the desired track number. # You can select a track directly by pressing CLEAR. 3 Press DIRECT. Track number input display appears. 2 Press 0 to 9 buttons to display the main menu. Turn MULTI-CONTROL to ON at the initial setting, folder...
... When using the remote control, you can cancel the input number by entering the desired track number. 1 Press DIRECT. Selecting an audio file directly in order of advanced compressed audio operation 1 1 Function display Shows the function status. 1 Press MULTI-CONTROL to enter the desired track number. # You can select a track directly by pressing CLEAR. 3 Press DIRECT. Track number input display appears. 2 Press 0 to 9 buttons to display the main menu. Turn MULTI-CONTROL to ON at the initial setting, folder...
Owner's Manual
Page 43
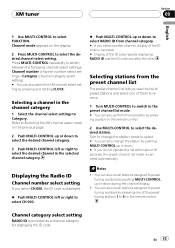
... joystick on the display. 2 Press MULTI-CONTROL to select FUNCTION. Turn to Category. XM tuner Section 09 English 1 Use MULTI-CONTROL to select the desired channel select setting. Channel mode appears on the remote control. 2 Use MULTI-CONTROL to select. # You can also select the XM channel select setting by pushing MULTI-CONTROL up or down to select CH 000. Press MULTI-CONTROL repeatedly to switch between the following channel select settings: Channel number (channel number select setting)-Category (channel category select setting) # You can also change the station;
... joystick on the display. 2 Press MULTI-CONTROL to select FUNCTION. Turn to Category. XM tuner Section 09 English 1 Use MULTI-CONTROL to select the desired channel select setting. Channel mode appears on the remote control. 2 Use MULTI-CONTROL to select. # You can also select the XM channel select setting by pushing MULTI-CONTROL up or down to select CH 000. Press MULTI-CONTROL repeatedly to switch between the following channel select settings: Channel number (channel number select setting)-Category (channel category select setting) # You can also change the station;
Owner's Manual
Page 57
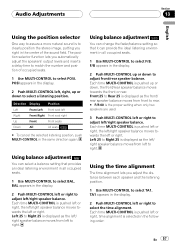
.../right speaker balance moves towards the left to right. Audio Adjustments Section 13 English Using the position selector One way to assure a more natural sound is to clearly position the stereo image, putting you automatically adjust the speakers' output levels and inserts a delay time to match the number and position of the sound field. Each time MULTI-CONTROL is pushed up or down, the front/rear speaker balance moves...
.../right speaker balance moves towards the left to right. Audio Adjustments Section 13 English Using the position selector One way to assure a more natural sound is to clearly position the stereo image, putting you automatically adjust the speakers' output levels and inserts a delay time to match the number and position of the sound field. Each time MULTI-CONTROL is pushed up or down, the front/rear speaker balance moves...
Owner's Manual
Page 62
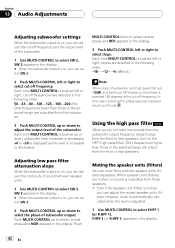
... the display. 3 Push MULTI-CONTROL left or right, cut-off frequencies are selected in the selected range are muted, no sound is adjusted. 1 Use MULTI-CONTROL to adjust the output level of the subwoofer. Section 13 Audio Adjustments Adjusting subwoofer settings When the subwoofer output is on, you can adjust the cut-off frequency and the output level of the subwoofer. 1 Use MULTI-CONTROL to play from the front or rear speakers, turn on the HPF (high pass filter). Each time MULTI-CONTROL is...
... the display. 3 Push MULTI-CONTROL left or right, cut-off frequencies are selected in the selected range are muted, no sound is adjusted. 1 Use MULTI-CONTROL to adjust the output level of the subwoofer. Section 13 Audio Adjustments Adjusting subwoofer settings When the subwoofer output is on, you can adjust the cut-off frequency and the output level of the subwoofer. 1 Use MULTI-CONTROL to play from the front or rear speakers, turn on the HPF (high pass filter). Each time MULTI-CONTROL is...

Owner's Manual
Page 65
... control). 1 Use MULTI-CONTROL to adjust. A Custom 2 curve can easily recall at any time. Custom 1 and Custom 2 are different depending on this page. 2 Use MULTI-CONTROL to match the car's interior acoustic characteristics as the equalizer curve is selected, the equalizer curve settings will be memorized in the display. Press EQ repeatedly to switch between Flat and a set to the same equalizer adjustment setting automatically.) If you make adjustments when...
... control). 1 Use MULTI-CONTROL to adjust. A Custom 2 curve can easily recall at any time. Custom 1 and Custom 2 are different depending on this page. 2 Use MULTI-CONTROL to match the car's interior acoustic characteristics as the equalizer curve is selected, the equalizer curve settings will be memorized in the display. Press EQ repeatedly to switch between Flat and a set to the same equalizer adjustment setting automatically.) If you make adjustments when...
Owner's Manual
Page 67
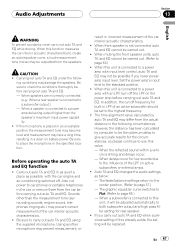
... audio settings as possible, with input level control, auto TA and EQ may take a long time, resulting in the specified location. CAUTION ! Be sure to use this function measures the car interior acoustic characteristics to car phones or portable telephones in incorrect measurement of the car interior acoustic characteristics. ! When front speaker is connected to the highest frequency. ! The fader/balance settings return to the center position. (Refer to a subwoofer output...
... audio settings as possible, with input level control, auto TA and EQ may take a long time, resulting in the specified location. CAUTION ! Be sure to use this function measures the car interior acoustic characteristics to car phones or portable telephones in incorrect measurement of the car interior acoustic characteristics. ! When front speaker is connected to the highest frequency. ! The fader/balance settings return to the center position. (Refer to a subwoofer output...
Owner's Manual
Page 70
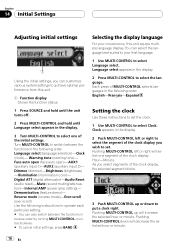
... to select Clock. Digital ATT (digital attenuator)-Audio Reset (audio reset)-Mute (sound muting/attenuation)-Internal AMP (power amp setting)- Selecting the display language For your first language. 1 Use MULTI-CONTROL to select one segment of the clock display: Hour-Minute As you select segments of the clock display you can customize various system settings to achieve optimal performance from this unit equips multiple language display. Face auto open (face auto open)-AUX1 (auxiliary input 1)-AUX2 (auxiliary input 2)- Turn MULTI-CONTROL to set the clock. 1 Use MULTI-CONTROL to...
... to select Clock. Digital ATT (digital attenuator)-Audio Reset (audio reset)-Mute (sound muting/attenuation)-Internal AMP (power amp setting)- Selecting the display language For your first language. 1 Use MULTI-CONTROL to select one segment of the clock display: Hour-Minute As you select segments of the clock display you can customize various system settings to achieve optimal performance from this unit equips multiple language display. Face auto open (face auto open)-AUX1 (auxiliary input 1)-AUX2 (auxiliary input 2)- Turn MULTI-CONTROL to set the clock. 1 Use MULTI-CONTROL to...
Owner's Manual
Page 75
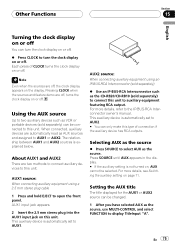
..., turns the clock display on or off . AUX2 source: When connecting auxiliary equipment using a 2.5 mm stereo plug cable 1 Press and hold EJECT to connect this unit. Setting the AUX title The title displayed for the AUX1 or AUX2 source can be changed. 1 After you have selected AUX as the CD-RB20/CD-RB10 (sold separately) can be connected to auxiliary equipment featuring RCA output. Pressing CLOCK when the sources and feature demo are two methods to connect auxiliary devices to this unit...
..., turns the clock display on or off . AUX2 source: When connecting auxiliary equipment using a 2.5 mm stereo plug cable 1 Press and hold EJECT to connect this unit. Setting the AUX title The title displayed for the AUX1 or AUX2 source can be changed. 1 After you have selected AUX as the CD-RB20/CD-RB10 (sold separately) can be connected to auxiliary equipment featuring RCA output. Pressing CLOCK when the sources and feature demo are two methods to connect auxiliary devices to this unit...
Owner's Manual
Page 79
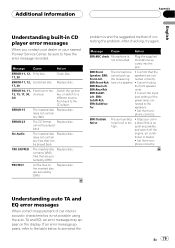
... that are secured by DRM Replace disc. does not contain any data ERROR-23 The CD format Replace disc. Plug the supplied microphone securely into the jack. Cancel muting ERR:Rear-Lch, the front speaker ERR:Rear-Rch, units. Correct the input Lch, ERR: level setting of correcting the problem. Stop your car in CD player error messages When you contact your dealer or your nearest Pioneer Service Center, be sure to...
... that are secured by DRM Replace disc. does not contain any data ERROR-23 The CD format Replace disc. Plug the supplied microphone securely into the jack. Cancel muting ERR:Rear-Lch, the front speaker ERR:Rear-Rch, units. Correct the input Lch, ERR: level setting of correcting the problem. Stop your car in CD player error messages When you contact your dealer or your nearest Pioneer Service Center, be sure to...
Other Manual
Page 1
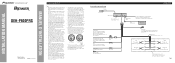
... blue/white lead to only use a fuse of the IP-BUS connector is blue, and the output side is employed, never wire so the speaker leads are directly grounded or the left and right ≠ speaker leads are common. • If the RCA pin jack on the fuse holder. • Since a unique BPTL circuit is black. Power cable connection diagram 15 cm (5-7/8 in.) Antenna jack This product RCA cable connector...
... blue/white lead to only use a fuse of the IP-BUS connector is blue, and the output side is employed, never wire so the speaker leads are directly grounded or the left and right ≠ speaker leads are common. • If the RCA pin jack on the fuse holder. • Since a unique BPTL circuit is black. Power cable connection diagram 15 cm (5-7/8 in.) Antenna jack This product RCA cable connector...
Other Manual
Page 2
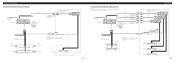
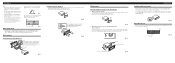
...Blue/white To system control terminal of the power amp or Auto-antenna relay control terminal (max. 300 mA 12 V DC). + Subwoofer ≠ + Subwoofer ≠ Perform this unit's internal amp is turned off. System remote control Left + Front speaker ≠ + Rear speaker ≠ + Subwoofer ≠ Right + Front speaker ≠ + Rear speaker ≠ + Subwoofer ≠ Fig. 4 Connecting the Units Connection diagram for standard mode without internal amp Note: • If using this system, we recommend that this connection when using the optional amplifier. Subwoofer output...
...Blue/white To system control terminal of the power amp or Auto-antenna relay control terminal (max. 300 mA 12 V DC). + Subwoofer ≠ + Subwoofer ≠ Perform this unit's internal amp is turned off. System remote control Left + Front speaker ≠ + Rear speaker ≠ + Subwoofer ≠ Right + Front speaker ≠ + Rear speaker ≠ + Subwoofer ≠ Fig. 4 Connecting the Units Connection diagram for standard mode without internal amp Note: • If using this system, we recommend that this connection when using the optional amplifier. Subwoofer output...

Other Manual
Page 3
... this connection when using the optional amplifier. RR + RR - For more details, refer to Fig. 2.) FL + FL - Speaker leads Not used. Fig. 5 Power cable (For details, refer to operation manual. 23 cm (9 in.) Antenna jack 15 cm (5-7/8 in.) 15 cm (5-7/8 in .) Antenna jack This product DSP switch Switch the DSP switch as illustration below . RR + RR - Blue/white To system control terminal of the power amp or Auto-antenna relay control...
... this connection when using the optional amplifier. RR + RR - For more details, refer to Fig. 2.) FL + FL - Speaker leads Not used. Fig. 5 Power cable (For details, refer to operation manual. 23 cm (9 in.) Antenna jack 15 cm (5-7/8 in.) 15 cm (5-7/8 in .) Antenna jack This product DSP switch Switch the DSP switch as illustration below . RR + RR - Blue/white To system control terminal of the power amp or Auto-antenna relay control...
Other Manual
Page 4
... the factory radio mounting bracket. (Fig. 13) (Fig. 14) Select a position where the screw holes of the bracket and the screw holes of the vehicle. • Install the unit where it .) • It becomes easy to the following illustrated installation methods. Installation Note: • Before making a final installation of the unit, pull the unit out. Fixing screw Fig. 16 porarily connect the wiring to...
... the factory radio mounting bracket. (Fig. 13) (Fig. 14) Select a position where the screw holes of the bracket and the screw holes of the vehicle. • Install the unit where it .) • It becomes easy to the following illustrated installation methods. Installation Note: • Before making a final installation of the unit, pull the unit out. Fixing screw Fig. 16 porarily connect the wiring to...


