Owner's Manual
Page 2
...in strong signals 14 Built-in the current folder 20 - Pausing disc playback 17 - Selecting an audio file directly in CD Player 14 - Displaying text information of advanced operations 13 - Before You Start Information to operate your unit from the ...16 - Selecting a source 11 - Selecting a track directly 15 - Installing the battery 9 - Selecting a repeat play range 20 - After you have finished reading the instructions, keep this Pioneer product. Basic Operations 19 - Browsing for Pioneer products 7 Visit our website 7 Protecting your model properly. Using the...
...in strong signals 14 Built-in the current folder 20 - Pausing disc playback 17 - Selecting an audio file directly in CD Player 14 - Displaying text information of advanced operations 13 - Before You Start Information to operate your unit from the ...16 - Selecting a source 11 - Selecting a track directly 15 - Installing the battery 9 - Selecting a repeat play range 20 - After you have finished reading the instructions, keep this Pioneer product. Basic Operations 19 - Browsing for Pioneer products 7 Visit our website 7 Protecting your model properly. Using the...

Owner's Manual
Page 8
... care not to grip it too tightly or to drop the front panel and protect it into provided protective case for the first time after installation ! One is the reverse mode, the other pointed instrument. 2 Slide and remove the front panel toward you do not perform an operation within about 30...
... care not to grip it too tightly or to drop the front panel and protect it into provided protective case for the first time after installation ! One is the reverse mode, the other pointed instrument. 2 Slide and remove the front panel toward you do not perform an operation within about 30...

Owner's Manual
Page 9
... battery Slide the tray out on the back of battery leakage, wipe the remote control completely clean and install a new battery. ! When using for a month or longer. ! special handling may not function prop- The remote control may apply. placed. En 9 In the event of ...
... battery Slide the tray out on the back of battery leakage, wipe the remote control completely clean and install a new battery. ! When using for a month or longer. ! special handling may not function prop- The remote control may apply. placed. En 9 In the event of ...
Owner's Manual
Page 33
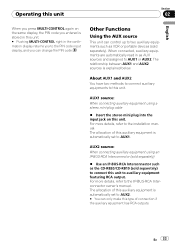
The allocation of this auxiliary equipment is stored in this unit. # Pushing MULTI-CONTROL right in as the CD-RB20/CD-RB10 (sold separetely) to connect this unit to the PIN code input display, and you can control up to two auxiliary equipments such as VCR ... of this auxiliary equipment is explained below. For more details, refer to the IP-BUS-RCA Interconnector owner's manual. For more details, refer to the installation manual. About AUX1 and AUX2 You have two methods to connect auxiliary equipments to AUX1 or AUX2. Other Functions Using the AUX source This unit...
The allocation of this auxiliary equipment is stored in this unit. # Pushing MULTI-CONTROL right in as the CD-RB20/CD-RB10 (sold separetely) to connect this unit to the PIN code input display, and you can control up to two auxiliary equipments such as VCR ... of this auxiliary equipment is explained below. For more details, refer to the IP-BUS-RCA Interconnector owner's manual. For more details, refer to the installation manual. About AUX1 and AUX2 You have two methods to connect auxiliary equipments to AUX1 or AUX2. Other Functions Using the AUX source This unit...
Other Manual
Page 1
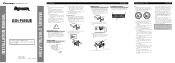
...pour ce produit est conforme à CEMA. Insert the supplied extraction keys into both sides of less than the following installation methods. 2. Screw Dashboard or Console Factory radio mounting bracket Connecting the Units ENGLISH Note: • When this unit in a shallow space, use factory supplied mounting ... unit, use a supplied mounting sleeve. Vehicles with supplied screw. 2. Pull the unit out of the ignition key. INSTALLATION MANUAL OF OF DEH-P690UB This product conforms to ground. - For details, refer to remove the trim ring. This cable and other equipment.
...pour ce produit est conforme à CEMA. Insert the supplied extraction keys into both sides of less than the following installation methods. 2. Screw Dashboard or Console Factory radio mounting bracket Connecting the Units ENGLISH Note: • When this unit in a shallow space, use factory supplied mounting ... unit, use a supplied mounting sleeve. Vehicles with supplied screw. 2. Pull the unit out of the ignition key. INSTALLATION MANUAL OF OF DEH-P690UB This product conforms to ground. - For details, refer to remove the trim ring. This cable and other equipment.


