Owner's Manual
Page 3
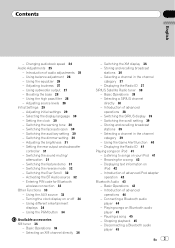
... accessories XM tuner 36 - Basic Operations 38 - Introduction of audio adjustments 25 - Switching the scroll setting 39 - Displaying the Radio ID 41 Playing songs on iPod 42 - Using the equalizer 26 - Boosting the bass 28 - Switching the auxiliary... 44 - Connecting a Bluetooth audio player 44 - Contents English - Changing audiobook speed 24 Audio Adjustments 25 - Adjusting initial settings 29 - Setting the clock 30 - Switching the dimmer setting 30 - Switching the sound muting/ attenuation 31 - Activating the BT Audio source 32 - Entering PIN code for a song...
... accessories XM tuner 36 - Basic Operations 38 - Introduction of audio adjustments 25 - Switching the scroll setting 39 - Displaying the Radio ID 41 Playing songs on iPod 42 - Using the equalizer 26 - Boosting the bass 28 - Switching the auxiliary... 44 - Connecting a Bluetooth audio player 44 - Contents English - Changing audiobook speed 24 Audio Adjustments 25 - Adjusting initial settings 29 - Setting the clock 30 - Switching the dimmer setting 30 - Switching the sound muting/ attenuation 31 - Activating the BT Audio source 32 - Entering PIN code for a song...
Owner's Manual
Page 10
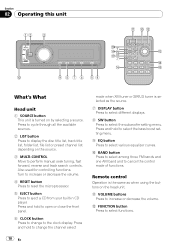
...7 DISPLAY button Press to select different displays. 8 SW button Press to select the subwoofer setting menu. Remote control Operation is selected as when using the buttons on the head unit. Press and hold to change to the clock display. a BAND button Press to select among three FM bands and one AM band... and to eject a CD from your built-in CD player. b VOLUME buttons Press to select functions. 10 En c FUNCTION button Press to...
...7 DISPLAY button Press to select different displays. 8 SW button Press to select the subwoofer setting menu. Remote control Operation is selected as when using the buttons on the head unit. Press and hold to change to the clock display. a BAND button Press to select among three FM bands and one AM band... and to eject a CD from your built-in CD player. b VOLUME buttons Press to select functions. 10 En c FUNCTION button Press to...
Owner's Manual
Page 29
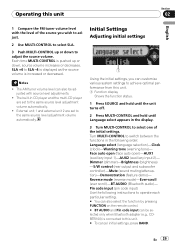
...SOURCE and hold until the unit turns off. 2 Press MULTI-CONTROL and hold until Language select appears in CD player and the multi-CD player are set to select SLA. 3 Push MULTI-CONTROL up or down to the same source level adjustment volume automatically. ...various system settings to achieve optimal performance from this unit. # To cancel initial settings, press BAND. Pin code input (pin code input) Use the following order: Language select (language selection)-Clock (clock)-Warning tone (warning tone)- Initial Settings Adjusting initial settings 1 Using the initial settings, you ...
...SOURCE and hold until the unit turns off. 2 Press MULTI-CONTROL and hold until Language select appears in CD player and the multi-CD player are set to select SLA. 3 Push MULTI-CONTROL up or down to the same source level adjustment volume automatically. ...various system settings to achieve optimal performance from this unit. # To cancel initial settings, press BAND. Pin code input (pin code input) Use the following order: Language select (language selection)-Clock (clock)-Warning tone (warning tone)- Initial Settings Adjusting initial settings 1 Using the initial settings, you ...
Owner's Manual
Page 30
...can turn the face auto open . 2 Press MULTI-CONTROL to select the segment of the clock display you select segments of the clock display the segment selected will sound. Switching the auxiliary setting Auxiliary equipments connected to a time signal by pressing MULTI-CONTROL. ! If the minute is 30...unit equips multiple language display. This function is not detached from being too bright at night, the display is 00 to set the clock. 1 Use MULTI-CONTROL to select Clock. 2 Push MULTI-CONTROL left or right will select one segment of turning off the ignition, a warning tone will ...
...can turn the face auto open . 2 Press MULTI-CONTROL to select the segment of the clock display you select segments of the clock display the segment selected will sound. Switching the auxiliary setting Auxiliary equipments connected to a time signal by pressing MULTI-CONTROL. ! If the minute is 30...unit equips multiple language display. This function is not detached from being too bright at night, the display is 00 to set the clock. 1 Use MULTI-CONTROL to select Clock. 2 Push MULTI-CONTROL left or right will select one segment of turning off the ignition, a warning tone will ...
Owner's Manual
Page 34
...control. % Press PGM to turn the clock display on or off , the clock display appears on the display. % Press CLOCK to display TitleInput "A". 2 Enter a title in the same way as the built-in CD player. Built-in the display. # If the auxiliary setting is not turned on when selecting tuner... PGM and hold until AUX appears in CD player ! Setting the AUX title The title displayed for each sound source. 1 Press MULTI-CONTROL to turn the clock display on or off . Each press of CLOCK turns the clock display on or off . # The clock display disappears temporarily when you have selected AUX...
...control. % Press PGM to turn the clock display on or off , the clock display appears on the display. % Press CLOCK to display TitleInput "A". 2 Enter a title in the same way as the built-in CD player. Built-in the display. # If the auxiliary setting is not turned on when selecting tuner... PGM and hold until AUX appears in CD player ! Setting the AUX title The title displayed for each sound source. 1 Press MULTI-CONTROL to turn the clock display on or off . Each press of CLOCK turns the clock display on or off . # The clock display disappears temporarily when you have selected AUX...

Owner's Manual
Page 37
... the selected station in memory, press one of the ID code repeats displaying RADIO ID and the ID code one after the other. 1 Press and hold CLOCK to switch to Category (channel category select setting). Using the remote control % When you find a station that appears by category... selecting a channel: by number and by using MULTI-CONTROL. Displaying the Radio ID Channel number select setting If you to narrow your search down to only channels in the selected channel category. Channel category select setting RADIO ID is displayed. % Push MULTI-CONTROL left or right to select CH...
... the selected station in memory, press one of the ID code repeats displaying RADIO ID and the ID code one after the other. 1 Press and hold CLOCK to switch to Category (channel category select setting). Using the remote control % When you find a station that appears by category... selecting a channel: by number and by using MULTI-CONTROL. Displaying the Radio ID Channel number select setting If you to narrow your search down to only channels in the selected channel category. Channel category select setting RADIO ID is displayed. % Push MULTI-CONTROL left or right to select CH...
Owner's Manual
Page 39
... name-Song title/program title -Composer name Switching the scroll setting You can also select the function by using MULTI-CONTROL. The selected station has been stored in the display. # To return to Channel number (channel number select setting), press and hold CLOCK to switch to switch the SIRIUS display. CAT appears in...
... name-Song title/program title -Composer name Switching the scroll setting You can also select the function by using MULTI-CONTROL. The selected station has been stored in the display. # To return to Channel number (channel number select setting), press and hold CLOCK to switch to switch the SIRIUS display. CAT appears in...


